DIY Vintage Farm Fresh Pumpkins Sign: Craft Your Own Fall Decor (No Cutting Machine Needed!)
As the leaves begin to turn vibrant shades of red and gold, there’s an undeniable magic in the air that beckons us to embrace the cozy spirit of autumn. Fall is here, and with it comes the perfect opportunity to infuse our homes with warmth, charm, and handmade beauty! If you’ve been following along, you’ll know our excitement for fall crafts and DIY autumn decor projects is absolutely overflowing.
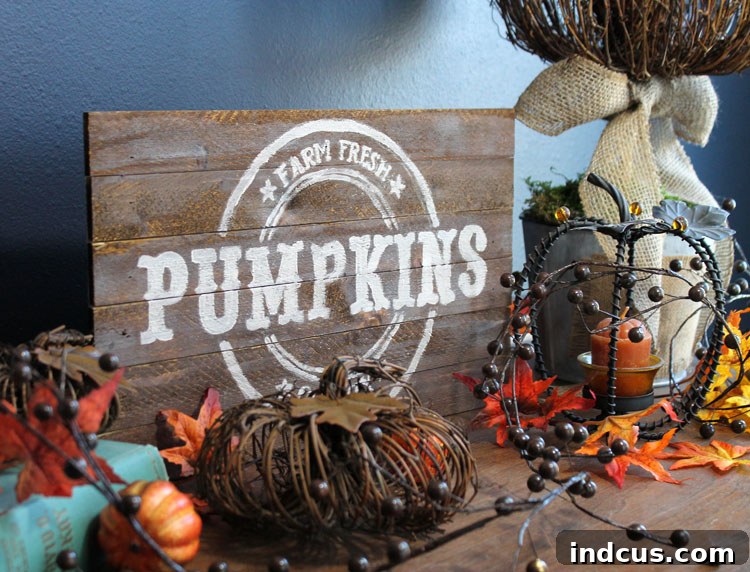
Today, we’re thrilled to guide you through the creation of a stunning vintage-style “Farm Fresh Pumpkins” pallet sign. This project is designed for everyone, especially those who love the rustic, farmhouse aesthetic but don’t own a fancy cutting machine. The best part? We’re including a complimentary printable template to make your crafting journey as simple and enjoyable as possible!
Why This Vintage Fall Sign is Your Perfect Autumn Project
There’s something uniquely satisfying about handmade decor, and this vintage fall sign perfectly embodies that sentiment. Here’s why this DIY project stands out:
- No Cutting Machine Required: Forget about expensive electronic cutting machines or intricate hand-cutting. Our method relies on a simple, budget-friendly chalk transfer technique.
- Charming Vintage Appeal: The combination of distressed wood, subtle whitewash, and classic typography creates an authentic antique look that’s timeless.
- Farmhouse Style Favorite: This sign fits seamlessly into any farmhouse, rustic, or cozy traditional decor scheme, adding character to your fall display.
- Beginner-Friendly: With clear, step-by-step instructions and a ready-to-use template, even crafting novices can achieve professional-looking results.
- Customizable: While we provide a specific design, the technique can be adapted for endless possibilities, allowing you to personalize future projects.
- Meaningful Decor: A handmade sign adds a personal touch and a story to your home, making your autumn decorating even more special.
Gathering Your Materials for the Farm Fresh Pumpkins Sign
Before diving into the creative process, let’s ensure you have all the necessary supplies. Most of these items can be found at your local craft store or hardware store, making it easy to get started right away. Selecting quality materials will contribute to a beautiful, long-lasting sign.
Materials Needed
- Wood Pallet Sign: A pre-assembled pallet sign works best for this project, providing an instant rustic base. You can often find these at craft stores in various sizes. If you’re feeling ambitious, you could also construct one from reclaimed wood.
- Wood Stain (Spray or Liquid): We recommend a spray stain for even coverage and ease of application, but a liquid stain applied with a rag or brush also works beautifully. Choose a color that complements the vintage aesthetic, such as a dark walnut or classic oak.
- White Craft Paint: A good quality acrylic craft paint in white will be perfect for both the whitewash effect and painting your design. Matte or satin finishes are ideal for a rustic look.
- Paint Brushes:
- Foam Brush: Essential for applying and blending the wood stain smoothly.
- Small Detail Brush: Crucial for carefully filling in the intricate lines of your “Farm Fresh Pumpkins” design. Look for a fine-tipped brush that allows for precision.
- Pencil or Ball Point Pen: Needed for tracing the design outline onto the wood. A pencil is forgiving, while a pen creates a more defined chalk transfer.
- White Chalk: Standard classroom chalk or artist’s chalk will work for the transfer method. Ensure it’s white to show up clearly on the darker stained wood.
- Vintage Sign Template: This is your key to success! You’ll find the link to download our exclusive “Farm Fresh Pumpkins” template at the end of this post.
- Paper Towels or Clean Rag: For blending the paint and wiping away excess.
- Protective Work Surface: Newspaper, drop cloths, or old cardboard are essential to protect your work area from paint and stain.
Step-by-Step Instructions: Crafting Your Vintage Fall Sign
Follow these detailed steps to bring your vintage “Farm Fresh Pumpkins” sign to life. Patience and attention to detail will ensure a beautiful finished product.
1. Prepare Your Pallet Sign with Wood Stain
Begin by setting up your work area in a well-ventilated space. Lay down your protective covering. Pick up your wood pallet sign and prepare for staining.
If using spray stain, hold the can about 6-8 inches away from the wood and apply a light, even coat across the entire surface of the pallet sign. Don’t worry if it looks a bit uneven initially. Immediately after spraying, use a foam brush to gently smooth out the stain, ensuring it penetrates evenly into the wood grains. This step creates the foundational rustic tone for your sign. Allow the stain to dry according to the manufacturer’s instructions, usually a few hours.
2. Create a Weathered Whitewash Effect
Once your stain is completely dry, it’s time to add that charming weathered look. This technique will soften the stain and give the sign an aged, farmhouse feel.
Dip your foam brush into your white craft paint, wiping off most of the excess. You want a very light amount of paint. Apply a thin, light brush of white paint over the stained wood. The goal isn’t to fully cover the stain, but rather to create a translucent, almost hazy layer. Immediately after applying the paint, use a crumpled paper towel or a clean, soft rag to gently blend and smudge the paint into the stain. This creates a beautifully distressed and weathered appearance, allowing the wood grain and the base stain to show through. Continue blending until you achieve your desired level of “weathered.” Let this layer dry completely.
3. Prepare Your Template for Chalk Transfer
Now for the magic trick that eliminates the need for any cutting machines! First, download and print our “Farm Fresh Pumpkins” template (link at the end of this post). The template might come in two pages; if so, carefully tape them together to form the complete design.
Once assembled, turn the template sheet over. Using your white chalk, apply a heavy, even layer to the entire back side of the paper, specifically covering all the areas where the design lines are on the front. Make sure there’s a good, thick coating of chalk. This chalk layer is what will transfer your design onto the wood.
4. Transfer the Design to Your Wood Sign
Carefully position your chalk-backed template face-up onto the center of your prepared wood sign. Take a moment to ensure it’s perfectly centered and straight. You can use a bit of painter’s tape to hold it in place if needed, especially on larger signs.
Once aligned, firmly trace over all the lines and details of the design using a pencil or a ballpoint pen. Apply consistent, moderate pressure as you trace. As your pencil or pen moves over the paper, the pressure will transfer the chalk from the back of the template directly onto the whitewashed wood, creating a clear outline of your “Farm Fresh Pumpkins” design. Be thorough and ensure you trace every line you want to paint.
Once you’ve traced everything, carefully lift the template. You should now see a faint but clear chalk outline of your design on the wood sign. This outline will serve as your guide for painting.
5. Hand-Paint Your “Farm Fresh Pumpkins” Design
This is where your sign truly comes to life! Grab your small detail brush and your white craft paint. Carefully begin filling in the chalk outlines of your “Farm Fresh Pumpkins” design. Take your time, working slowly and steadily to achieve clean, crisp lines and full coverage.
For best results, apply multiple thin coats of paint rather than one thick coat. This prevents paint from clumping and ensures a smoother, more professional finish. Allow each thin layer to dry slightly before applying the next. Don’t worry if some of the chalk lines are still visible; they will be covered by the paint. If you make a small mistake, a slightly damp cotton swab can help clean up edges before the paint dries completely.
Once all the lettering and design elements are filled in, allow the paint to dry completely. If desired, you can gently erase any remaining chalk marks around the edges of your painted design with a soft cloth or a very soft eraser, but often they are covered or blend in naturally.
Your Vintage Fall Sign is Complete! Display with Pride
And just like that, you’ve created a charming, farmhouse-style pallet sign that looks like it came straight from a vintage autumn market! We absolutely adore the authentic, weathered feel of this project. It’s so perfectly suited for Fall, bringing a touch of rustic elegance to any corner of your home.
Tips for Customization and Display
While the “Farm Fresh Pumpkins” design is delightful, feel free to get creative! Here are a few ideas to personalize your sign or enhance its display:
- Color Variations: Experiment with different paint colors for the lettering. A soft cream, a deep charcoal gray, or even a subtle terracotta could offer a unique twist.
- Distressing Details: For an even more aged look, once your paint is dry, lightly sand the edges and corners of the sign with fine-grit sandpaper. You can also lightly sand over the painted words to make them appear slightly worn.
- Protective Sealant: To protect your sign, especially if it will be displayed outdoors (in a sheltered area), consider applying a clear matte or satin sealant. A spray sealant is often the easiest to apply evenly.
- Other Designs: This chalk transfer method can be used for any design! Create signs for other seasons, inspiring quotes, or personalized family names.
- Display Ideas:
- Front Porch: Lean your sign against your home’s exterior, surrounded by real pumpkins, corn stalks, and mums for an inviting autumn welcome.
- Entryway: Place it on an entryway table or bench, setting a festive tone as soon as guests arrive.
- Mantelpiece: Center it on your fireplace mantel, flanked by candles, garlands, and small decorative pumpkins.
- Kitchen or Dining Room: Bring a rustic touch to your kitchen or dining area, especially if you have an open shelving concept.
- Gift Giving: Handmade signs make wonderful, thoughtful gifts for friends and family who love fall or farmhouse decor.
Get Your Free “Farm Fresh Pumpkins” Sign Template!
Ready to start crafting your very own vintage fall masterpiece? Click the button below to download the printable “Farm Fresh Pumpkins” sign template. It’s absolutely free and will give you everything you need to recreate this charming design in your home.
We hope you enjoy making this beautiful vintage fall sign as much as we do. It’s a wonderful way to celebrate the season and add a personal, rustic touch to your autumn home decor. Happy crafting!