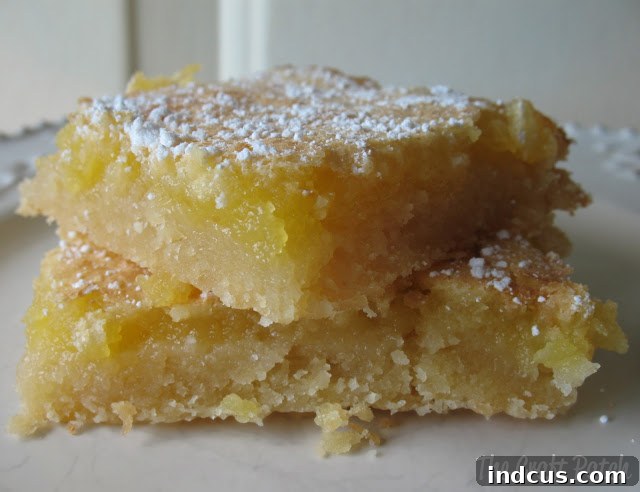
Luscious Lemon Bars: Your Go-To Recipe for a Zesty Burst of Sunshine
There’s an undeniable magic that happens when the vibrant, tangy flavor of lemon meets a perfectly sweet and buttery base. For many, including myself, lemon is the quintessential taste of spring and summer, evoking images of bright, sunny days and refreshing treats. This recipe for Luscious Lemon Bars captures that essence flawlessly. Imagine a golden, flaky, and rich shortbread crust, providing the ideal foundation for a silky-smooth lemon filling. Each bite offers an exquisite balance of sweet and tart, creating an ooey-gooey, utterly delightful experience that will have you reaching for another square before you’ve even finished the first. These bars aren’t just a dessert; they’re a celebration of citrus, a burst of joy in every single bite. They are incredibly satisfying, ridiculously easy to make, and guaranteed to become a cherished favorite in your recipe collection.
Why These Lemon Bars Are Simply Irresistible
What makes these particular lemon bars stand out from the rest? It’s a combination of factors that ensure a truly superior dessert experience:
- Perfect Balance of Flavors: The filling strikes an impeccable equilibrium between sweet and tart. It’s bright and zesty without being overwhelmingly sour, and sweet enough to satisfy your cravings without being cloying.
- Sublime Texture: The crust is a dream – flaky, buttery, and melts in your mouth, providing a delightful contrast to the smooth, gooey, and almost custardy lemon filling. The edges, where the filling and crust meld, offer a slightly chewier, caramelized texture that is pure bliss.
- Effortless Elegance: Despite their sophisticated taste and appearance, these lemon bars are surprisingly simple to prepare. With straightforward ingredients and easy-to-follow steps, even novice bakers can achieve stunning results.
- Versatile Treat: Whether you’re hosting a spring brunch, a summer barbecue, a holiday gathering, or simply craving a comforting homemade dessert, these lemon bars fit every occasion perfectly. They travel well and are always a crowd-pleaser.
- Fresh and Invigorating: The use of fresh lemon juice ensures a vibrant, natural flavor that artificial lemon extracts simply cannot replicate. It’s a taste that brightens any day and invigorates the palate.
These bars are more than just a dessert; they’re an experience, a little slice of sunshine that promises to brighten your day and delight your taste buds.
The Ultimate Luscious Lemon Bars Recipe
Ingredients
For the Buttery Shortbread Crust:
- 1 cup melted unsalted butter
- 1/4 teaspoon salt
- 1/2 cup granulated sugar
- 2 cups all-purpose flour
For the Silky Sweet-Tart Lemon Filling:
- 2 cups granulated sugar
- 1/4 cup all-purpose flour
- 4 large eggs, beaten
- 8 tablespoons fresh lemon juice (from approximately 3-4 medium lemons)
- 2 1/4 tablespoons cornstarch
Instructions
- Prepare the Crust: In a medium bowl, gently mix together the melted butter, salt, granulated sugar, and flour until a soft dough forms. It should come together easily. Press this mixture evenly into the bottom of a 9×13 inch baking pan. For best results, use parchment paper to line the pan, leaving an overhang on the sides for easy removal later.
- Pre-bake the Crust: Bake the crust in a preheated oven at 350°F (175°C) for 15 minutes, or until it just begins to turn a very light golden brown around the edges. This pre-baking step ensures a flaky and well-set crust that won’t become soggy under the filling.
- Prepare the Filling: While the crust is pre-baking, prepare the lemon filling. In a separate large bowl, combine the granulated sugar, flour, beaten eggs, and fresh lemon juice. Whisk them together until completely smooth and well-incorporated. Ensure there are no lumps of flour.
- Add Cornstarch: Once the initial filling ingredients are mixed, slowly whisk in the cornstarch. Cornstarch is crucial here as it acts as a thickener, giving the lemon filling its signature gooey, set texture. Mix until thoroughly combined and smooth.
- Assemble and Bake: Carefully pour the prepared lemon filling over the warm, pre-baked crust in the pan. Return the pan to the oven and bake for an additional 30-35 minutes, or until the filling is set. The center should no longer be jiggly when gently shaken, and the edges might show a slight golden hue. Be careful not to overbake, as this can lead to a less gooey texture.
- Cooling is Key: Once baked, remove the pan from the oven and immediately place it on a wire cooling rack. While still warm, run a sharp knife or a metal spatula along the edges of the pan. The lemon filling can become quite sticky where it meets the pan, so this step helps prevent it from sticking as it cools and contracts. If your knife or spatula starts to stick, a light spray with non-stick cooking spray can work wonders.
- Chill and Finish: Allow the lemon bars to cool completely at room temperature, which can take a couple of hours. For best results and clean cuts, transfer the cooled bars to the refrigerator and chill for at least 2-3 hours, or even overnight. This chilling process allows the filling to fully set and firm up.
- Serve: Once thoroughly chilled, use the parchment paper overhang to lift the entire slab of lemon bars out of the pan. Place them on a cutting board. If desired, generously sprinkle the top with powdered sugar (confectioners’ sugar). Cut into desired square sizes using a sharp, clean knife. For super clean cuts, wipe the knife clean with a damp cloth after each slice. Serve chilled and enjoy!
Preparation & Baking At a Glance
Prep time: Approximately 15 minutes
Bake time: Approximately 45-50 minutes (15 for crust, 30-35 for filling)
Cooling/Chill time: At least 2-3 hours (preferably longer)
Yield: 24 generous squares (from a 9×13 inch pan)
Expert Tips for Perfect Lemon Bars Every Time
Achieving bakery-quality lemon bars at home is easier than you think with these professional tips:
- Fresh Lemon Juice is Non-Negotiable: While bottled lemon juice might be convenient, it simply cannot compare to the bright, nuanced flavor of freshly squeezed lemon juice. Invest in a good citrus reamer and use fresh lemons for the best taste.
- Don’t Skip the Zest (Optional but Recommended): For an even more intense lemon flavor, consider adding a tablespoon of finely grated lemon zest to the filling mixture. Just be sure to zest only the yellow part of the peel, avoiding the bitter white pith.
- Measure Flour Correctly: For both the crust and the filling, ensure you’re measuring your flour correctly. Spoon flour into your measuring cup and level it off with a straight edge, rather than scooping directly from the bag, which can compact the flour and lead to a denser crust or thicker filling.
- Parchment Paper is Your Best Friend: Lining your baking pan with parchment paper, leaving an overhang on the sides, is a game-changer. It makes lifting the cooled bars out of the pan incredibly easy, preventing sticking and ensuring beautifully intact squares.
- Do Not Overbake the Filling: The key to a gooey, silky lemon filling is to pull it from the oven when the edges are set and lightly golden, but the very center still has a slight jiggle. It will continue to set as it cools. Overbaking can result in a rubbery or crumbly texture.
- Cool Completely Before Cutting: Patience is a virtue, especially with lemon bars. Allow them to cool fully at room temperature, and then chill them in the refrigerator for at least a few hours. This step is crucial for the filling to firm up and allows for clean, precise cuts.
- For Clean Cuts: Use a long, sharp knife. For the neatest slices, wipe the blade clean with a damp cloth or paper towel after each cut. Dipping the knife in hot water and drying it between cuts can also help.
- Dust with Powdered Sugar Just Before Serving: Powdered sugar tends to absorb moisture and disappear over time. For the prettiest presentation, sprinkle a fresh layer just before serving.
Creative Variations to Explore
While classic lemon bars are perfect as they are, don’t hesitate to get creative and experiment with these delightful variations:
- Lemon-Berry Bars: Before pouring the lemon filling over the crust, scatter a cup of fresh or frozen (not thawed) raspberries, blueberries, or mixed berries onto the crust. They add a beautiful color and an extra burst of fruity flavor.
- Coconut Lemon Bars: Add 1/2 cup of shredded unsweetened coconut to the crust mixture for a tropical twist. You can also sprinkle some toasted coconut flakes on top of the finished bars.
- Lime Bars: Substitute lemon juice and zest with fresh lime juice and zest for a vibrant, tangy key lime-like experience.
- Lavender-Lemon Bars: Infuse the lemon juice with a teaspoon of culinary lavender buds for a delicate floral note. Strain the lavender out before adding the juice to the filling mixture.
- Ginger-Crust Lemon Bars: Add a teaspoon of ground ginger or finely minced candied ginger to your shortbread crust for a warming, spicy kick.
- Gluten-Free Lemon Bars: Use a 1:1 gluten-free all-purpose flour blend for both the crust and the filling. Ensure your chosen blend contains xanthan gum for optimal texture.
These variations offer exciting new dimensions to an already beloved dessert, allowing you to tailor them to your personal taste or specific occasions.
Serving Suggestions and Storage Tips
Serving Suggestions:
Luscious Lemon Bars are perfect on their own, but a few garnishes can elevate their presentation and taste:
- A dusting of powdered sugar (as recommended in the recipe)
- A swirl of whipped cream or a dollop of crème fraîche
- Fresh berries, such as raspberries or blueberries, on the side
- A thin slice of fresh lemon or a twist of lemon zest
- Alongside a cup of tea or coffee for a delightful afternoon treat
Storage:
Proper storage ensures your lemon bars stay fresh and delicious:
- Room Temperature: Uncut lemon bars can be left at room temperature for a few hours if your kitchen is cool, but for optimal freshness and safety due to the egg-based filling, refrigeration is recommended.
- Refrigerator: Store leftover lemon bars in an airtight container in the refrigerator for up to 4-5 days. The flavors tend to meld and deepen over time, often tasting even better the next day!
- Freezer: Lemon bars freeze beautifully. Once fully chilled and cut into squares, arrange them in a single layer on a baking sheet and freeze until firm (about 1-2 hours). Then, transfer the frozen bars to a freezer-safe airtight container, separating layers with parchment paper to prevent sticking. They can be stored in the freezer for up to 3 months. Thaw in the refrigerator before serving.
Frequently Asked Questions About Lemon Bars
- Q: Can I use bottled lemon juice instead of fresh?
- A: While you can, it’s highly recommended to use fresh lemon juice for the best flavor. Bottled lemon juice often contains preservatives and lacks the bright, authentic taste that makes these bars so special.
- Q: Why did my lemon bars crack on top?
- A: Cracking can occur if the bars are overbaked or if they cool too rapidly. Ensure you’re pulling them out when the center still has a slight jiggle. Also, allow them to cool gradually at room temperature on a wire rack before refrigerating.
- Q: How do I prevent the crust from becoming soggy?
- A: Pre-baking the crust is crucial for preventing sogginess. Ensure it bakes for the full 15 minutes until lightly golden. Also, letting the bars cool completely before cutting helps the crust set properly.
- Q: My lemon bars are too tart/too sweet. What can I do next time?
- A: Lemon’s tartness can vary. If they are too tart for your liking, you can slightly increase the sugar in the filling (add 1/4 cup more). If too sweet, reduce the sugar by 1/4 cup. Adjusting to personal preference is part of baking!
- Q: Can I make these lemon bars ahead of time?
- A: Absolutely! Lemon bars are an excellent make-ahead dessert. In fact, they often taste better the next day once the flavors have had a chance to meld and the filling has fully set. Store them covered in the refrigerator.
- Q: What kind of pan should I use?
- A: A standard 9×13 inch metal baking pan works best. Avoid glass pans for the crust, as they conduct heat differently and can lead to uneven baking. Lining it with parchment paper is highly recommended.
- Q: Can I double this recipe?
- A: Yes, you can double the recipe. You would need a larger pan (e.g., a full sheet pan) or you can bake two separate 9×13 inch pans. Be mindful that baking times might need slight adjustments in a larger or second pan.
Embrace the Zest: Enjoy Your Homemade Lemon Bars!
There you have it – the definitive guide to creating the most luscious lemon bars you’ve ever tasted. This recipe promises not only a delectable dessert but also a delightful baking experience. The combination of a tender, buttery crust and a bright, sweet-tart lemon filling is truly a match made in culinary heaven. Whether you’re making them for a special occasion or simply to brighten a mundane Tuesday, these lemon bars are sure to impress and satisfy. So, gather your ingredients, follow these steps, and prepare to indulge in a slice of pure citrus bliss. Don’t forget to share your creations with us! Happy baking!
Did You Make This?
Share it with me on Instagram @thecraftpatch and follow pinterest for more!
Share on Facebook