No-Bake Mini Naked Cheesecake Stacks: Effortless Elegance in Every Bite
Do you dream of dazzling your guests with gourmet desserts, yet secretly yearn for recipes that demand minimal effort? If your goal in the kitchen is to achieve maximum impact with minimal fuss, then you’ve come to the right place. I absolutely adore discovering delicious recipes that appear incredibly fancy and intricate, but are, in reality, astonishingly simple to execute. Today, I am thrilled to unveil my latest culinary deception: the exquisite no-bake mini naked cheesecake stack. This creation is designed to make you look like a seasoned pastry chef, all while requiring less than 20 minutes of your precious time.
Why Choose This No-Bake Mini Cheesecake Recipe?
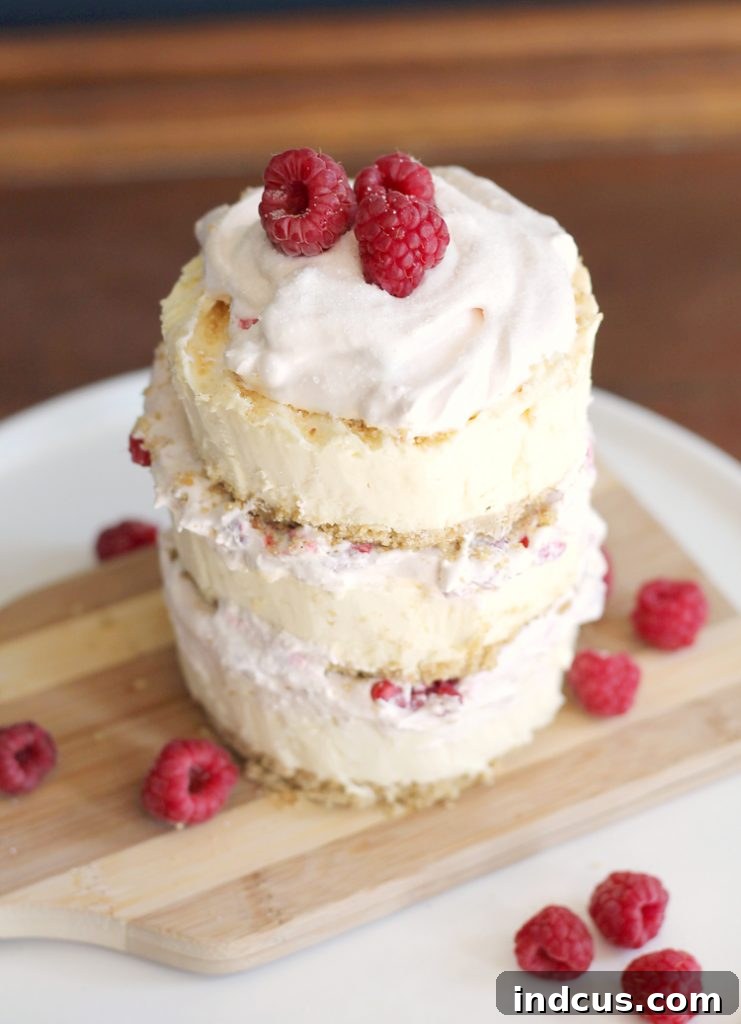
Isn’t it absolutely stunning? The “naked cake” trend has taken the dessert world by storm, and for good reason! Their rustic charm and minimalist appeal make them incredibly chic, and I must confess, I’m completely smitten. What makes this particular recipe an absolute game-changer is its incredible speed and simplicity. You heard that correctly, my friends – you can craft this magnificent dessert in approximately 20 minutes. Imagine creating a show-stopping treat that’s ideal for a sophisticated dinner party, an elegant tea party, a thoughtful Mother’s Day brunch, or any of a million other occasions where you desire a touch of refined flair without spending hours in the kitchen.
This recipe is a true secret weapon for anyone who loves to entertain but is short on time. It leverages a clever hack using a store-bought cheesecake, transforming it into individual, personalized desserts that look like they came straight from a high-end bakery. Say goodbye to complicated baking steps, intricate frosting techniques, and endless cleanup. With these no-bake mini naked cheesecake stacks, you’re not just making a dessert; you’re creating an experience of effortless sophistication.
Ingredients for Your Quick & Easy Naked Cheesecake
The beauty of this recipe lies in its incredibly simple ingredient list. You’ll only need three items, which can often be found readily available in your freezer and refrigerator, making it perfect for impromptu dessert emergencies or planned gatherings.
- 1 Sara Lee Cheesecake (or any similar store-bought frozen cheesecake)
- 1 container (approximately 8 oz or 225g) Cool Whip Whipped Topping (thawed)
- 1 container (approximately 6 oz or 170g) fresh raspberries
Step-by-Step Guide: Crafting Your Mini Cheesecake Masterpiece
Follow these straightforward steps to assemble your impressive mini naked cheesecakes. Precision and a touch of creativity are all you need!
Step 1: Preparing Your Cheesecake Bases
The foundation of our mini cheesecake stacks begins with neatly cut cheesecake circles. This step is crucial for achieving that polished, professional look.
First, ensure your cheesecake is fully frozen. This is paramount! A thawed cheesecake will be soft, sticky, and incredibly difficult to cut cleanly, resulting in a messy, uneven finish. Take your cheesecake directly from the freezer just before you begin.
Next, grab a large canning ring, a sturdy cup with a thin rim, or a round cookie cutter of your desired size. Gently but firmly press the edge of your chosen tool onto the top surface of the frozen cheesecake to outline three distinct circles. Aim to get as many circles as possible from your cheesecake, typically three uniform rounds. Once the outlines are visible, use a very sharp knife to carefully cut around each circle. For the cleanest and most elegant edges, hold your knife perfectly vertical as you cut. This ensures that the sides of your cheesecake discs are straight and smooth, contributing significantly to the overall presentation of your naked cakes.
Step 2: Crafting the Raspberry Whipped Cream Filling
Now for the delightful filling that adds both color and a burst of fruity flavor to our stacks.
In a medium-sized bowl, combine about a cup of the thawed Cool Whip with a generous handful of fresh raspberries. Using the back of your spoon, gently “moosh” or lightly mash some of the berries. This action helps to release their natural juices, which will beautifully tint the Cool Whip a lovely, soft pink hue and infuse it with a wonderful raspberry flavor. You don’t need to mash all of them; leaving some berries intact adds delightful texture and visual interest to the cream. Stir everything together until the mixture is well combined and has achieved that appealing blush color.
Step 3: Assembling Your Elegant Cheesecake Stacks
The final step brings all the elements together into a beautifully layered dessert.
Carefully place your first cheesecake circle onto your chosen serving dish or individual dessert plate. This will be the base of your stack. Next, spread a generous layer of your prepared berry Cool Whip mixture evenly over the top of the first cheesecake disc. The amount is up to your preference, but a visible layer enhances the “naked” effect. Repeat this process, carefully placing the second cheesecake circle on top of the cream, followed by another layer of berry Cool Whip. Finally, cap it off with the third and last cheesecake circle.
To complete this elegant presentation, garnish the very top of each mini cheesecake stack with a few fresh, vibrant raspberries. The bright red berries provide a stunning contrast against the creamy pink filling and white cheesecake layers, making your dessert truly pop. These individual touches elevate the dish from simple to spectacular, proving that minimal effort can yield magnificent results.
The Magic of Instant Dessert: Perfect for Any Occasion
The true genius of this no-bake mini naked cheesecake stack recipe isn’t just its stunning appearance, but its incredible convenience. This dessert is your ultimate secret weapon for stress-free entertaining. Imagine this scenario: unexpected guests drop by, or you suddenly realize you need an impressive dessert for tonight’s dinner. Instead of panicking or resorting to store-bought cookies, you can confidently declare, “I’ve got dessert covered!”
The key to this magical readiness is that all the main ingredients can be stored in your freezer. A frozen Sara Lee cheesecake and a container of Cool Whip are always on standby, allowing you to whip up this amazing treat at a moment’s notice. In just under 20 minutes, you can transform these simple components into a sophisticated dessert that looks like it took hours of painstaking effort. This empowers you to entertain in style, always prepared to delight your guests with a fresh, homemade-looking dessert, without ever breaking a sweat. It truly embodies the spirit of effortless elegance, making you the undisputed host with the most, every single time.
Tips for Success & Creative Variations
To ensure your mini naked cheesecakes are always a triumph and to spark your culinary imagination, here are some invaluable tips and exciting variations.
Pro Tips for the Perfect Mini Cheesecakes:
- Freezing is Key: We cannot stress this enough. A thoroughly frozen cheesecake is the secret to clean, crisp cuts. If it starts to thaw slightly, pop it back in the freezer for 10-15 minutes.
- Vertical Cuts: When cutting the cheesecake circles, always keep your knife perpendicular to the surface. This creates perfectly straight sides, which are essential for stable and attractive stacks.
- Berry Selection: Always opt for fresh, ripe raspberries. Their natural sweetness and slight tartness perfectly complement the cheesecake, and their vibrant color makes for a visually appealing filling.
- Cool Whip Storage: If you have any leftover Cool Whip, it can be stored in an airtight container in the refrigerator for up to two weeks, ready for your next quick dessert or topping. Good to know, right?
Creative Twists & Flavor Combinations:
While the raspberry version is a classic, feel free to experiment and make these mini cheesecakes truly your own!
- Different Berries: Substitute raspberries with other fresh berries like sliced strawberries, blueberries, or blackberries. Each berry offers a unique flavor profile and a different beautiful color for your whipped cream layer.
- Citrus Zest: For an extra layer of brightness, mix a teaspoon of finely grated lemon or orange zest into your Cool Whip before adding the berries. It adds a delightful aromatic lift.
- Chocolate Drizzle: Elevate the elegance with a delicate drizzle of melted dark or white chocolate over the finished stacks. A few chocolate shavings can also add a sophisticated touch.
- Nutty Crunch: For added texture, sprinkle a pinch of finely chopped pistachios, almonds, or walnuts between the layers or on top as a garnish.
- Different Cheesecake Flavors: While a classic vanilla cheesecake provides a versatile base, consider experimenting with other store-bought cheesecake flavors, like chocolate or strawberry, if available and suitable for your chosen fruit.
- Cookie Crumble Base: For an additional layer of flavor and texture, crush some graham crackers, shortbread cookies, or even Oreo cookies and sprinkle a thin layer on the serving plate before placing your first cheesecake circle. This mimics a traditional cheesecake crust.
Frequently Asked Questions (FAQ)
Q: Can I use homemade cheesecake for this recipe?
A: Absolutely! While this recipe champions the ease and convenience of a store-bought cheesecake, a firm, well-chilled, or even slightly frozen homemade cheesecake can also be used effectively. The key is its firmness for clean cutting. Ensure it’s thoroughly chilled (or partially frozen) to achieve the best results when cutting your circles.
Q: How far in advance can I prepare these mini cheesecakes?
A: These mini naked cheesecake stacks are at their absolute best when assembled shortly before serving to ensure the fresh berries and whipped cream maintain their optimal texture and appearance. However, you can prepare the cheesecake discs by cutting them and store them in the freezer, and make the berry whipped cream mixture a few hours in advance, keeping it refrigerated. Assemble them no more than an hour or two before your guests arrive for peak freshness and presentation.
Q: What if I don’t have a canning ring or round cookie cutter?
A: No problem at all! Innovation is part of the fun in the kitchen. A regular drinking glass with a thin, sturdy rim can work just as effectively. Simply press the rim firmly onto the frozen cheesecake to create your circles. The main goal is to create a clean, circular guide for your knife, so any suitable round object can be repurposed.
Q: Can I make a larger “naked cake” using this method?
A: While the fundamental layering technique can be scaled, the charm and ease of this specific recipe truly shine in its individual mini stacks. For a single, larger “naked cake,” you would typically bake thinner cake layers from scratch or use a much larger pre-made cake base and then layer it with frosting or cream. This particular recipe is optimized for creating elegant, individual cheesecake portions, offering a more controlled and impressive presentation for each guest.
Conclusion: Your Secret Weapon for Stress-Free Entertaining
There you have it – the no-bake mini naked cheesecake stack, your new favorite go-to dessert for effortless elegance! This recipe is proof that you don’t need a culinary degree or hours of free time to create something truly spectacular. With just three simple ingredients and less than 20 minutes, you can conjure up a dessert that looks like a masterpiece and tastes divine.
Embrace the joy of impressing your friends and family with minimal effort. This easy cheesecake hack will not only save you time and stress but also solidify your reputation as an amazing chef who can whip up gourmet delights on a whim. So go ahead, stock your freezer, and be prepared to dazzle at your next gathering. Your secret weapon for stress-free, stylish entertaining is now revealed!
Share your beautiful creations with us! We’d absolutely love to see your stunning no-bake mini naked cheesecake stacks and hear how they impressed your guests.