
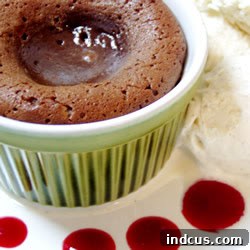
Decadent Molten Lava Cakes: An Easy Recipe for a Sweet Indulgence
There’s something uniquely magical about a dessert that looks incredibly fancy yet is surprisingly simple to create. For me, that dessert is the molten lava cake. My journey with this exquisite treat began unexpectedly, with a wedding gift – a set of ceramic dish “thingeys” from a great aunt. My mom, ever the astute observer, immediately recognized them: “You got ramekins? I am so jealous!” Little did I know, these humble ramekins would unlock a world of impressive, gooey, chocolatey delights. The molten lava cake quickly became my absolute favorite, a recipe I now cherish for its ability to deliver sophisticated flavor with minimal fuss.
This recipe is more than just a dessert; it’s an experience. It’s guaranteed to satisfy even the most devoted chocoholic and leave your guests utterly amazed. Imagine a warm, individual chocolate cake with a firm, slightly crisp exterior that gives way to an intensely rich, flowing river of molten chocolate. It’s a symphony of textures and flavors that promises pure indulgence.
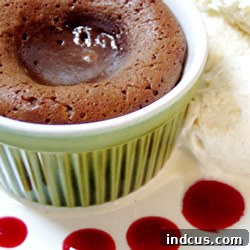
Unveiling the Allure: What Makes Molten Lava Cakes So Irresistible?
The widespread appeal of molten lava cakes, often referred to as chocolate lava cakes or individual chocolate molten cakes, stems from their captivating contrast. The magic happens when you break through the delicate, cake-like crust to uncover a warm, luscious, and intensely chocolatey liquid center. This culinary marvel masterfully blends the best characteristics of a traditional chocolate cake with the airy elegance of a chocolate soufflé, resulting in an unforgettable dessert experience that’s both deeply comforting and supremely luxurious.
Despite their reputation as a gourmet restaurant staple, the true beauty of these chocolate gems lies in their remarkable ease of preparation. This recipe proves that you don’t need to be a pastry chef to create a show-stopping dessert. With just a few common ingredients and straightforward steps, you can achieve a professional-quality treat right in your own kitchen, perfect for surprising loved ones or simply treating yourself.
The Essential Tools: Ramekins and Smart Alternatives for Your Lava Cakes
While my initial encounter with ramekins was purely serendipitous, they have since become an indispensable part of my baking arsenal, particularly for crafting these exquisite molten lava cakes. Ramekins are small, individual, oven-safe ceramic dishes, perfectly designed to ensure ideal heat distribution. This precise heating is what allows the cake’s edges to set beautifully while preserving that signature gooey, molten center – a critical element for any authentic lava cake.
However, if you’re not yet equipped with a set of these versatile dishes, there’s absolutely no need to delay your molten lava cake adventure! There are several excellent and readily available alternatives that will yield equally delicious results:
- Jumbo Muffin Cups: For a slightly larger, more substantial individual cake, opt for 8 jumbo muffin cups. When using muffin tins, it is absolutely crucial to either line them thoroughly with paper liners or grease and flour them meticulously to prevent sticking and ensure easy release.
- Regular Muffin Cups: If you prefer smaller, more delicate portions, 12 regular-sized muffin cups will work perfectly. As with jumbo cups, prioritize paper liners or diligent greasing and flouring to guarantee a smooth unmolding process.
- Oven-Safe Mugs or Small Bowls: Almost any small, heat-proof ceramic or glass dish that can withstand high oven temperatures can serve as a substitute for a ramekin. Just ensure they are structurally sound for baking. Their varied shapes can even add a unique charm to your dessert presentation.
Regardless of your chosen vessel, the key to success lies in proper preparation. A generous application of nonstick cooking spray, or a thorough coating of butter and flour (or cocoa powder for chocolate cakes), will act as your guardian against sticky situations, ensuring your delicate cakes release cleanly and beautifully onto the serving plate.
Why This Easy Molten Lava Cake Recipe Will Become Your Go-To Dessert
Beyond its impressive presentation and undeniably decadent flavor, this particular chocolate lava cake recipe stands out as a true culinary gem for a multitude of compelling reasons:
- Remarkable Simplicity: Don’t be fooled by its sophisticated appearance. The steps involved in this recipe are surprisingly straightforward, making it an incredibly accessible dessert for bakers of all experience levels, from absolute beginners to seasoned home cooks.
- Incredible Speed: Life is busy, and sometimes you need a show-stopping dessert in a flash. From the moment you start prepping to the instant it hits your plate, these warm, gooey delights can be ready in under 30 minutes. It’s the perfect solution for last-minute cravings, unexpected guests, or when you simply can’t wait for a chocolate fix.
- The Ultimate Chocolate Fix: This recipe doesn’t hold back on the chocolate. With a generous amount of high-quality chocolate chips and rich butter, it delivers an intensely profound chocolate flavor profile that will deeply satisfy even the most fervent chocoholic.
- Highly Versatile: While perfect on its own, this molten lava cake is a fantastic canvas for customization. It pairs beautifully with a wide array of garnishes and can be subtly flavored to suit any palate or occasion, allowing for endless creative possibilities.
- Unrivaled Impressive Factor: Consistently, this dessert elicits “oohs” and “aahs” from guests. Its elegant presentation and the delightful surprise of the molten center make you look like a culinary genius, all with surprisingly minimal effort.
Essential Ingredients for Your Decadent Chocolate Lava Cakes
Crafting the perfect molten lava cake starts with a careful selection of quality ingredients. Here’s what you’ll need, along with a few notes for optimal results:
- 1 cup (2 sticks) unsalted butter: Opt for high-quality unsalted butter. Its rich fat content significantly contributes to the luxurious texture and deep flavor of the cake. Unsalted butter also gives you control over the overall saltiness.
- 8 ounces semi-sweet chocolate chips: The heart of your lava cake! Choose a good quality semi-sweet chocolate (around 60-70% cacao content) for the best flavor and melt. You can also use chopped baking chocolate.
- 5 large eggs: For best results, ensure your eggs are at room temperature. This allows them to emulsify more effectively with other ingredients, leading to a smoother, more uniform batter and a better overall cake structure.
- 1/2 cup granulated sugar: Provides the necessary sweetness and helps to achieve that tender, delicate crumb characteristic of lava cakes.
- 1/4 teaspoon salt: A small pinch of salt is crucial. It doesn’t just add flavor; it acts as a flavor enhancer, deepening the chocolate notes and balancing the sweetness, preventing the cake from being overly cloying.
- 4 teaspoons all-purpose flour: This minimal amount of flour provides just enough structure to the cake without making it dense. It helps create the outer “cake” layer while allowing the center to remain molten.
- 6-8 ramekins (or alternatives): As discussed earlier, these individual oven-safe dishes are ideal. If using alternatives like jumbo or regular muffin tins, refer to the guidance above for proper preparation.
- Optional Garnish: A variety of garnishes can elevate your presentation and flavor. We recommend 6 oz fresh raspberries, gently rolled in granulated sugar just before serving, for a beautiful color contrast and burst of tartness. Other excellent choices include a scoop of premium vanilla bean ice cream, a dollop of freshly whipped cream, a dusting of cocoa powder or powdered sugar, or even a drizzle of caramel sauce.
Step-by-Step Directions: How to Bake Perfect Molten Lava Cakes
Follow these detailed instructions carefully to ensure your molten lava cakes turn out perfectly gooey and delicious every single time.
1. Prepare Your Workplace and Baking Vessels
Begin by preheating your oven to a hot 450 degrees Fahrenheit (232°C). This high temperature is absolutely crucial for creating the perfect molten center by setting the edges of the cake quickly. Next, thoroughly spray your 6-8 ramekins (or your chosen alternatives like muffin cups) with a high-quality nonstick cooking spray. For an extra layer of nonstick insurance and to enhance the chocolate flavor, you can lightly dust the greased ramekins with cocoa powder, tapping out any excess. Finally, arrange the prepared ramekins on a sturdy baking sheet; this not only makes transferring them to and from the hot oven much safer and easier but also catches any potential drips, keeping your oven clean.
2. Gently Melt the Chocolate and Butter
Combine the 1 cup of unsalted butter and 8 ounces of semi-sweet chocolate chips in a large, microwave-safe bowl. Heat this mixture in short 15-second intervals in the microwave, ensuring you stir thoroughly after each burst of heat. Patience is key here. Chocolate is delicate and can easily seize (become thick, grainy, and clumpy) if it gets too hot too quickly, or if even a tiny amount of moisture comes into contact with it. Continue this methodical process until the chocolate and butter are completely melted and yield a wonderfully smooth, glossy mixture. As an alternative, for even more controlled melting, you can use a double boiler method.
3. Craft the Velvety Egg and Sugar Mixture
In a separate medium-sized mixing bowl, combine the 5 large room-temperature eggs, 1/2 cup of granulated sugar, and 1/4 teaspoon of salt. Using a hand mixer or a sturdy whisk, beat these ingredients vigorously. Continue beating until the mixture transforms into a pale yellow, slightly thickened, and noticeably foamy consistency, and the sugar has completely dissolved. This process typically takes about 2-3 minutes. Proper beating at this stage incorporates air, which contributes to the final cake’s light and tender texture.
4. Gently Combine the Wet Ingredients
Once your chocolate and butter mixture is smooth and has cooled slightly to a warm, not hot, temperature, carefully pour it into the egg and sugar mixture. Gently beat or whisk the two mixtures together until they are thoroughly combined and smooth. Be mindful not to overmix at this stage; aim for just combined to prevent incorporating excessive air, which can alter the final texture of your molten center.
5. Fold in the Flour with Care
Add the 4 teaspoons of all-purpose flour to the chocolate-egg mixture. Beat or fold until the flour is just combined and no streaks of dry flour remain. The phrase “just combined” is critically important here. Overmixing flour develops gluten, which can lead to a tough, rubbery cake. For our molten lava cakes, we desire a delicate, tender crumb that beautifully contrasts with the liquid center, so a light hand is best.
6. Bake to Gooey Perfection
Divide the luscious batter evenly among your meticulously prepared ramekins, filling each approximately three-quarters full. Carefully transfer the baking sheet, with the filled ramekins, to the middle rack of your preheated 450°F (232°C) oven. Bake for a precise 8 to 10 minutes. The baking time is the most critical element for achieving that iconic molten interior! You are looking for the edges of the cakes to be set, slightly puffed, and firm, while the very center should still be noticeably soft and jiggly when you gently shake the ramekin. This distinct contrast ensures that magical flowing center. If you are using smaller muffin cups, they will likely bake faster, so begin checking for doneness around the 7-minute mark.
7. The Grand Reveal: Unmolding and Presentation
Once baked to perfection, carefully remove the ramekins from the oven. This step can sometimes feel a bit tricky, but with a little patience and a steady hand, you’ll master it! Allow the cakes to cool in their ramekins for an essential period of about 5 minutes. This crucial cooling time allows the delicate cakes to set slightly, firm up, and gently pull away from the sides of the ramekins, making the unmolding process significantly easier. After this cooling period, gently run a thin butter knife or an offset spatula around the inner edges of each cake to further loosen it from the ramekin walls.
Now for the exciting inversion: Place your chosen serving plate upside down directly over the ramekin. Holding both the plate and the ramekin firmly and confidently together, carefully and swiftly invert the entire assembly. Then, with gentle precision, lift the ramekin straight up and away. Hopefully, your perfectly molten lava cake will slide out beautifully onto the plate, revealing its exquisite form. If, by chance, it doesn’t come out perfectly, don’t fret! It will still taste absolutely divine. Many prefer to simply serve these individual desserts directly in their ramekins, which is an equally elegant and often less stressful serving option.
8. Garnish and Serve Immediately for Optimal Enjoyment
As soon as your warm molten lava cakes are ready, adorn each with your chosen garnish. Sugared raspberries offer a stunning visual contrast and a delightful burst of fresh, tart flavor that cuts through the richness of the chocolate. A generous scoop of premium vanilla bean ice cream, strategically placed to melt slowly into the warm chocolate, creates an irresistible hot-and-cold sensation. Alternatively, a dollop of freshly whipped cream provides a light, airy complement. For an extra touch of sophistication, a light dusting of cocoa powder or powdered sugar can elevate the presentation even further. Remember, these cakes are at their absolute best when enjoyed immediately, while the center is still wonderfully warm and beautifully flowing.
Pro Tips for Flawless Molten Lava Cakes Every Time
Achieving the perfect molten lava cake consistently is all about attention to detail. Incorporate these professional tips into your baking routine for exceptional results:
- Invest in Quality Ingredients: The flavor of your molten lava cakes directly correlates with the quality of your ingredients. Using premium butter and a good brand of chocolate will make a significant difference in the richness and depth of flavor.
- Never Overbake: This is arguably the most crucial rule! The delicate balance between a luscious, gooey center and a fully set cake is often a matter of just one or two minutes in the oven. Keep a watchful eye on your cakes, pulling them out as soon as the edges are firm and the center is still jiggly.
- Utilize Room Temperature Eggs: Eggs that are at room temperature emulsify far more effectively with other ingredients, leading to a smoother, more homogenous batter. This contributes to a finer texture in the final cake.
- Grease Your Vessels Generously: Whether you’re using classic ramekins or opting for muffin tins, ensure every nook and cranny is thoroughly coated with nonstick spray, butter, and/or flour/cocoa powder. This meticulous preparation is your best defense against sticking.
- Avoid Overmixing the Flour: Once you add the flour, mix only until it is just incorporated and no dry streaks remain. Overmixing develops gluten, which can result in a tough, rubbery cake – the antithesis of the delicate texture we desire.
- The Cooling Pause is Non-Negotiable: That seemingly brief 5-minute cooling period after baking is vital. It allows the cake’s structure to firm up just enough to release cleanly from the ramekin, minimizing the risk of breakage.
- Embrace Practice: Don’t be discouraged if your first attempt isn’t absolutely perfect. Baking, like any skill, improves with practice. Each batch offers an opportunity to learn and refine your technique.
Troubleshooting Common Molten Lava Cake Issues
Even seasoned bakers encounter challenges from time to time. Here’s how to diagnose and rectify some of the most common issues you might face when making molten lava cakes:
- “My cake didn’t ooze! It’s fully baked all the way through.” This is the most frequently encountered problem and almost always indicates that your cake was overbaked. The high oven temperature means even an extra minute can make a significant difference. For your next attempt, reduce the baking time by one or two minutes, or be more vigilant and remove them from the oven as soon as the edges are just set and the center retains a noticeable wobble.
- “My cake stuck to the ramekin and broke when I tried to unmold it.” This issue typically stems from insufficient greasing or not allowing enough cooling time. Ensure you thoroughly coat the ramekins with nonstick spray, or butter and flour/cocoa powder them meticulously. Also, that critical 5-minute cooling period allows the cake to slightly contract and pull away from the sides, facilitating a clean release.
- “My chocolate seized when I was melting it.” Chocolate seizes when it gets too hot too quickly, or when it comes into contact with even a tiny amount of water or steam. To prevent this, melt chocolate slowly in short, controlled intervals in the microwave, stirring frequently. Alternatively, using a clean double boiler provides a gentler, more forgiving heat.
- “My cake collapsed after I unmolded it.” A collapsed cake can be a sign of being slightly underbaked (meaning the internal structure wasn’t quite strong enough to hold its shape once the support of the ramekin was removed). It could also happen if the cake cooled too rapidly, leading to a sudden loss of structural integrity. Ensure the edges are properly set and slightly firm before removing from the oven.
Delicious Variations and Customizations for Your Lava Cakes
While the classic chocolate molten lava cake stands as a testament to perfection, the beauty of this dessert lies in its adaptability. Don’t hesitate to unleash your creativity and experiment with different flavors and additions:
- White Chocolate Lava Cakes: For a delightful twist, substitute the semi-sweet chocolate chips with good quality white chocolate chips or chopped white chocolate. This yields a sweeter, creamier, and equally impressive version.
- Flavor Infusions: Elevate the chocolate experience by adding various extracts or zests. Incorporate 1 teaspoon of instant espresso powder into the batter to deepen and intensify the chocolate flavor. A hint of orange zest (especially delicious with dark chocolate), a dash of peppermint extract (perfect for holiday indulgence), or even a tiny pinch of chili powder for a sophisticated Mexican hot chocolate inspired kick can transform the cake.
- Surprise Fillings: Create an extra layer of delight by adding a hidden filling. Spoon half of the batter into the ramekin, then carefully place a spoonful of luscious caramel sauce, creamy peanut butter, a soft truffle, or even a mini marshmallow in the center, before topping with the remaining batter.
- Textural Enhancements: For an added crunch, sprinkle finely chopped nuts (such as pecans, walnuts, or hazelnuts) into the batter or directly on top of the cakes just before baking. This introduces a wonderful textural contrast.
- Gluten-Free Option: This recipe can be easily adapted for those with gluten sensitivities. Simply substitute the all-purpose flour with an equal amount of a good quality 1:1 gluten-free all-purpose flour blend to enjoy a gluten-free molten lava cake.
Frequently Asked Questions About Molten Lava Cakes
Can I make molten lava cakes ahead of time?
Yes, you can prepare the molten lava cake batter up to a day in advance. Store the prepared batter covered tightly in the refrigerator. When you’re ready to bake, allow the batter to sit at room temperature for about 30 minutes to an hour to take the chill off. Then, proceed with baking as directed, although you might need to add an extra minute or two to the baking time to compensate for the colder batter.
How do I store leftover molten lava cakes?
Molten lava cakes are truly at their peak when enjoyed fresh out of the oven, ensuring that iconic warm, gooey center. However, if you happen to have any leftovers, store them covered in an airtight container in the refrigerator for up to 2-3 days. To reheat, warm them gently in the microwave for 30-60 seconds, or place them in a preheated oven at 350°F (175°C) for 5-10 minutes until they are warmed through. Be aware that the center might not be as liquid as when freshly baked.
What kind of chocolate is best for this molten lava cake recipe?
For optimal results, semi-sweet chocolate chips or chopped semi-sweet baking chocolate with a cacao content of around 60-70% works beautifully. This range provides a rich chocolate flavor without being overly bitter or overly sweet. You can also experiment with darker chocolate (70%+) for a more intense, less sweet cake. It’s generally best to avoid milk chocolate, as it can be too sweet and often doesn’t yield the same robust molten consistency.
My cake is not rising much; is that normal for a lava cake?
Yes, it is entirely normal for molten lava cakes not to rise significantly like a traditional fluffy cake. These desserts contain a relatively small amount of flour and do not use leavening agents like baking powder or baking soda. The slight puffing around the edges that you observe during baking is precisely what you’re looking for, indicating that the cake is setting while preserving that delightful liquid center.
Can I bake molten lava cakes in an air fryer?
While an air fryer can be used for some individual desserts, an traditional oven generally provides a more consistent and even heat distribution, which is crucial for achieving the delicate balance of perfectly set edges and a perfectly molten center in lava cakes. If you choose to experiment with an air fryer, ensure you use small, oven-safe dishes and monitor the cakes very closely, as cooking times and temperatures will vary significantly and require careful adjustment.







