Effortlessly Restore Your Grout: The No-Scrub Method for Eliminating Dirt and Mold
There are few household chores more universally dreaded than cleaning stubborn grout. Whether it’s the unsightly buildup of soap scum, the persistent dark stains of dirt, or the insidious spread of mold, dirty grout can make even the cleanest bathroom feel neglected and unhygienic. The thought of getting down on your hands and knees with a scrub brush and harsh chemicals, spending hours meticulously cleaning each tiny line, is enough to deter anyone. But what if there was a revolutionary, no-scrub method that promised sparkling clean grout with minimal effort? Prepare to banish those scrubbing woes and discover a simple yet incredibly effective technique to restore your grout to its former glory.
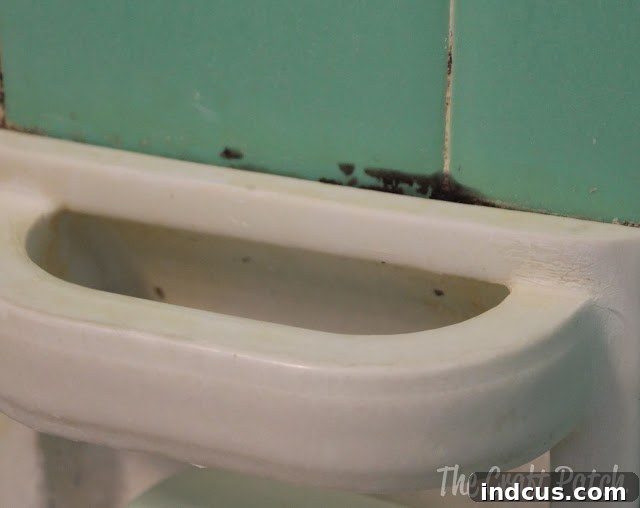
Recently, I faced the all-too-common challenge of severely neglected bathroom tile. Our vintage 1950s tub surround, once a charming feature, had fallen victim to layers of grimy soap scum and, more alarmingly, stubborn patches of mold creeping into the corners. It was a disheartening sight, a clear sign that this area needed urgent attention. (And yes, for fellow parents out there, the usual suspect for household neglect is often a tiny, adorable human demanding all your attention!) Mold, in particular, is a formidable foe; it multiplies rapidly and clings tenaciously to surfaces, proving incredibly difficult to eradicate with conventional methods. I knew I needed a powerful solution, and I needed it fast.
The Lingering Grout Problem: More Than Just an Eyesore
Dirty and moldy grout isn’t just an aesthetic problem; it can pose significant issues for your home and health. Grout, being porous, easily traps moisture, soap residue, dirt, and mildew, creating a fertile breeding ground for mold and bacteria. Over time, these contaminants can lead to:
- Unpleasant Odors: Mold and mildew often produce a musty smell that permeates your bathroom.
- Health Concerns: Certain types of mold can trigger allergies, asthma attacks, and respiratory issues, especially in sensitive individuals.
- Structural Damage: Persistent moisture and mold can eventually compromise the integrity of your grout and tiles, leading to costly repairs.
- Aesthetic Deterioration: Dark, discolored grout makes your entire bathroom look dated and unclean, diminishing its appeal.
Traditional cleaning methods often involve vigorous scrubbing with abrasive cleaners, which can be physically exhausting, time-consuming, and potentially damaging to the grout itself. Furthermore, scrubbing might only remove surface mold, leaving the roots to grow back quickly. This is precisely why a “no-scrub” approach is so appealing – it promises deep cleaning without the back-breaking labor.
Before diving into the solution, take a moment to cringe with me at the “before” state of the grout:
Discovering the Game-Changing No-Scrub Solution
In my quest for a truly effective and easy grout cleaning method, I recalled seeing a viral Pinterest pin detailing a seemingly miraculous technique for eradicating mold. The promise of “banishing mold forever” without any scrubbing immediately piqued my interest. Could it really be that simple? For the sake of my sanity, and to share a potential household game-changer with you, I decided to put this method to the ultimate test on my stubbornly dirty and moldy grout.
The original instructions suggested using cotton beauty coils, which are typically found in beauty supply stores. While these might offer superior absorption and adherence to grout lines, the idea of an extra trip to a specialized store and an unnecessary expense didn’t appeal to me. Resourcefulness is key in DIY cleaning! Instead, I opted for a readily available and equally effective alternative: good old-fashioned cotton balls. This simple substitution proved that you don’t need fancy tools to achieve remarkable results.
Gathering Your Simple Supplies
One of the most appealing aspects of this no-scrub grout cleaning method is the minimal list of supplies required. You likely already have most of these items at home:
What you’ll need:
- Bleach: Regular household bleach is the active ingredient. Ensure it’s fresh for maximum potency.
- Cotton Balls (or Cotton Beauty Coils): These are crucial for delivering the bleach directly and consistently to the grout lines. Cotton balls work perfectly, but if you have beauty coils on hand, they can be used.
- Gloves: Essential for protecting your hands from bleach.
- Ventilation: A fan, open window, or both, to ensure good airflow. Bleach fumes can be strong.
- Old Clothes: Wear something you don’t mind getting bleach on, as spills can easily lighten fabric.
- Tongs or Tweezers (Optional): For precise placement of bleach-soaked cotton.
Step-by-Step Guide: Your Path to Spotless Grout
This method is surprisingly straightforward, relying on the potent oxidizing power of bleach and the direct contact provided by cotton. Follow these steps carefully for the best results:
Step 1: Prioritize Safety and Prepare Your Area
Before you begin, ensure the area is well-ventilated. Open windows, turn on the exhaust fan, or use a portable fan to circulate air. Put on your protective gloves and wear old clothing to avoid accidental bleach damage. Clear any items from the tub or shower that might obstruct your access to the grout lines.
Step 2: Saturate Your Cotton Balls with Bleach
Take a cotton ball and carefully soak it in undiluted household bleach. You want it thoroughly saturated but not dripping excessively. If using beauty coils, apply bleach directly along their length until they are fully wet.
Step 3: Precisely Apply to Moldy Grout Lines
Using your gloved hands (or tongs for extra precision), gently press the bleach-soaked cotton balls directly onto the dirty or moldy grout lines. Arrange them so they make firm, continuous contact with the affected areas. For corners or particularly stubborn spots, you might need to use several cotton balls to cover the entire patch. The goal is to ensure the bleach stays in direct contact with the mold for an extended period.
Step 4: The Overnight Transformation – Patience is Key
Once all affected areas are covered, leave the cotton balls in place overnight, or for a minimum of 6-8 hours. This extended contact time is crucial for the bleach to penetrate and effectively break down the mold and grime. During this period, avoid using the shower or tub to prevent dislodging the cotton balls or diluting the bleach. Ensure continued ventilation, especially if leaving it overnight, to dissipate fumes.
Step 5: Reveal and Rinse
The next morning, with your gloves still on, carefully remove the cotton balls. You’ll likely notice an immediate, dramatic improvement. Discard the cotton balls responsibly. Then, thoroughly rinse the treated areas with warm water to wash away any residual bleach and loosened debris. You might use an old cloth or sponge to help wipe away any remaining residue. Marvel at your sparkling clean grout!
The Astonishing Results: Before & After
I have to admit, I was cautiously optimistic, but the actual results left me absolutely stunned. When I removed the bleach-soaked cotton, the transformation was nothing short of miraculous. The dull, discolored, and mold-ridden grout lines were gone, replaced by a pristine, sparkly white finish. Not even a faint hint of mold remained! The satisfaction of seeing such a dramatic improvement with so little effort was incredibly gratifying. This method truly delivered on its “no-scrub” promise.
The contrast was truly night and day. Take a look at these side-by-side comparisons to fully appreciate the power of this simple technique:
Why This Method Works So Well: The Science Behind the Sparkle
The effectiveness of this no-scrub method lies in the chemical properties of bleach (sodium hypochlorite) and the application technique. Bleach is a powerful oxidizing agent. When it comes into contact with mold, mildew, and many types of stains, it chemically alters their structure, breaking them down at a molecular level. It essentially “bleaches” the color out of the stains and kills the mold spores.
The cotton balls play a vital role by holding the bleach directly against the grout for an extended period. This prolonged contact allows the bleach to deeply penetrate the porous grout, killing mold not just on the surface but also within its microscopic crevices, and dissolving stubborn organic stains. Unlike a quick spray and wipe, which only touches the surface, this method provides the necessary dwell time for a truly deep clean without requiring any physical scrubbing.
Tips for Maintaining Pristine Grout and Preventing Future Mold
Once you’ve achieved sparkling clean grout, the goal is to keep it that way. Prevention and regular light maintenance are far easier than deep cleaning. Consider these tips:
- Improve Ventilation: Always use an exhaust fan during and after showers to reduce humidity. If you don’t have one, open a window.
- Squeegee Your Shower: A quick squeegee after each shower removes excess water, which is the primary fuel for mold growth.
- Wipe Down Surfaces: Routinely wipe down tiles and grout lines with a towel after use to remove moisture and soap residue.
- Regular Mild Cleaning: Use a daily shower spray or a diluted mixture of white vinegar and water (rinse thoroughly afterwards to avoid acidity degrading grout) to keep surfaces clean.
- Seal Your Grout: Grout sealer creates a protective barrier that makes grout less porous and more resistant to water, stains, and mold. Re-seal every 1-2 years.
- Address Leaks Promptly: Even small drips can create persistent dampness, leading to mold.
Important Safety Considerations When Working with Bleach
While bleach is highly effective, it’s a powerful chemical that requires careful handling. Always prioritize safety:
- Ventilation is Non-Negotiable: Ensure excellent airflow to avoid inhaling strong fumes, which can irritate respiratory passages.
- Wear Protective Gear: Always wear chemical-resistant gloves to protect your skin and consider eye protection.
- Never Mix Bleach: Do NOT mix bleach with other cleaners, especially ammonia-based products (like some window cleaners) or acidic cleaners (like vinegar or toilet bowl cleaners). Mixing can create dangerous, toxic gases.
- Patch Test: If you have colored grout or delicate tile, test the bleach on an inconspicuous area first to ensure it doesn’t cause discoloration or damage. This method is generally safe for white or light-colored grout.
- Keep Away from Children and Pets: Store bleach securely out of reach.
- Proper Disposal: Dispose of bleach-soaked cotton balls in a trash can, not down the drain, and ensure they are not left where they could come into contact with curious hands or paws.
Beyond Grout: Other Applications for This Smart Cleaning Hack
The success of this bleach and cotton ball method isn’t limited to just shower grout. Its principle of targeted, prolonged chemical contact can be applied to other notoriously difficult-to-clean areas. For instance, after witnessing the incredible results on my tub grout, I decided to adapt the same strategy for another challenging cleaning task: the often-neglected holes under the rim of the toilet bowl. This area, prone to mineral buildup and mildew, typically requires awkward scrubbing. By applying bleach-soaked cotton, I found similar astonishing results, proving the versatility of this simple cleaning hack.
You can read all about my experience cleaning the toilet rim and other hard-to-reach areas using a similar method HERE.
Reclaim Your Bathroom: Effortless Grout Cleaning Awaits!
No longer do you need to dread the task of cleaning dirty or moldy grout. This innovative, no-scrub method utilizing simple bleach and cotton balls offers a powerful, efficient, and surprisingly satisfying solution. By allowing the bleach to work its magic over several hours, you can achieve professional-level cleanliness without the strenuous labor. Embrace this smart cleaning hack and transform your bathroom from dull and dingy to bright and hygienic. Say goodbye to mold and hello to sparkling grout – the easy way!