Elevate Your Outdoor Entertaining: Charming DIY Utensil Pouches for Every Backyard Barbecue
There’s nothing quite like the laid-back atmosphere of a backyard barbecue: the tempting aroma of grilled delights, the cheerful chatter of friends, and the soft glow of summer twilight. As a host, you strive to create memorable experiences, and often, it’s the thoughtful little details that leave the biggest impression. That’s precisely where these adorable and highly practical DIY utensil pouches come into play! Forget about scattered cutlery or napkins struggling to hold silverware; these custom-made pouches effortlessly enhance your table setting, keep everything neatly organized, and infuse a delightful personalized flair that your guests will absolutely adore.
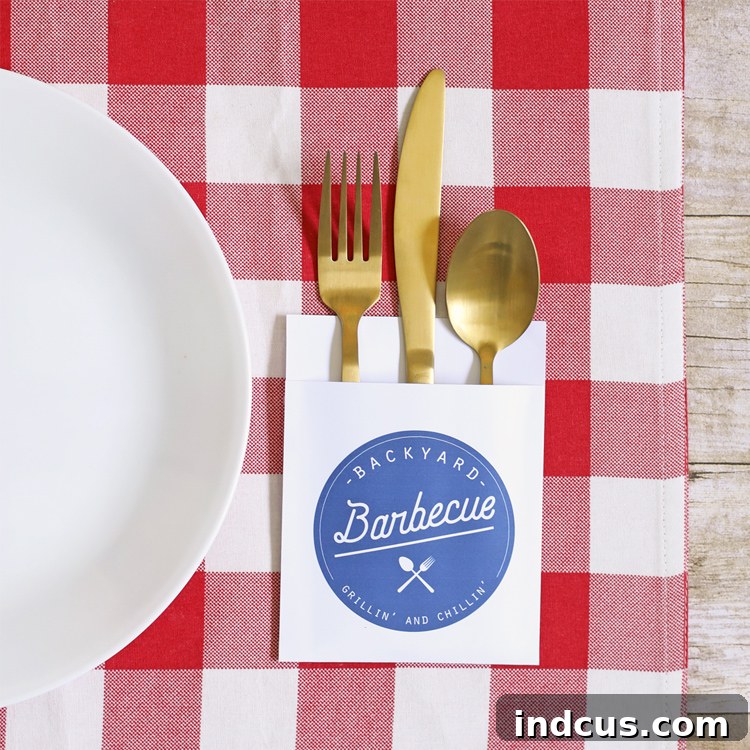
Whether you’re gearing up for a casual cookout, a vibrant Fourth of July celebration, a cozy family picnic, or even a sophisticated garden party, these easy-to-craft utensil holders are an impeccable addition. They do more than just streamline your serving process; they also provide a hygienic way to protect your cutlery from outdoor elements and offer unparalleled convenience for your guests. The best part? They are incredibly simple to bring to life using our complimentary printable design. So, let’s roll up our sleeves and discover how you can make these charming pouches a cornerstone of all your future outdoor entertaining endeavors!
Why DIY Utensil Pouches Are an Essential Touch for Every Thoughtful Host
When planning an outdoor dining event, striking a balance between practicality and elegant presentation is key. Our printable utensil pouches masterfully achieve this synergy. Here’s a deeper look into why integrating them into your next gathering is not just a good idea, but a brilliant one:
- Seamless Organization: Bid farewell to the hassle of individual forks, knives, and spoons scattered across your table or buffet. Each pouch is designed to hold a complete set of cutlery, making it incredibly straightforward for guests to pick up everything they need from a central, convenient spot. This prevents clutter and ensures a smooth flow during meal service.
- Elevated Hygiene Standards: In an outdoor environment, maintaining cleanliness and protecting cutlery from dust, playful breezes, insects, or accidental spills is of utmost importance. These carefully designed pouches offer a neat, enclosed space, guaranteeing that your utensils remain pristine and untouched until your guests are ready to use them, providing peace of mind for both you and your attendees.
- Instant Aesthetic Upgrade: Move beyond basic functionality and transform a simple outdoor table into a beautifully curated dining vignette. The custom design of these printable pouches acts as a decorative accent, harmoniously complementing your barbecue theme or any party decor. This thoughtful detail makes your event feel more refined, intentional, and truly special.
- Effortless Personalization: While our free printable provides a fantastic and appealing design, the DIY nature of this project opens up a world of personalization possibilities. You have the creative freedom to select different cardstock colors, experiment with various textures, or add unique embellishments to perfectly align with any specific party theme, seasonal palette, or personal aesthetic.
- Unmatched Guest Convenience: Envision your guests effortlessly selecting a perfectly bundled set of cutlery and a neatly folded napkin. This seemingly small detail significantly enhances their overall dining experience, demonstrating your meticulous attention to comfort and practicality as a gracious host. It’s about making things easy and enjoyable for everyone.
- A Step Towards Eco-Consciousness: For hosts who prefer reusable cutlery, these pouches simplify the collection and post-party washing process, helping to reduce the reliance on single-use plastics. Even if disposable options are used, the elegant presentation these pouches provide feels far more considered and less wasteful.
Gathering Your Crafting Arsenal: A Detailed Look at What You’ll Need
The excellent news is that creating these captivating utensil pouches doesn’t require a specialty craft store overhaul. Most of the necessary items are commonly found, and you might already possess several of them! Here’s an in-depth guide to the essential supplies you’ll need to get started:
Key Materials for Crafting Your DIY Utensil Holders
- White 8.5″x11″ Cardstock: This forms the essential structure and canvas for your pouches. We highly recommend using a medium-to-heavy weight cardstock, typically ranging from 65 lb to 110 lb (176-297 gsm), for optimal durability and a premium feel. Standard printer paper is generally too thin and prone to tearing, especially when holding utensils. Cardstock ensures your pouches stand upright, maintain their shape, and exude a professional finish.
- Printable Design (Available for download at the end of this post): Our custom-designed template is the heart of this project! It features festive graphics and clearly marked cut lines, guiding you through the creation process. Ensure you’ve downloaded and saved the file, ready for printing.
- Printer: Any standard inkjet or laser printer capable of handling cardstock will work perfectly. For the best results, ensure your printer has sufficient ink or toner to produce crisp, vibrant colors and sharp details, as the design is a key visual element of the pouch.
- Corner Rounder (Optional but Highly Recommended): While not strictly mandatory for functionality, a corner rounding punch (readily available at craft stores or online) significantly elevates the appearance of your pouches. It gracefully softens the sharp edges, lending a more refined, professional, and inviting finish that truly adds that coveted “flair.”
- Hot Glue Gun + Glue Sticks: This will be your primary tool for quick and secure assembly. A hot glue gun provides an instant, strong bond ideal for paper crafts. It’s advisable to have a generous supply of glue sticks. For those new to hot glue or working with children, a low-temperature glue gun can be a safer alternative, minimizing the risk of burns.
- Precision Cutting Tools (Scissors or Craft Knife with Ruler): For making your cuts, sharp scissors will work adequately. However, for achieving impeccably straight and clean edges, especially if you plan to create a large batch of pouches, we suggest using a craft knife (like an X-Acto knife) paired with a metal ruler and a self-healing cutting mat. This combination offers unparalleled precision and a professional look.
Step-by-Step Guide: Crafting Your Picture-Perfect Utensil Pouches
With all your materials meticulously gathered, it’s time to embark on the creative journey! Follow these easy-to-understand steps to transform simple cardstock into elegantly functional utensil pouches. This process has been designed to be accessible and enjoyable for crafters of all skill levels, including beginners.
Detailed Crafting Steps for Your Utensil Holders
Step 1: Download and Print Your Unique Design
Your first task is to access our complimentary printable design file by clicking the download link provided further down this page. Once the file is securely on your computer, open it and prepare to send it to your printer. Crucially, before hitting print, adjust your printer settings to achieve the highest possible quality—select “best quality” or “photo quality” if available. Also, ensure you specify “cardstock” or “heavy paper” as the paper type. Print the design onto your chosen white 8.5″x11″ cardstock. A useful tip: run a test print on a regular sheet of paper first to verify alignment and color accuracy, preventing any waste of your premium cardstock.
Step 2: Execute Precision Cutting Along the Outlines
With your design printed, it’s time for careful cutting. Meticulously follow the faint gray lines visible on your cardstock. Achieving precision in this step is vital for a polished, professional outcome. If you are using scissors, take your time, aiming for smooth, continuous strokes. For those seeking even crisper, factory-like edges, particularly when mass-producing pouches, opt for a craft knife (e.g., X-Acto) used alongside a sturdy metal ruler and a self-healing cutting mat. Each printed sheet of cardstock will gracefully yield two complete utensil pouches.
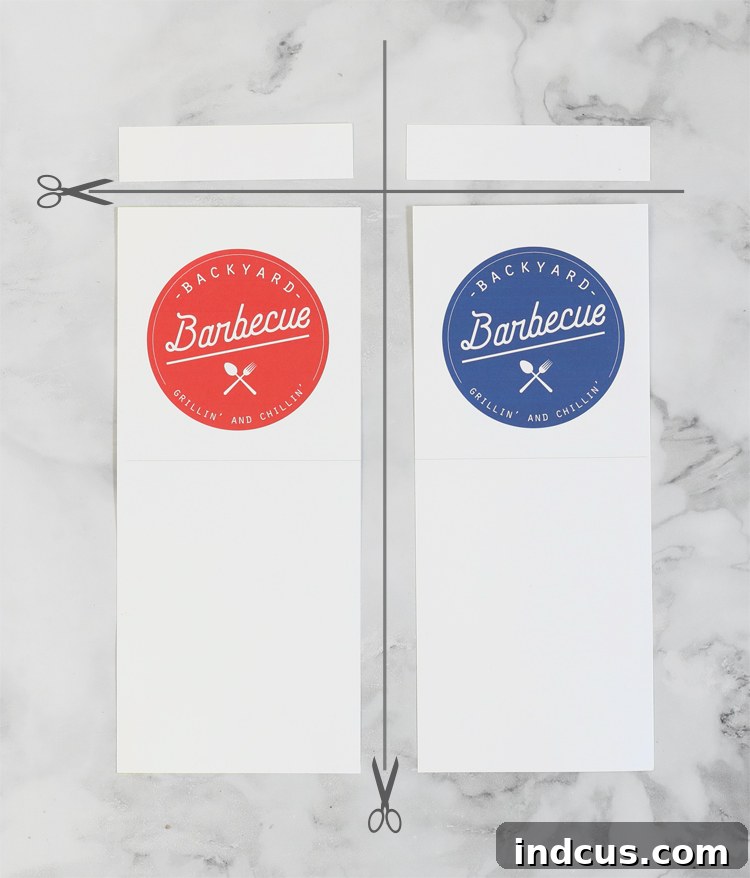
Step 3: Master the Art of Folding Your Lines
Next, take each individually cut piece and carefully fold it along the remaining faint gray line. This specific line designates the precise bottom edge of your utensil pouch. To achieve a perfectly sharp and professional-looking fold, we highly recommend gently scoring the line beforehand. You can use a dedicated scoring tool, the dull edge of a butter knife, or even an emptied ballpoint pen. Scoring creates a clean crease, preventing the cardstock from tearing or cracking, and ensures your pouch has a beautifully crisp, finished appearance.
Step 4: Secure the Sides to Expertly Form Your Pocket
Position your cut-out with the decorative design facing outwards. Now, fold the bottom flap upwards along the crease you established in Step 3. Using your hot glue gun, apply a thin, consistent bead of glue along the two side edges of this folded bottom flap. With care, press the flap firmly onto the main body of the pouch, ensuring all edges are perfectly aligned. Hold it steadily for a few seconds to allow the glue to set and form a strong bond. This action ingeniously creates the sturdy pocket designed to cradle your utensils. A crucial tip: avoid applying excessive glue, as it can ooze out and create a less refined finish; a fine, even line is all that’s needed for optimal adhesion.
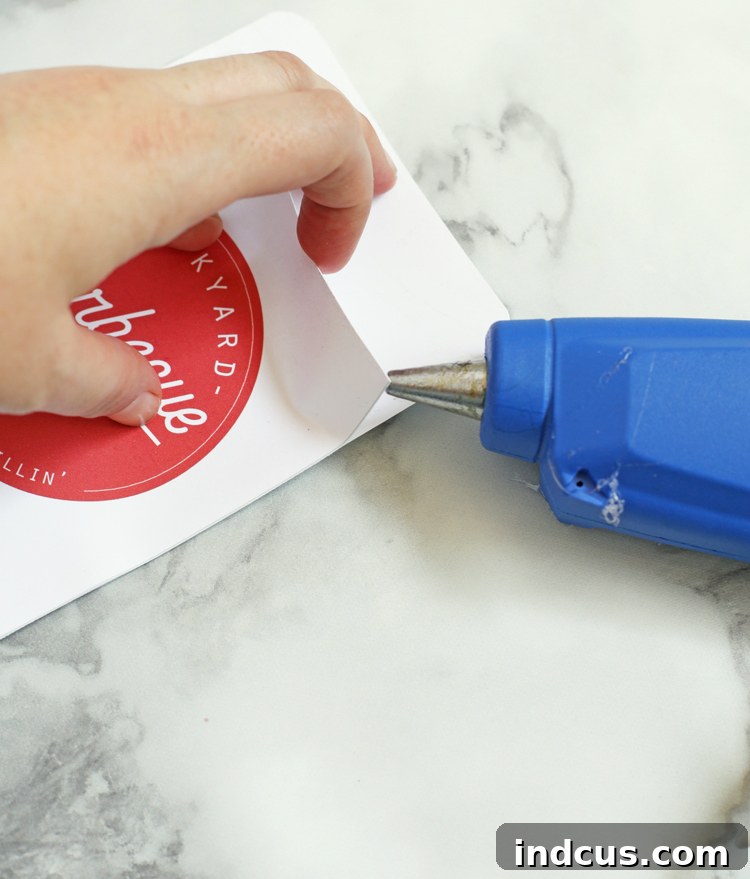
Step 5: (Optional but Recommended) Round the Top Corners for an Elegant Touch
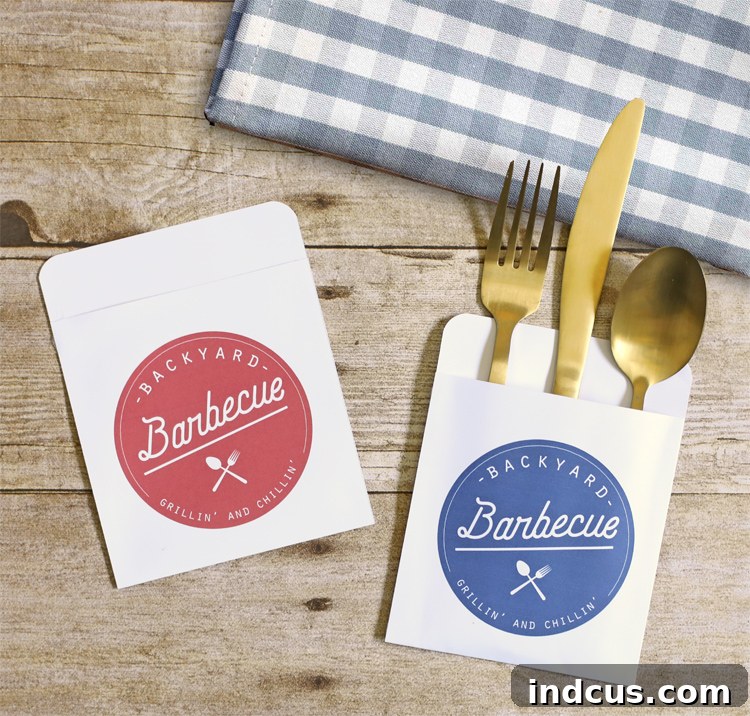
This final step is completely optional, yet it is highly recommended if you desire a more polished, sophisticated, and aesthetically pleasing result. Utilizing your corner rounding punch, gently round over the top two exposed edges of your freshly assembled pouch. This subtle but impactful detail instantly elevates the overall design, imparting a softer, more professional, and finished appearance. If you have access to different punch sizes, feel free to experiment, but even a standard corner rounder will make a remarkable difference in the pouch’s final look.
Once your charming pouches are fully assembled and the glue has set, it’s time for the satisfying act of filling them! Neatly place a fork, knife, spoon, and a beautifully folded napkin inside each pouch. Your discerning party guests will undoubtedly appreciate the thoughtful presentation and the sheer convenience of grabbing a complete set of dining essentials in a single, effortless motion. These pouches are not just incredibly cute; they are ingeniously handy!
Personalize and Customize: Making Your Pouches Uniquely Yours
While our complimentary printable design provides a fantastic and attractive starting point, the true magic of DIY lies in its boundless potential for personalization. Don’t feel limited to just the basic instructions—consider these creative ideas to transform your utensil pouches into truly unique keepsakes, perfectly tailored to your event and personal style:
- Experiment with Diverse Cardstock: While crisp white cardstock allows for the vibrant display of the print, you could explore light pastel-colored cardstocks or even those with subtle textures, provided your printer can handle them. Always ensure that the design’s colors will still pop beautifully against your chosen background.
- Incorporate Elegant Embellishments: Before or after assembling, consider adding small, decorative touches. A simple piece of rustic twine or a colorful satin ribbon tied around the pouch can add charm. Small charms, beads, or even a personalized label with your guests’ names can introduce a more formal or bespoke element.
- Artisanal Hand-Stamping or Stickers: For a handcrafted, artisanal appeal, utilize rubber stamps with playful patterns or meaningful words (such as “Enjoy,” “Cheers,” or your initial) on any plain areas of the pouch. Themed stickers offer a quick, vibrant burst of color and personality, perfect for casual gatherings or children’s parties.
- Dazzling Glitter or Metallic Accents: A delicate touch of glitter glue along the edges or a sophisticated metallic pen used to outline certain design elements can infuse a festive sparkle, making your pouches perfect for evening soirees or holiday celebrations.
- Creative Themed Variations: While this design is perfectly suited for barbecues, imagine the possibilities for adaptation! For a whimsical kids’ party, opt for bright, colorful cardstock and adorn them with fun cartoon stickers. For a charming rustic wedding, select kraft paper cardstock and tie with elegant burlap ribbon, perhaps adding a sprig of dried lavender.
The horizons of creativity are limitless! Unleash your imagination and let these simple yet impactful pouches become a memorable, personalized detail for any and every occasion you host.
Beyond the Barbecue: Versatile Applications for Your Utensil Pouches
While these delightful printable utensil pouches are an ideal companion for backyard barbecues, their practical and aesthetic appeal extends far beyond summer cookouts. Their organized and charming presentation makes them an exquisite addition to a wide array of other events and settings throughout the year:
- Effortless Picnics and Outdoor Excursions: Conveniently pack these pouches into your picnic basket, cooler, or hiking backpack for an impeccably organized and mess-free outdoor meal, whether you’re at the local park, a sunny beach, or on a serene camping trip. They keep everything tidy and accessible.
- Festive Holiday Gatherings: As previously hinted, these designs can be skillfully adapted for various holidays. Imagine elegantly themed pouches for Thanksgiving feasts, charming heart-adorned ones for Valentine’s Day dinners, or even jolly designs for Christmas celebrations. They infuse a truly special and cohesive touch to your holiday table settings.
- Chic Birthday Parties: Whether you’re hosting a vibrant children’s party with a specific theme or an elegant adult birthday celebration, custom-designed pouches can beautifully complement your chosen decor and streamline the serving of cake, ice cream, or a full meal, making transitions smoother.
- Elegant Baby Showers and Bridal Brunches: For more sophisticated and delicate affairs, choose soft pastel cardstock and incorporate subtle embellishments to craft exquisite utensil holders that harmoniously match your refined decor, adding a touch of bespoke charm.
- Streamlined Buffet Lines: These pouches are an absolute game-changer for any event featuring a buffet. They empower guests to effortlessly pick up their complete cutlery set without causing bottlenecks, disorganization, or lengthy waits at the beginning of the food line.
- Community Potlucks and Large Gatherings: If you’re contributing to a community potluck or orchestrating a substantial group meal, these pre-assembled pouches significantly enhance the efficiency and hygiene of self-service meals, ensuring a smoother experience for everyone.
By simply altering the printable design or selecting a different color of cardstock, these incredibly versatile pouches can seamlessly integrate into virtually any event you envision, solidifying their status as a year-round, indispensable hosting accessory.
Mastering the Art of Hosting: Essential Tips for the Perfect Summer Soiree
While creating beautiful utensil pouches is a wonderful step, it’s just one component of orchestrating an unforgettable backyard barbecue. Here are some comprehensive tips to ensure your summer soiree is not only a smashing success but also creates cherished, lasting memories for every guest:
- Thoughtful Menu Planning: Beyond your mouth-watering grilled mains, consider preparing side dishes that can be made ahead of time, such as vibrant salads, fresh fruit platters, or perfectly seasoned corn on the cob. Importantly, remember to include enticing vegetarian or vegan options to cater to all dietary preferences.
- Inviting Hydration Station: Establish a dedicated drink station that offers a diverse selection of beverages—chilled water infused with fruit, refreshing iced tea, zesty lemonade, and perhaps some carefully chosen adult refreshments. Crucially, ensure an abundant supply of ice to keep everything cool and enjoyable.
- Crafting the Perfect Ambiance: Elevate the atmosphere with decorative elements: string up enchanting fairy lights or rustic Edison bulbs, strategically place citronella candles or torches to naturally deter insects, and curate a fantastic playlist that sets the perfect mood. Providing comfortable seating and shaded areas is also vital for your guests’ relaxation and enjoyment.
- Strategic Advance Preparation: Maximize your enjoyment by completing as much prep work as possible before your guests arrive. This includes chopping vegetables, marinating meats, setting out all serving dishes, and, of course, assembling those charming utensil pouches!
- Define Functional Zones: Create clear and distinct areas for food service, beverages, various seating arrangements, and any planned games or activities. This intelligent zoning helps to manage guest flow, prevents congestion, and enhances overall comfort.
- Kid-Friendly Entertainment: If children will be attending, make sure to plan some engaging activities or designate a specific play area to keep them happily entertained, allowing the adults to relax and socialize.
- Prioritize Sun Protection & Bug Control: Thoughtfully offer sunscreen for daytime events and bug spray as the evening approaches. Citronella candles, insect-repelling torches, or even a strategically placed outdoor fan can significantly help in keeping those pesky insects at bay.
- Remember to Relax and Enjoy: While you are the host, it’s equally important to remember you are also a participant in your own celebration! Once all your meticulous preparations are complete, try to unwind, savor the delicious food, and most importantly, enjoy the wonderful company of your friends and family.
With a touch of thoughtful planning and the added charm of these delightful DIY utensil pouches, your backyard barbecue is destined to be the talk of the neighborhood, remembered for its style, warmth, and impeccable organization!
Loved this creative idea? Be sure to pin it to your favorite Pinterest board to save these fantastic DIY utensil pouches for all your upcoming gatherings!
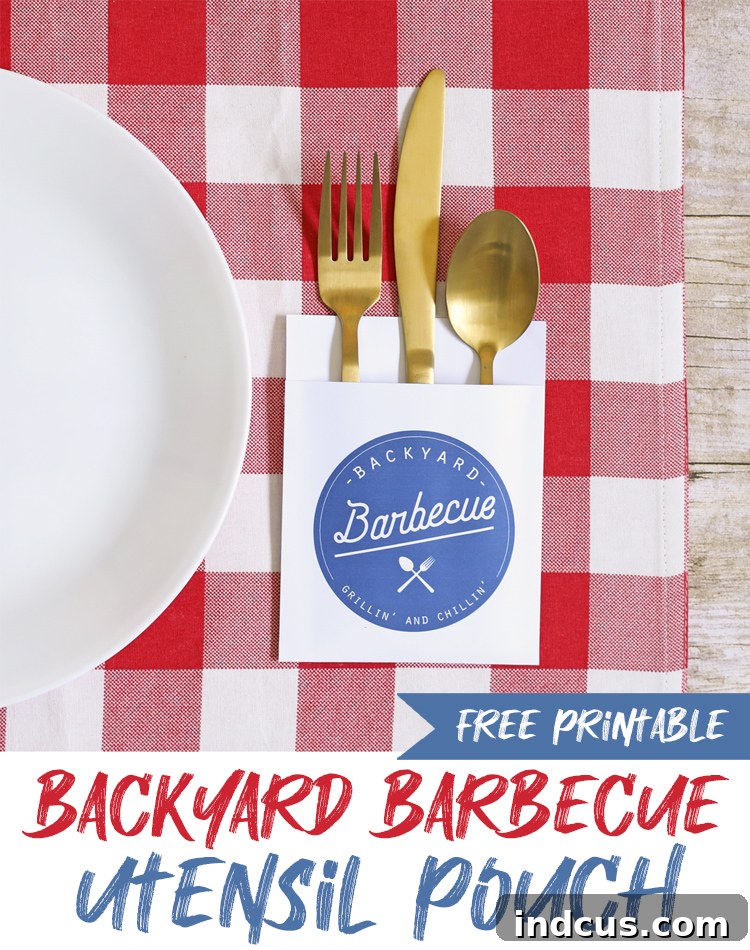
Discover More Seasonal Utensil Pouch Designs for Every Occasion
If you’ve thoroughly enjoyed the process of crafting these delightful barbecue utensil pouches, you’ll be ecstatic to explore our diverse collection of other charming designs, perfectly suited for a wide array of holidays and special occasions. Customizing your table settings has never been more straightforward or more creatively fulfilling! Take a moment to browse some of our other complimentary printable utensil pouch and napkin wrap designs, each offering a unique flair:
- Thanksgiving Utensil Pouch: Infuse your holiday feast with a heartfelt touch of gratitude and the warm, inviting charm of autumnal aesthetics.
- Valentine’s Day Utensil Pouch: Spread an abundance of love with utterly adorable, heart-themed holders, ideal for a romantic dinner for two or a festive celebration with loved ones.
- St. Patrick’s Day Utensil Pouch: Usher in the luck of the Irish to your festive spread with these spirited green designs, perfect for a lively St. Paddy’s Day gathering.
- And anticipate many more to come! We are continuously expanding our collection, so keep a keen eye out for new and exciting additions. This ensures your table will be flawlessly dressed and perfectly themed for every season and celebration throughout the entire year, keeping your hosting game strong and stylish.
Embrace the pure joy of hands-on crafting and undeniably elevate your hosting prowess with these deceptively simple yet profoundly impactful DIY projects. Your guests will be genuinely impressed by your attention to detail, and you, in turn, will undoubtedly cherish the organized, stylish, and personal touch these creations bring to any meal or event.