Transforming a neglected piece of furniture into a statement piece doesn’t always require a hefty budget or professional help. Sometimes, all it takes is a keen eye, a dash of creativity, and a willingness to get a little hands-on. For quite some time, I had been searching for that perfect, cozy, yet compact chair to neatly tuck away under my computer desk. My criteria were simple: it had to be comfortable enough for long hours, durable, and ideally, not break the bank. My search led me, as it often does, to the charming aisles of my favorite local thrift store. It was there, amidst an array of forgotten treasures, that I spotted what could only be described as an “ugly duckling” of a chair. Its potential, however, gleamed brighter than its tarnished exterior, promising a rewarding DIY project.
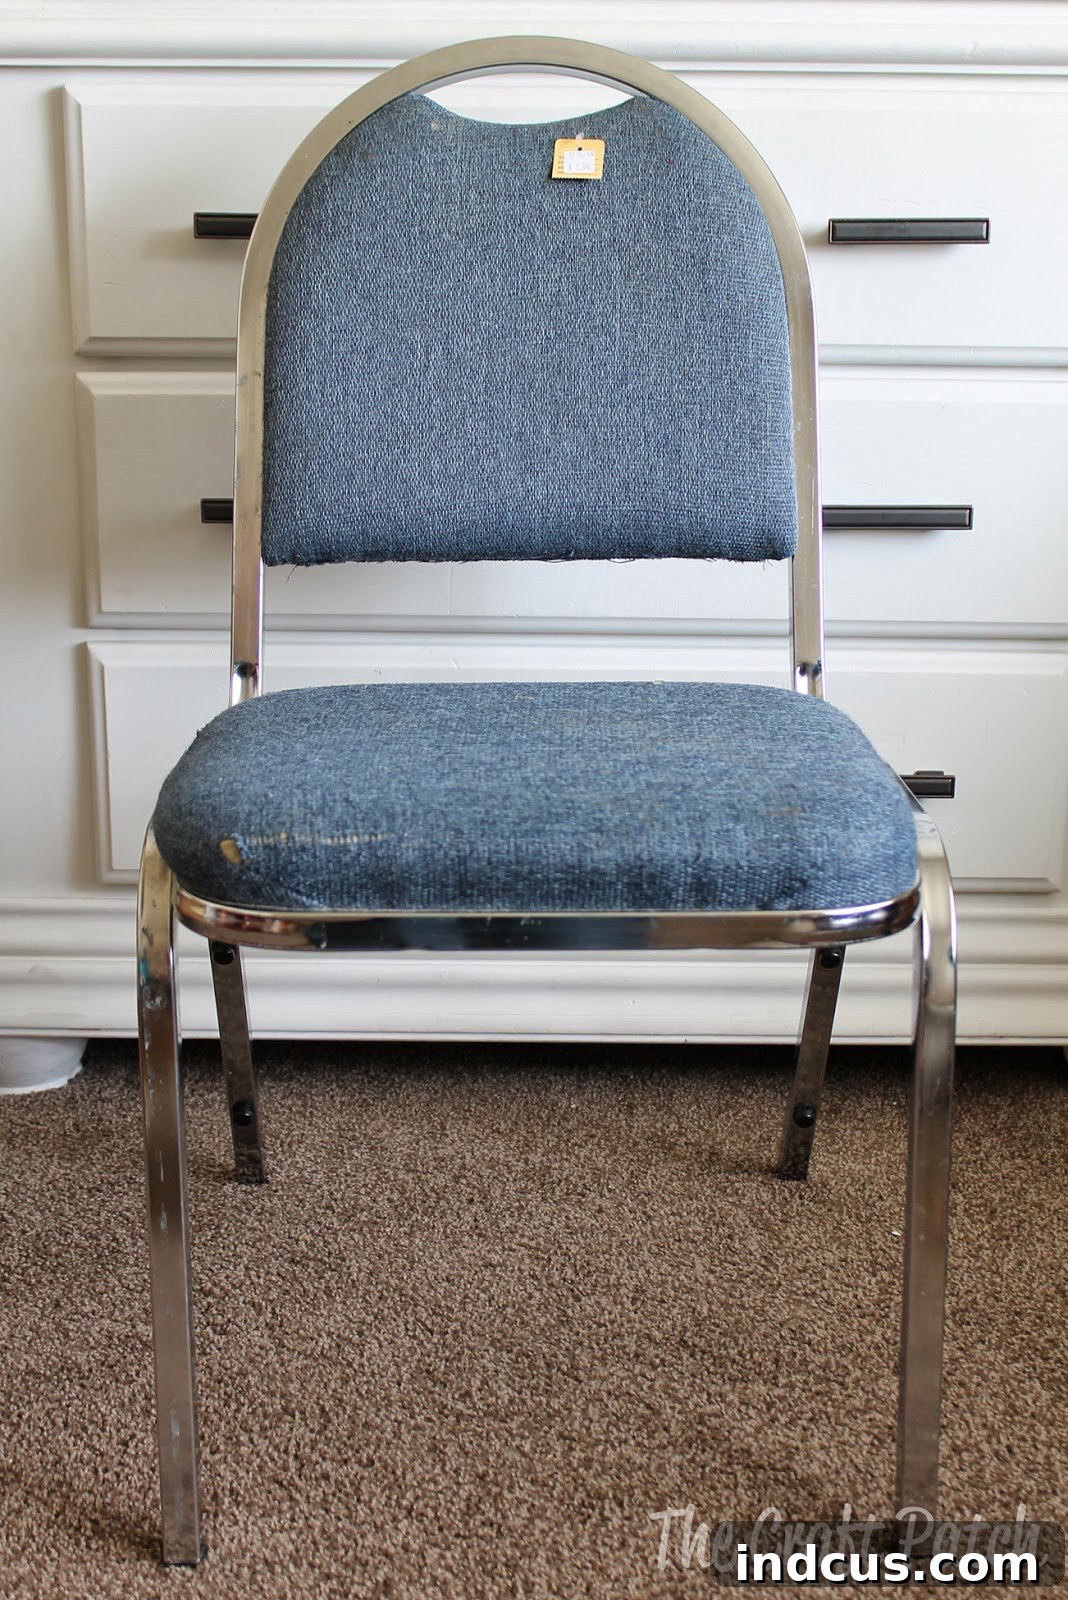
Upon closer inspection, the chair’s condition was, frankly, a bit disheartening. The existing fabric upholstery was severely dirty, marked with rips and tears that spoke volumes of its past life. The metal legs, once likely pristine, were splattered with old paint, adding to its overall sad and neglected appearance. It was far from the sleek, modern aesthetic I usually gravitate towards. Yet, despite its initial drawbacks, a significant factor swayed my decision: the price tag. A mere $1.99. For such a minuscule investment, the potential reward of breathing new life into this forgotten piece seemed too good to pass up. Moreover, beneath its worn facade, the chair possessed a sturdy frame and offered a surprisingly comfortable sit, proving its fundamental soundness. I decided then and there that for two dollars, it was worth bringing home and embarking on a transformative DIY journey to see what magic I could work.
Embarking on a DIY Upholstery Adventure
While my experience with reupholstering was limited – the closest I had come was crafting a new cover for my car seat years ago – the simplicity of this metal chair’s design suggested it would be an ideal beginner project. The basic structure, with its separate seat and back cushions, seemed straightforward enough for a novice like myself. I approached the task with an open mind and a willingness to learn, confident that even with minimal experience, I could give this thrift store find a much-needed facelift. The journey from “ugly duckling” to “chic statement piece” was about to begin.
Step 1: The Art of Disassembly and Staple Removal
The first crucial step in any successful reupholstering project is careful disassembly. I began by methodically unscrewing the backrest and seat cushion from the chair’s metal frame. This part usually requires a basic screwdriver and a careful hand, as you want to avoid stripping the screws or damaging the frame. Once the cushions were detached, the real challenge began: removing what felt like a “bazillion” staples. Over the years, countless staples had secured the old fabric, holding it firmly in place. This task requires patience, a good staple remover tool, and a pair of needle-nose pliers. Each staple must be painstakingly pried out to ensure a clean surface for the new upholstery. It’s a tedious process, but absolutely vital for achieving a smooth, professional finish. As I worked, I took mental notes (and a few quick photos) of how each piece was attached, anticipating the reassembly process.
Step 2: Crafting the New Fabric Pattern
With the old fabric meticulously removed, I had the perfect template for my new upholstery. Laying the old fabric pieces flat, I used them as precise patterns to cut out the new fabric. This method is incredibly helpful for beginners as it eliminates the guesswork of measuring and shaping. When selecting your new fabric, consider both aesthetics and durability. I was looking for something that would complement my workspace, be easy to clean, and hold up well to daily use. Ensuring the fabric is laid out correctly and cut accurately is paramount, especially if you’re working with a patterned material, as any slight misalignment can become very noticeable later on. Always check for the fabric’s grain and stretch direction to ensure a uniform look and fit.
Step 3: Sewing and Stapling the New Upholstery
Once the new fabric pieces were cut, I moved to my sewing machine. I carefully stitched the fabric together, mimicking the construction of the original covers. This step requires basic sewing skills, primarily straight seams. After the covers were sewn, it was time to attach them to the chair’s cushions. This is where a reliable staple gun becomes your best friend. The key to a smooth, wrinkle-free finish is to stretch the fabric tightly and evenly as you staple. I started by stapling the fabric in the middle of each side, then worked my way outwards, pulling firmly to eliminate any slack. Corners require extra attention, often needing a bit of folding and strategic stapling to create a neat, tailored look. Once both the seat and back cushions were impeccably covered, it was time for reassembly, putting everything back together in the reverse order of disassembly.
The Grand Reveal: A Stunning Transformation
And then, the moment of truth. After all the meticulous work, the chair had undergone a complete metamorphosis. It was no longer the sad, grimy “ugly duckling” I had brought home, but a vibrant, stylish piece ready for its new life. I had been torn between several gorgeous fabric choices at the store, but once I got the West Elm Honeycomb fabric home, I knew it was the absolute perfect selection. Its subtle geometric pattern and fresh color injected a modern, sleek vibe into the chair that was exactly what I had envisioned. The transformation was dramatic, elevating a forgotten thrift store find into a bespoke piece of furniture that perfectly complements my computer desk. It’s truly amazing how new fabric can completely revolutionize the look and feel of a simple metal chair.
Invaluable Lessons Learned from a First-Time Reupholstery Project
As with any DIY project, especially a first attempt, there are always valuable lessons to be learned along the way. My chair makeover, despite its successful outcome, was no exception. It taught me practical insights that I’m eager to share, ensuring your own upholstery journey is even smoother.
1. Label Everything Before Disassembly
One of my biggest revelations was the critical importance of labeling every single piece before taking anything apart. You might think you’ll easily remember how everything fits back together, especially on a seemingly simple chair. However, details can quickly become fuzzy. This particular seat cushion, for instance, had one side where the fabric subtly tapered. For some inexplicable reason, I incorrectly assumed this tapered edge was meant for the front of the chair. I proceeded to cut and sew the new cushion together based on this assumption, only to realize my mistake when I tried to reattach it. Unfortunately, I didn’t have any extra fabric to redo the cut, which explains why the pattern on my finished chair goes in two different directions – a happy accident, perhaps, but an accident nonetheless! If I had simply stuck a piece of masking tape labeled “THIS IS THE FRONT OF THE CHAIR” onto the original cushion, this rookie error would have been entirely avoidable. Always take photos and label, label, label!
2. Navigating Patterned Fabrics with Care
Working with fabrics that feature distinct patterns like stripes, geometrics, or prominent motifs can be quite challenging. While I carefully cut my fabric correctly, all the tugging and stretching required to achieve a smooth, flat surface during the stapling process caused the pattern to end up slightly crooked. Initially, this imperfection bugged me. My desire for a perfectly aligned pattern was strong. However, the thought of undoing a “bazillion” staples to fix a minor misalignment quickly diminished my perfectionist tendencies! Sometimes, embracing the slight quirks of a handmade item adds to its unique charm. For future projects with intricate patterns, extra care in alignment and more frequent checks during stapling will be essential.
3. The Invaluable Help of an Extra Pair of Hands
Reupholstering, especially the stapling phase, can be significantly easier with an assistant. I tackled this project solo, and while it was manageable, I quickly realized how much smoother and more efficient the process would have been with an extra set of hands. Having a friend, a spouse, or even an older child hold the fabric taut and in perfect alignment would have freed up both my hands to operate the staple gun with greater precision and force. I firmly believe that this collaborative approach would have also minimized some of the pulling and stretching that contributed to my fabric pattern appearing slightly crooked. Don’t be afraid to ask for help!
4. Prioritize Cleaning the Metal Frame
This point might seem like a no-brainer, but it’s an easily overlooked step. I made the mistake of not thoroughly cleaning the metal frame before reattaching the newly upholstered parts. As a result, removing years of accumulated dirt and stubborn paint splatters from the nooks and crannies of the assembled chair became exponentially harder. It’s far more efficient to clean the bare frame when it’s disassembled and all surfaces are easily accessible. A good scrub with appropriate cleaners (degreasers for grease, paint removers for splatters, and general-purpose cleaners for dirt) will ensure your restored piece looks flawless from top to bottom.
5. Reupholstering is Absolutely Doable!
Perhaps the most empowering lesson of all is that reupholstering is an entirely achievable DIY project for almost anyone. You don’t need a workshop full of specialized tools. The essentials are quite basic: a sewing machine (for the fabric covers), a sturdy staple gun, needle-nose pliers (for staple removal), and a screwdriver. Think of it as a reverse puzzle: you carefully take all the pieces apart, and then you meticulously put them back together again, albeit with a fresh new look. The dramatic difference that new fabric made for my simple metal chair is truly astounding. It has not only given me a beautiful, custom desk chair for a fraction of the cost of buying new, but it has also instilled a significant boost of confidence. This successful first project has ignited a desire to tackle something more complex in the future, perhaps even a charming wing-back chair or a set of dining chairs. The possibilities for creative, budget-friendly home decor are endless!
The Budget-Friendly Chair Makeover: A Cost Breakdown
One of the most satisfying aspects of this DIY reupholstery project is the incredibly low cost involved. I purchased 2/3 yard of the West Elm Honeycomb fabric, though in hindsight, I probably could have managed with just 1/2 yard. The chair itself was a steal at $1.99, and the fabric cost approximately $7. This means I walked away with a “brand new” custom-designed chair for an astonishing total of just $9. This kind of value and personalization is simply unmatched by retail options, making DIY upholstery a smart choice for savvy decorators.
What’s Next on the DIY Agenda?
The success and satisfaction derived from this metal chair transformation have inspired me to look at other neglected pieces in my home with a fresh perspective. I’m already eyeing our padded folding chairs, imagining the possibilities for a similar fabric refresh. Reupholstering is not just about saving money; it’s about injecting personality, extending the life of beloved items, and gaining immense satisfaction from creating something beautiful with your own hands. So, if you’ve been considering tackling an upholstery project, I encourage you to take the plunge. You might just surprise yourself with what you can create!