Elevate Your Home Decor: Crafting an Easy & Elegant Metallic Geometric Vase
As the vibrant hues of spring begin to emerge, bringing with them the promise of longer days and blooming gardens, many of us feel a renewed desire to refresh our living spaces. While the last remnants of winter ice cling to driveways and the final snowfalls make their appearance, my thoughts turn to the beauty that spring flowers will soon bring indoors. To celebrate this much-anticipated season and infuse my home with a touch of modern elegance, I embarked on a delightful DIY project: creating a unique vase. My criteria for this craft were simple yet specific: it had to be distinctive, possess an opaque finish (no worries about unsightly stems or the need for elaborate fillers!), and most importantly, be incredibly inexpensive. The result exceeded all expectations, delivering a sophisticated decor piece that looks far more costly than its actual price tag.
Discover the Allure of Modern Metallic Decor
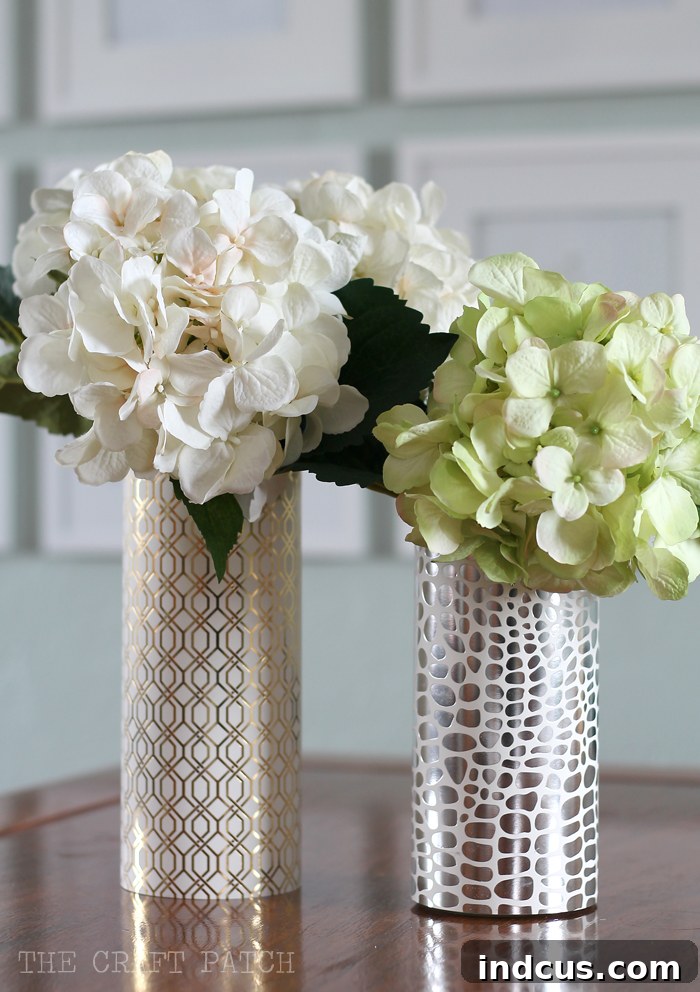
Isn’t it captivating? There’s something inherently luxurious about metallic finishes, and when combined with a clean, geometric pattern, the entire piece exudes an ultra-modern aesthetic. As a self-proclaimed aficionado of all things metallic, I was thrilled with how this project turned out. What makes this DIY even more remarkable is its astonishing simplicity. You might imagine that such a chic item would require intricate steps or specialized tools, but you’d be pleasantly surprised. This entire transformation took me a mere five minutes to complete from start to finish. Yes, you read that right – five minutes! This quick craft proves that you don’t need to spend a fortune or devote an entire afternoon to elevate your home decor with stylish, on-trend pieces.
Why Choose an Opaque Vase? Practicality Meets Style
One of my non-negotiable requirements for this DIY vase was its opacity. This preference isn’t merely an aesthetic choice; it’s incredibly practical. Clear glass vases, while beautiful, often present a challenge: how to hide the unsightly stems of your flowers or plants? Whether you’re displaying fresh blooms or artificial arrangements, the interior of a clear vase can sometimes detract from the overall beauty. An opaque vase, on the other hand, elegantly conceals the stems, allowing the focus to remain solely on the vibrant blossoms or greenery. This also eliminates the need for elaborate fillers like decorative stones, marbles, or gel beads, simplifying your floral arrangements and saving you time and money. The sleek, uninterrupted surface of an opaque vase also contributes to a cleaner, more contemporary look, making it a versatile choice for a wide range of interior styles.
The Inspiration: Geometric Patterns and Glimmering Metallics
The decision to combine metallic finishes with a geometric pattern was driven by current design trends and my personal style. Geometric patterns have a timeless appeal, bringing structure and visual interest to any space without being overwhelming. When paired with the reflective quality of metallic gold, they create a dynamic interplay of light and shadow, adding depth and sophistication. This combination is particularly effective in modern and contemporary interiors, but it can also provide a striking contrast in more traditional settings, injecting a fresh, updated feel. The gold metallic hue specifically adds a touch of warmth and luxury, making this vase a perfect accent for various color palettes, from cool neutrals to rich jewel tones.
Gather Your Simple Supplies: High Style on a Low Budget
The beauty of this project lies not only in its stunning outcome but also in its accessibility. The materials required are few, readily available, and incredibly budget-friendly, proving that luxurious decor doesn’t have to come with a hefty price tag. Here’s what you’ll need to create your own:
- A Straight-Sided Vase: My journey began with a simple, straight-sided glass vase, which I picked up from a dollar store. The key here is to choose a vase with straight sides, as this makes the wrapping process much easier and ensures a smooth, seamless finish. Dollar stores are treasure troves for basic glasswares that serve as perfect canvases for DIY projects. Look for cylindrical or rectangular shapes for the best results.
- Metallic Scrapbook Paper: The transformative element of this project is a stack of metallic gold scrapbook paper. I found mine at Michaels, but any craft store will carry a wide variety of metallic papers in different colors and patterns. Opt for paper with a good weight and a consistent metallic sheen. Gold is classic, but don’t hesitate to experiment with silver, rose gold, copper, or even patterned metallics for a different look. The geometric design on my chosen paper instantly added that modern edge I was looking for.
- Strong Adhesive: While the original craft used tape, for enhanced durability and a professional finish, I recommend using a strong double-sided tape specifically designed for crafting, or a high-quality craft glue. This ensures the paper adheres securely and smoothly to the vase, preventing any lifting or bubbling over time.
- Scissors or Craft Knife: For precise cutting of your paper. A craft knife with a cutting mat will give you the cleanest, straightest edges.
- Ruler: Essential for accurate measurements, ensuring your paper fits the vase perfectly.
A plain, unassuming vase, ready for its glamorous transformation.
The metallic gold paper from Michaels, the secret ingredient for an upscale look.
Step-by-Step Tutorial: Crafting Your Elegant Vase in Minutes
This is where the magic happens, and frankly, it’s almost embarrassingly simple. The speed and ease with which you can transform a plain dollar store vase into a designer-inspired centerpiece are truly astounding. You’ll be finished before you know it, with a stunning piece of decor ready to display.
Step 1: Prepare Your Vase
Before you begin, ensure your glass vase is clean and dry. Any dust, fingerprints, or water spots could affect the adhesion of your paper. A quick wipe-down with glass cleaner or rubbing alcohol will do the trick, ensuring a pristine surface for your metallic wrap.
Step 2: Measure and Cut Your Metallic Paper
Using your ruler, measure the height of your vase and the circumference. You’ll want to cut your metallic scrapbook paper to these dimensions. For the height, aim for it to be exactly the same as the vase, or slightly shorter if you prefer a small rim of glass exposed at the top. For the width, measure the circumference of your vase and add about a quarter to half an inch (0.5 to 1 cm) for a slight overlap, which will help create a clean seam. Precision here is key for a professional finish. Use a craft knife and cutting mat for the cleanest, straightest cuts, or sharp scissors if preferred.
Step 3: Wrap and Secure the Paper
Now for the main event! Lay your cut metallic paper flat with the patterned side facing down. Apply your chosen adhesive (double-sided tape or craft glue) along one of the shorter edges, and also along the longer edges that will meet the top and bottom of the vase. Carefully align one non-adhesive short edge of the paper with a seam or inconspicuous side of your vase, ensuring the top and bottom edges are perfectly flush with the vase’s rim. Slowly and smoothly wrap the paper around the vase, pressing firmly as you go to eliminate air bubbles and wrinkles. When you reach the starting point, overlap the adhesive edge over the non-adhesive edge, pressing down firmly to secure. Take your time to ensure a smooth, taut finish all around. The goal is to make it look like a seamless part of the vase, not just paper wrapped around it.
The transformation is complete! A few simple steps, and you have a stunning piece of home decor.
The Stunning Transformation: A High-End Look for Almost Nothing
Isn’t the result absolutely gorgeous? It truly looks like a sophisticated, high-end vase that you might find in a boutique home goods store, yet it cost me almost nothing to create. The metallic sheen catches the light beautifully, and the geometric pattern provides a modern edge that elevates any space. This project is a testament to the power of creative thinking and the incredible potential of humble, inexpensive materials. You no longer have to compromise on style when you’re decorating on a budget; with a little ingenuity, you can craft pieces that rival their luxury counterparts.
I am eagerly anticipating the arrival of fresh tulips in a few more months to fill this beautiful creation. Imagine the vibrant pinks, yellows, or reds of spring tulips set against the shimmering gold and sharp lines of the geometric pattern – won’t they look absolutely fabulous? The opaque nature of the vase means the focus will be entirely on the blooms, creating a striking visual impact.
Versatility Beyond Spring: Decorating Ideas for Every Occasion
While I initially conceived this vase for my spring decor, its elegant design and versatile metallic finish make it suitable for a myriad of other occasions and settings. This isn’t just a seasonal piece; it’s a timeless accent that can enhance various celebrations and interior styles throughout the year.
Wedding Centerpieces: Glamour on a Budget
These DIY metallic geometric vases would be absolutely perfect for wedding centerpieces. If you’re planning a wedding and looking for ways to cut costs without sacrificing style, this project is a dream come true. Imagine rows of these glittering vases adorning guest tables, filled with delicate roses, lush hydrangeas, or elegant greenery. They lend themselves beautifully to modern, minimalist, art deco, or even glamorous wedding themes. The ability to customize the paper color (silver for a cooler palette, rose gold for a romantic touch) allows them to seamlessly integrate into any wedding aesthetic, providing a high-end look that belies their humble origins.
Party Decor: An Instant Upgrade
Beyond weddings, these vases are ideal for any glamorous party or special event. Hosting a birthday celebration, an anniversary dinner, a bridal shower, or even a sophisticated New Year’s Eve gathering? These vases can instantly elevate your party decor. Use them to hold flowers, elegant branches, or even as purely decorative elements on a mantelpiece or side table. Their striking appearance makes them fantastic conversation starters and adds a touch of bespoke charm that store-bought items often lack.
Everyday Home Styling: A Touch of Modern Luxury
Don’t relegate these beautiful vases solely to special occasions. They are robust and stylish enough to be a permanent fixture in your home decor. Place one on your living room coffee table to anchor a collection of books, on your dining table as a continuous centerpiece, or on a bedroom dresser to add a touch of sparkle. They can even dress up a home office or entryway console. The metallic and geometric combination works well with various decorative styles, from minimalist and Scandinavian to industrial chic and eclectic. Pair them with contrasting textures like wood, concrete, or plush fabrics to create a visually rich and interesting vignette.
Customization and Creative Variations: Make It Uniquely Yours
The beauty of DIY lies in its potential for personalization. While the gold geometric pattern is undeniably chic, this project offers endless possibilities for customization. Don’t be afraid to experiment and make these vases truly reflect your personal style and decor scheme.
- Color Palette: Instead of gold, try silver for a cooler, sleeker look, or rose gold for a softer, more romantic vibe. Copper metallics offer a warm, earthy appeal. You could even use matte-finished papers in bold solid colors or subtle pastels for a completely different aesthetic.
- Pattern Play: The world of scrapbook paper is vast! Explore different patterns – stripes for a classic look, polka dots for a playful touch, or abstract designs for an artistic statement. You can even cut your own shapes from plain metallic paper using stencils or a craft cutter to create unique patterns like chevrons, hexagons, or even your initials.
- Material Alternatives: Beyond scrapbook paper, consider other materials. Adhesive vinyl (contact paper) comes in an incredible array of colors, patterns, and finishes, including metallics, and offers increased durability. Textured papers, fabrics with a metallic sheen, or even thin leatherette sheets could also provide interesting results.
- Embellishments: For an extra touch of flair, consider adding embellishments. A thin satin ribbon tied around the neck of the vase, a small charm glued to the front, or even hand-painted details (if using a solid paper) can further personalize your creation.
Care for Your DIY Masterpiece
To ensure your metallic geometric vase remains a beautiful accent for a long time, proper care is essential. Since the paper is not waterproof, it’s best to avoid submerging the vase in water. When cleaning, simply wipe the exterior with a dry or slightly damp cloth to remove dust. If you’re using fresh flowers, change the water carefully, ensuring no spills run down the outside of the vase to saturate the paper. With a little care, your handmade vase will continue to sparkle and delight for seasons to come.
Start Your Spring Decor Journey Today!
This simple DIY metallic geometric vase project offers an incredibly satisfying way to refresh your home decor, welcome the spring season, or create stunning centerpieces for any event. It’s quick, cost-effective, and yields a beautifully modern piece that looks far more expensive than it is. So, why wait? Gather your supplies, unleash your creativity, and craft your own elegant vase. You’ll be amazed at what you can achieve in just five minutes. Share your creations and inspire others to add a touch of DIY glamour to their lives!