Easy & Festive Chocolate Covered Wafer Cookies: The Ultimate St. Patrick’s Day Treat!
Are you searching for a delightful, eye-catching, and incredibly simple treat that’s perfect for any celebration, especially St. Patrick’s Day? Look no further! Today, we’re diving into the wonderful world of chocolate-covered wafer cookies. These aren’t just any cookies; they are an instant crowd-pleaser that transform a humble store-bought wafer into an elegant, gourmet-like dessert with minimal effort. The magic truly happens when you introduce a vibrant coating of chocolate, elevating the crunchy, light wafer to an entirely new level of deliciousness and visual appeal.
Why Chocolate Covered Wafer Cookies Are a Must-Try for Your Next Celebration
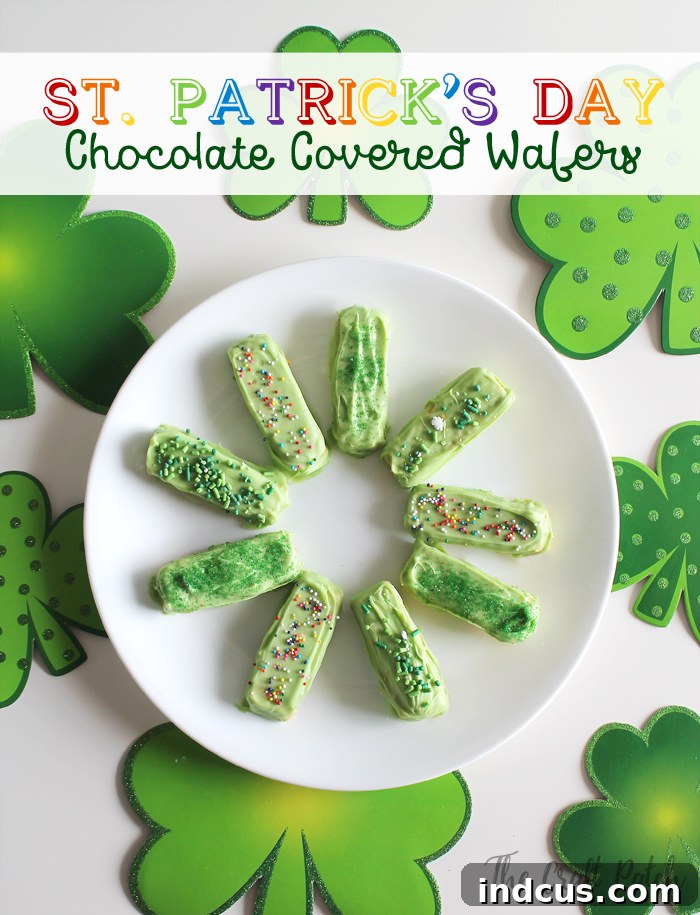
The beauty of chocolate covered wafer cookies lies in their incredible versatility and undeniable charm. They are remarkably easy to customize for any holiday or theme, making them a go-to recipe for busy hosts and sweet-tooth enthusiasts alike. For St. Patrick’s Day, opting for a festive green melting chocolate instantly infuses a playful spirit, turning these simple wafers into enchanting little masterpieces. The contrast between the crisp wafer and the smooth, rich chocolate creates an irresistible texture combination that will have everyone reaching for more.
Beyond their ease and visual appeal, these homemade wafer cookies offer a fantastic way to enjoy a gourmet-tasting treat without the complexity or cost associated with elaborate baking. They are an excellent project for involving kids in the kitchen, fostering creativity, and making cherished memories. Plus, who can resist a treat that looks this good and tastes even better?
Crafting Your St. Patrick’s Day Chocolate Wafer Delights: A Simple Guide
Ready to embark on this delightful culinary adventure? The process is wonderfully straightforward, requiring just a few key ingredients and a sprinkle of enthusiasm. Here’s everything you’ll need to create your own batch of festive chocolate covered wafer cookies.
Ingredients for Your Festive Wafer Cookies:
- 1 Package Sugar Wafers: Opt for classic vanilla wafers for a neutral base that pairs perfectly with any chocolate flavor.
- 1 Package Green Melting Chocolate: Specifically chosen for St. Patrick’s Day, but feel free to experiment with other colors for different occasions (e.g., white, milk, dark, or other colored candy melts).
- Sprinkles: Rainbow, green, or gold sprinkles are ideal for a St. Patrick’s Day theme. Consider various shapes like shamrocks or gold coins to add extra flair.
Step-by-Step Instructions: Mastering the Art of Chocolate Dipped Wafers
1. Perfecting Your Melting Chocolate
The foundation of these delicious treats is perfectly melted chocolate. Place your green melting chocolate (or candy melts) into a microwave-safe bowl. Heat the chocolate in 30-second intervals, stirring thoroughly after each interval. It’s crucial not to overheat the chocolate, as this can cause it to seize or become grainy. Continue this process until the chocolate is completely melted and beautifully smooth, with a consistent, pourable consistency.
Pro Tip for Success: Keep Your Chocolate Warm!
One of the most frustrating aspects of working with melting chocolate is how quickly it can cool and harden, forcing you to constantly reheat it. Here’s a game-changing tip: warm up a rice bag or a low-setting heating pad. Place your bowl of melted chocolate directly on top of this warm surface. This simple trick will keep your chocolate wonderfully warm and pliable for an extended period, allowing you to dip all your wafers without interruption. This ensures a consistent, smooth coating for every single cookie, significantly streamlining the process and reducing stress.
I can personally attest to the effectiveness of this method; I was able to coat an entire package of wafers without needing to reheat my chocolate once! If you’ve ever battled with rapidly hardening chocolate, you’ll understand just how revolutionary this simple trick can be for making homemade wafer cookies.
2. Coating Your Delicate Wafers
While traditional dipping is an option, I found that for the delicate structure of wafer cookies, a spreading method works best. Gently spread the melted chocolate onto the wafer cookies using a small spatula, knife, or even the back of a spoon, much like you would frost a cake. This technique provides greater control, minimizes breakage, and ensures a uniform, elegant coating. You can cover the entire wafer or get creative with partial coatings, dipping just one end for a chic, minimalist look.
3. The Magic of Sprinkles
The timing for adding sprinkles is crucial! As soon as you’ve coated a wafer in chocolate, immediately add your chosen sprinkles. The chocolate hardens relatively quickly, so act fast to ensure the sprinkles adhere properly. Don’t be shy – a generous dusting of sprinkles adds both visual appeal and a delightful textural contrast. Once sprinkled, gently place the coated wafers on parchment paper or a silicone mat to set. Allow them to set completely at room temperature or, if you’re in a hurry, pop them in the refrigerator for 10-15 minutes.
And that’s it! In just a few simple steps, you’ve created a festive, delicious, and incredibly easy treat that’s guaranteed to impress. These chocolate covered wafer cookies are so versatile, you’ll find yourself wanting to adapt them for every holiday and special occasion throughout the year!
Creative Variations and Serving Suggestions
Dipping Styles: Full Coverage vs. Partial Elegance
While fully coating the wafer offers a complete chocolate experience, dipping just one end can create a sophisticated, minimalist look. This partial dip method is particularly charming when showcasing the original wafer beneath or when you want to offer a lighter chocolate touch. It’s a fantastic way to vary the presentation on a dessert platter. Experiment with diagonal dips or even a simple half-dip for different aesthetic appeals.
Beyond St. Patrick’s Day: Endless Customization Possibilities
The beauty of this easy dessert recipe lies in its adaptability. You can effortlessly switch out the chocolate color and sprinkles to match any holiday or theme:
- Christmas: Red and green chocolate with festive snowflake or candy cane sprinkles.
- Valentine’s Day: Pink or red chocolate with heart-shaped sprinkles.
- Easter: Pastel-colored chocolates with bunny or egg sprinkles.
- Birthday Parties: Any color chocolate matching the party theme, adorned with rainbow or themed sprinkles.
- Everyday Treat: Classic milk or dark chocolate with simple chocolate shavings or a drizzle of contrasting white chocolate.
Consider adding a tiny drop of food-grade essential oil (like peppermint or orange) to your melted chocolate for an extra burst of flavor, or sprinkle with crushed nuts or dried fruit for added texture. Your imagination is the only limit when it comes to decorating these delightful homemade wafer cookies!
Which sprinkle color is your favorite? The rainbow colored sprinkles always bring a smile to my face, offering a cheerful contrast to the green chocolate. But metallic gold sprinkles would also be absolutely stunning for a St. Patrick’s Day theme, evoking thoughts of a pot of gold at the end of the rainbow!
Frequently Asked Questions About Chocolate Covered Wafer Cookies
Q: Can I use regular chocolate chips instead of melting chocolate?
A: While you can, melting chocolate (also known as candy melts or confectionery coating) is specifically designed to melt smoothly and harden quickly without tempering. Regular chocolate chips often require tempering to achieve a glossy finish and prevent blooming, which can be more complex for beginners. For best results and ease, especially for this simple cookie recipe, stick to candy melts.
Q: How long do these chocolate covered wafer cookies last?
A: When stored in an airtight container at room temperature, these cookies can last for up to 1-2 weeks. To maintain their crispness and fresh taste, avoid refrigerating them unless your environment is very warm, as refrigeration can sometimes make the wafers a bit soft.
Q: Can I make these treats ahead of time for a party?
A: Absolutely! These festive cookies are perfect for making in advance. Prepare them a day or two before your event and store them in an airtight container. This makes party preparation much less stressful!
Q: My chocolate is too thick/thin. What should I do?
A: If your melting chocolate is too thick, you can add a tiny bit of shortening (like Crisco) or a specialized chocolate thinning agent, stirring well until it reaches the desired consistency. If it’s too thin, unfortunately, it’s harder to thicken without adding more solid chocolate, so it’s best to avoid over-thinning.
Q: What other toppings can I use besides sprinkles?
A: The possibilities are endless! Consider finely crushed nuts (pistachios for green!), shredded coconut, mini chocolate chips, a drizzle of contrasting colored chocolate, edible glitter, or even a dash of sea salt for a sweet and salty twist.
Conclusion: Your Go-To Easy Dessert Recipe
There you have it – a wonderfully simple, incredibly versatile, and absolutely delicious recipe for chocolate covered wafer cookies. Whether you’re celebrating St. Patrick’s Day, a birthday, or simply craving a sweet treat, these festive cookies are sure to bring joy. Their ease of preparation, combined with their impressive appearance and delightful taste, makes them a perfect addition to any baker’s repertoire. So, gather your ingredients, get creative with your sprinkles, and enjoy crafting these charming little confections. Happy dipping!