Have you ever embarked on the exciting journey of creating a classic pillowcase dress, only to find the finished product didn’t quite live up to your expectations? Many aspiring sewers, myself included, have experienced this common scenario. I vividly recall my first attempt: full of anticipation, I followed a basic tutorial, envisioning an adorable garment for my slender little girl. The reality? A somewhat disheartening, shapeless sack that completely swallowed her delicate frame. It was far from the cute, flattering look I had hoped for, leaving me a bit discouraged about the whole “easy pillowcase dress” concept.
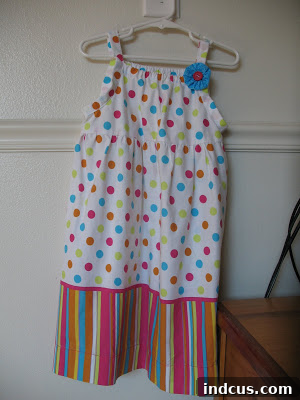
However, the allure of a simple, upcycled dress remained strong. My determination was rekindled during a visit to a local thrift store, where I stumbled upon a truly delightful pillowcase. Its vibrant pattern and soft fabric immediately sparked a renewed vision. I knew, without a doubt, that this particular pillowcase was destined to become a fantastic dress. But this time, I was determined to avoid the previous pitfall of a boxy fit. So, armed with newfound inspiration, I revisited the basic pillowcase dress concept – like the excellent tutorial often found HERE – but committed to a crucial modification. The result? This charming, perfectly shaped dress:
The secret to transforming that potentially shapeless silhouette into a beautifully fitted garment lay in a surprisingly simple alteration: adding a defined, gathered waist. Instead of a single, continuous tube of fabric, I created a distinct bodice and skirt. I intentionally made the bottom rectangle of fabric (the skirt portion) significantly wider than the top bodice part of the dress. This thoughtful design choice provided ample room for gathering, which, when sewn, created that lovely, flattering cinch at the waistline. It’s a remarkably straightforward technique, yet its impact on the dress’s overall shape and appeal is absolutely profound.
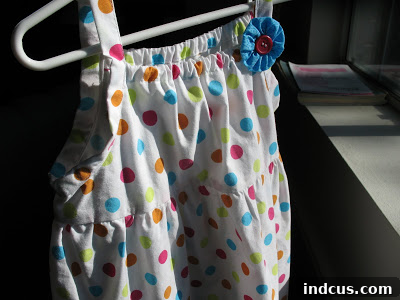
Take a closer look at the bodice section of the dress in the images above. You can clearly see how much better and more defined it looks with the strategic addition of the waistline. It truly makes all the difference, elevating a simple pillowcase project into something that looks professionally made. And perhaps the most exhilarating detail for any budget-conscious crafter? The total cost of this adorable, custom-fitted dress was an astonishing $1! Yes, you read that right. This project proves that stunning fashion doesn’t have to come with a hefty price tag.
The Common Dilemma: Why Many Pillowcase Dresses Fall Flat
The standard pillowcase dress tutorial is a staple for beginner sewers, celebrated for its simplicity and the joy of upcycling. The appeal is undeniable: take an ordinary pillowcase, add a few cuts, some straight seams, and a couple of straps, and voilà – an instant dress! It’s touted as a quick, easy, and affordable way to make children’s clothing. Parents and crafters are drawn to the idea of repurposing textiles, giving new life to forgotten linens, and saving money on expensive patterns and fabrics.
However, the simplicity often comes at a cost: the silhouette. Many traditional pillowcase dresses, while undeniably easy to construct, tend to hang straight down from the shoulders, creating a rather boxy, shapeless, and sometimes unflattering tunic-like garment. For children with slender builds, this can mean the dress looks baggy or like a sack, completely obscuring their natural shape. For others, it might just lack that tailored, “finished” look that makes an outfit truly special. This common aesthetic issue can be disheartening, especially when you’ve invested time and effort into creating something beautiful.
A Second Chance: The Thrift Store Inspiration That Sparked a Better Idea
My journey to perfecting the pillowcase dress began, as many great creative endeavors do, with a stroke of serendipity at a local thrift store. It wasn’t just any pillowcase; it was *the* pillowcase. Adorned with a vibrant, charming pattern and crafted from a soft, breathable cotton, it practically called my name from the overflowing linen bin. I instantly envisioned its potential, seeing past its current life as bedding and straight to its future as a delightful garment. The vivid print and quality of the fabric convinced me that it deserved a second chance, and so did my dream of a perfect pillowcase dress.
This particular find wasn’t just pretty; it was a catalyst. It pushed me to think beyond the conventional. I knew I couldn’t simply make another shapeless dress. This beautiful fabric deserved more. It spurred me to research, to reconsider, and ultimately, to innovate. The goal was clear: utilize the ease and affordability of the pillowcase concept, but infuse it with a design element that would guarantee a flattering and stylish outcome. This thrift store gem became the motivation behind tackling the common “sack” problem head-on and developing a simple yet effective modification.
From Basic to Beautiful: The Gathered Waist Transformation Explained
The core of this improved DIY pillowcase dress lies in a single, smart modification: introducing a gathered waistline. This technique breaks away from the traditional single-piece construction, elevating the dress from a simple tunic to a charming, well-defined garment. Instead of just cutting armholes and sewing sides, we introduce a separation, creating a distinct bodice and skirt, with the magic happening where they meet.
Understanding the Core Modification for a Flattering Fit
Imagine your pillowcase. In the basic design, you might cut armholes near the top and then just sew down the sides. For our gathered waist version, we approach it differently. We mentally (or physically, with chalk) divide the pillowcase into two main sections: an upper “bodice” part that will cover the chest area, and a lower “skirt” part. The key insight is that the skirt section will be cut to be *wider* than the bodice section. This excess width in the skirt is what we’ll “gather” – essentially scrunching it up evenly – to match the narrower width of the bodice. When these two pieces are sewn together, the gathers create a beautiful fullness in the skirt while defining the waist, giving the dress shape and movement.
This technique is a cornerstone of garment construction, commonly used in many commercial patterns to add volume and flair to skirts or sleeves. By applying it to a pillowcase dress, we transform a very rudimentary design into something that looks thoughtfully constructed and more sophisticated. The gathered waist not only enhances the aesthetic appeal but also provides comfort and room for a child to move and play freely, without feeling restricted by a tight or poorly fitting garment.
Step-by-Step: Crafting Your Own Gathered Waist Pillowcase Dress
Ready to create your own charming, custom-fitted pillowcase dress? Here’s a conceptual guide to help you through the process. Remember, precise measurements will depend on the size of your pillowcase and the child you’re sewing for. Always measure twice, cut once!
- Preparation is Key: Begin by thoroughly washing and ironing your chosen pillowcase. This pre-shrinks the fabric and ensures a smooth, wrinkle-free surface for cutting and sewing. Gather your basic sewing supplies: sewing machine, thread, scissors, pins, measuring tape, and fabric chalk.
- Defining the Bodice: Lay your pillowcase flat. Determine the desired length for the bodice section. This usually extends from the top of the chest down to just above the natural waistline. Cut across the pillowcase to separate the top section (your future bodice) from the rest. The width of this bodice piece will be the original width of your pillowcase.
- Crafting the Skirt Panel: Now, take the remaining larger piece of the pillowcase. This will form your skirt. You’ll want it to be significantly wider than your bodice piece – aim for at least 1.5 to 2 times the width of the bodice for good gathers. If your pillowcase isn’t wide enough, you might need to add side panels from a coordinating fabric, or simply accept slightly less full gathers. The length of the skirt will determine the overall dress length. The existing hem of the pillowcase can often be used as the skirt hem, saving you a step!
- Side Seams First: Fold both your bodice piece and your skirt piece in half lengthwise (right sides together). Sew up the side seams of each piece independently. For the bodice, you’ll also need to cut out the armholes. You can use an existing child’s dress as a template, or simply freehand a gentle curve. Finish these raw edges with a zig-zag stitch or serger.
- Creating Comfortable Straps: You’ll need two straps for the dress. These can be made from leftover pillowcase fabric, bias tape, or ribbon. Cut two strips of fabric, about 2 inches wide and 18-24 inches long (adjust for desired length and ties). Fold them in half lengthwise, right sides together, stitch, turn right side out, and press.
- The Magic of Gathering: This is where the transformation happens. Along the top edge of your skirt piece, sew two parallel rows of basting stitches (long, loose stitches) within the seam allowance. Leave long thread tails at both ends. Gently pull the bobbin threads from both rows simultaneously, gathering the fabric evenly until the skirt’s top edge matches the width of the bodice’s bottom edge. Distribute the gathers evenly.
- Joining Bodice and Skirt: With right sides together, align the gathered top edge of the skirt with the bottom edge of the bodice. Pin carefully, ensuring the gathers remain even and the side seams match up. Stitch securely, then remove your basting stitches. Finish this seam with a zig-zag stitch or serger to prevent fraying.
- Finishing Touches: Hem the top edge of the bodice if you haven’t already. Attach your straps to the front and back of the bodice. You can sew them securely in place, or create buttonholes and use buttons for adjustable straps. Finally, press all your seams neatly for a professional finish.
Benefits Beyond Beauty: Why This Modification is a Must-Try
Beyond the immediate visual improvement, incorporating a gathered waist into your upcycled pillowcase dress offers a multitude of practical and aesthetic benefits that make it a truly worthwhile endeavor.
A Flattering Silhouette for Every Child
The most obvious advantage is the enhanced silhouette. A gathered waist creates a defined shape that gently cinches in, then flows out, providing a more flattering and sophisticated look than the typical straight-cut design. This allows the dress to accentuate a child’s natural form rather than hiding it, making even a simple fabric choice look elegant. The gathers add volume and movement to the skirt, giving it a playful twirl-factor that children absolutely adore.
Furthermore, this design offers a degree of flexibility in fit. The gathered skirt provides ample room for growth and movement, making the dress comfortable for active children and extending its wearability as they grow. It’s a design that feels less restrictive and looks far more intentional than its simpler counterpart.
Unleash Your Creativity: Customization and Styling Opportunities
A dress with a defined waist is also much easier to accessorize and style. You can add a decorative sash, a belt, or even sew on embellishments like appliques or embroidery directly onto the bodice or skirt. The clear distinction between the top and bottom sections invites creativity, allowing you to play with different fabric combinations if you’re piecing materials together, or to highlight a specific pattern on the pillowcase itself.
This design also lends itself well to layering. In cooler weather, it can be worn over a long-sleeved shirt with leggings, transforming it into a versatile year-round garment. In warmer months, it stands alone as a breezy, comfortable dress. The possibilities for personalizing and adapting the look are endless, making each gathered waist pillowcase dress a unique expression of style.
Thrifting Smart: Finding Your Perfect Pillowcase for Upcycling
The foundation of a great pillowcase dress starts with the right pillowcase. Thrift stores, garage sales, and even your own linen closet are treasure troves waiting to be explored. But not all pillowcases are created equal when it comes to sewing projects.
- Fabric Quality: Look for 100% cotton pillowcases. They are easy to sew, breathable, and hold up well to washing and wearing. Avoid blends that are too stiff, slippery (like satin), or stretchy, as these can be more challenging for beginners.
- Print and Pattern: This is where the fun begins! Choose a pattern that you love and that would look good on a child’s dress. Floral prints, whimsical characters, stripes, or simple geometric designs all work wonderfully. Consider the scale of the print – a large print might get cut off oddly, while smaller, all-over prints are usually safer.
- Condition: Always inspect for stains, holes, or excessive wear. While a small stain might be cut around, significant damage means it’s not worth the effort. Check the integrity of the fabric itself.
- Size: A standard or queen-sized pillowcase is generally ideal for a child’s dress, providing enough fabric for both the bodice and the wider skirt. King-sized pillowcases offer even more fabric for fuller skirts or larger sizes.
Don’t limit yourself to just pillowcases! Flat sheets, duvet covers, or even men’s button-down shirts can be fantastic sources of fabric for upcycled children’s clothing. Keep an open mind and a keen eye for potential!
The Ultimate Beginner-Friendly Sewing Project: Why This Is For You
If you’re new to sewing, or looking for a project that offers a high reward for relatively low effort, the gathered waist pillowcase dress is an excellent choice. Here’s why:
- Straight Seams Galore: The vast majority of sewing involves straight lines, making it perfect for practicing your basic machine skills.
- Minimal Pattern Pieces: You’re working with essentially two main rectangles (bodice and skirt) plus straps. No complex pattern cutting or fitting.
- Low-Cost Materials: With a $1 pillowcase, the financial risk is minimal. You can experiment, make mistakes, and learn without the pressure of ruining expensive fabric.
- Quick Gratification: This project can often be completed in a single afternoon, providing that satisfying sense of accomplishment quickly.
- Skill Building: You’ll practice cutting, straight stitching, gathering, and attaching seams – fundamental skills that will serve you well in future sewing projects.
The $1 Dress: Unbeatable Value and Sustainable Style
Reiterating the incredible cost-effectiveness, this particular dress came in at a grand total of $1. This figure is not just impressive; it highlights the immense value of upcycling and DIY projects. When you consider the cost of purchasing a similar quality, unique, and comfortable dress from a retail store, the savings are substantial. This project truly embodies budget-friendly fashion without compromising on style or quality.
Beyond the monetary savings, there’s the significant environmental benefit. Upcycling textiles like pillowcases reduces waste, lessens the demand for new fabric production (which has a considerable environmental footprint), and promotes a more sustainable approach to fashion. Each stitch in your gathered waist pillowcase dress contributes to a greener planet, making it a choice you can feel good about on multiple levels.
Ready to Create Your Own Masterpiece?
So, if you’ve ever felt disappointed by a shapeless pillowcase dress, or if you’re simply looking for an incredibly rewarding and budget-friendly sewing project, I wholeheartedly encourage you to try this gathered waist modification. It transforms a simple idea into a stylish, comfortable, and truly beautiful garment that your child will adore. Grab a thrift store pillowcase, dust off your sewing machine, and prepare to create something wonderful!
We’d love to see your creations! Share your gathered waist pillowcase dresses and inspire fellow crafters. Happy sewing!