Unlock Your Creativity: Easy DIY Stenciled Tote Bag with Vibrant Fabric Markers!
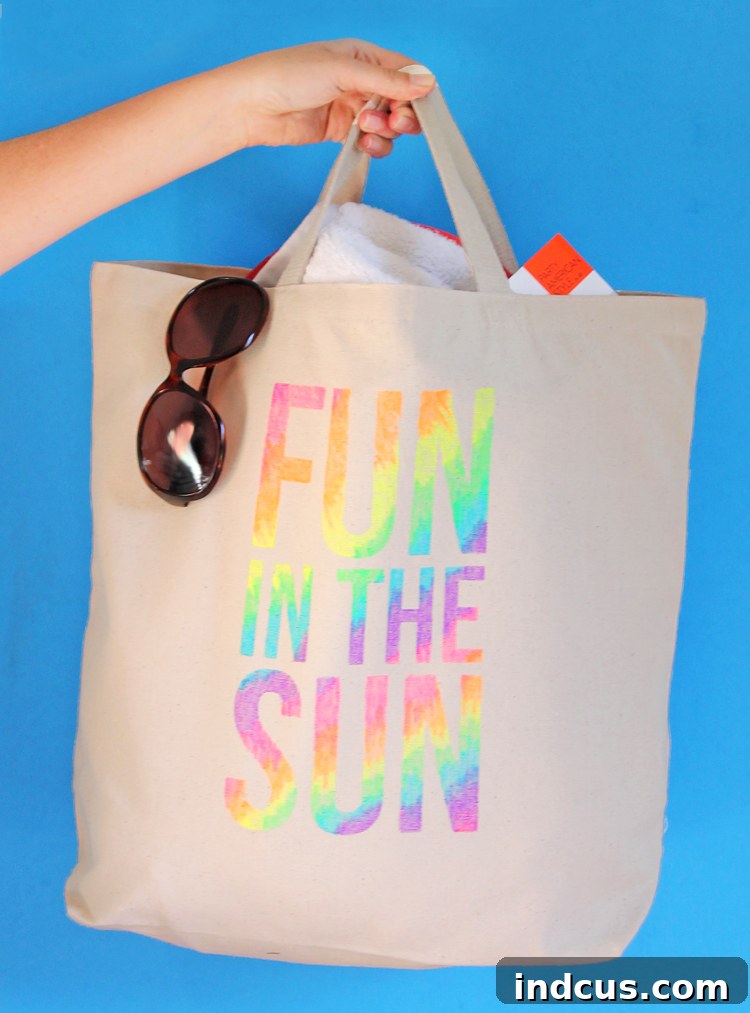
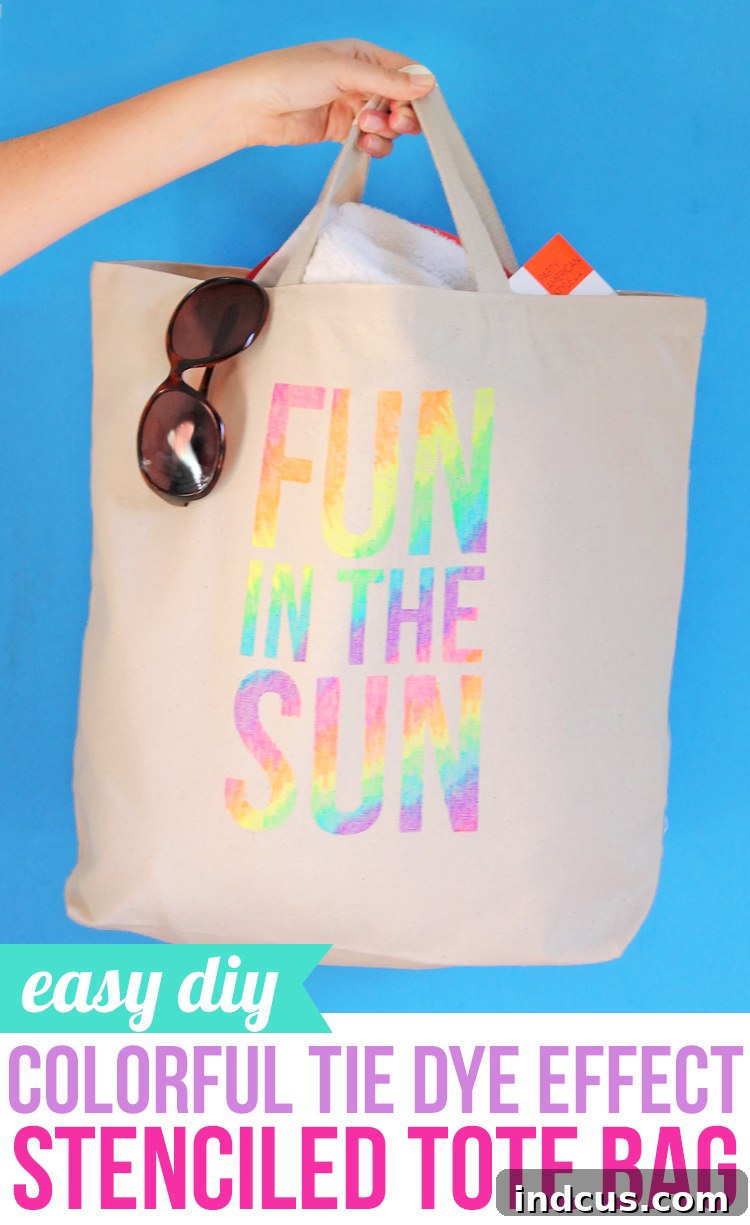
As the vibrant energy of summer gradually mellows, there’s still ample opportunity to immerse yourself in exciting creative projects. This guide introduces you to a wonderfully simple yet incredibly stylish DIY stenciled tote bag that perfectly blends functionality with personal expression. Imagine crafting a unique accessory or a thoughtful handmade gift with just a few readily available supplies. This project utilizes the magic of vibrant fabric markers and a clever stencil technique to achieve a striking, often tie-dye-inspired effect, making it a fantastic activity for crafters of all ages and skill levels. Whether you’re a seasoned DIY enthusiast looking for a quick and satisfying make, or a beginner seeking an easy entry into the world of fabric crafting, this colorful tote bag project promises an engaging experience and a fantastic, custom-made result.
The true charm of this craft lies in its impressive simplicity and the surprisingly professional outcome. Forget complicated techniques or expensive equipment; all you truly need are quality fabric markers and a well-designed stencil. The finished look is uniquely yours, allowing for endless possibilities in customization and personal flair. What’s more, this stenciling method is so versatile, you’ll undoubtedly find yourself wanting to apply it to a myriad of other fabric projects – from custom t-shirts and stylish pillowcases to decorative pouches and even personalized canvas art. It’s also incredibly kid-friendly! For younger crafters, the process is wonderfully streamlined: simply prepare and apply the stencil for them, then let their imaginations run wild as they fill in the design with their favorite colors. The absolute best part? It’s a largely mess-free activity, making it an ideal choice for parents and educators alike who are looking for engaging, creative fun without the extensive cleanup often associated with art projects.
Why Choose a DIY Stenciled Tote Bag?
In an era dominated by mass-produced items, creating something by hand offers immense satisfaction and a refreshing sense of individuality. A DIY stenciled tote bag isn’t just a craft; it’s a statement piece, a sustainable choice, and a canvas for your personal style. Here’s why this project is an absolute must-try for anyone looking to add a splash of color and creativity to their life:
- Unleash Your Inner Artist: From meticulously selecting your stencil design to choosing a vibrant color palette, every step of this project is an exciting opportunity for personal expression. Let your unique style shine through!
- Sustainable & Stylish: By personalizing reusable tote bags, you’re not only adding a unique touch to your everyday accessories but also making an eco-conscious choice by reducing reliance on single-use plastic bags. Carry your groceries, books, or beach essentials with pride and purpose.
- The Perfect Handmade Gift: A custom-designed tote bag makes a deeply personal, incredibly thoughtful, and highly practical gift for birthdays, holidays, teacher appreciation, or any special occasion. It’s a gift that truly shows you care.
- Beginner-Friendly Craft: Absolutely no prior crafting experience is required to achieve stunning results. The stencil acts as your trusty guide, doing most of the heavy lifting and ensuring crisp, clean lines and a professional-looking design every single time.
- Kid-Approved Creative Fun: This project is an excellent way to help children develop fine motor skills, practice color recognition, and boost their creativity. They’ll love having a tangible, usable item they created themselves. Plus, the minimal mess factor is a huge bonus for busy parents!
- Cost-Effective Customization: Compared to purchasing specialized fabric paints, brushes, and intricate tools, fabric markers are an affordable and incredibly convenient option. They often yield brighter, more consistent colors with less fuss, making high-quality customization accessible to everyone.
Essential Materials for Your Stenciled Tote Bag Creation
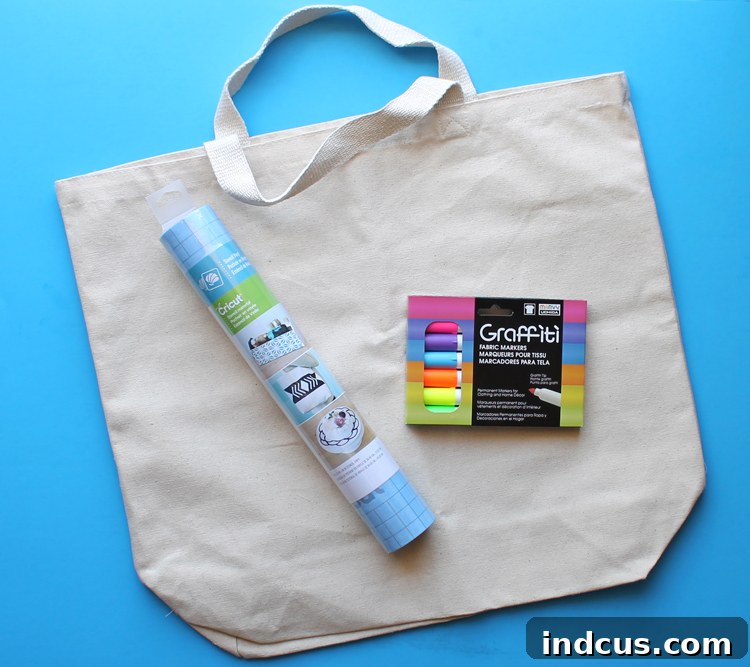
Getting started on your custom tote bag is refreshingly easy, and you might even discover that you already have some of these materials around your home! Here’s a comprehensive list of what you’ll need to create your vibrant stenciled tote bag, complete with helpful tips for selecting the best supplies. (Please note: affiliate links may be included for your convenience, directing you to products that can help you achieve the best results.)
-
Tote Bag (or other Fabric Blank): A sturdy canvas or cotton tote bag serves as the perfect foundation for your project. Opt for a bag made from a relatively smooth, light-colored fabric; this choice will allow your marker colors to truly pop and display their vibrancy beautifully. Beyond tote bags, consider other exciting alternatives like plain t-shirts, decorative pillowcases, durable denim jackets, or even canvas shoes for unique wearable art. Always ensure your chosen fabric item is pre-washed and thoroughly dried before you begin. This crucial step prevents any unexpected shrinking or future dye-bleed after your artistic customizations are complete.
Explore a diverse selection of high-quality tote bags here. -
Stencil Vinyl: This adhesive-backed material is absolutely essential for achieving those crisp, professional-looking lines in your design. Stencil vinyl is specially engineered to temporarily adhere to fabric, creating a clean, protective barrier for your coloring. Many types are also reusable if cleaned gently after each use. If you don’t own a craft cutting machine, don’t worry! You can easily opt for pre-made stencils available at most craft stores, or even use thick cardstock cut with a precise craft knife (though cardstock isn’t adhesive and might benefit from a temporary spray adhesive). Freezer paper is another excellent, budget-friendly option for fabric stenciling, which adheres temporarily with an iron.
Shop for top-quality stencil vinyl to ensure sharp designs. -
Fabric Markers: The true heroes of this project! Select a set of high-quality fabric markers that promise permanence after heat setting (typically achieved with an iron). While neon colors create an undeniably vibrant and fun look that screams summer, feel empowered to experiment with a spectrum of hues – pastels for a softer touch, metallics for sparkle, or classic primary colors to match your specific design aesthetic. Always ensure the markers you choose are specifically designed for fabric use to guarantee durability and washability, ensuring your artwork lasts.
Discover a wide and exciting range of fabric markers to fuel your creativity. - Craft Cutting Machine (Optional but Highly Recommended): Machines such as a Silhouette or Cricut make the process of cutting intricate stencil designs incredibly easy, precise, and efficient. If you don’t own one, fear not! You can readily purchase pre-cut stencils from craft stores, or meticulously cut your design by hand using a sharp craft knife and a protective cutting mat.
- Weeding Tool (for stencil vinyl): A small, hooked tool is immensely helpful for delicately removing the tiny, intricate parts of your cut stencil design, ensuring a clean and perfect stencil.
- Scraper Tool or Old Credit Card: This handy tool is used for firmly pressing the stencil onto the fabric. Good adhesion is critical for preventing any color bleed underneath the stencil, guaranteeing crisp lines.
- Cardboard or Plastic Insert: Absolutely essential! Place this inside your tote bag, directly beneath the area you plan to stencil, to prevent the marker ink from bleeding through to the other side of the fabric and ruining your design.
Step-by-Step Instructions: Crafting Your Masterpiece
Ready to transform a plain, unassuming tote bag into a vibrant, personalized accessory? Follow these detailed, easy-to-understand steps to craft your truly unique stenciled bag with confidence and creativity.
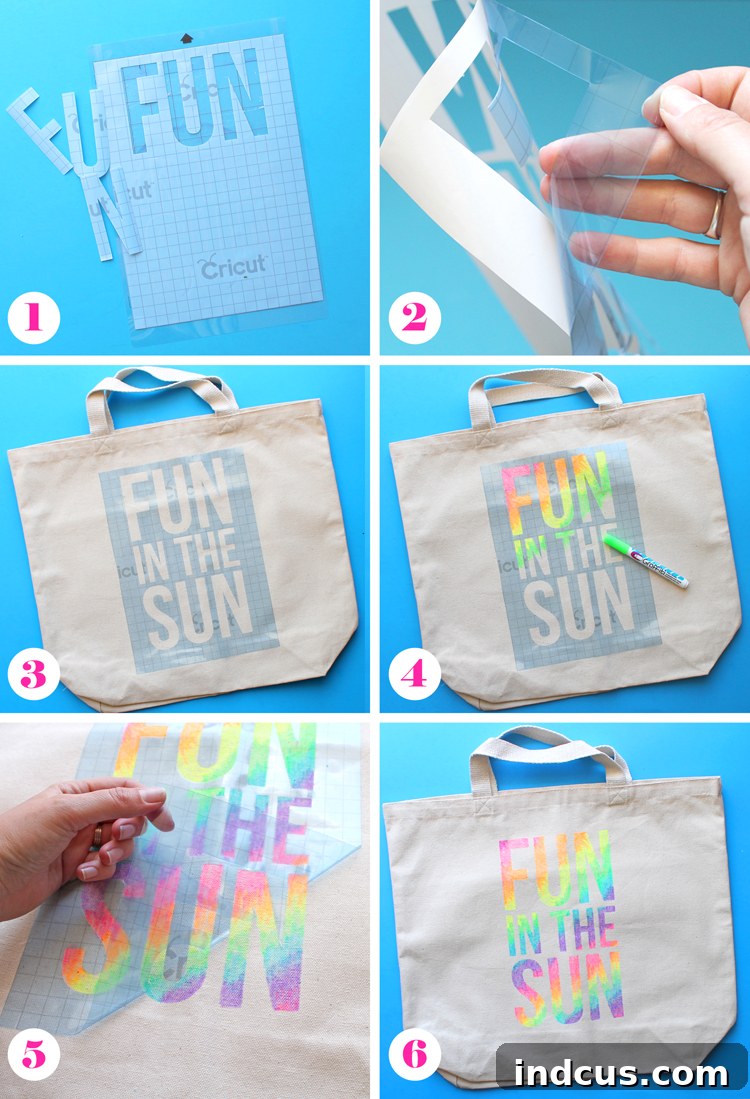
- Design Your Stencil and Precisely Cut It Out: Begin by creating or selecting your desired design. If you’re utilizing a craft cutting machine (like Silhouette Studio or Cricut Design Space), design your chosen text, image, or pattern. For a clean, impactful aesthetic, consider simple yet striking designs that will stand out. Once your design is finalized, carefully load your stencil vinyl into the machine and execute the cut. If you’re opting for hand-cutting, print your design onto regular paper, securely tape it onto your stencil vinyl, and meticulously cut it out using a sharp craft knife on a protective mat. The key here is to carefully peel away the *inside* of the letters or design elements – this is known as the “negative space” – leaving behind the stencil frame that will guide your markers.
- Prepare Your Stencil for Seamless Application: With your design cut, it’s time to prepare it for transfer. Carefully peel the white backing paper off your cut stencil design. Take your time with this delicate step, especially if your design incorporates intricate or slender elements, to ensure the vinyl doesn’t tear or stretch. The adhesive side of the vinyl should now be exposed and ready for placement.
- Precisely Apply the Stencil to Your Tote Bag: Now, carefully position the stencil exactly where you envision it on your tote bag. Once you are completely satisfied with its placement, stick it down firmly. Use a scraper tool, an old credit card, or even the pads of your fingers to press down all edges of the stencil with consistent pressure. This crucial step ensures a strong, uniform seal between the stencil and the fabric, which is vital for preventing any marker ink from bleeding underneath and blurring your design. Before you start coloring, remember to place a piece of cardboard or plastic insert inside the tote bag, directly underneath the area you’re working on. This will act as a protective barrier and prevent any ink from bleeding through to the back of the bag.
- Unleash Your Colors and Create Your Vision: Now for the most exciting part – coloring! Using your fabric markers, carefully fill in the open areas of your stencil. The original project successfully used a “faded tie-dye pattern.” To achieve this beautiful effect, apply different colors adjacent to each other and blend their edges slightly for a smooth, gradient transition. Start with one color, then smoothly transition into the next, gently overlapping where they meet. You can use various techniques to fill in the areas: soft circular motions, distinct parallel strokes, or even a careful dotting technique for texture. Don’t feel confined to a tie-dye effect; this is truly your moment to get creative! Experiment with vibrant solid colors, delicate ombre blends, bold geometric patterns, or even abstract scribbles. Anything goes when it comes to personalizing your unique design!
- Carefully Remove the Stencil to Reveal Your Art: Once you are entirely satisfied with your coloring, and are sure all areas are filled in just how you want them, it’s time for the grand reveal of your masterpiece. Gently peel the stencil vinyl off the tote bag. It’s best to peel slowly and at a sharp angle to avoid stretching the fabric or disturbing the freshly applied ink. You’ll be absolutely amazed and delighted by the crisp, clean edges the stencil has provided.
- Cure and Proudly Enjoy Your Brand New Design!: Most fabric markers require a specific heat setting process to become permanent and fully washable. Always check the specific instructions provided by your marker brand. This process typically involves ironing the design on a medium-high setting for a few minutes, often with a protective cloth placed over the design to prevent scorching. Once properly cured, your brand new, one-of-a-kind stenciled tote bag is officially ready to be admired, proudly carried, and put to stylish use!
No Cutting Machine? No Problem!
If you don’t happen to own a craft cutting machine, don’t let that deter you from embarking on this fun project! There are numerous fantastic alternatives that will allow you to achieve equally impressive results. You can easily purchase high-quality, pre-made stencils from virtually any craft supply store; these come in an incredibly vast array of designs, letters, and patterns to suit any taste. Alternatively, for simpler designs, you can print your chosen image onto regular paper, trace it onto a sheet of freezer paper, meticulously cut it out with a craft knife, and then iron the freezer paper onto your fabric. The wax coating on the freezer paper will temporarily adhere to the fabric, effectively creating a temporary stencil that works wonderfully with fabric markers.
Designing Your Stencil: Inspiration and Limitless Ideas
The true beauty of this project lies in its infinite capacity for customization. Your tote bag can be a reflection of your personality, your passions, or a special message. Here are some inspiring ideas to spark your imagination for your stencil design:
- Personalized Text: Etch your name, a cherished favorite quote, a single inspiring word, significant dates, or even memorable song lyrics onto your bag.
- Geometric Shapes: Create a modern, chic look with triangles, circles, chevrons, hexagons, or a vibrant mosaic of different interlocking shapes.
- Nature Themes: Embrace the outdoors with delicate leaves, blooming flowers, graceful animals, majestic trees, or celestial bodies like stars and moons.
- Abstract Patterns: Let your creativity flow with artistic swirls, controlled splatters (contained by the stencil), free-form designs, or repeating motifs.
- Holiday & Seasonal Themes: Tailor your bag for the season – pumpkins and fall leaves for autumn, intricate snowflakes for winter, loving hearts for Valentine’s Day, or bright suns and waves for summer.
- Event Specific: Design custom tote bags as thoughtful keepsakes for bridal parties, lively family reunions, impactful school events, or to show team spirit for sports groups.
I personally adore the vibrant, almost electric color palette of the neon fabric markers I meticulously selected for this specific project. They truly evoke an undeniable feeling of summer fun, bright sunshine, and carefree creativity, don’t you agree? The vivid, eye-catching hues make any design pop instantly and add an immediate cheerful, energetic touch that is bound to turn heads.
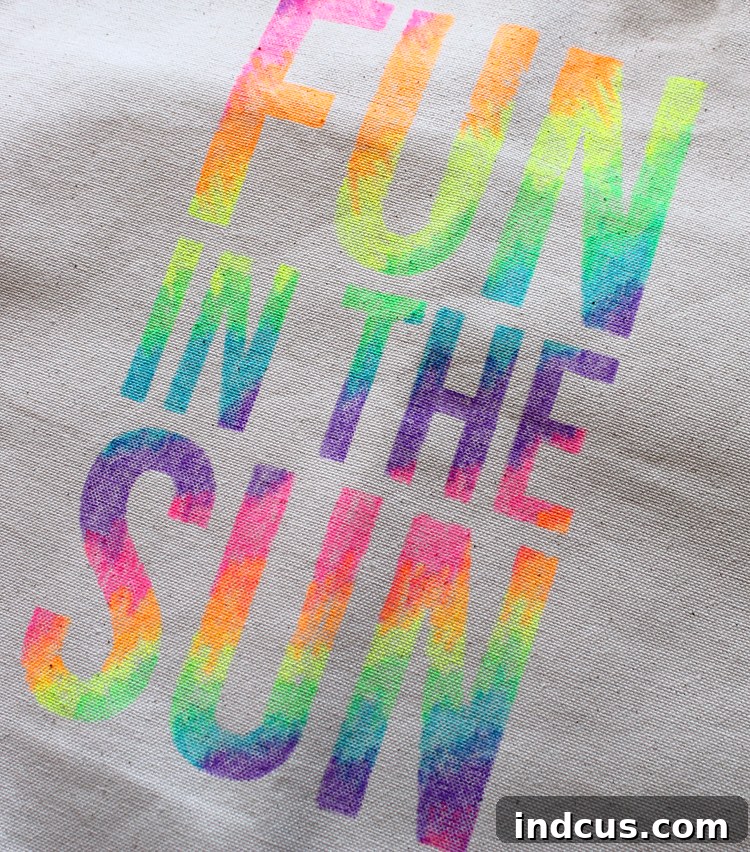
If you’re particularly eager to replicate the exact “Sunshine” stencil design I used for this vibrant project, you’re in luck! You can easily download the free SVG file here. This versatile file is compatible with most popular craft cutting machines, allowing you to get started on creating your very own cheerful and radiant tote bag right away.
Beyond Tote Bags: Expand Your Fabric Crafting Horizons
While custom tote bags are undeniably fantastic canvases for showcasing your creativity and personal style, the stencil and fabric marker technique is incredibly versatile and can be applied to a multitude of other fabric items. Consider expanding your newfound crafting skills to personalize and transform:
- Custom T-Shirts: Design personalized apparel for yourself, your family, or as unique gifts for friends that truly reflect their personality.
- Decorative Pillowcases: Add a unique, handmade decorative touch to your home decor, creating accent pieces that are truly one-of-a-kind.
- Sneakers or Canvas Shoes: Breathe new life into old sneakers or give plain canvas shoes a fresh, custom look that stands out from the crowd.
- Kitchen Aprons: Create a fun, personalized gift for the chef, baker, or artist in your life, adding a touch of whimsy to their culinary adventures.
- Small Pouches or Makeup Bags: Perfect for organizing small items with a stylish flair, these personalized bags make excellent gifts or practical accessories for yourself.
The Perfect Activity for Any Occasion and Every Age
This engaging and creative craft is truly ideal for a wide spectrum of settings and diverse age groups, making it a universally appealing project. Picture it as a lively, collaborative activity for a girls’ camp, a fun and enriching educational project for Vacation Bible School (VBS), or simply a wonderful, productive way to conquer boredom on a rainy afternoon spent at home. Its universal appeal ensures it will be a resounding hit with kids, teenagers, and adults alike, primarily because it offers boundless opportunities for individual creativity and personal expression. Thanks to the guiding hand of the stencil, even the youngest and most inexperienced crafters are virtually guaranteed to produce a design that looks polished, impressive, and something they can be incredibly proud of. It’s more than just a craft; it’s a wonderful opportunity to spend quality time together, fostering creativity, building confidence, and producing a tangible, usable item that everyone will be excited to show off and enjoy.
Ready to Unleash Your Inner Designer?
Creating your own vibrant stenciled tote bag is far more than just a simple craft project; it’s an exciting opportunity to express yourself authentically, bring something truly unique into existence, and savor a deeply rewarding hands-on experience. With these easy-to-follow steps and a minimal set of readily available supplies, you’ll be absolutely amazed at the stunning results you can achieve. So, gather your chosen materials, pick your favorite design or download ours, and get ready to infuse some vibrant personality and unique charm into your accessories collection. Don’t forget to share your amazing creations with us – we can’t wait to see what you design! Happy crafting, and enjoy your one-of-a-kind masterpiece!