DIY Embroidered Pencil Cup: Elevate Your Desk with Unique Cross Stitch Art
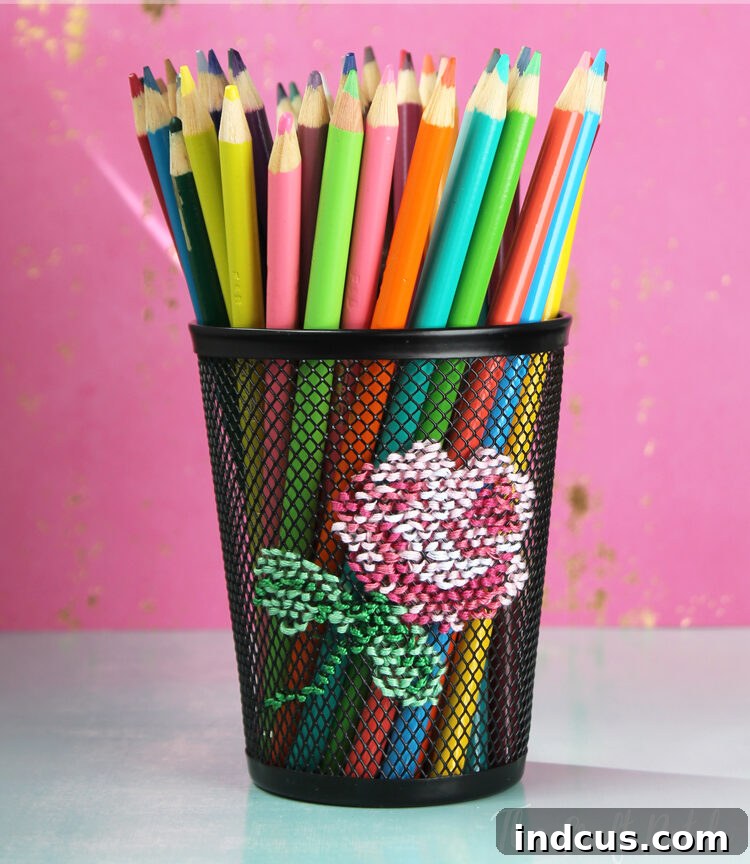
Have you ever looked at everyday objects and wondered how you could transform them into something truly unique and reflective of your personality? As crafters, we often find ourselves drawn to the allure of unconventional projects – taking a traditional art form and applying it in unexpected ways. For quite some time now, I’ve been captivated by the incredible creativity of those who tackle large-scale embroidery, adorning everything from chairs to entire walls. The idea of “out-of-the-hoop” cross stitch holds a special charm, pushing the boundaries of what’s possible with needle and thread. While those grand projects are certainly inspiring, I decided to start with something a little more manageable, especially since embroidery isn’t my primary craft. My goal was a fun, quick, and rewarding project that would introduce me to the world of non-traditional stitching. And that’s how this charming embroidered pencil cup came to life!
This project is a fantastic way to add a touch of handmade charm and personality to your workspace. Forget bland, mass-produced office supplies; with a little creativity, you can turn a simple item into a conversation starter. Whether you’re a seasoned cross stitcher looking for a fresh challenge or a beginner eager to dip your toes into embroidery, this DIY pencil cup offers a perfect blend of simplicity and satisfaction. It’s a testament to how small details can make a big difference in creating an inspiring and organized environment.
Finding Your Canvas: The Perfect Mesh Pencil Cup
The foundation of this unique craft project is surprisingly humble: a simple mesh pencil cup. I stumbled upon mine at a dollar store, a true testament to the fact that amazing craft supplies can be found almost anywhere. These cups are readily available at most stores that sell office supplies, from large department stores to dedicated stationery shops. What makes them ideal for embroidery are their built-in mesh holes – a grid just begging for some colorful thread!
When selecting your cup, pay attention to the size and shape of the mesh holes. While many traditional cross stitch fabrics feature a perfectly square grid, these pencil cups often have diamond-shaped holes. Don’t let this deter you; it simply means we’ll adapt our stitching technique slightly, as I’ll explain shortly. The key is to find a cup with a consistent mesh pattern that allows a needle and thread to pass through easily. A metal or sturdy plastic mesh works best to hold its shape during stitching and long-term use.
Choosing Your Design: Adapting Cross Stitch Patterns for Unique Surfaces
Once you have your mesh cup, the fun of selecting a design begins! While I used a specific floral cross stitch chart as a loose guide, the possibilities are endless. A quick online search for “free cross stitch patterns” or “simple embroidery designs” will yield a treasure trove of cute and inspiring options. Websites like Pinterest, craft blogs, and dedicated cross stitch forums are excellent resources for finding patterns ranging from intricate motifs to minimalist icons.
| [source] |
When adapting a pattern for your mesh cup, remember that you’re not working on a traditional Aida fabric. The diamond-shaped mesh, common in these cups, requires a slight modification to the classic ‘X’ cross stitch. Instead of forming perfect crosses, I found it more effective and aesthetically pleasing to simply loop the stitches around the mesh openings. This creates a solid, consistent block of color that outlines your design beautifully, even on an unconventional grid. Experiment with different stitch directions to see what works best with the unique angles of your specific cup’s mesh.
Essential Materials for Your Embroidered Pencil Cup:
- Mesh Pencil Cup: The star of our show, preferably with a consistent hole pattern.
- Embroidery Floss: Choose colors that complement your design and office decor. Standard 6-strand cotton floss works wonderfully. You won’t need much, making this a great stash-busting project!
- Embroidery Needle: A sharp tapestry needle or a regular embroidery needle that can easily pass through the mesh holes. Make sure it’s not too thick to avoid deforming the mesh.
- Small Scissors: For trimming floss ends cleanly.
- Fabric Glue (Optional but Recommended): A clear-drying fabric adhesive is perfect for securing loose thread ends on the inside of the cup.
- Cross Stitch Pattern or Design Idea: Your creative blueprint!
Step-by-Step Guide: Stitching Your Unique Pencil Cup
1. Prepare Your Workspace and Materials
Before you begin stitching, ensure your mesh cup is clean and dry. Gather all your materials. Decide on the area of the cup where you want your design to begin. For most patterns, starting from the center or a distinct corner of your design and working outwards can help ensure it’s centered on the cup. Cut a manageable length of embroidery floss (about 18-24 inches) to prevent tangling. If you’re using 6-strand floss, you might want to separate it into 2 or 3 strands for a finer, more delicate look, or use all 6 for a bolder effect. I personally prefer 3 strands for most detailed work on these cups.
2. Initiating Your First Stitch
Unlike traditional embroidery where you might start with a knot, on a mesh cup, it’s best to secure your thread by leaving a small tail on the inside of the cup and catching it with your subsequent stitches. Alternatively, a tiny dab of fabric glue can secure the starting end against the inner surface of the mesh. Pass your needle from the inside to the outside through a mesh hole, leaving a tail of about an inch on the inside. You’ll cover this tail with your future stitches.
3. Mastering the “Loop” Stitch for Diamond Mesh
Since the mesh holes are often diamond-shaped, a true ‘X’ cross stitch can be challenging to form neatly. Instead, we’ll create a modified stitch that looks fantastic and is much easier to execute. Think of it as a series of consistent diagonal lines. Bring your needle up through one corner of a diamond hole (e.g., bottom left) and down through the opposite corner (top right). This creates a single diagonal “loop” across the mesh opening. For the next stitch, move to an adjacent mesh hole and repeat the process, ensuring all your diagonal stitches flow in the same direction. Maintaining consistency in direction and tension is paramount for a polished look.
The beauty of this technique is its simplicity. As long as you maintain uniformity in the direction and tightness of each loop, the embroidered design will appear cohesive and intentional. You’ll build your pattern by creating these single-direction diagonal stitches, working your way through the chosen design. Don’t worry about perfect alignment with a traditional square grid pattern; instead, focus on how the colors and shapes come together on the unique mesh of your cup.
4. Following Your Pattern (Loosely!)
Translating a traditional cross stitch chart to a diamond mesh can be a bit intuitive. Instead of strictly counting squares, you’ll be counting mesh openings. Look at your pattern and identify key elements. Start with the largest color blocks, then fill in details. Don’t be afraid to eyeball it a bit. The charm of handmade items lies in their slight imperfections and the unique adaptation to their canvas. A close-up view reveals how the stitches integrate with the mesh, creating a vibrant texture.
5. Finishing Your Work: Securing Threads
Once your design is complete, it’s time for the crucial finishing touches. To prevent the threads from coming loose or snagging during daily use, you’ll need to secure the ends on the inside of the cup. The easiest method is to use a small amount of clear-drying fabric glue. Apply a tiny dot to the tail end of your floss on the interior of the cup, pressing it gently against the mesh or other stitches. This creates a strong, invisible bond that will ensure your beautiful embroidery lasts. Make sure to let the glue dry completely before using the cup.
Why This DIY Embroidered Pencil Cup is a Must-Try Project
Beyond simply being a fun craft, creating your own embroidered pencil cup offers a multitude of benefits:
Personalization and Unique Style
In a world of mass-produced items, adding a handmade touch to your workspace makes it uniquely yours. This embroidered pencil cup isn’t just a container for pens; it’s a statement piece, reflecting your creativity and personal aesthetic. Choose colors and patterns that truly speak to you, transforming a mundane object into a source of daily joy.
Affordable and Accessible Crafting
This project is incredibly budget-friendly. A dollar store pencil cup, some leftover embroidery floss from your stash, and a basic needle are often all you need. It’s an excellent way to use up those smaller skeins of thread you’ve accumulated, giving them new life in a practical and beautiful way.
Perfect for Skill Development
Whether you’re new to embroidery or a seasoned pro, working on an unconventional surface like a mesh cup is a fantastic way to develop your skills. It encourages creative problem-solving (like adapting stitches for diamond mesh) and helps you think outside the traditional embroidery hoop. It’s a low-pressure project that still yields impressive results.
A Thoughtful Handmade Gift Idea
Looking for a unique gift for a friend, colleague, or teacher? A personalized embroidered pencil cup makes a wonderful and heartfelt present. It shows care, creativity, and the effort of a handmade item, perfect for birthdays, holidays, or just because.
Boost Your Desk Organization and Aesthetic
A tidy and aesthetically pleasing workspace can significantly impact productivity and mood. This DIY project helps you organize your pens and pencils while simultaneously elevating the visual appeal of your desk. It’s functional art!
This was such a fun and rewarding little project! I absolutely loved the process of rummaging through my embroidery thread stash and bringing something unique and vibrant to life for my office. The satisfaction of seeing a simple object transformed into a personalized piece of art is truly immense. Don’t you agree that everyone needs an embroidered pencil cup in their life? It’s a small detail that brings a lot of personality and cheer to any desk.
I wholeheartedly encourage you to give this out-of-the-hoop embroidery project a try. It’s easier than you might think and the results are incredibly charming. If you decide to embark on your own embroidered pencil cup adventure, please do share a picture with me! I’d be absolutely delighted to see your creative adaptations and share them on my Facebook page, inspiring even more crafters to personalize their spaces. Happy stitching!