Revitalize Your Seating: A Simple Guide to Reupholstering Round Chair Seats for a Fresh Look
Are your beloved round chair seats looking tired, faded, or simply out of sync with your evolving decor? Instead of replacing them, consider the transformative power of reupholstery! This DIY project is surprisingly straightforward, incredibly rewarding, and can breathe new life into your furniture, saving you money and offering endless customization possibilities. Whether you’re updating a cherished dining set, refreshing a patio arrangement, or giving a unique accent chair a modern twist, learning how to reupholster a round chair seat is a skill that will serve you well.
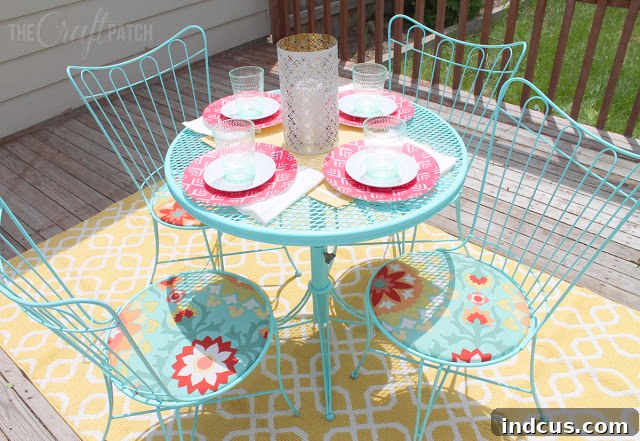
You might recall the stunning transformation of my patio set, where these very round chair seats received a much-needed facelift. The difference was remarkable – new fabric instantly elevated their appearance, making the entire set feel brand new. What’s even better is that achieving a smooth, professional-looking finish on round seats is entirely achievable with a simple, effective method. This comprehensive guide will walk you through each step, ensuring you gain the confidence to tackle your own upholstery project and achieve beautiful, lasting results.
Get ready to ditch the drab and embrace the fabulous! Let’s dive into how you can easily cover your own round chair seats and give them a stunning, custom upgrade.
Why Choose to Reupholster Your Round Chair Seats?
Reupholstering furniture is more than just a craft; it’s a sustainable and creative choice that offers numerous benefits:
- Cost-Effective Makeover: Purchasing new chairs or cushions can be expensive. Reupholstering allows you to refresh your existing furniture at a fraction of the cost, making it a budget-friendly way to update your home decor.
- Personalized Style: Your home should reflect your unique taste. With reupholstery, you have complete control over the fabric choice – from patterns and textures to colors that perfectly match your interior design scheme. This personalization is impossible with mass-produced furniture.
- Sustainability and Eco-Friendliness: Instead of sending old furniture to the landfill, you’re giving it a second life. Reupholstery is a fantastic way to practice sustainability, reduce waste, and minimize your environmental footprint.
- Preserve Sentimental Value: Sometimes, a piece of furniture holds cherished memories. Reupholstering allows you to keep a beloved chair that might be an antique or a family heirloom, updating its look while preserving its history and sentiment.
- Enhanced Durability and Comfort: You can choose high-quality, durable upholstery fabric that stands up to wear and tear, especially important for frequently used items like dining chairs. You can also opt to replace or add new padding for improved comfort.
Essential Materials and Tools for Your Upholstery Project
Before you begin, gather all the necessary materials and tools. Having everything at hand will make the process smoother and more efficient.
Materials:
- New Upholstery Fabric: Choose a durable fabric suitable for seating. Consider patterns, textures, and colors that complement your space. As a general rule, measure the diameter of your seat and add 6-8 inches to that measurement to determine the side length of a square piece of fabric you’ll cut your circle from. For example, if your seat is 16 inches in diameter, aim for at least a 22-24 inch square of fabric.
- Original Round Chair Seat (or a sturdy wooden base and foam padding): Ensure your seat base is solid and the existing foam padding is in good condition, or acquire new foam if needed.
- New Foam Padding (Optional): If your existing padding is flattened or damaged, you might want to replace it. High-density foam is recommended for seating.
Tools:
- Heavy-Duty Staple Gun: An electric staple gun is often preferred for continuous use and ease, but a good quality manual heavy-duty staple gun will also work.
- Staples: Ensure you have a sufficient supply of staples compatible with your staple gun. Upholstery staples are typically 1/2 inch or 3/8 inch long.
- Fabric Scissors: Sharp scissors are essential for clean, precise cuts.
- Fabric Marker or Chalk (Optional): Useful for marking your cut lines on the fabric.
- Screwdriver or Drill: For carefully removing the chair seat from its frame, if necessary.
- Staple Remover or Pliers: If you’re removing old fabric, these tools will be invaluable for extracting old staples.
- Safety Glasses: Always wear eye protection when using a staple gun.
Preparing Your Round Chair Seat for Upholstery
Proper preparation is key to a successful reupholstery project. Take your time with these initial steps to ensure a clean slate and a smooth finish.
- Remove the Seat from the Chair Frame: Most chair seats are attached with screws from the underside. Carefully unscrew and detach the round seat from the chair base. Keep all screws in a safe place.
- Inspect and Remove Old Fabric (Optional): If the existing fabric is stained, torn, or you simply want a completely fresh start, use a staple remover or pliers to carefully pull out all old staples and remove the old fabric. This also allows you to inspect the padding underneath.
- Assess and Replace Padding: Check the foam padding for firmness and integrity. If it’s compressed, lumpy, or disintegrating, now is the time to replace it. Cut new foam to the exact shape of your wooden seat base. You can often use the old foam or wooden base as a template.
- Clean the Wooden Base: Give the wooden base a quick clean, removing any dust or debris, especially if you’re not replacing the padding.
Step-by-Step Guide: Reupholstering Your Round Chair Seat
Now that your materials are ready and your seat is prepared, let’s get down to the exciting part: applying your new fabric! This method is designed to help you achieve a beautifully taut and smooth finish.
Step 1: Cut Your Fabric and Layer Your Materials
The first crucial step is to prepare your fabric. Lay your chosen upholstery fabric face down on a clean, flat work surface. The “right” side (the patterned or finished side) should be touching the table. Next, center your foam padding (if using new foam) on top of the fabric. Finally, place your wooden chair seat base on top of the foam. Essentially, you’ll have three layers, all oriented face down: fabric, then foam, then wood. This layering ensures that when you flip the seat over, the fabric will be correctly oriented.
Using the wooden seat base as a guide, cut out a circular piece of fabric that is approximately 3-4 inches larger in diameter all around the seat. This extra allowance provides enough material to grip, pull, and securely staple the fabric to the underside of the seat. A generous margin is better than too little!
Step 2: Begin Initial Stapling – The Quarter Method for Smoothness
This is where your heavy-duty staple gun comes into play. The key to a smooth, wrinkle-free finish on a round seat is to work systematically, pulling the fabric taut as you go. Start by placing a staple at one point on the edge of the seat. Then, move directly across the seat to the opposite side and place another staple, pulling the fabric firmly but not so aggressively that you distort the pattern or tear the fabric. Repeat this process, stapling at the 12 o’clock, 6 o’clock, 3 o’clock, and 9 o’clock positions, essentially dividing the seat into quarters. This “cross-stapling” method ensures even tension and helps eliminate wrinkles before they start.
Continue to place staples at intermediate points, always pulling the fabric tight and smoothing it out from the center towards the edges before each staple. Think of it like tightening a drum. The goal is to create consistent tension across the entire surface of the seat.
Step 3: Creating Triangle-Shaped Pleats for a Neat Edge
As you work your way around the seat, filling in the gaps between your initial staples, you’ll notice that the excess fabric will start to bunch up around the curve. This is completely normal for round shapes! To manage this, you’ll need to create neat pleats. Gently pinch the bunched fabric into small, triangular-shaped pleats. These pleats will help distribute the excess fabric evenly, allowing it to lay flat against the underside of the seat without creating bulky lumps or uneven tension on the top surface.
Take your time with this step. The quality of your pleats will directly impact the neatness of the finished edge on the underside of your seat. Aim for consistent size and spacing for a professional look.
Step 4: Securing Each Pleat with Staples
Once you’ve formed a pleat, it’s time to secure it. Don’t just place one staple. For maximum security and a flatter finish, staple each pleat in at least three places: one at the apex of the triangle and two more along its base, spreading them slightly to hold the fabric firmly. This multi-point stapling technique ensures that the pleat stays in place and the fabric remains taut, preventing any loosening or shifting over time. This meticulous attention to detail is what separates an amateur finish from a polished, durable one.
Step 5: Completing the Circle – Stapling All Around
Continue this process of forming and stapling pleats around the entire perimeter of the round chair seat. Work your way methodically, ensuring that each section of fabric is pulled tight and smoothed before you create the next pleat. The goal is to have every part of the fabric securely fastened to the wooden base, without any loose areas or visible wrinkles on the top surface. Take a moment to periodically flip the seat over and check the top side for any imperfections, making adjustments as needed. This continuous inspection will help you catch and correct issues before they become permanent. Once you’ve completed the full circle, your entire fabric edge should be securely stapled down, creating a neat and durable underside.
Finishing Touches and Reassembly
With all the stapling complete, your beautifully reupholstered seat cushion is almost ready! First, inspect the underside one last time. If there are any excessively long fabric tails or loose threads, carefully trim them to create a tidy finish. You can also add a dust cover fabric to the underside for an even more polished look, though this is optional for many DIY projects. Finally, reattach your newly covered seat to the chair frame using the screws you saved earlier. Tighten them securely, and admire your handiwork.
For my patio chairs, the seats sit loosely atop the metal frames, so the final step was simply to place them back on. The transformation was complete, and the chairs looked absolutely incredible with their fresh, new upholstery. This method ensures a snug fit and a smooth surface, giving your chair a brand-new lease on life.
Tips for Success in Your DIY Upholstery Project
- Choose the Right Fabric: For high-traffic areas like dining chairs, opt for durable, easy-to-clean upholstery fabric. Consider patterns that are forgiving of minor imperfections.
- Practice Makes Perfect: If you’re new to upholstery, consider practicing on a small, less visible area or with a scrap piece of fabric to get a feel for your staple gun and fabric tension.
- Don’t Rush the Process: Upholstery requires patience. Take your time with each staple and pleat to ensure a high-quality finish. Rushing can lead to wrinkles or uneven tension.
- Prioritize Safety: Always wear safety glasses when operating a staple gun. Keep your fingers clear of the stapling mechanism.
- Consider New Padding: If your original foam is old or thin, replacing it will significantly improve the comfort and longevity of your reupholstered seat.
- Clean Your Fabric: Before you start, give your new fabric a quick once-over to ensure it’s clean and free of any dust or debris.
Troubleshooting Common Upholstery Issues
Even with the best preparation, you might encounter a few minor hiccups. Here’s how to address them:
- Wrinkles or Looseness on the Top Surface: This usually means the fabric wasn’t pulled taut enough before stapling. If it’s a minor area, try removing a few staples, pulling tighter, and restapling. For larger areas, you might need to remove more staples and re-tension that section.
- Staples Not Penetrating Fully: Ensure your staple gun is set to the correct power level for the thickness of your wood. If using a manual gun, apply more pressure. Check if your staples are the correct size and type for your gun and material.
- Uneven Pleats on the Underside: While the underside is less visible, uneven pleats can still affect the overall stability. Try to redistribute the fabric and reform the pleats more evenly. Practice will improve your pleating technique.
- Fabric Fraying: Some fabrics fray more easily than others. Work carefully and try not to handle the raw edges too much. If fraying is excessive, consider using a fabric adhesive or zigzag stitch along the edge before stapling.
Maintaining Your Newly Upholstered Seats
To keep your revitalized round chair seats looking beautiful for years to come, regular maintenance is key:
- Regular Vacuuming: Use a brush attachment on your vacuum cleaner to gently remove dust, crumbs, and pet hair.
- Spot Cleaning: Address spills immediately. Blot, don’t rub, with a clean white cloth. Use a mild fabric cleaner designed for upholstery, testing it on an inconspicuous area first.
- Protect from Sunlight: Direct sunlight can cause fabric to fade over time. Position your chairs to minimize sun exposure or use blinds/curtains.
- Avoid Harsh Chemicals: Stick to gentle cleaning solutions to prevent damage to the fabric fibers or color.
Conclusion: Embrace Your Inner Upholsterer!
Reupholstering a round chair seat is a rewarding DIY project that empowers you to transform your living space with personalized style and a touch of craftsmanship. By following these simple steps – from careful fabric cutting and strategic stapling to meticulous pleating – you can achieve a professional-looking finish that will impress. It’s a fantastic way to update old furniture, save money, and add a unique, handmade touch to your home decor.
Don’t let the idea of upholstery intimidate you. With a few basic tools and a bit of patience, you’ll be amazed at what you can accomplish. So, pick out your favorite fabric, gather your supplies, and get ready to give your round chair seats the stunning makeover they deserve. Happy upholstering!