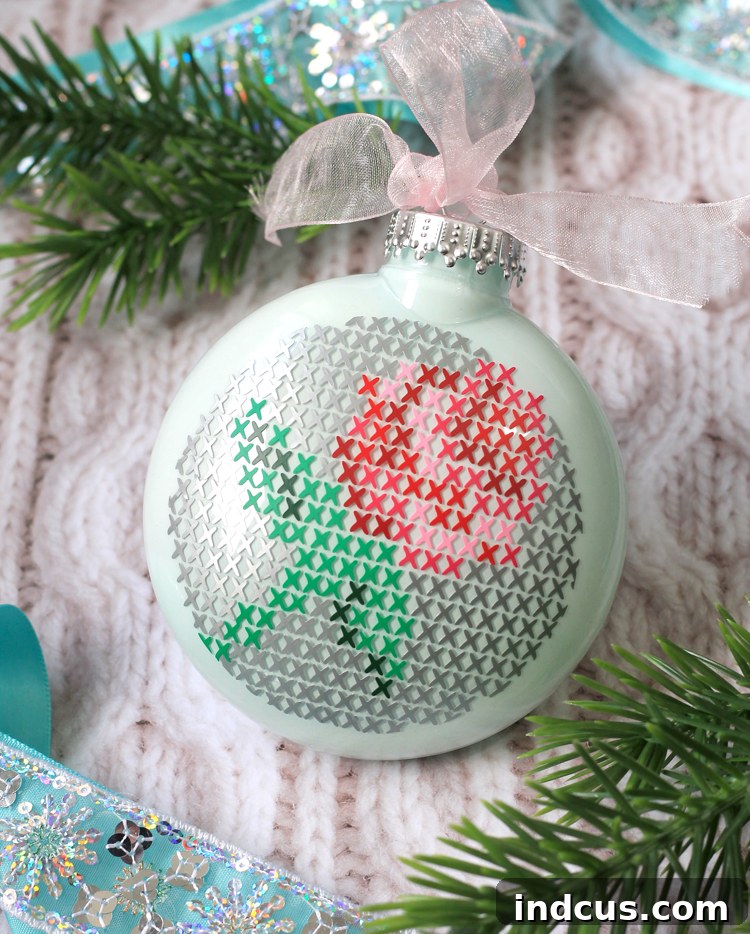
Welcome, fellow craft enthusiasts! The holiday season is synonymous with joy, warmth, and the special touch of handmade decorations. There’s something truly magical about adorning your home with unique pieces crafted with love. Today, we’re diving into a captivating project that combines the classic charm of cross-stitch with the modern versatility of vinyl – creating a stunning, personalized Christmas ornament. This particular idea was born from a creative challenge sponsored by Expressions Vinyl, where the only rule was to incorporate vinyl into a festive ornament design. The result? A surprisingly simple yet incredibly elegant cross-stitched ornament made entirely with vinyl!
At first glance, this intricate design might appear incredibly complicated, but I assure you, it’s much easier to create than it looks. We’ll walk you through every single step, providing clear instructions and helpful tips, so you can confidently craft your own beautiful cross-stitch vinyl Christmas ornaments. Get ready to impress your friends and family with these unique, handmade treasures that blend traditional artistry with contemporary crafting techniques.
Why Choose Vinyl for Your Christmas Ornaments?
Vinyl is a fantastic medium for holiday crafting, offering unparalleled versatility and durability. It adheres beautifully to various surfaces, including the delicate curves of glass ornaments, and comes in an astounding array of colors, finishes, and textures. For this project, vinyl allows us to mimic the detailed look of cross-stitching without the need for needles, thread, or fabric. It’s a clean, efficient, and highly customizable way to achieve intricate designs, making it perfect for personalizing your holiday decor or creating thoughtful, handmade gifts that will last for seasons to come.
Essential Materials for Your Cross Stitch Vinyl Ornament
Before we begin our creative journey, let’s gather all the necessary supplies. Having everything at hand will make the crafting process smooth and enjoyable. Each item plays a crucial role in bringing your vision to life, so make sure you have them ready.
- Craft Vinyl: For this specific design, we used a selection of vibrant colors including silver, red, and green from a festive Christmas pack, complemented by light pink and dark pink. Removable indoor vinyl is generally recommended for ornaments as it’s easier to work with and reposition if needed, but permanent vinyl can offer enhanced durability if desired.
- Clear Christmas Ornament: A standard clear glass or plastic ornament provides the perfect canvas for your vinyl design. Glass offers a more classic, elegant look, while plastic is a safer, shatterproof option, especially if you have pets or young children around.
- Craft Paint (Optional): If you prefer a solid background instead of a clear one, a small amount of craft paint (acrylic or glass paint works well) is needed. This adds another layer of customization and can make your cross-stitch design pop even more.
- Silhouette Cutting Machine: A Silhouette Cameo or Portrait machine is essential for precisely cutting the intricate cross-stitch design. These machines make quick work of detailed vinyl projects, ensuring crisp edges and perfect shapes.
- Free Cut File: Access the exact design used in this tutorial by downloading our FREE CUT FILE HERE. This file is pre-designed for optimal cutting with your Silhouette machine, saving you time and effort.
- Transfer Tape: An indispensable tool for moving your cut vinyl design from its backing to the ornament.
- Weeding Tool: A small hook or pick for removing excess vinyl.
- Scraper Tool/Squeegee: For smoothing vinyl and transfer tape.
Preparing Your Design with Silhouette Studio and Cutting Your Vinyl
The first crucial step is to prepare your design for cutting. Our free cut file streamlines this process, ensuring you get perfect results every time. Follow these detailed instructions carefully to set up your vinyl pieces for an efficient and successful cut.
- Download and Open the Cut File: Begin by downloading the provided free cut file. Once downloaded, open it in your Silhouette Studio software. You’ll see the intricate cross-stitch design pre-arranged for multi-color cutting.
- Prepare Your Vinyl Pieces: To make the most of your vinyl and ensure all colors cut simultaneously, cut your craft vinyl into small, manageable squares according to the following dimensions. This layout is optimized for the pre-set design in the cut file.
- Light Green – 2.5 x 2 inches
- Silver – 4 x 4 inches (This will be your base layer, often requiring a slightly larger piece)
- All Other Colors (Red, Dark Pink, Light Pink) – 2 x 2 inches each
Once your vinyl pieces are cut, carefully arrange them on your Silhouette cutting mat. Refer to the picture above for the exact placement. It’s important to leave approximately one inch of space between each vinyl square. This meticulous arrangement allows the Silhouette machine to cut all the different colored pieces in one go, saving you time and ensuring precise alignment later on.
- Adjust Cut Settings: In Silhouette Studio, select the appropriate cut settings for the type of vinyl you are using. Generally, a “Vinyl, Glossy” or “Vinyl, Matte” setting will work, but always perform a test cut if you’re unsure, especially if using a new brand or type of vinyl. Proper blade depth and force are crucial for a clean cut without cutting through the vinyl backing.
- Send to Cut: Once your vinyl is securely on the mat and settings are confirmed, send the design to your Silhouette machine. Watch as your machine precisely cuts out all the tiny cross-stitch ‘X’s and the background shapes, preparing them for the next stage of your ornament creation.
The Art of Reverse Weeding: Preparing Your Vinyl Design
Weeding intricate vinyl designs can sometimes be challenging, but for this cross-stitch pattern, we’ll employ a technique called “reverse weeding.” This method significantly simplifies the process, especially for small, detailed cuts, by allowing the desired pieces to remain on the transfer tape while the excess vinyl is removed. It’s a game-changer for projects like this!
- Apply Transfer Tape: After your vinyl has been cut, carefully peel off the paper backing from each vinyl color square. Then, firmly press a piece of transfer tape onto the front of the vinyl design. Use a scraper tool to ensure good adhesion between the vinyl and the transfer tape.
- Reverse Weeding Process: Now comes the clever part. Instead of removing the inner pieces, you’ll peel away the negative space – the vinyl surrounding your little ‘X’s. This means you will be left with the small ‘X’s (your cross-stitch elements) perfectly adhered to the transfer tape. This is indeed the opposite of traditional weeding, but for this intricate design, it proves to be much more effective and less frustrating. The tiny cross-stitch shapes are delicate, and reverse weeding minimizes the risk of losing or distorting them.
- Inspect Your Pieces: Once all the negative space is removed for each color, you’ll have a collection of perfectly weeded cross-stitch jigsaw puzzle pieces, each ready for application. Take a moment to admire your precision!
Mastering Vinyl Application on a Curved Surface
Applying vinyl to a curved surface like a Christmas ornament requires a bit of patience and a few clever techniques. The goal is a smooth, bubble-free finish. This is where your attention to detail will really pay off, creating that polished, professional look.
- Start with the Silver Background: Begin by applying the silver background piece first. This provides a solid base for your cross-stitch design and helps with overall alignment. Carefully position it on your clear ornament, starting from the center and working your way outwards.
- Layering Each Color: Now, it’s time to layer the other colors. This is where the cross-stitch effect truly comes to life. Carefully line up each new color, referring to a picture of the finished ornament (like the initial image in this guide) to ensure accurate placement. Precision here makes all the difference in achieving the intended pattern.
Expert Tips for Applying Vinyl to Curved Surfaces:
- Don’t Stress About Transfer Tape Wrinkles: When applying vinyl to a sphere, it’s almost impossible for the transfer tape to remain perfectly smooth. Don’t worry about folds or bends in the transfer tape itself. Your primary focus should be on ensuring the actual vinyl design lines up correctly and adheres smoothly to the ornament.
- Work in Sections: For larger or more complex designs, you can cut the transfer tape with the vinyl design into smaller, more manageable pieces. This allows you to apply sections individually, making it easier to navigate curves and prevent bubbles.
- Use Your Fingers and a Squeegee: After positioning, firmly press the vinyl onto the ornament using your fingers, working from the center outwards to push out any air bubbles. A soft felt-edged squeegee can also be helpful for smoothing, but be gentle on delicate ornaments.
- Slow and Steady Wins the Race: Peel back the transfer tape slowly and at a sharp angle. If any part of the vinyl isn’t sticking, press it back down with your finger or squeegee before continuing to peel.
- Patience is Key: Layering multiple colors, especially tiny pieces, requires patience. Take your time with each layer to ensure perfect alignment and adhesion. The end result will be well worth the effort!
Once all the vinyl pieces have been carefully applied and layered, you’ll be left with this stunning cross-stitch rose design. Isn’t it incredibly cool how vinyl can mimic such a traditional craft? The visual impact is far greater than the actual difficulty involved in making it!
Adding the Finishing Touch: Clear or Painted?
With your vinyl design expertly applied, you have an exciting decision to make: will your ornament remain beautifully clear, allowing light to shine through and highlight the design, or will you add an optional pop of color with paint?
To Paint Your Ornament (Optional):
If you opt for a painted background to make your vinyl design truly pop, here’s how to achieve a smooth, even coating on the inside of a clear ornament:
- Choose Your Paint: Acrylic craft paint works wonderfully for this. You can choose any color that complements your vinyl design or your overall holiday decor scheme.
- Pour and Swirl: Remove the cap from your ornament. Pour a small amount of paint directly into the ornament. Start with less than you think you need; you can always add more. Gently swirl the ornament, rotating it slowly to coat the entire inner surface. Ensure the paint reaches every crevice, creating an opaque layer.
- Drain Excess Paint: Once the inside is fully coated, turn the ornament upside down over a paper towel or disposable cup. Allow all the extra paint to drip out. This step is crucial to prevent puddling and ensure an even finish. You might need to let it drain for several hours or even overnight.
- Dry Completely: Place the ornament right-side up in an egg carton or similar holder to dry completely. This can take 24-48 hours, depending on the paint and humidity. Ensure it’s fully dry before replacing the cap and displaying it.
Whether you leave it clear or paint it, your ornament is now a unique piece of art, ready to be showcased!
And just like that, your personalized cross-stitch vinyl Christmas ornament is complete! It’s incredible how such a simple craft can yield such a sophisticated and charming result. This year, if you’re experimenting with non-traditional color schemes or simply looking for something fresh and handmade, this happy ornament will fit right in. Imagine a whole tree adorned with these delightful creations, each one a testament to your creativity and holiday spirit.
Beyond the Basics: Customization and Community Inspiration
The beauty of DIY crafts lies in their endless possibilities for customization. Don’t feel limited to the rose design or the specific colors used here. Experiment with different cross-stitch patterns – perhaps a festive reindeer, a simple snowflake, or even personalized initials. Play with various vinyl finishes like glitter, metallic, or holographic for an extra festive touch. You could also try different ornament shapes, from traditional spheres to flat discs, or even create vinyl designs for gift tags and holiday cards.
Crafting challenges are fantastic ways to spark creativity and discover new ideas. This ornament was created as part of a challenge hosted by Expressions Vinyl, and such events often lead to a wealth of innovative projects from fellow crafters.
For more inspiration and to explore other fantastic ornament ideas created by a community of talented crafters, you can often visit craft blogs and dedicated challenge pages. Check out resources like the Expressions Vinyl blog to see how other participants interpreted similar challenges. Engaging with craft communities is a wonderful way to learn new techniques, get inspired, and perhaps even discover opportunities for giveaways or special offers on crafting supplies. Supporting fellow crafters and sharing your passion makes the creative journey even more rewarding!
Conclusion: Your Handmade Holiday Masterpiece Awaits
Creating your own cross-stitch vinyl Christmas ornament is a deeply satisfying project that yields beautiful, personalized results. It’s a testament to how accessible and enjoyable crafting can be, even for seemingly complex designs. Whether you’re a seasoned crafter or just starting your DIY journey, this tutorial empowers you to add a unique, handmade touch to your holiday celebrations. Imagine the joy of hanging an ornament you’ve crafted yourself, or gifting a truly personal piece to someone special.
So, gather your supplies, fire up your Silhouette machine, and prepare to infuse your holiday season with creativity and charm. We encourage you to try this project and experience the magic of handmade decor. Don’t forget to share your creations and inspire others! Happy crafting!