Unleash Your Creativity: Crafting Stunning Giant Paper Sunflowers from Cardstock
Welcome, fellow crafters, to a world where paper transcends its humble origins to become breathtaking works of art! If you’ve ever dreamt of filling your home or event space with vibrant, cheerful blooms that last forever, then you’re in the right place. Today, we’re diving deep into the delightful process of creating magnificent giant paper sunflowers from simple cardstock. Not only will these sunflowers infuse any setting with warmth and charm, but they also offer an incredibly satisfying DIY experience.
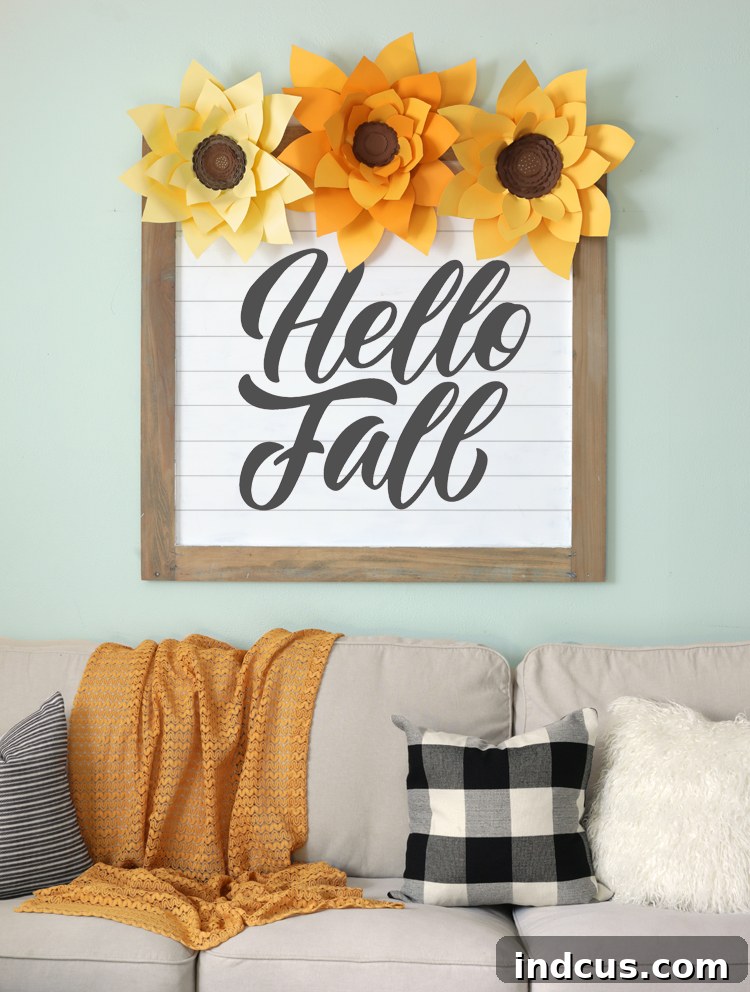
My enduring fascination with giant paper flowers is no secret. I’ve explored countless ways to integrate them into my decor and special projects. From adorning a Christmas tree with delicate paper blossoms to constructing an impressive oversized paper flower American flag, these versatile creations have brought so much joy. I’ve even dedicated an entire resource to curating the best free paper flower templates available, ensuring everyone can join in on the fun. There’s just something inherently magical about transforming flat sheets of paper into voluminous, lifelike flora!
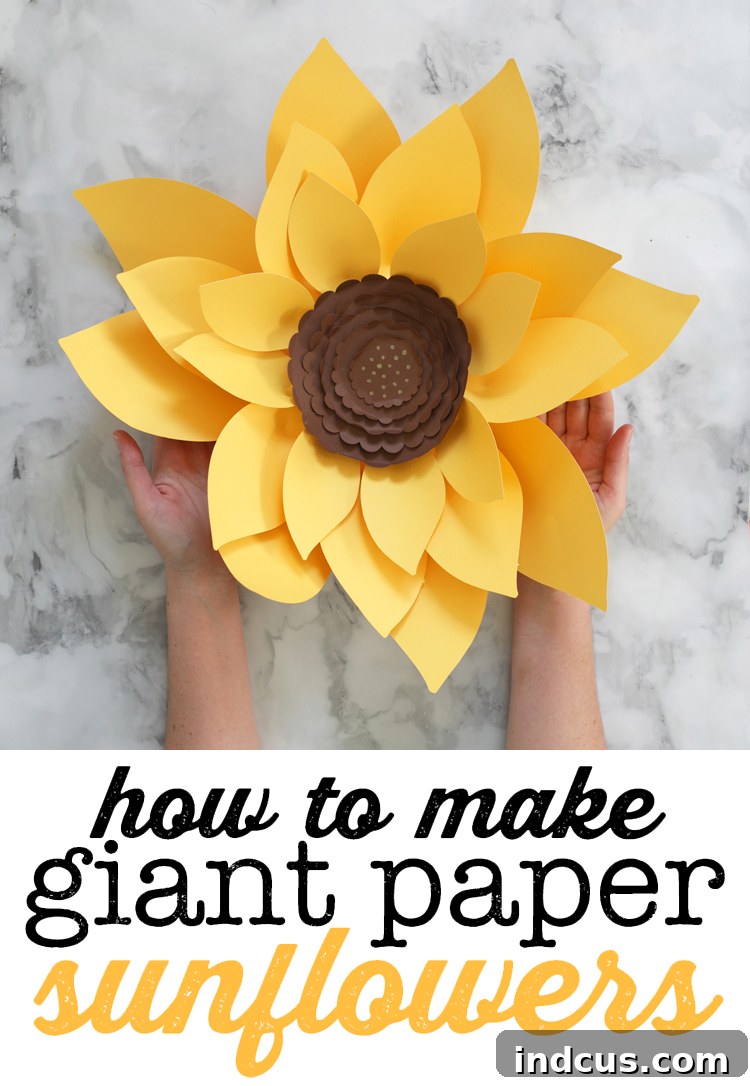
This fall, my creative compass pointed directly towards the iconic sunflower. Its radiant beauty and joyful disposition make it the quintessential autumn bloom. Crafting these giant paper sunflowers has been an absolute delight, and I simply couldn’t wait to share this project with you. They truly add a touch of sunny happiness and festive fall flair to any space, becoming an instant focal point that captures attention and spreads cheer. Trust me, these vibrant paper masterpieces are a must-have for your seasonal decorating!
To help you embark on this crafting adventure, I’ve prepared comprehensive resources. You can easily download the essential files at the bottom of this post. Whether you’re a digital crafting enthusiast or prefer a hands-on approach, I’ve got you covered. The download includes high-quality SVG cut files, perfectly optimized for use with your Silhouette or Cricut cutting machine. Additionally, I’ve provided printable patterns, allowing you to meticulously cut out each petal and component by hand if you don’t own a cutting machine. Flexibility and accessibility are key to enjoyable crafting!
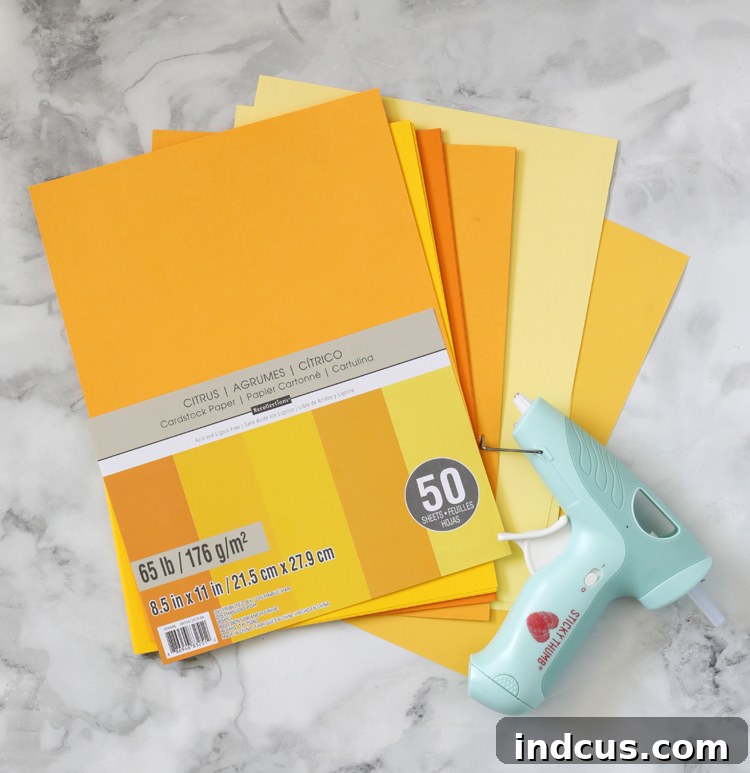
Gather Your Essentials: Materials and Tools
Before we begin transforming simple paper into magnificent sunflowers, ensure you have all the necessary materials on hand. Having everything ready will make your crafting process smooth and enjoyable.
- Yellow and Brown Cardstock: The backbone of your sunflowers! Opt for sturdy cardstock, ideally 65lb to 80lb weight, to ensure your petals hold their shape beautifully. Vibrant yellow shades for the petals and a rich brown for the center will give your sunflowers an authentic look. Keep an eye out for sales at craft stores like Michaels; often, you can find great packs at an affordable price, just like I did for $3!
- Hot Glue Gun + Glue Sticks: Your primary adhesive for quick and strong bonds. A good hot glue gun will ensure your petals stay firmly in place, creating a durable and long-lasting flower. Make sure you have plenty of glue sticks!
- Cutting Tool Options:
- Silhouette Cameo or Cricut Machine: For precise and efficient cutting. These machines save a tremendous amount of time and effort, especially when making multiple flowers or intricate designs.
- OR Printable Patterns + Sharp Scissors: If you don’t have a cutting machine, a sharp pair of scissors and a steady hand will work perfectly. Precision is key when hand-cutting to ensure your petals fit together seamlessly.
- Optional but Recommended: A bone folder or a wooden dowel for curling petals, and a self-healing cutting mat if hand-cutting with a craft knife for precision.
With your materials assembled, you’re ready to dive into the crafting process and bring these beautiful giant paper sunflowers to life!
Crafting with Precision: Instructions for Using a Cutting Machine
Utilizing a cutting machine like a Silhouette Cameo or Cricut makes the process of cutting numerous intricate petals a breeze. Follow these steps to prepare your materials and achieve perfect cuts every time:
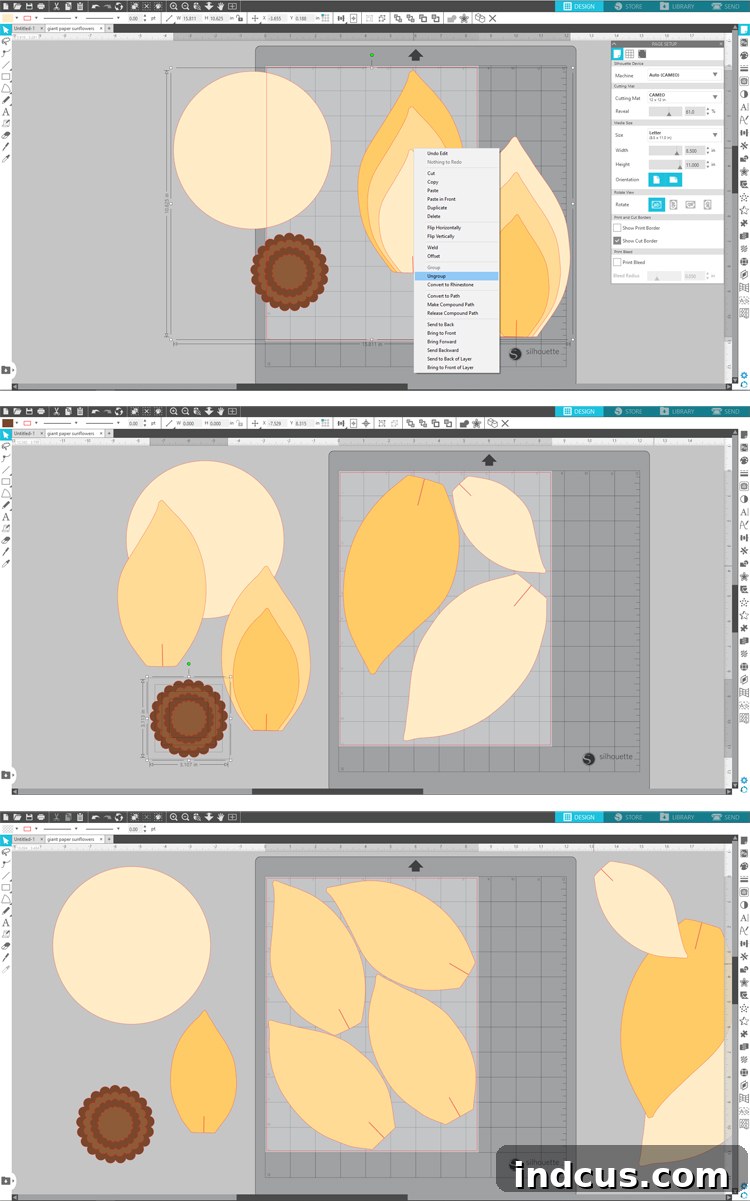
Step 1: Begin by downloading the free paper flower SVG cut files provided at the bottom of this post. Once downloaded, import these files into your preferred design software, such as Silhouette Design Studio or Cricut Design Space. Ensure all layers are correctly recognized.
Step 2: In your design software, ungroup the various petal designs. This will allow you to manipulate each element individually. Strategically arrange the petals and other shapes on your virtual cutting mat to optimize paper usage. You can move any extra petals off the cutting mat temporarily if they are not needed for the current cut, allowing you to cut different sizes or shapes on separate sheets of cardstock.
Step 3: Adjust your machine’s cut settings specifically for cardstock. Cardstock typically requires a deeper blade setting and possibly multiple passes compared to regular paper. Always perform a test cut on a scrap piece of your chosen cardstock to verify the settings before cutting your main project. Once optimized, send the petals to be cut. Repeat this process until all the necessary shapes are perfectly cut. The large circular piece will serve as the sturdy base onto which you will glue all your petals. The brown scalloped pieces are specially designed to form the textured, intricate center of your sunflower.
*** A quick but crucial note on petal quantity: For each giant sunflower, you will need a minimum of 8 petals per size (large, medium, and small). To enhance the realism and natural appearance of your flower, the templates include two slightly different variations for each petal size. Don’t worry, you only need 8 petals in total for each size category. This means you should aim to cut approximately 4 petals of each of the two unique shapes within the same size group (e.g., 4 of large petal shape A and 4 of large petal shape B). This subtle variation adds depth and an organic feel to your finished sunflower. ***
Step 4: Once your petals are cut, it’s time to give them a natural, three-dimensional curve. Gently curl the edges of each petal. You can achieve this by lightly dragging the petal against the edge of a ruler, a wooden dowel, or a bone folder. A subtle curve makes a big difference in the final look, making your sunflowers appear more organic and less flat.
Step 5: Look closely at the bottom of each petal; you’ll notice a small slit. This slit is essential for giving your sunflower its signature voluminous, 3D shape. Fold one side of the slit over the other, overlapping them slightly, and secure this overlap with a tiny dab of hot glue. This creates a small dart at the base of the petal, pushing the paper upwards and giving it dimension. Ensure the glue dries completely before moving on.
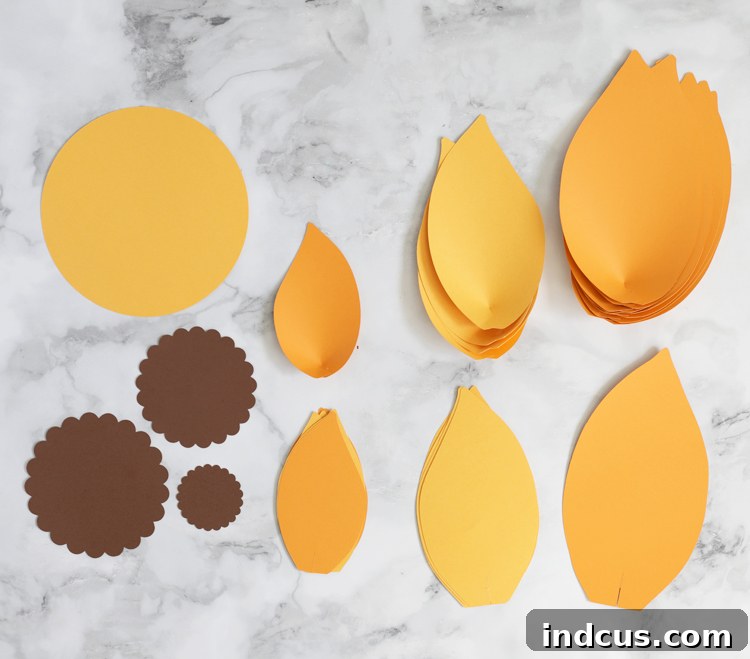
Step 6: Now, for the exciting assembly phase! Using your hot glue gun, begin by attaching the largest petals to the outer edge of your circular paper base. Position them evenly around the circumference, ensuring they overlap slightly to create a full, lush look. Next, move inward and attach the medium-sized petals in the same fashion, layering them just inside the large petals. Finally, secure the smallest petals towards the center. For the sunflower’s distinctive center, gently curl up the edges of the brown scalloped circles. Then, stack them from largest to smallest, gluing each layer to the one below it. This creates a beautifully textured and dimensional core for your sunflower. Press firmly to ensure all glued parts are secure.
Hand-Crafted Beauty: Instructions for Making Paper Flowers By Hand
If you prefer a more hands-on approach or don’t have access to a cutting machine, crafting these paper sunflowers by hand is equally rewarding. It simply requires a little more patience and precision.
First, download the free printable templates. Print these patterns onto standard copy paper. Carefully cut out each template shape. These will be your guides. Next, place the cut-out patterns onto the back of your chosen cardstock (the less visible side) and meticulously trace around them using a pencil. To ensure you have enough components for a complete flower, you’ll need to trace and cut 8 large petals, 8 medium petals, and 8 small petals. Additionally, trace and cut out the various scalloped circles that form the sunflower center, along with one large solid circle to serve as the sturdy base for assembling your flower. When cutting, use sharp scissors and take your time to follow the lines accurately for the best results.
Once all your pieces are cut, proceed with Steps 4, 5, and 6 from the “Instructions for Making Paper Flowers With A Cutting Machine” section above. These steps detail how to curl the petals, fold the bottom slit for a 3D effect, and finally, how to layer and glue all the petals and the center onto the base to construct your magnificent giant paper sunflower.
Visual Guide: Paper Sunflower Video Tutorial
Sometimes, seeing a process in action can clarify any uncertainties. Here’s a quick video tutorial demonstrating the assembly of the petals and the overall construction of your giant paper sunflower. This visual guide complements the written instructions, ensuring you master each step with confidence.
Creative Display Ideas: Decorating with Your Giant Paper Sunflowers
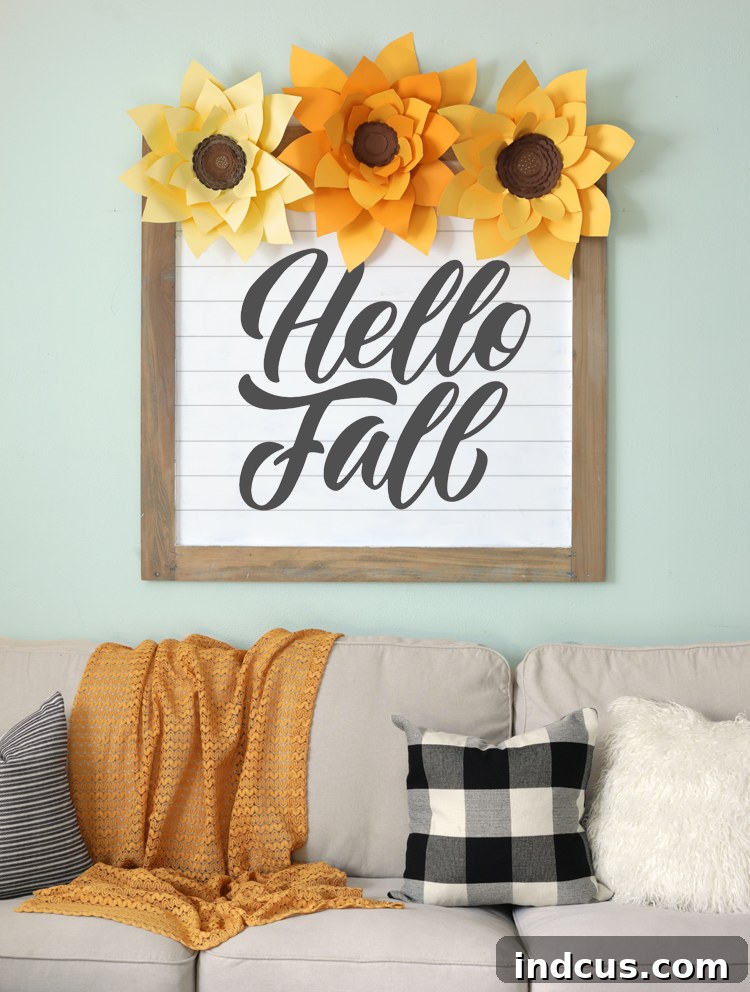
Once you’ve crafted your beautiful giant paper sunflowers, the real fun begins: decorating! These versatile blooms can transform any space, adding a touch of personalized charm and vibrant color. I proudly hung my paper flowers above a charming shiplap sign in my downstairs living room, but the possibilities are truly endless. Here are a few more inspiring ideas for how you could decorate with your stunning paper sunflowers:
- Wall Art: Create an eye-catching focal point by hanging them on a blank wall above a TV console, an elegant armoire, a dresser in a bedroom, or nestled in a cozy corner hutch. They instantly add texture and dimension to any vertical space.
- Welcoming Entryway: Adorn your front door or porch area with a cluster of sunflowers. If you have a covered porch, they’ll be protected from the elements, creating a warm and inviting entrance for guests throughout the fall season.
- Stunning Party Backdrops: For events like weddings, baby showers, birthdays, or fall harvest festivals, craft an entire backdrop composed of various-sized sunflowers. This creates a magnificent photo opportunity and a memorable ambiance for your celebration.
- Window Embellishments: Elevate your window decor by hanging your paper sunflowers above a window frame, much like I did in my craft room. They frame the view beautifully and allow natural light to filter through, highlighting their vibrant colors.
- Seasonal Mantelpiece: Arrange a display of sunflowers on your fireplace mantel, mixing them with real or faux autumn leaves, gourds, and candles for a cozy and festive fall centerpiece.
- Children’s Room Decor: Brighten up a child’s bedroom or nursery with these cheerful blooms. They add a playful and whimsical touch, perfect for inspiring imagination.
- Gift Toppers: Instead of traditional bows, use a smaller version of these paper sunflowers to embellish gifts. It adds a personal and handcrafted touch that makes any present extra special.
- Table Centerpieces: Arrange a few sunflowers in a decorative bowl or basket for a unique and long-lasting table centerpiece that brightens up your dining area.
- Bedroom Headboard Accent: Create a romantic and artistic headboard by attaching a cluster of sunflowers behind your bed, providing a beautiful focal point for your sleeping sanctuary.
- Office or Studio Inspiration: Bring a touch of nature and cheer into your workspace. A few strategically placed sunflowers can boost creativity and create a more pleasant environment.
With these ideas, your giant paper sunflowers are ready to bring beauty and joy wherever you choose to display them!
Unlock Your Free Templates: Get the SVG and Printable Files!
GET THE SVG and Printable Files
Check your email to download the printable file.
Found this tutorial inspiring? Don’t forget to pin it to your favorite craft boards so you can easily find it later and share the creative joy with others!