DIY Valentine’s Day Art on a Budget: Transforming Dollar Spot Finds into Stunning Decor
There’s an undeniable thrill in discovering charming little treasures that don’t break the bank, especially when they spark a burst of creative inspiration. Recently, I indulged in a delightful haul from Target’s infamous Dollar Spot – a haven for budget-friendly finds that are just begging to be transformed. If you’re like me, you love finding ways to infuse your home with seasonal cheer without emptying your wallet. This project began with a simple shopping trip and evolved into a vibrant, personalized piece of art, perfect for celebrating Valentine’s Day or simply adding a touch of sparkle to your home. Get ready to dive into a simple yet impactful DIY that proves beautiful decor doesn’t have to come with a hefty price tag.
For those new to my crafting adventures, you might not know I’ve been exploring the fun world of Instagram! It’s quickly become a delightful space for sharing quick peeks into my creative process and daily inspirations. I’m so glad I decided to give it a go, and it often serves as a great place to share initial ideas, like my recent Dollar Spot finds. The beauty of these affordable finds is their potential to become something truly unique with just a little imagination and effort. This particular project started as I sat admiring my new collection of goodies, pondering how to best utilize their charm. The result? A fantastic art piece that brightens my entryway and demonstrates just how much magic can be found in everyday items.
Why Embrace DIY for Your Holiday Decor?
Before we jump into the crafting process, let’s chat about why DIY holiday decor is such a rewarding endeavor. First and foremost, it’s incredibly **cost-effective**. Instead of splurging on mass-produced decorations, you can often create stunning pieces for a fraction of the cost using items you already own, dollar store finds, or craft supplies bought on sale. This project, for example, relied heavily on items from the Dollar Spot and Dollar Tree, making it exceptionally budget-friendly.
Secondly, DIY allows for **unparalleled personalization**. You get to choose the colors, themes, and styles that perfectly match your home decor and your personal taste. No more settling for generic items that don’t quite fit your vision! Your creations will be truly unique, carrying a special charm that store-bought items simply can’t replicate. Each piece tells a story, imbued with your creativity and effort.
Moreover, crafting provides a wonderful **creative outlet**. It’s a chance to unwind, express yourself, and tap into your artistic side. The process itself can be therapeutic, and the satisfaction of seeing a project come to life from start to finish is immense. It’s also an excellent way to **reduce waste** by repurposing items or giving new life to inexpensive materials, contributing to a more sustainable approach to home decor. Finally, DIY projects can become cherished family activities, creating lasting memories as you craft together. It’s more than just decorating; it’s about making your home truly yours.
Materials You’ll Need for Your Sparkling Valentine’s Art
Gathering your supplies is the first exciting step in any DIY adventure. For this project, we’re keeping it simple and affordable, mostly relying on finds from dollar stores and craft stashes. Here’s what you’ll need:
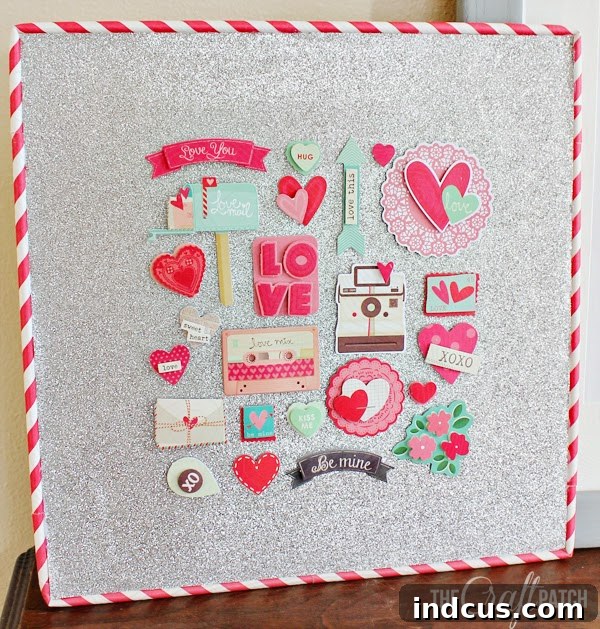
- 3D Stickers: I used four packages of themed stickers from Target’s Dollar Spot. Look for ones with different shapes, colors, and textures that appeal to you.
- 12×12 Silver Glitter Paper: This will be your dazzling backdrop. Any glitter scrapbook paper will work, but silver provides a versatile sparkle.
- Foam Core Board: A sturdy 12×12 inch piece is ideal to give your art structure. Easily found at Dollar Tree or craft stores.
- Craft Glue: A strong adhesive suitable for paper to foam. White craft glue or a spray adhesive works well.
- Hot Glue Gun and Glue Sticks: Essential for securing the straw frame.
- Paper Straws: These charming straws will become your unique frame. Look for festive colors or patterns.
- Scissors: For cutting stickers and straws.
Step-by-Step Guide: Creating Your DIY Valentine’s Day Specimen Art
Let’s turn those simple materials into a work of art! This project is designed to be straightforward, allowing for both creative freedom and a beautiful end result.
1. Preparing Your 3D Stickers: The Dry-Fit Advantage
My journey began with four packages of these adorable 3D stickers, brimming with potential. They were the perfect starting point for an art piece that felt both whimsical and elegant. The key to a successful arrangement is to plan before you commit.
Carefully, I cut each individual sticker apart, making sure to leave the plastic backing intact. This step is crucial for what crafters call a “dry fit” – arranging your elements without permanent adhesion. By keeping the backing on, I could effortlessly move and rearrange the stickers countless times until I found the perfect composition. This freedom to experiment removes the pressure of making an immediate decision, allowing for a more thoughtful and satisfying design process. Consider different layouts – a grid, a random scattering, or perhaps a central focal point. This initial playful stage is where your creativity truly takes flight.
2. Building Your Sturdy Foundation: Glitter Paper and Foam Core
Once your stickers are ready for their grand debut, it’s time to prepare their stage. A strong foundation is essential for any art piece, ensuring longevity and a professional finish. I took a vibrant 12×12 silver glitter paper – the kind you find in scrapbook aisles, or often in dollar stores – and carefully adhered it to a piece of foam core. Foam core is fantastic for this purpose because it’s lightweight yet incredibly sturdy, preventing any warping that might occur with just cardstock.
To ensure a smooth, wrinkle-free application, I recommend using a good quality craft glue or even a spray adhesive for an even coat. Apply the adhesive to the foam core, then gently lay the glitter paper over it, smoothing out any air bubbles from the center outwards. This step is crucial for the overall polished look of your finished art. The glitter paper immediately elevates the project, providing a dazzling backdrop that makes your stickers truly pop.
3. The Art of Arrangement: Designing with Your Stickers
With your glittery canvas ready, it’s time for the fun part: arranging your prepared stickers! Recall the “dry fit” technique from earlier. Take your time during this stage, experimenting with various placements. Do you prefer a symmetrical pattern, a playful scattering, or a more structured design? I initially opted for a somewhat random yet balanced arrangement. Once you’re completely satisfied with your layout, carefully peel the plastic backing off each sticker, one by one, and press them firmly onto the glitter paper. Work methodically to avoid shifting your carefully planned design.
As I finalized my initial design, a sweet thought occurred to me: why not arrange them in the shape of a heart? After all, it is Valentine’s Day! While I had already adhered my stickers, this realization sparked an idea for future versions. If you’re making this for Valentine’s Day, definitely consider pre-arranging your stickers into a heart shape during your dry fit stage for an extra festive touch. The beauty of this craft is its adaptability; you can choose any shape or pattern that speaks to you.
4. The Finishing Touch: Crafting a Charming Straw Frame
Even after arranging the stickers, I felt the piece needed a little something extra – a frame to truly define it and give it a polished look. Rummaging through my craft stash, my eyes landed on a pack of festive party straws, and an idea instantly clicked! These weren’t just for drinks; they were the perfect material for a unique, whimsical frame.
Using a hot glue gun, I meticulously attached the straws around the perimeter of the foam core. The trick here is to fold the straws neatly at each corner, creating crisp angles that mimic a traditional frame. If your straws have stripes or patterns, try your best to align them as you go for a seamless look. The hot glue provides a strong, instant bond, making this step quick and satisfying. I was amazed at how this simple addition completely transformed the art piece, adding that “little extra something” that tied everything together beautifully. The paper straw frame truly gives the art a bespoke, handcrafted appeal, distinguishing it from ordinary decor.
Showcasing Your Masterpiece: Styling Your Entryway
And just like that, my new Valentine’s Day art piece was complete! The joy of finishing a DIY project is incomparable, especially when it adds a fresh, festive touch to your home. My entryway was instantly transformed, ready to welcome guests with a burst of color and charm. This new creation seamlessly integrated with my existing holiday decor, pulling everything together for a cohesive and inviting display.
To give you a better idea of how I styled it, imagine this: the centerpiece, my sparkling new sticker art, nestled among other budget-friendly Valentine’s accents. My trusty Dollar Tree hurricane vases, filled with more Dollar Tree glitter hearts and some charming red disco ball ornaments, flank the art. Above it, a delightful banner of Valentine’s cards, cleverly held together with mini clothespins, adds a touch of playful sentiment. Nearby, cute little paper clip love birds perch whimsically, and a large frame I revamped from a yard sale anchors the entire display. While this year I only added one new decoration, its impact was significant, truly pulling all the elements into a harmonious whole. It just goes to show you don’t need to spend a fortune to create a beautifully decorated space. Hurray for cheap, chic holiday decor!
Beyond Valentine’s Day: Seasonal Crafting Inspiration
The beauty of this crafting technique lies in its versatility. Once you’ve mastered the art of transforming simple stickers and foam core into holiday art, a whole world of seasonal decorating opens up to you! I’m already envisioning a collection of these charming signs for every major holiday throughout the year. Imagine the possibilities!
- St. Patrick’s Day: Swap out hearts for shimmering shamrocks, leprechauns, or pots of gold stickers on a vibrant green glitter background, framed with green and white striped straws.
- Easter: Think pastel-colored bunnies, chicks, or decorated eggs on a soft yellow or pink glitter paper, framed with floral-patterned straws.
- 4th of July: Red, white, and blue stars, flags, or fireworks stickers against a silver or blue glitter backdrop, framed with patriotic striped straws. This would make a fantastic display for summer BBQs!
- Halloween: Spooky-cute ghosts, pumpkins, bats, or cat stickers on an orange or black glitter paper, framed with black and orange striped straws.
- Thanksgiving: Autumn leaves, acorns, or cornucopia stickers on a warm gold or copper glitter paper, perhaps framed with rustic brown or plaid straws.
- Christmas/Winter: Snowflakes, reindeer, Santa, or festive ornament stickers on a frosty blue or classic red glitter paper, framed with candy cane striped or metallic straws.
This simple concept can be adapted endlessly, allowing you to create a rotating gallery of festive art that keeps your home fresh and seasonally appropriate. It’s an easy way to keep your decor exciting without a constant stream of new purchases, by simply switching out the theme of your stickers and paper. You’ll be “goin’ nuts” with ideas, just like me!
Pro Tips for Successful DIY Holiday Decorating
To make your DIY crafting experience even more enjoyable and successful, here are a few insider tips:
- Start with a Vision: Before you shop, have a general idea of the theme, colors, and style you’re aiming for. This helps prevent impulse buys and ensures your finished piece fits your decor.
- Shop Smart: Dollar stores, craft store sales, and even your own existing stash are excellent places to find materials. Don’t be afraid to repurpose old items.
- Experiment with Layouts: Always “dry fit” your elements. Lay everything out before gluing to finalize your design and avoid regrets.
- Patience is Key: While this is a quick project, take your time with each step, especially gluing and aligning, for the best results.
- Don’t Be Afraid to Personalize: Add your own unique twist! Embellishments like rhinestones, ribbons, or small bows can add extra flair.
- Involve Others: Crafting can be a fun activity for families and friends. Kids can help with sticker placement or choosing colors.
Conclusion: The Joy of Affordable and Charming Decor
This DIY Valentine’s Day art project stands as a testament to the power of imagination and budget-friendly shopping. From a humble Dollar Spot haul to a dazzling piece of personalized decor, it proves that you don’t need to spend a fortune to infuse your home with holiday spirit and artistic flair. The process itself is a joy – a creative escape that leaves you with a tangible piece of beauty.
The satisfaction of crafting something with your own hands, especially something so charming and unique, is incredibly rewarding. Whether it’s brightening your entryway or serving as a thoughtful gift, this glittery, sticker-filled art piece is sure to bring a smile. So, next time you’re browsing the aisles of your favorite dollar store, remember the potential tucked away in those inexpensive treasures. Grab some stickers, some glitter paper, and let your creativity shine! Happy crafting, and hurray for beautiful, budget-friendly home decor that truly reflects your style.