Craft Adorable Beaded Bow Keychains: The Perfect DIY for Beginners and Girls’ Nights
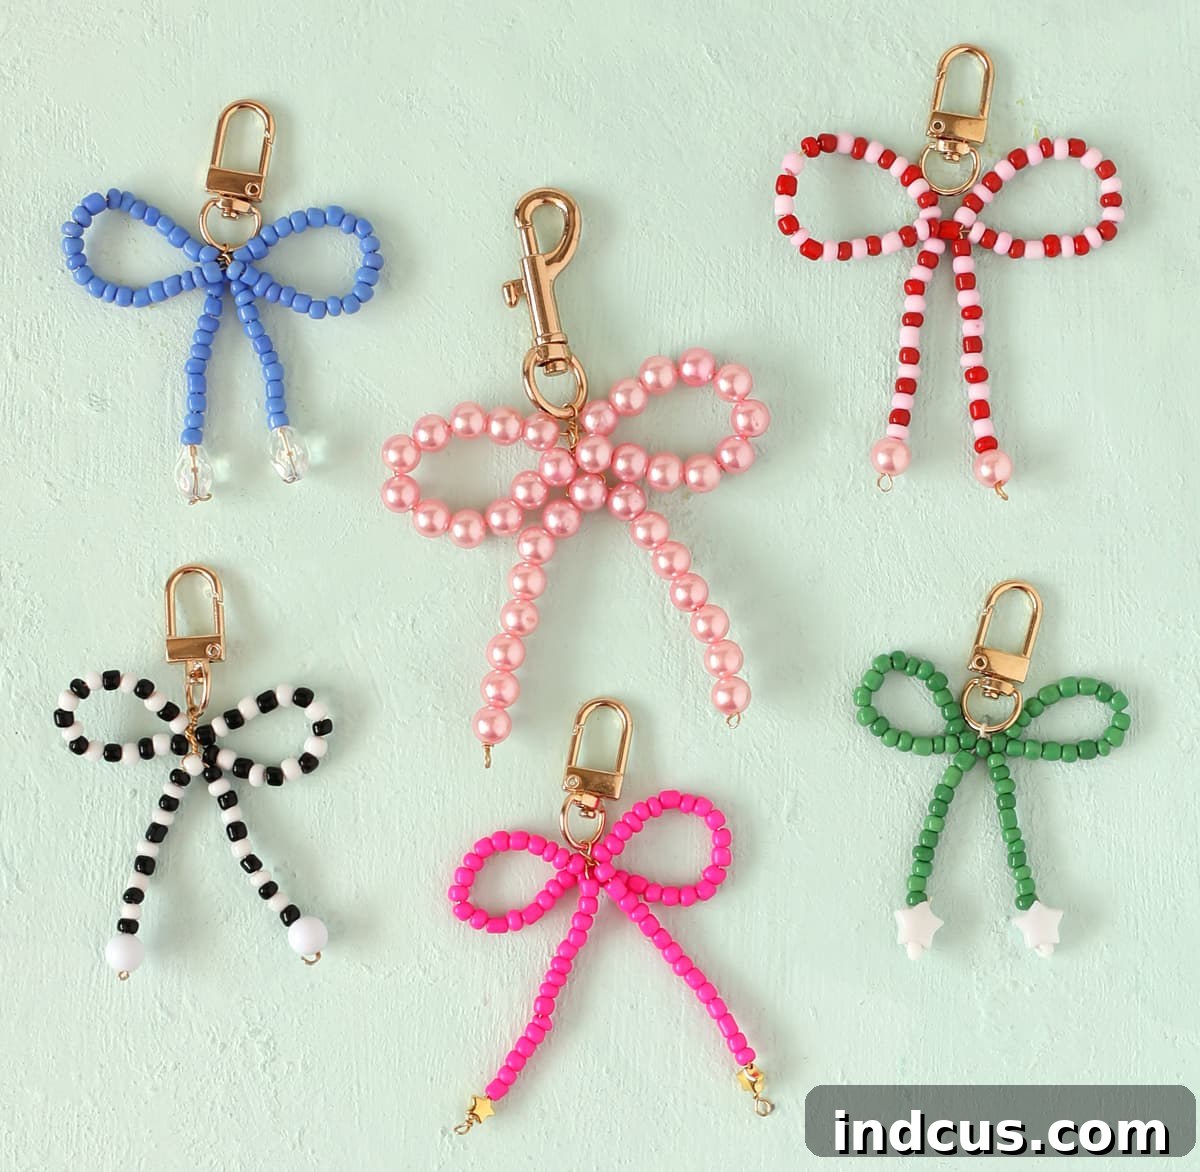
Are you searching for a delightful and straightforward crafting project that yields beautiful results? Look no further! This comprehensive guide will walk you through creating charming beaded bow keychains – a craft that’s not only incredibly cute but also surprisingly easy and budget-friendly. Whether you’re a seasoned crafter or just dipping your toes into the world of DIY jewelry making, these personalized keychains are a fantastic way to unleash your creativity. They make perfect gifts, unique party favors, or a fun accessory to brighten your own day. Prepare to be inspired; once you master this simple technique, you’ll want to craft a whole collection!
Handmade items carry a special charm, a touch of personal effort that mass-produced goods simply can’t replicate. These beaded bow keychains embody that spirit, offering endless possibilities for customization. Imagine creating a rainbow of bows, each one unique, reflecting different styles and personalities. Beyond being a stylish accessory for your keys, these bows can adorn handbags as charming charms, serve as zipper pulls for jackets and backpacks, or even be transformed into decorative ornaments. The beauty of this project lies in its simplicity and the joy of seeing your creation come to life, bead by bead. Get ready to embark on a fun, rewarding crafting journey that promises both enjoyment and adorable finished products.
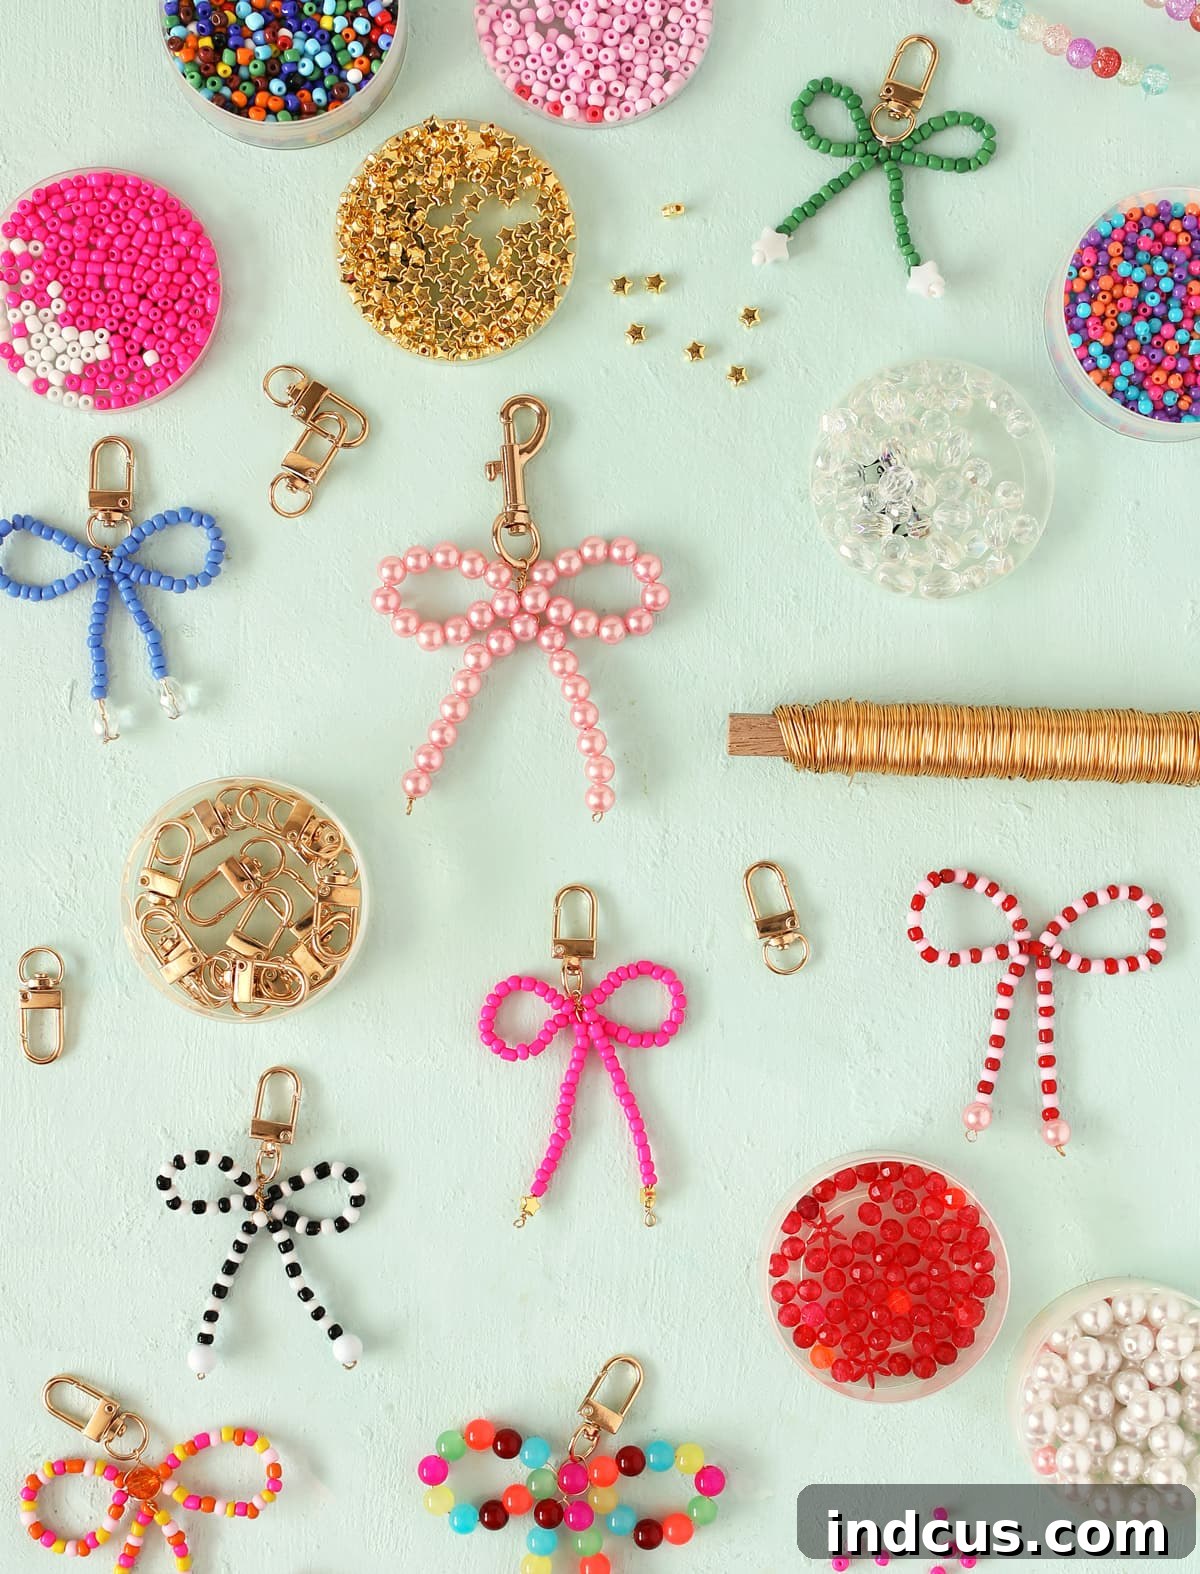
Essential Supplies for Your Beaded Bow Keychain Project
Before diving into the creative process, gathering your materials is key. One of the many advantages of this craft is that it requires only a handful of basic and inexpensive supplies, most of which can be found at your local craft store or online. This makes it an ideal choice for crafting sessions with friends, where everyone can easily acquire their own set of tools and beads. Here’s a detailed look at what you’ll need to get started:
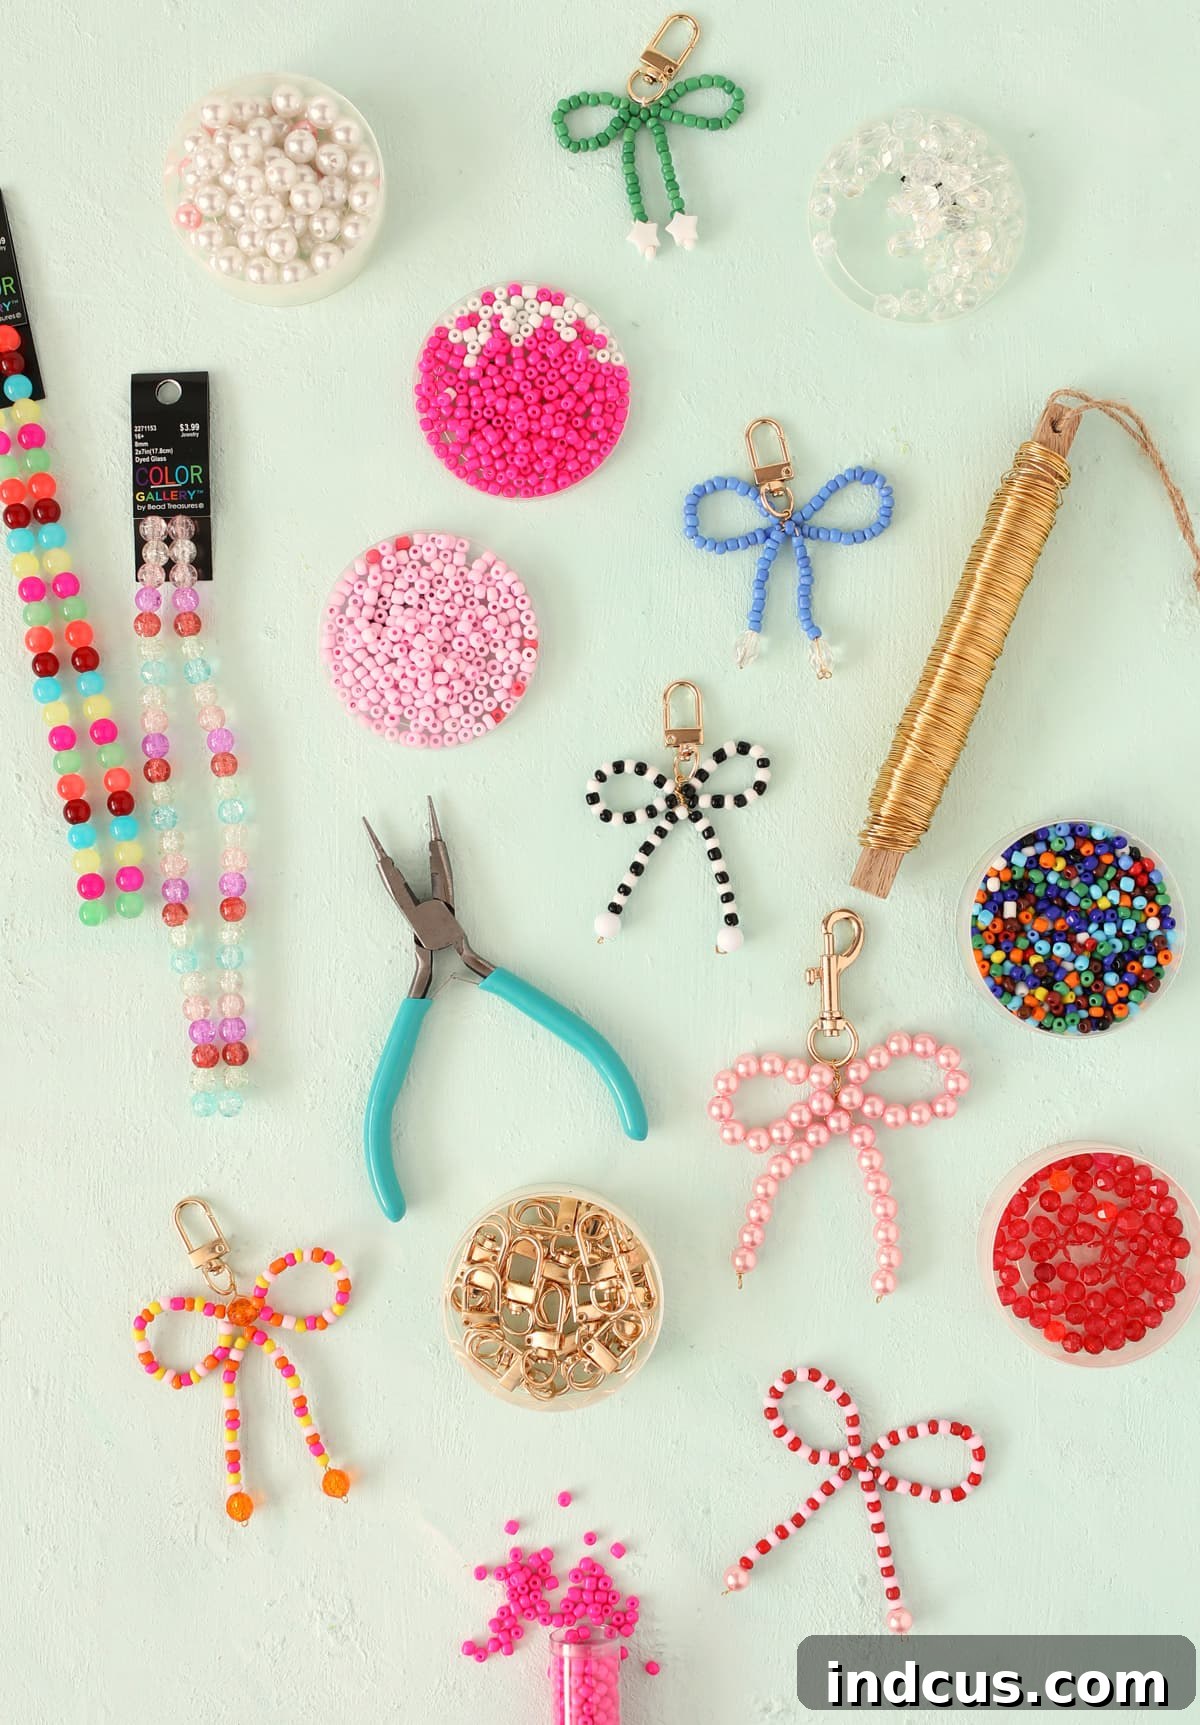
Materials List
Click on any highlighted item in the supply list for more information or to purchase. Affiliate links may be used, which means we may earn a small commission at no extra cost to you if you make a purchase.
- Assorted Beads (See important note below on bead and wire selection)
- Beading Wire – Recommended: 22 or 26 Gauge
- Jewelry Pliers – Round-nose pliers are ideal for shaping loops.
- Keychain Clasps – Swivel lobster clasps are easy to use.
- Wire Snips or Sharp Scissors – Essential for clean cuts.
When it comes to beads, the possibilities are virtually limitless, allowing for incredible personalization. You can experiment with various types, styles, and sizes of beads for this project. Seed beads (typically round and small) are a popular choice due to their versatility and wide range of colors. However, don’t hesitate to explore glass beads, acrylic beads, wooden beads, or even small semi-precious stone beads for a more elevated look. The key consideration is the hole size of your chosen beads, as this will dictate the appropriate beading wire gauge.
Understanding wire gauge is crucial for successful jewelry making. Wire gauge refers to the thickness of the wire: the lower the number, the thicker the wire. For example, a 12-gauge wire is quite thick and rigid, while a 32-gauge wire is very fine and pliable. The right wire gauge for your project depends entirely on the size of the bead holes. It’s imperative that your chosen wire can pass through the bead holes at least twice, as some steps in this project require double threading. Thicker wire offers greater strength and durability, but it can be more challenging to bend and manipulate. Conversely, thinner wire is easier to work with but can be prone to breaking if twisted too vigorously. If the thought of matching bead holes to wire gauges feels overwhelming, a simple solution is to opt for 26-gauge beading wire and 6/0 seed beads. This combination is highly forgiving and perfectly suited for this specific project, ensuring a smooth and enjoyable crafting experience without any guesswork.
Step-by-Step Instructions: Creating Your Beaded Bow Keychain
Crafting these adorable keychains is a straightforward process, designed for success even if you’re a complete beginner. Follow these detailed steps carefully, and you’ll have a beautiful beaded bow in no time. For visual learners, a helpful video tutorial is embedded at the end of this post to guide you through each stage.
Step 1: Prepare and Attach the Wire
Begin by cutting an 18-inch (approximately 45 cm) piece of your chosen beading wire. Finding the exact center of this wire is important for balance. Once you’ve located the center, thread it through the loop of your keychain clasp. Gently twist the wire once or twice directly below the clasp to secure it firmly in place. This initial twist creates a stable anchor for your bow. Remember throughout this entire project to handle the wire with care; excessive force can cause it to snap, especially with thinner gauges. A gentle but firm touch is all that’s needed.
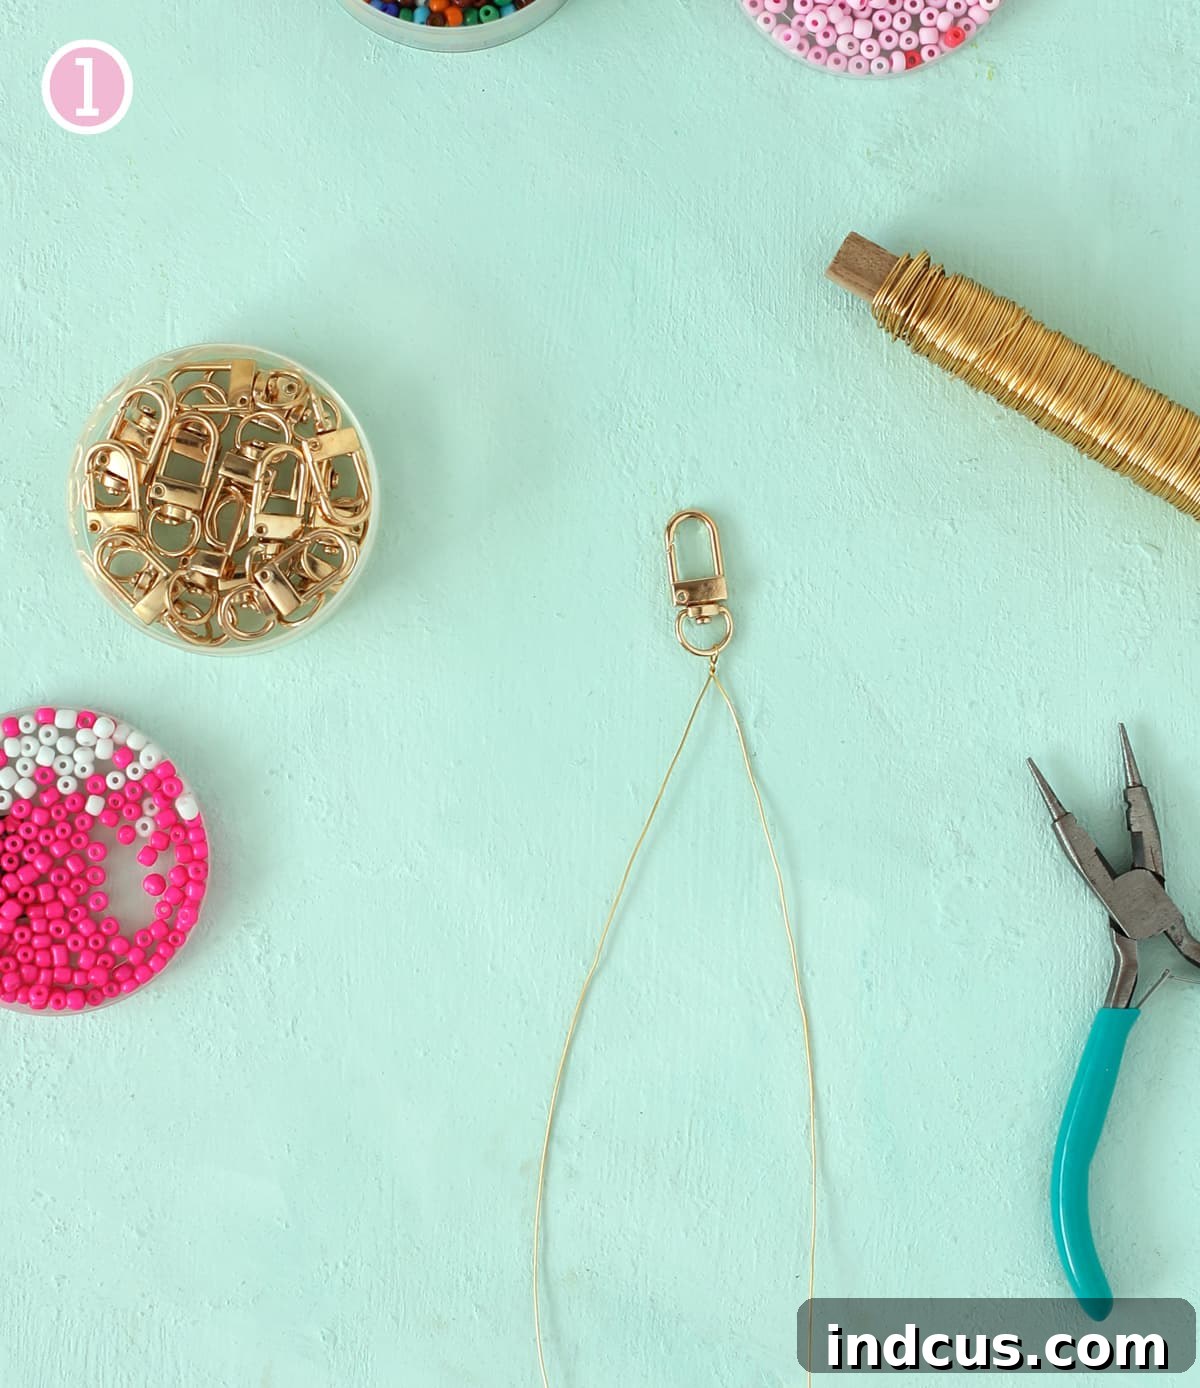
Step 2: String the Main Bow Beads
Now, it’s time to add the beads that will form the main loops of your bow. Take one end of the wire and string approximately 20 seed beads onto it. Repeat this process with the other end of the wire, ensuring that you string the same number of beads onto both sides. This symmetrical arrangement is crucial for creating a balanced and visually appealing bow. You can adjust the total number of beads (more for a larger bow, fewer for a smaller one), but always ensure an even count on each side to maintain symmetry. Push the beads down towards the twisted wire section near the keychain clasp.
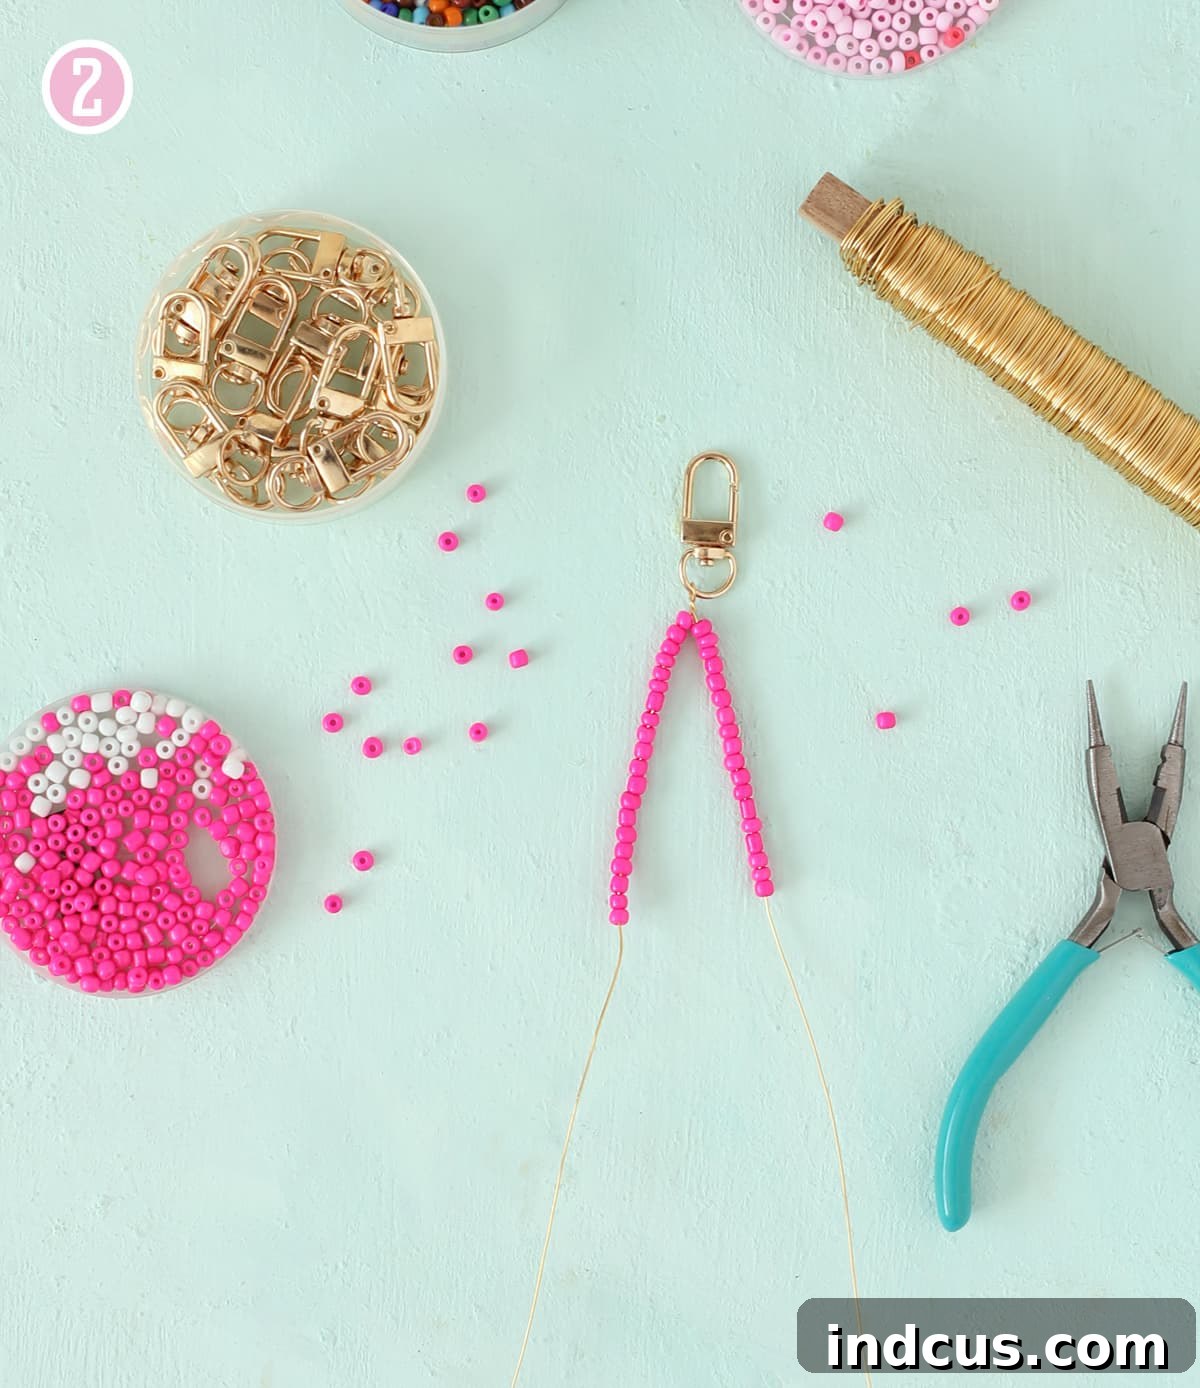
Step 3: Create the Bow’s Center Knot
This step forms the central “knot” of your bow. Take one more bead – this will be your focal center bead. String this bead onto the left wire (or right, it doesn’t matter which you start with). Now, with the right wire, carefully cross it through the *same* bead but from the opposite direction. Essentially, both wire ends should pass through this single bead, entering from opposite sides and exiting on opposite sides. This creates an interlocking effect.
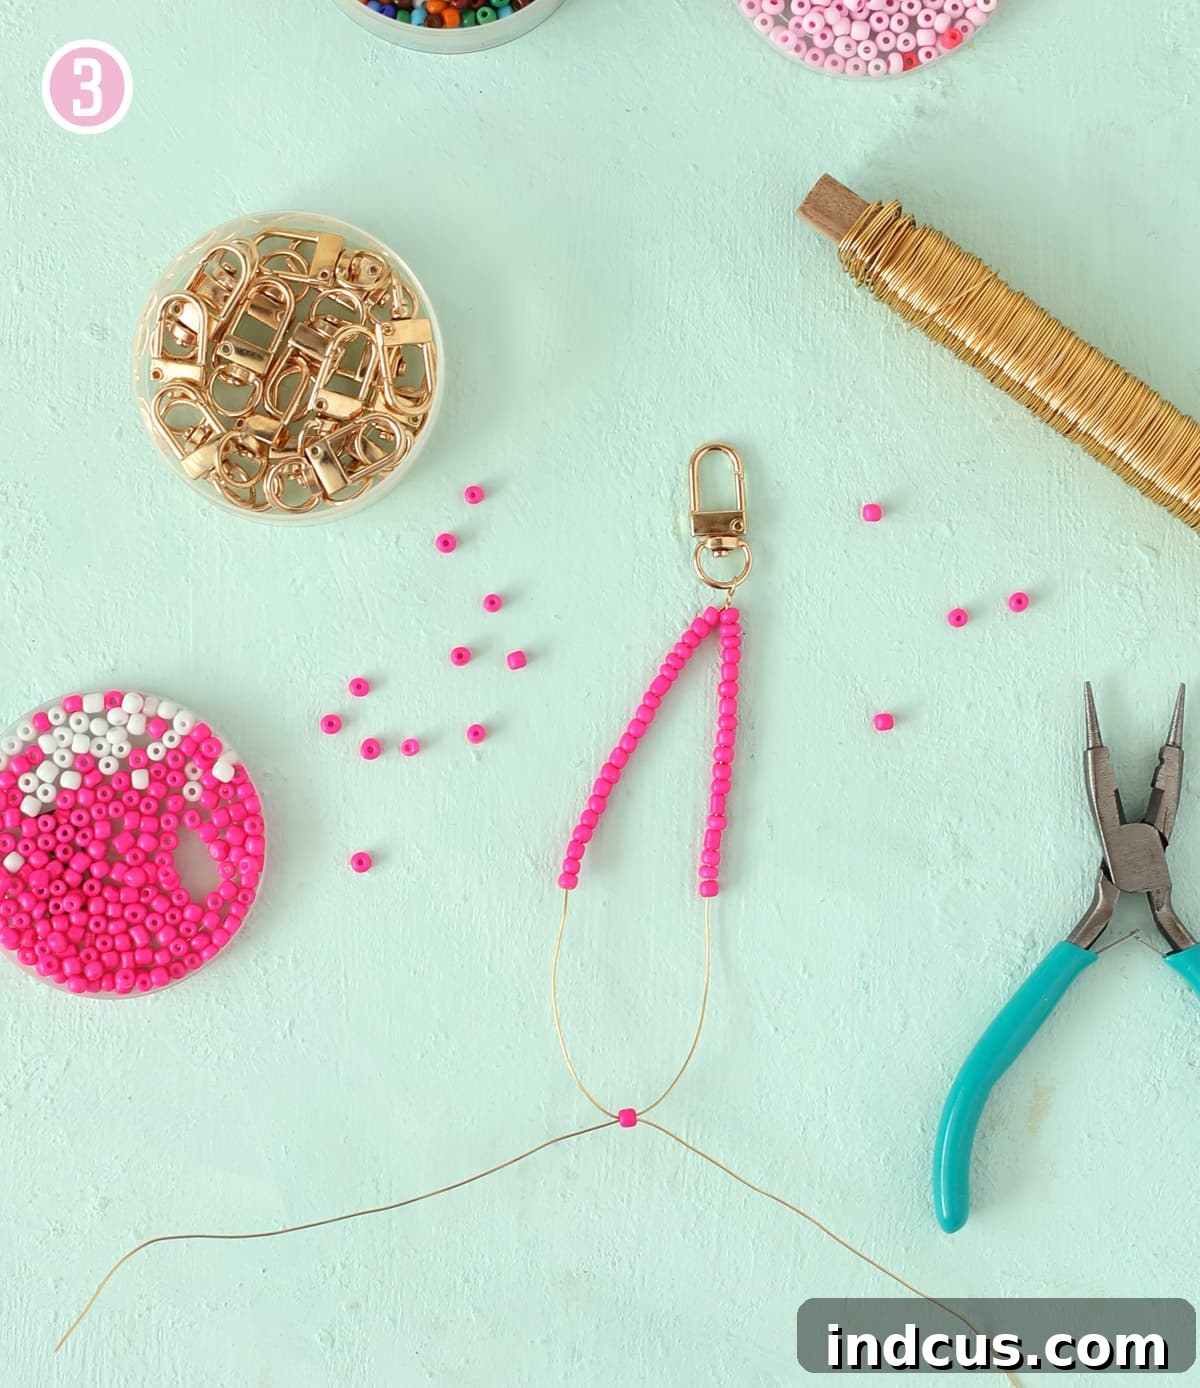
Gently pull both ends of the wire until this central bead is snug against the other beads, forming a neat circle. This action effectively brings the two beaded strands together, creating the initial shape of your bow.
Step 4: Form the Bow Loops
Now you’ll define the iconic loops of your bow. Take both ends of the wire and carefully guide them upwards and over the keychain clasp loop. Once both wires are over the clasp, bring them back down, twisting them once or twice directly below the clasp where your first twist was made. This action cinches the beaded strands into two distinct loops, forming the upper part of your bow. Adjust the beads gently to ensure the loops are evenly sized and gracefully shaped. This step really brings the bow to life!
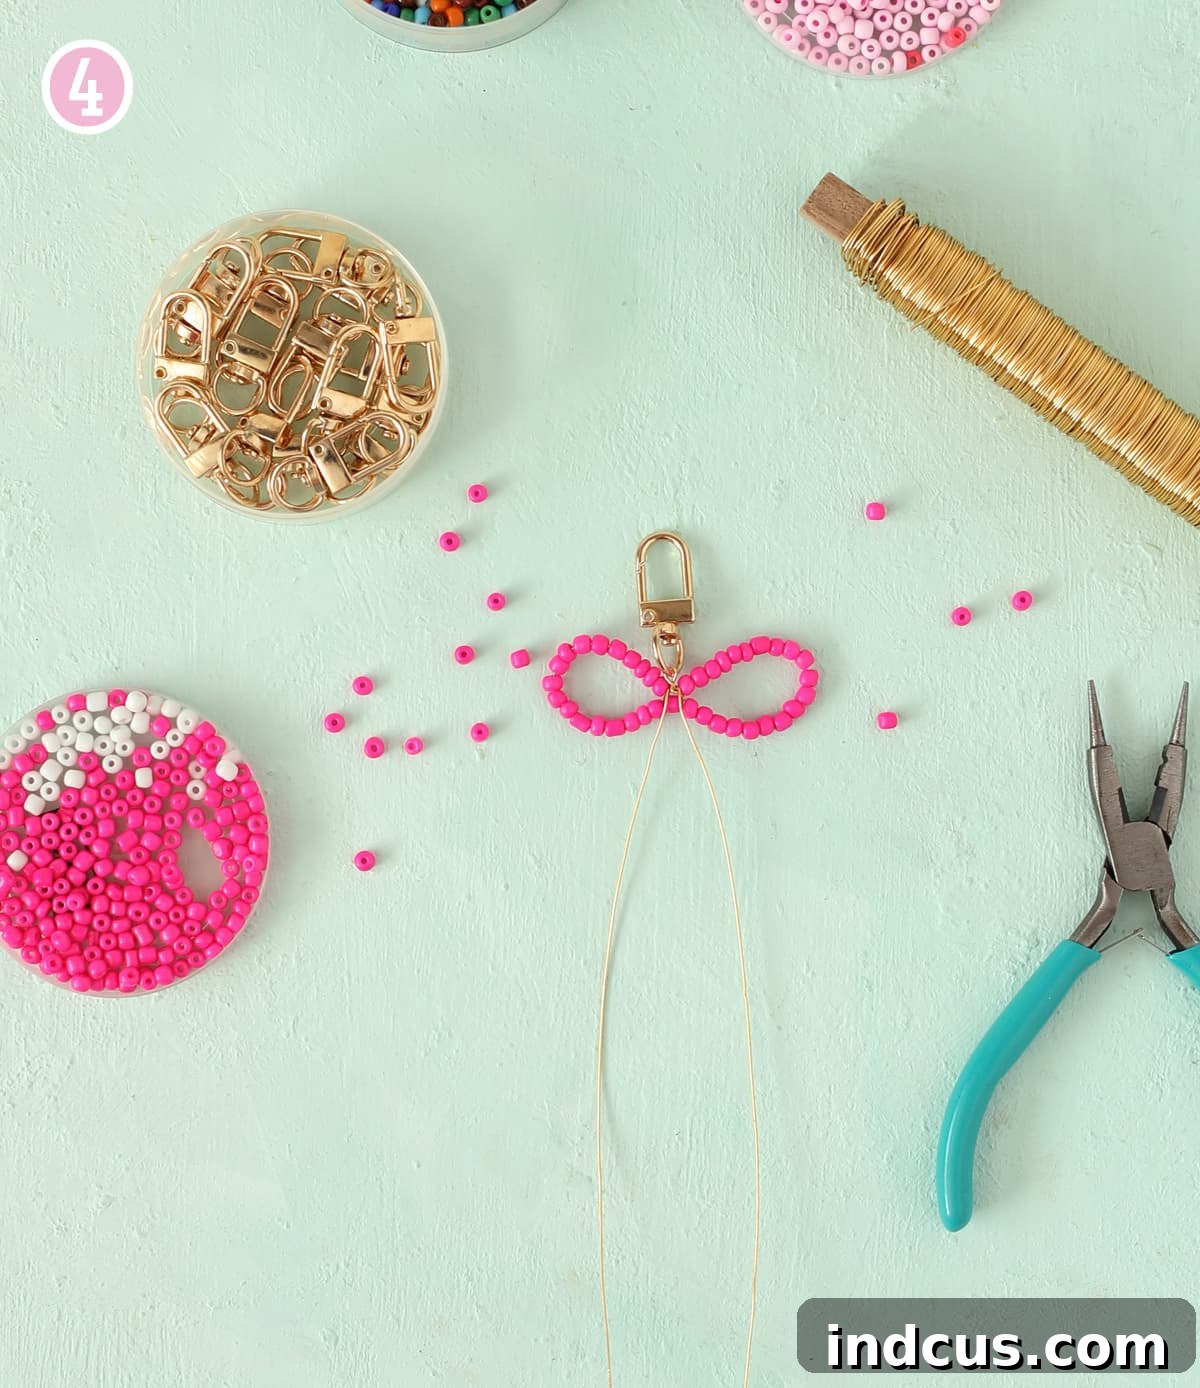
Step 5: Add the Bow Tails
With the main bow loops established, it’s time to create the dangling tails. Take one of the wire ends and begin stringing beads onto it. Continue adding beads until the tail reaches your desired length and aesthetic. For reference, the example shown used 14 beads per tail, creating a lovely proportional look. Repeat this process for the second wire end, ensuring you string an equal number of beads to create symmetrical tails. A helpful tip here is to complete one tail entirely before starting the second; this prevents beads from accidentally falling off one side while you’re focused on the other.
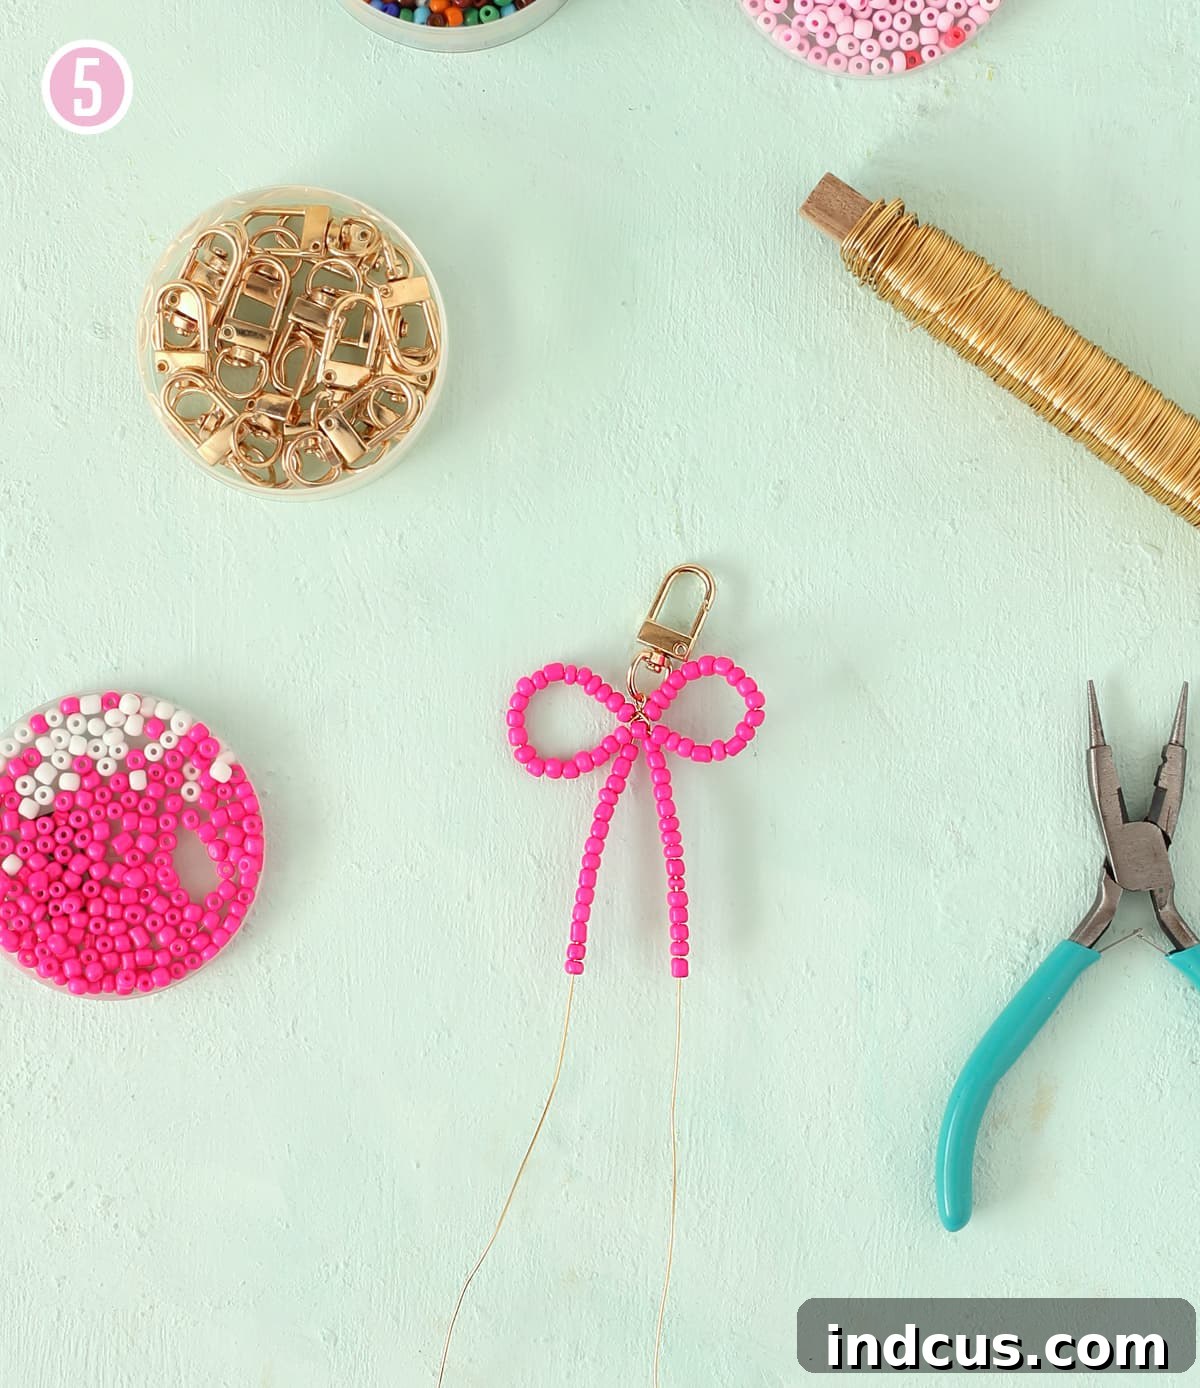
Step 6: Secure the Wire Ends – Initial Loop
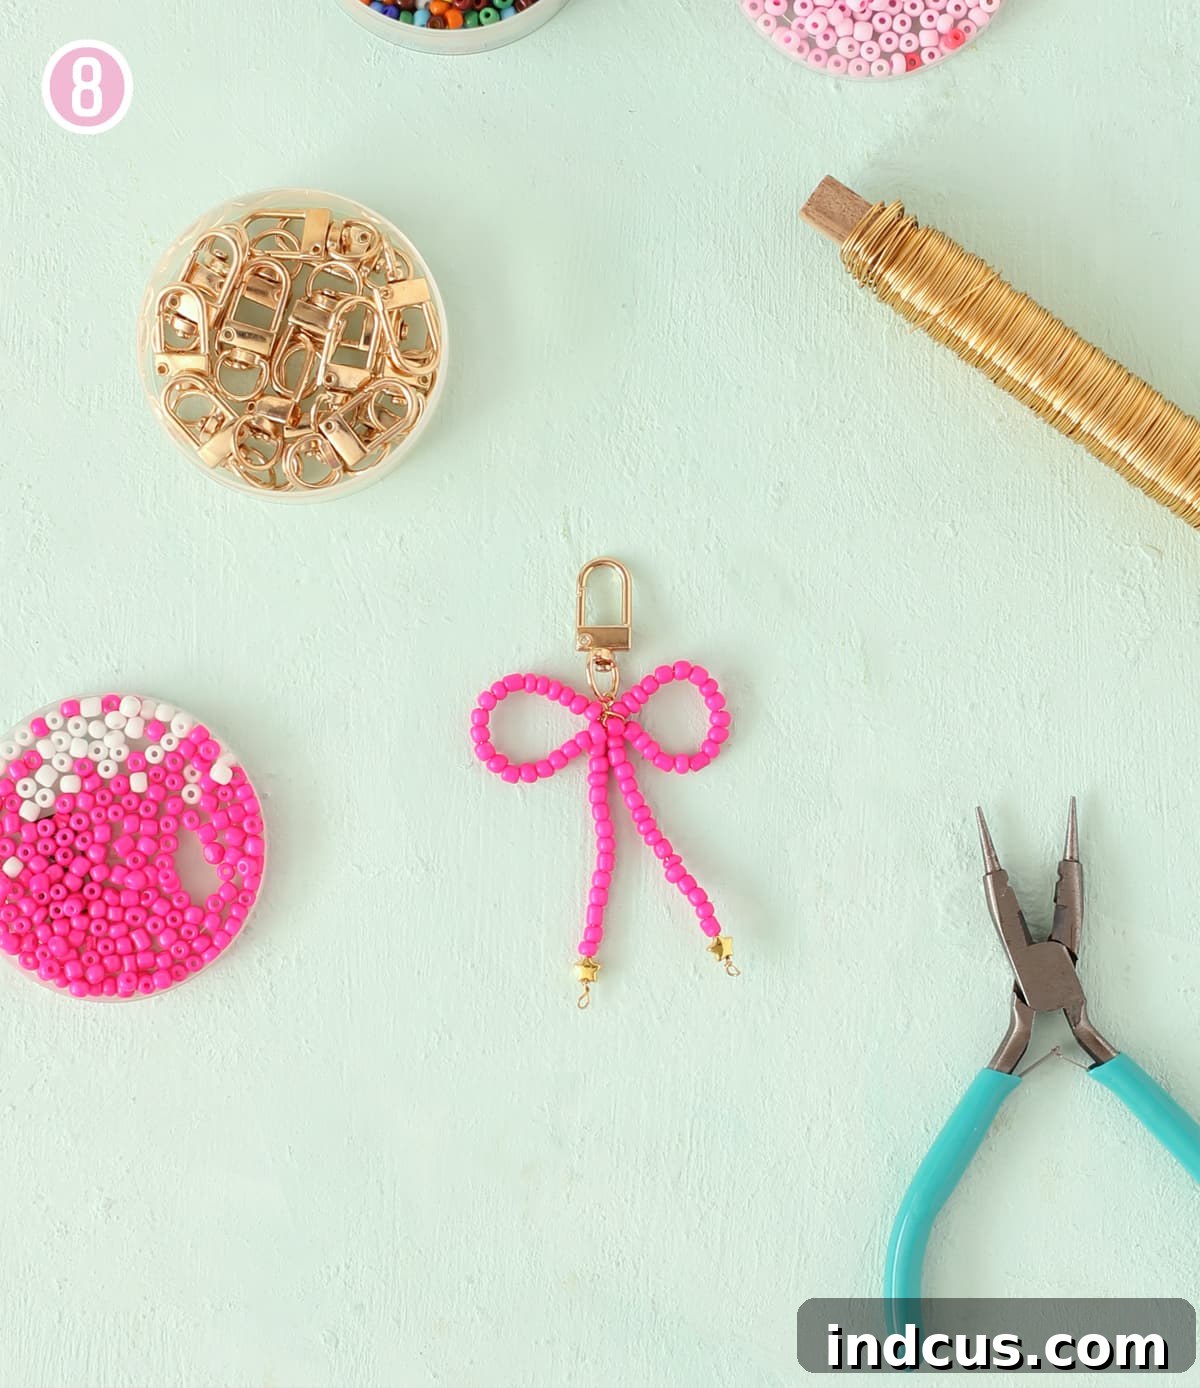
Now that your beautiful bow is fully formed, it’s time to secure the wire ends neatly. This is a crucial step for durability and a professional finish. Using your jewelry pliers (round-nose pliers work best for this), grasp the wire about 1/4 inch (about 0.6 cm) from the last bead. Create a small loop by bending the wire around the nose of the pliers. Once the loop is formed, wrap the remaining wire end tightly around the base of this newly formed loop twice. Ensure everything is snug and tight to prevent unraveling, but be careful not to overtighten, as this could weaken or break the wire, especially if you’re using a finer gauge.
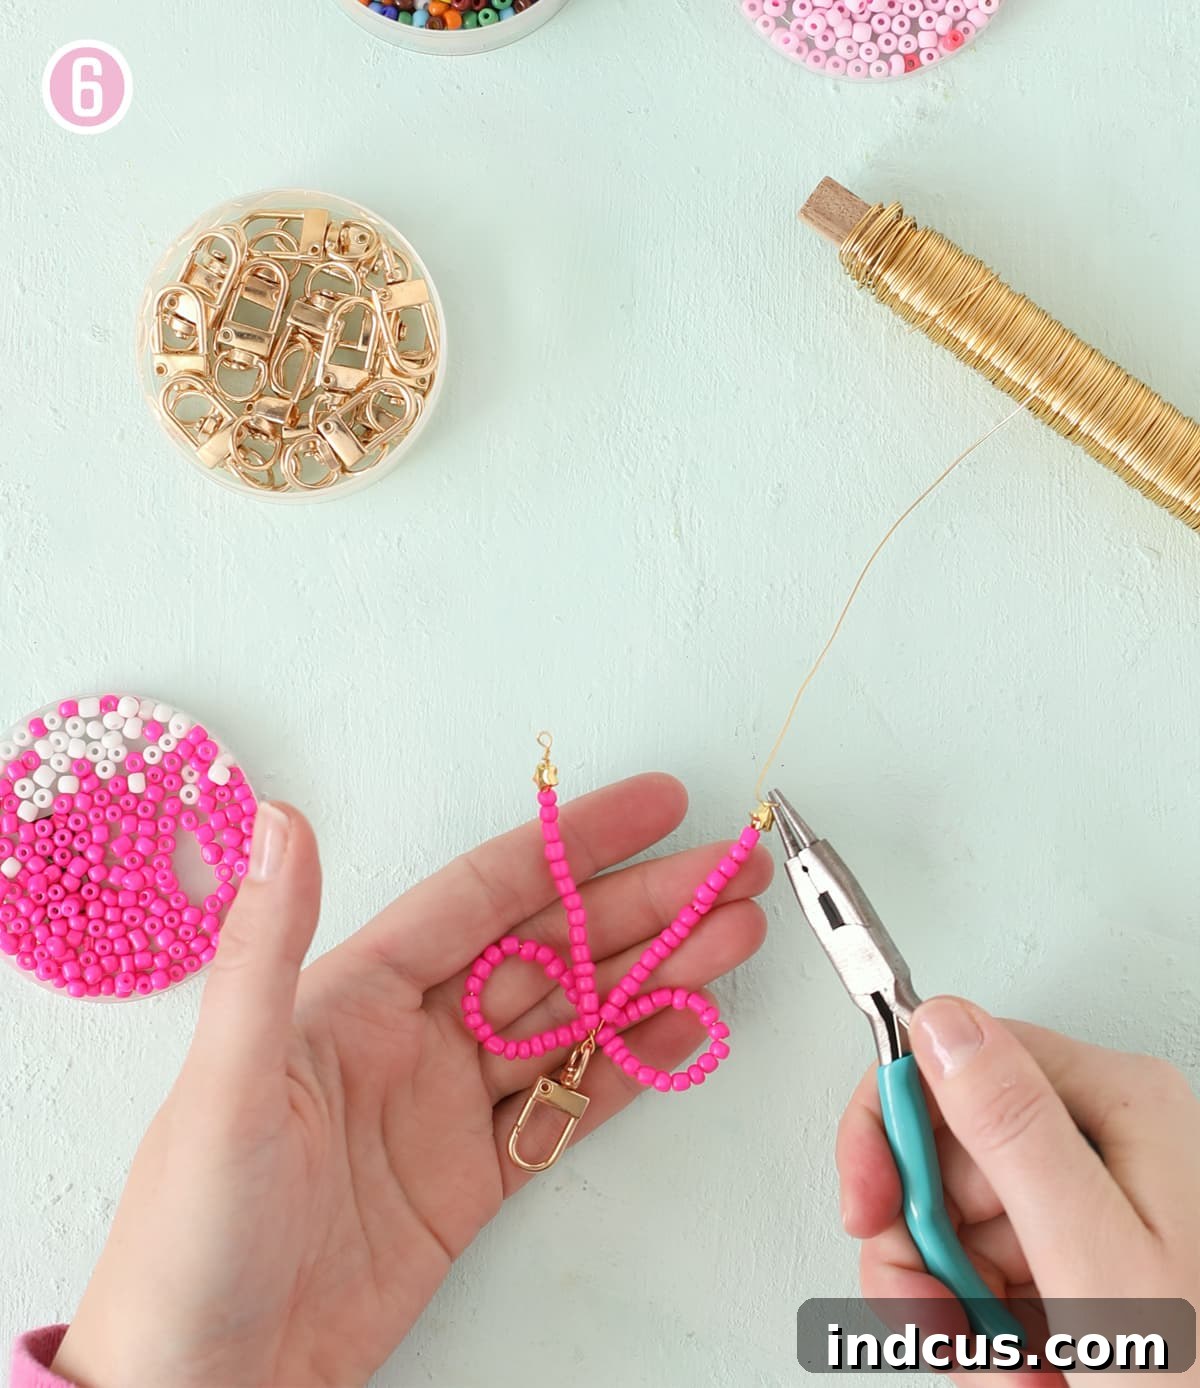
Step 7: Finalize and Trim
For a clean and secure finish, take the very end of the wrapped wire and feed it back up through the very last bead on that tail. Gently pull the wire until it’s smooth and tight, effectively tucking the wire end discreetly within the bead. With your wire snips, carefully trim off any excess wire as close to the bead as possible. The goal is to leave no sharp edges exposed. If a tiny bit of wire remains, use your pliers to gently tuck the tip further into the bead hole, ensuring a completely smooth and snag-free finish. Repeat steps 6 and 7 for the other bow tail.
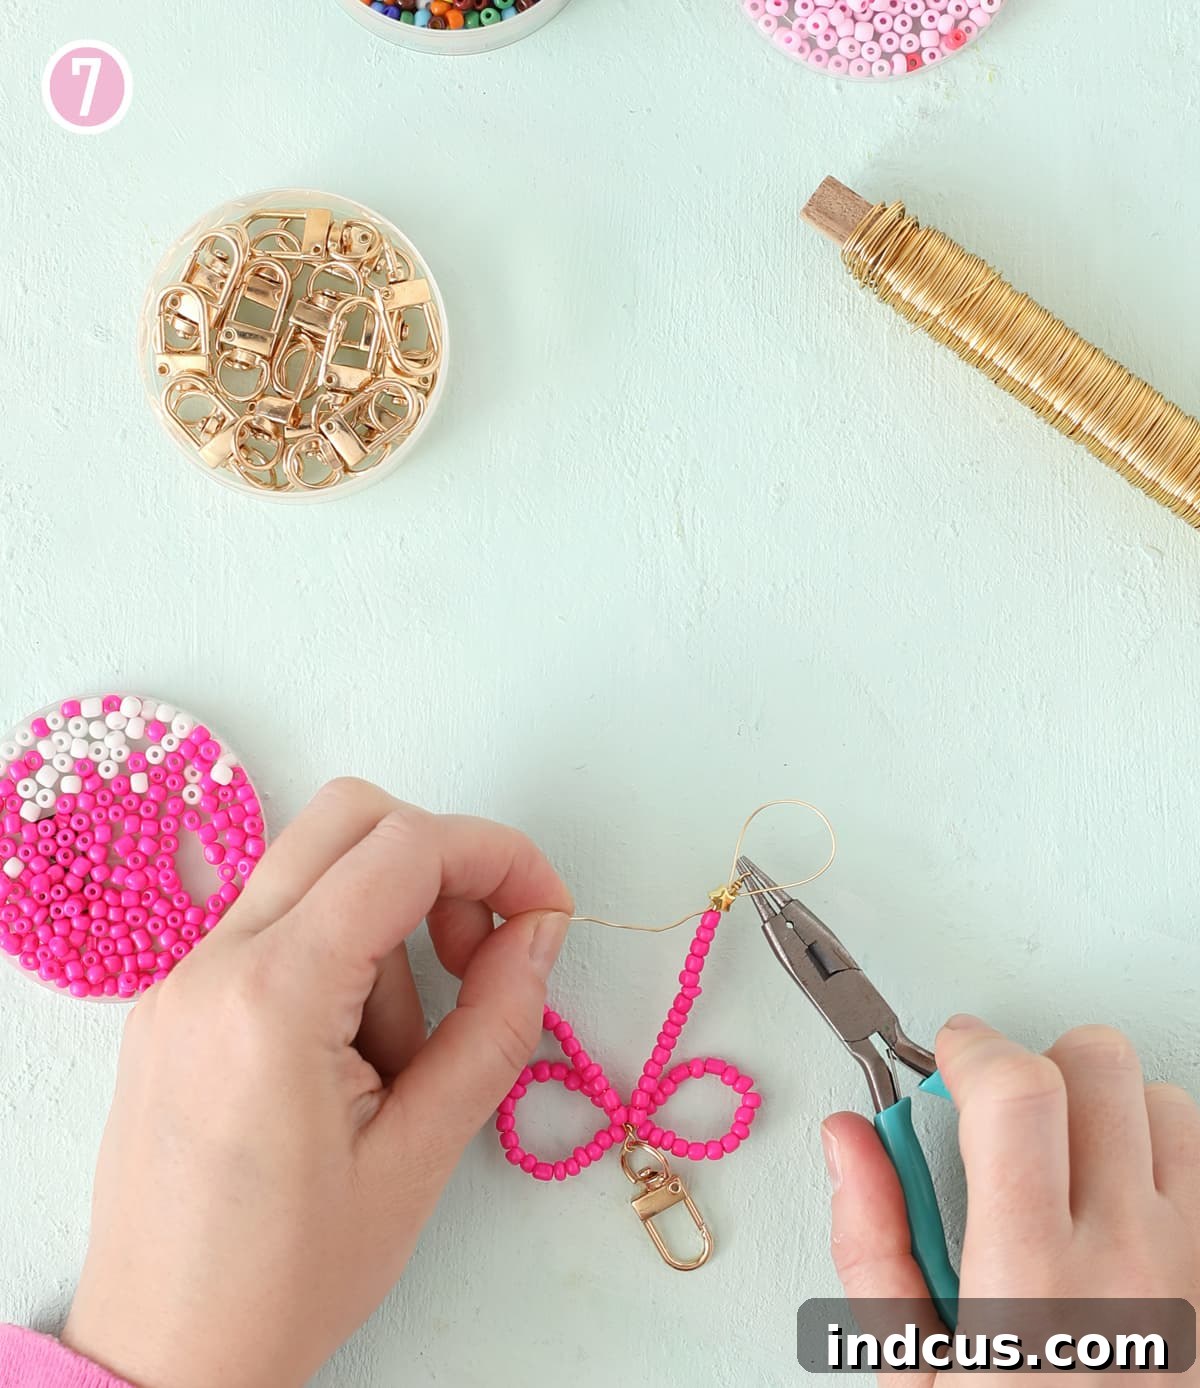
And there you have it! A beautifully crafted, utterly adorable beaded bow keychain. This simple yet effective method allows you to create a personalized accessory that is both charming and durable. Admire your handiwork and get ready to show it off!
Unleash Your Creativity: Customization and Variation Ideas
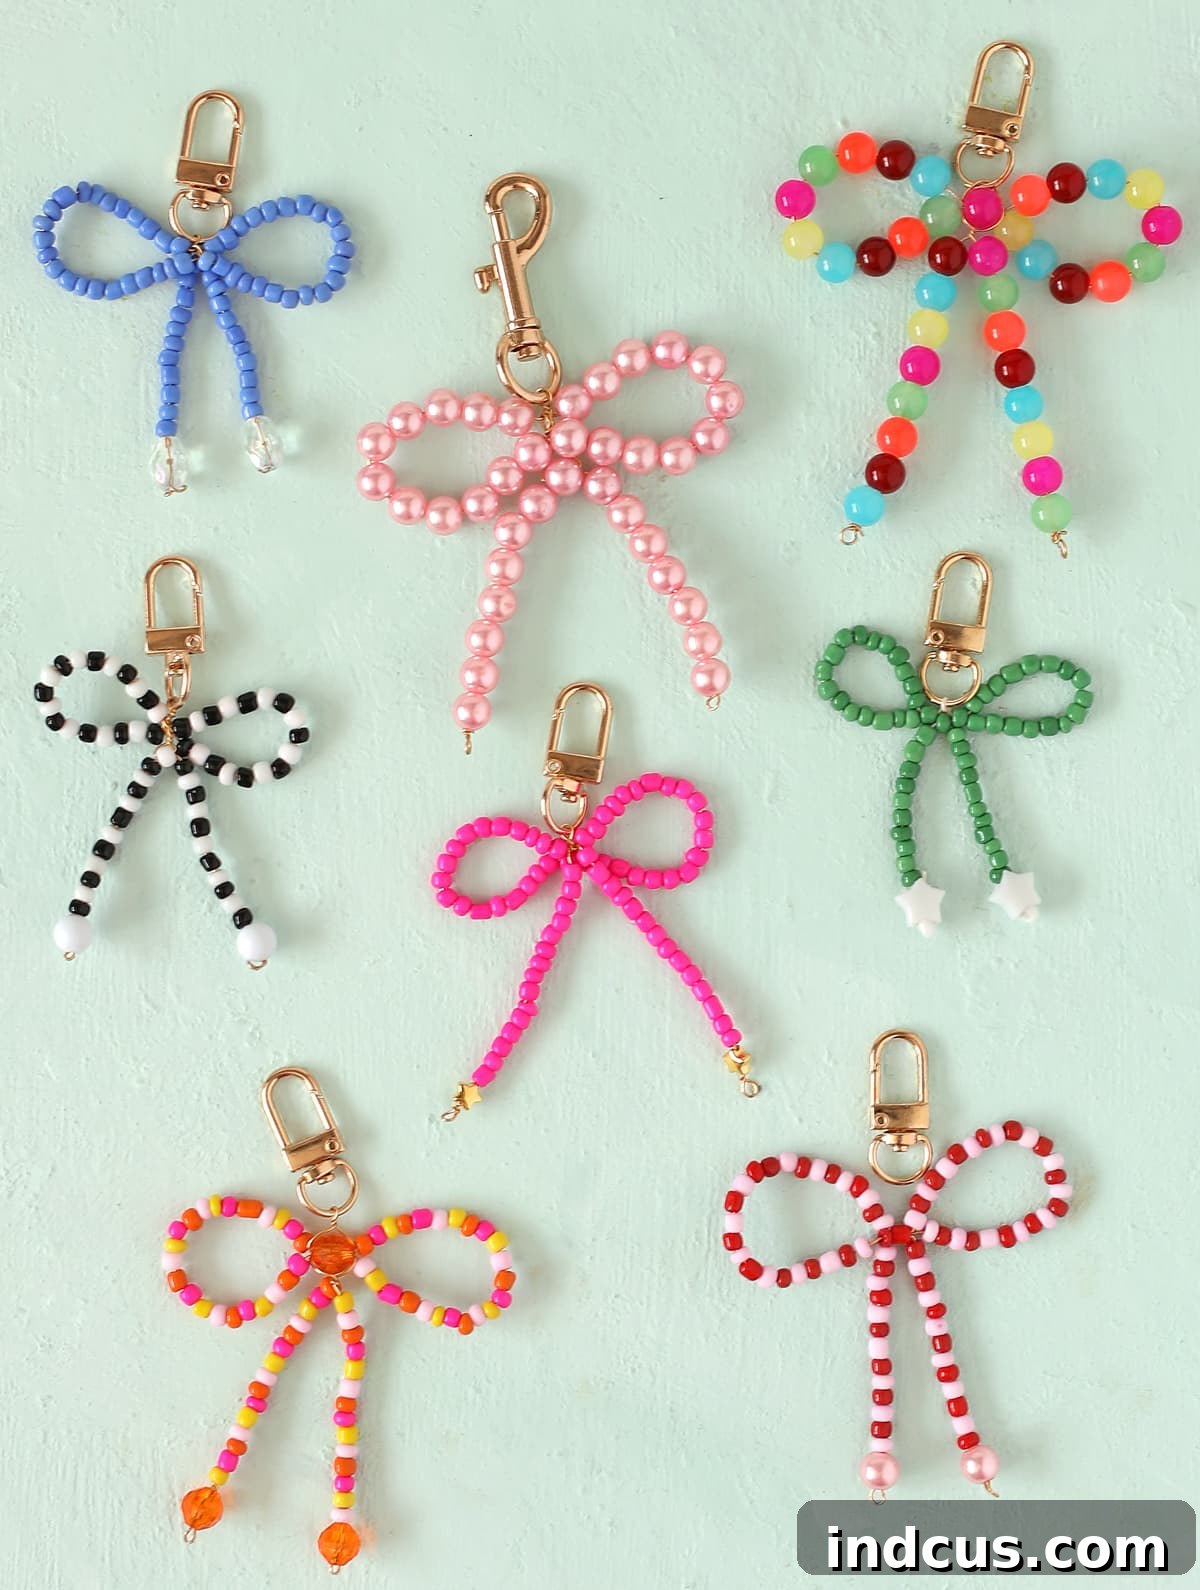
The beauty of DIY crafts lies in the freedom to personalize every detail, and these beaded bow keychains are no exception. The basic technique is a canvas for endless creative variations. Don’t stop at just one design; explore different combinations to truly make each keychain unique and special.
- Color Palettes: Experiment with vibrant color patterns. Try an ombre effect by gradually transitioning from light to dark shades, create striking stripes with contrasting colors, or design a themed bow using specific holiday colors or school team hues.
- Bead Types and Sizes: While seed beads are excellent for beginners, venture into other bead varieties. Incorporate faceted beads for a touch of sparkle, use tiny pearl beads for an elegant look, or mix in some unique shaped beads like stars, hearts, or flowers. You can also play with different bead sizes, using larger beads in the center or at the ends of the tails for visual interest.
- Accent Beads: Elevate your design by adding special accent beads. A slightly larger or uniquely shaped bead can replace the single cross-over bead in Step 3, creating a prominent “knot” for the bow. Similarly, a decorative charm or a distinctive bead at the very end of each tail can add a lovely finishing touch.
- Adding Charms: For an extra layer of personalization, consider incorporating small charms. These can be attached to the keychain clasp alongside the bow, or even dangled from the wire tails for a playful effect. Just ensure any added charms are lightweight and complement the overall design.
- Wire Colors: Don’t limit yourself to traditional silver or gold wire. Beading wire comes in a spectrum of colors, including black, copper, and various metallic tones. Using a colored wire can add an unexpected pop and enhance the overall aesthetic of your bow.
- Beyond Keychains: Think outside the box! These beaded bows can be transformed into beautiful bag charms, stylish zipper pulls for purses or jackets, or even unique ornaments for rearview mirrors. Their versatility makes them perfect for a wide range of decorative applications.
With these variations, the possibilities are truly endless. Let your imagination guide you, and enjoy creating a collection of one-of-a-kind beaded bows that showcase your personal style!
The Perfect Craft for Every Occasion: Girls’ Night, Teens, and Thoughtful Gifts
This beaded bow keychain project is more than just a simple craft; it’s an experience waiting to happen. Its ease, affordability, and customizability make it an ideal choice for a variety of settings and age groups.
An Unforgettable Girls’ Night Craft: If you’re planning a girls’ night, bridal shower, or a casual get-together with friends, this craft is an absolute winner. It requires minimal setup, and most of the process involves the meditative act of stringing beads, allowing for plenty of uninterrupted conversation and laughter. Imagine a table laden with bowls of colorful beads, everyone happily chatting while crafting their unique keychains. The low-stress nature of the project means everyone can relax and enjoy the creative process without feeling pressured. Plus, at the end of the evening, everyone goes home with a tangible, handmade souvenir of a fun time spent together.
Engaging for Tweens and Teens: This craft is particularly appealing to the 10+ age group, including tweens and teens. It strikes the perfect balance between being challenging enough to be engaging but simple enough to prevent frustration. Young crafters will love the opportunity to express their individuality through bead choices and color combinations, creating accessories that perfectly match their style or reflect their current interests. It’s a wonderful way to foster fine motor skills, patience, and a sense of accomplishment. Parents can rest assured that this is a safe and creative activity that yields practical, stylish results.
Thoughtful Handmade Gifts: In an era of mass consumption, a handmade gift carries immense sentimental value. These beaded bow keychains are perfect for showing appreciation to teachers, as heartfelt birthday gifts for friends, charming party favors, or even small tokens of gratitude for bridesmaids. Because they are so easy to personalize, you can tailor each bow to the recipient’s favorite colors, style, or even their birthstone colors, making the gift even more meaningful.
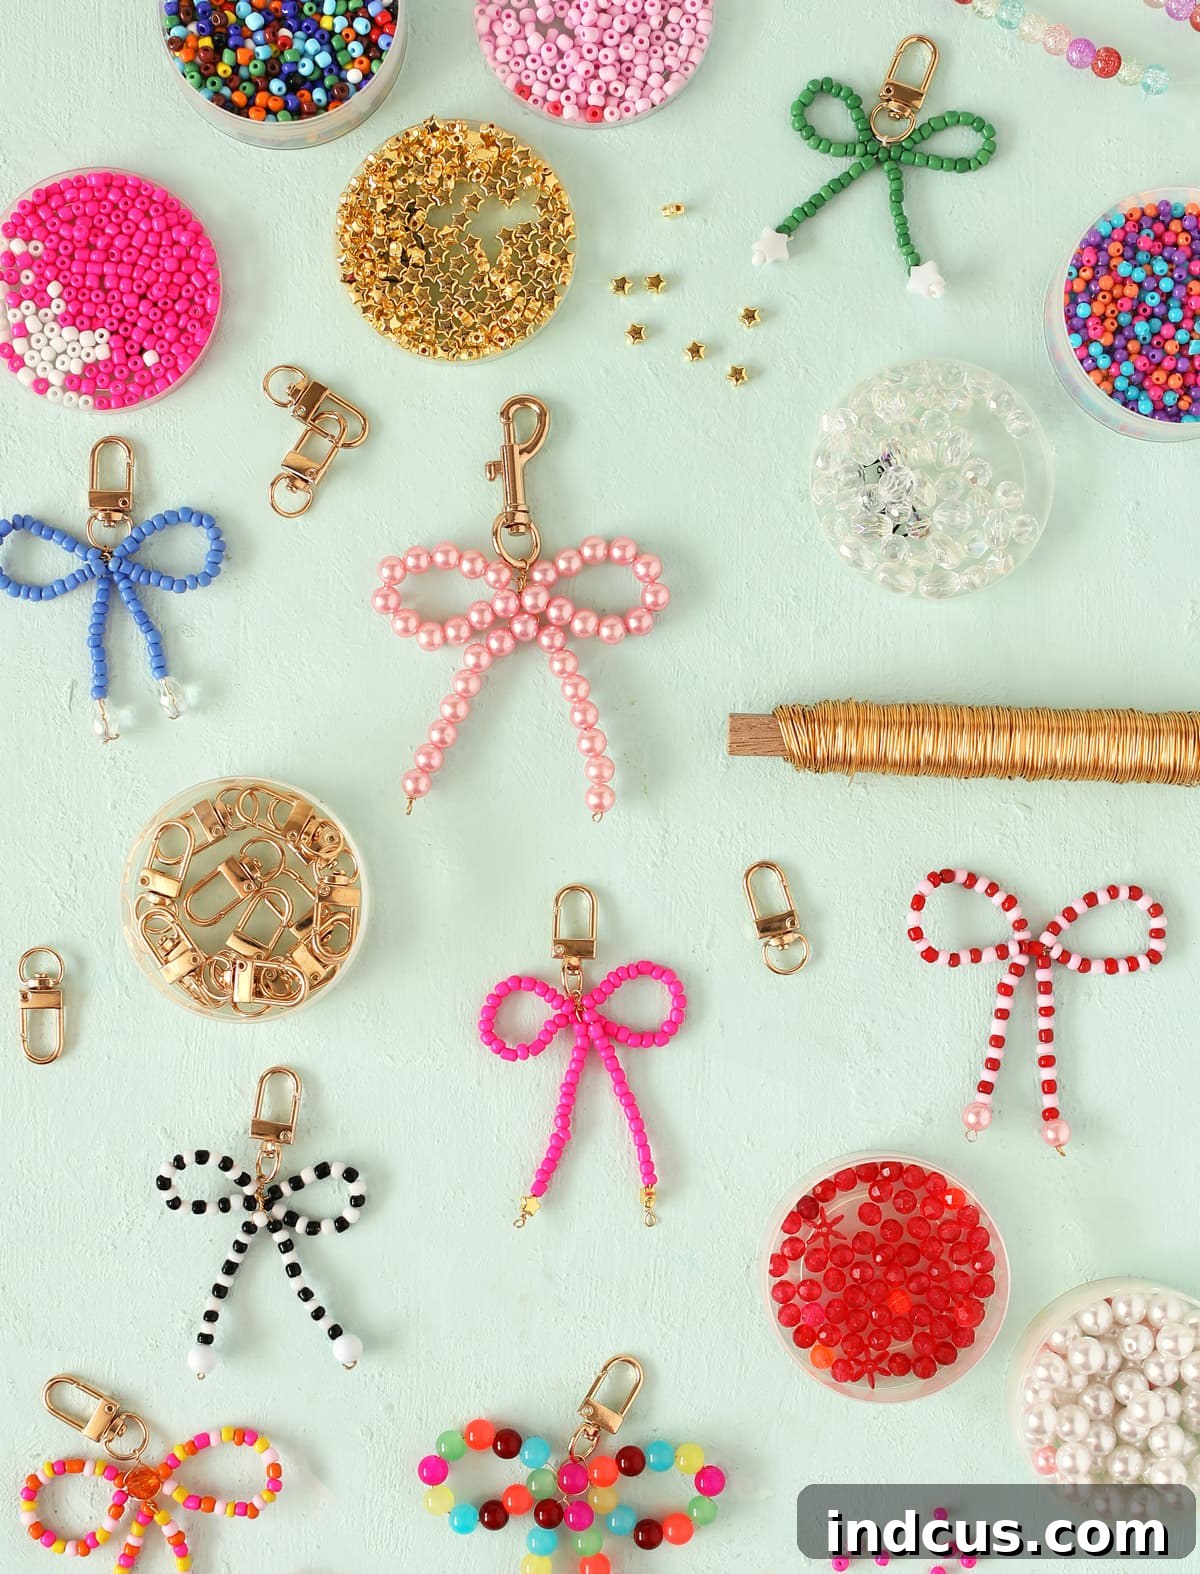
In essence, this beaded bow keychain project offers a delightful escape into creativity, a chance to bond with loved ones, and the satisfaction of making something beautiful with your own hands. Gather your supplies, invite your friends, and get ready to create some truly charming accessories!