DIY Painted Pillow: Add a Graphic Punch to Your Home Decor
Embarking on a home decoration journey is a rewarding process, often filled with anticipation and creative discoveries. For nearly a year, our front room has been a delightful canvas in progress since we first moved in, slowly taking shape with each carefully chosen detail. The major element currently on hold, awaiting its transformation, involves painting some key furniture pieces – a task dependent on the blessings of consistently warm weather. With a hopeful spirit, I’m eagerly anticipating that this coming weekend will finally offer the perfect conditions to bring those larger projects to life.
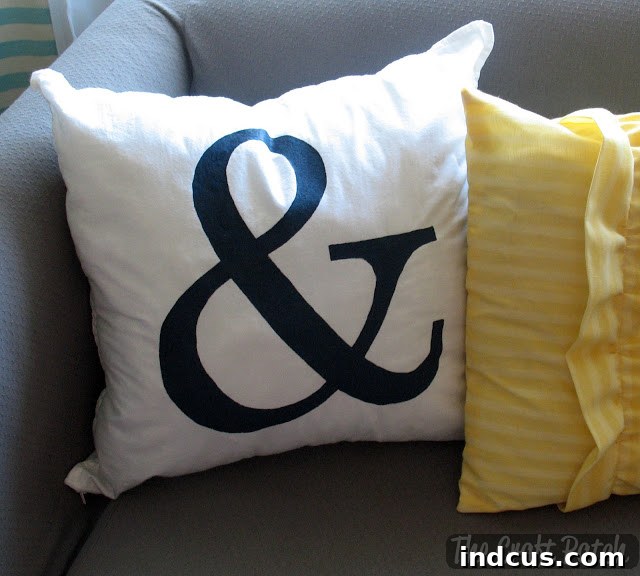
However, while the big makeovers are patiently waiting their turn, I simply couldn’t resist diving into a smaller, yet incredibly impactful project that offers immediate gratification. Today, I am absolutely thrilled to share a little sneak-peek into our evolving front room decor: a custom-painted pillow that instantly adds a vibrant, graphic punch to the space!
Why Choose a DIY Painted Pillow for Your Space?
In the dynamic world of interior design, accent pillows are more than just cushions; they are vital accessories that can dramatically alter the mood and aesthetic of any room. Opting for a DIY painted pillow, as I did, offers a multitude of advantages over mass-produced alternatives, allowing for unparalleled personalization and creativity:
- Unleash Your Unique Style: A custom-painted pillow allows you to express your individual taste and match your decor vision precisely. You’re not limited by what’s available in stores.
- Budget-Friendly Decor: This project is incredibly economical. With a plain pillow cover and a small amount of paint, you can achieve a high-end look without the high-end price tag. It’s perfect for budget-conscious decorators.
- Instant Room Refresh: A new set of custom pillows can instantly refresh an existing sofa, armchair, or bed, breathing new life into a tired space without major renovations.
- Perfect Color Coordination: You can mix paints to achieve the exact shade that complements your existing color palette or introduces a bold accent color to tie the room together.
- Eco-Conscious Crafting: Repurpose an old pillow cover or transform an inexpensive new one into a unique piece of art, contributing to a more sustainable decorating practice.
- Quick and Rewarding: Unlike extensive renovation projects, painting a pillow is a quick and satisfying craft that delivers visible results in a short amount of time, often less than an hour.
Essential Materials for Your Painted Pillow Project
One of the beauties of this DIY project is its accessibility and the minimal supplies required. Most items you might already have on hand, or they are readily available at any craft store. Here’s what you’ll need to get started:
- Plain Pillow Cover: A white or light-colored cotton or canvas pillow cover works best, as it provides a clean base for your design. Ensure it’s pre-washed and thoroughly dried to prevent any future shrinkage or paint crackling.
- Acrylic Craft Paint (Color of Your Choice): I chose a rich navy blue for a sophisticated contrast. While regular acrylic craft paint can be used, for enhanced durability and washability, I highly recommend mixing it with a fabric medium according to the product’s instructions. This transforms standard acrylics into flexible fabric paint that resists cracking and fading. Alternatively, you can purchase fabric paint specifically designed for textiles.
- Paintbrushes: A small, fine-tipped brush is ideal for outlining intricate designs, while a slightly larger flat brush will help you fill in broader areas efficiently and smoothly.
- Pencil: A standard graphite pencil for lightly tracing your chosen design onto the fabric.
- Printed Design/Symbol: Select and print your desired graphic or text to the size you envision for your pillow. Simple, bold designs often yield the most striking results for this technique.
- Scissors: For cutting out your printed design to create a tracing template.
- Iron and Ironing Board: Absolutely essential for the heat-setting process, which permanently bonds the paint to the fabric fibers.
- Clean Cloth or Parchment Paper: To act as a protective barrier between your painted design and the hot iron during heat setting.
- Cardboard or Plastic Insert: Place this inside the pillow cover before painting to prevent the paint from bleeding through to the back side of the fabric. A cutting mat or a piece of freezer paper can also work.
Step-by-Step Guide: Crafting Your Custom Painted Pillow
This entire transformation was surprisingly quick and incredibly straightforward, proving that you don’t need to be an expert crafter to achieve impressive results. Here’s a detailed breakdown of how you can create your very own personalized pillow:
Step 1: Select Your Design and Prepare the Template
The foundation of your custom pillow begins with your design choice. Think about the overall aesthetic of your room – do you want a bold geometric pattern, a subtle botanical motif, a meaningful quote, or a clean, modern symbol like I chose? Once decided:
- Print Your Graphic: Using your home printer, print your chosen symbol or design onto regular paper. Ensure the size is appropriate for your pillow cover; you might need to adjust the print scale to get it just right.
- Cut Out the Template: Carefully cut around the outline of your printed design using scissors. For intricate details, a craft knife and cutting mat can provide cleaner edges, creating a precise template for tracing.
- Protect Your Pillow: Slide a piece of cardboard or plastic inside your pillow cover, positioning it directly under where your design will be painted. This crucial step prevents paint from seeping through to the back of the pillow cover, ensuring a neat and professional finish.
Step 2: Trace Your Design onto the Pillow Fabric
With your template prepared and your pillow cover protected, it’s time to transfer your vision to the fabric:
- Position Your Template: Lay your cutout design onto the front of the pillow cover. Take a moment to experiment with different placements – centered, off-center, or a repetitive pattern – until you find the perfect position that aligns with your aesthetic.
- Lightly Trace the Outline: Holding the template firmly in place with one hand, use a pencil to lightly trace around its edges onto the fabric. Apply gentle pressure; you want a visible line that you can follow with paint, but not so deep that it becomes difficult to cover or erase.
- Remove Template: Once your tracing is complete and you’re satisfied with the outline, carefully lift and remove your paper template.
Step 3: Paint Your Design with Care and Precision
Now for the truly artistic part – bringing your design to life with color! I opted for a deep navy blue acrylic craft paint, which offers a sophisticated contrast against the white fabric and introduces a bold, modern accent into the room’s scheme.
- Outline First: Begin by using a fine-tipped paintbrush to carefully paint along the pencil lines you’ve traced. This creates crisp edges for your design and acts as a barrier, helping to prevent the paint from bleeding into unintended areas of the fabric.
- Fill In the Design: Once your outlines are complete (and slightly dry to avoid smudging), switch to a slightly larger brush to fill in the interior of your design. Apply the paint in thin, even layers. It’s always better to apply two or three thin coats than one thick coat, as thick applications can result in a stiff, cracked finish over time.
- Ensure Opaque Coverage: Work methodically, ensuring that the paint is applied evenly for full, opaque coverage. Smooth out any visible brushstrokes for a professional, seamless appearance.
- Allow for Complete Drying: This step is non-negotiable! Allow the paint to dry completely, which typically takes at least 24 hours. Refer to your paint manufacturer’s instructions for precise drying times. Rushing this stage can lead to smudging or adhesion issues during the heat-setting process.
Step 4: Heat Set Your Painted Pillow for Lasting Durability
This final step is crucial for transforming your painted design from a temporary embellishment into a permanent, washable work of art. Especially in a bustling home with active children, I have no doubt that this pristine white pillow will require a thorough cleaning sooner rather than later! Heat setting ensures the paint won’t wash out or crack.
Here’s how to heat set your painted design for maximum longevity:
- Verify Dryness: Double-check that all paint layers are absolutely bone dry to the touch. Any residual moisture can cause the paint to smear or transfer when heat is applied.
- Prepare Your Iron: Set your iron to the highest temperature suitable for your pillow cover’s fabric (typically the cotton setting). Crucially, ensure that the steam function is turned OFF. Steam can hinder the paint’s ability to bond properly with the fabric fibers.
- Protect the Design: Place a clean, dry cloth (a kitchen towel, old t-shirt, or a piece of parchment paper works perfectly) directly over the dried painted design. This barrier protects your iron from any paint residue and helps distribute the heat evenly.
- Iron the Design: Gently press the hot, dry iron over the cloth-covered painted area. Keep the iron moving continuously for approximately 30 to 60 seconds over each section of the design. Avoid leaving the iron stationary in one spot, as this could potentially scorch the fabric.
- Repeat as Needed: For larger designs, you may need to lift and reposition the protective cloth and iron multiple times to ensure the entire painted area receives adequate heat.
- Allow to Cool: Once you’ve completed the heat-setting process, allow the pillow cover to cool completely before handling it further or inserting the pillow form.
And just like that, the entire project – from choosing my symbol to the final heat setting – took me well under an hour! Not only was it incredibly quick, but it also cost me absolutely nothing, as I already had all the necessary supplies on hand. I am absolutely thrilled with the outcome; it has effortlessly added a sophisticated graphic punch to my evolving front room.
Expert Tips for Achieving Professional Fabric Painting Results
While the painted pillow project is wonderfully straightforward, incorporating a few expert tips can elevate your results and ensure your DIY creation looks professionally made:
- Practice Makes Perfect: If you’re new to fabric painting, consider doing a small test swatch on a scrap piece of similar fabric. This helps you get a feel for the paint’s consistency, how it absorbs, and drying times.
- Always Use a Fabric Medium: As previously mentioned, mixing regular acrylic craft paint with a fabric medium is highly recommended. It significantly improves the paint’s flexibility, preventing cracking, and ensures the fabric retains a softer feel, making it genuinely washable and durable.
- Work on a Stable, Flat Surface: Ensure your pillow cover is laid out flat and taut on a firm, stable surface. This prevents the fabric from shifting and helps achieve even paint application and crisp lines.
- Avoid Overloading Your Brush: Too much paint on your brush can lead to drips, smudges, and excessive bleeding, especially on absorbent fabrics. Dip sparingly and apply in controlled, thin layers.
- Allow Layers to Dry: If your design incorporates multiple colors or requires several coats for opacity, allow each layer or color to dry completely before applying the next. This prevents colors from bleeding into one another and creating muddy tones.
- Consider Stencils for Intricacy: For complex patterns, repeating motifs, or precise lettering, using a pre-made stencil or cutting one from freezer paper can save time and guarantee sharp, consistent results.
- Clean Brushes Promptly: Always wash your paintbrushes thoroughly with soap and water immediately after use. This prevents paint from drying and hardening on the bristles, preserving your tools for future projects.
Integrating Your Custom Pillow into Your Home Decor Strategy
A custom-painted pillow is far more than just an accessory; it’s a statement piece that reflects your personal journey in home design. For my front room, this navy blue symbol pillow serves several vital functions. It acts as a visual anchor, drawing the eye and effortlessly complementing the nuanced color scheme I envision for the space. The bold, graphic nature of its design introduces a modern, crisp element that beautifully contrasts with the softer textures and patterns that will soon adorn the room.
Consider how your DIY pillow can strategically enhance your living environment:
- Introduce a Pop of Color: Utilize the pillow to bring in an accent color that ties together other decorative elements, such as artwork, rugs, or existing furniture.
- Add Dynamic Texture and Pattern: Even a simple painted design provides significant visual interest, breaking up monochromatic schemes and adding depth to your decor.
- Reflect Your Personal Story: Choose a design that genuinely resonates with you, whether it’s an inspiring quote, an abstract shape that calms you, or a motif that embodies your interests and passions.
- Curate a Cohesive Look: Create a collection of several custom-painted pillows with complementary designs or a harmonious color palette to achieve a unified, thoughtfully curated look on a sofa, bench, or bed.
Caring for Your Painted Fabric Creations
With the crucial step of heat setting properly executed, your custom-painted pillow should be robust enough to withstand regular use and routine washing. To ensure the longevity and vibrancy of your painted design, follow these simple care guidelines:
- Wash in Cold Water: Always wash your painted fabric items in cold water. Cold water helps prevent colors from bleeding and fading.
- Gentle Cycle Recommended: Use your washing machine’s gentle cycle to minimize stress on the painted design and fabric fibers.
- Turn Inside Out: Before placing the pillow cover in the washing machine, turn it inside out. This small step provides an extra layer of protection for the painted design against friction and abrasion during the wash cycle.
- Mild Detergent Only: Opt for a mild, color-safe detergent. Avoid harsh chemicals, bleach, or detergents with strong stain removers, as these can degrade the paint over time.
- Air Dry for Best Results: Air drying your painted pillow cover is ideal, as it’s the gentlest method. If you must use a dryer, tumble dry on the lowest heat setting to prevent excessive wear and potential cracking of the paint.
Conclusion: A Small Project, A Significant Impact
This DIY painted pillow project stands as a shining example that impactful home decor doesn’t necessarily demand extensive time, a hefty budget, or professional expertise. In less than an hour, and utilizing materials I already had tucked away, I successfully crafted a personalized accessory that injects significant graphic punch and unique style into my front room. There’s an immense sense of satisfaction that comes from creating something with your own hands that perfectly aligns with your aesthetic vision, turning a simple blank canvas into a focal point.
So, if you’re contemplating a quick, economical, and deeply rewarding way to revitalize your living space, or to add that distinct, personal touch to a room still in its developmental stages, I wholeheartedly encourage you to try your hand at painting a pillow. It’s an excellent opportunity to experiment with color, embrace new design ideas, and the joy derived from seeing your creation come to life is truly unparalleled.
Now, my focus shifts back to my patient vigil for warmer weather, eagerly anticipating the day I can finally tackle those furniture painting projects! Stay tuned for more updates on the continuing transformation of my front room!