Craft Your Own Heirloom: A DIY Felt Nativity Advent Calendar for a Meaningful Christmas
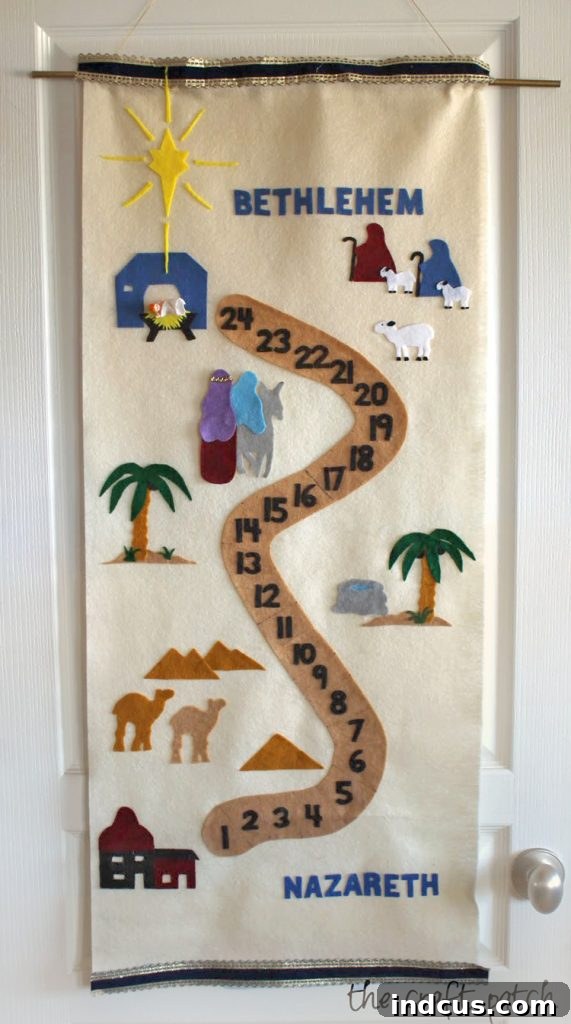
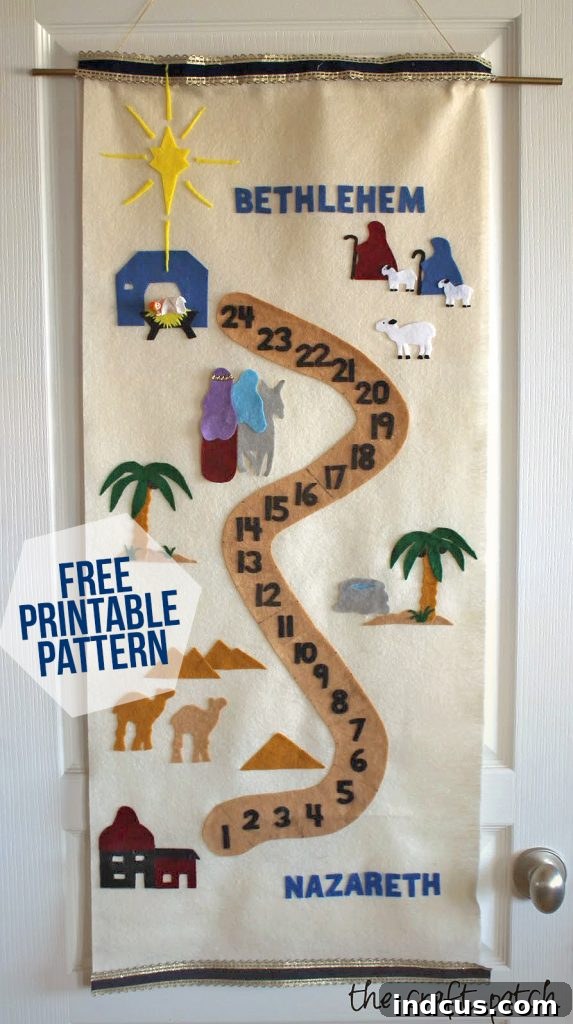
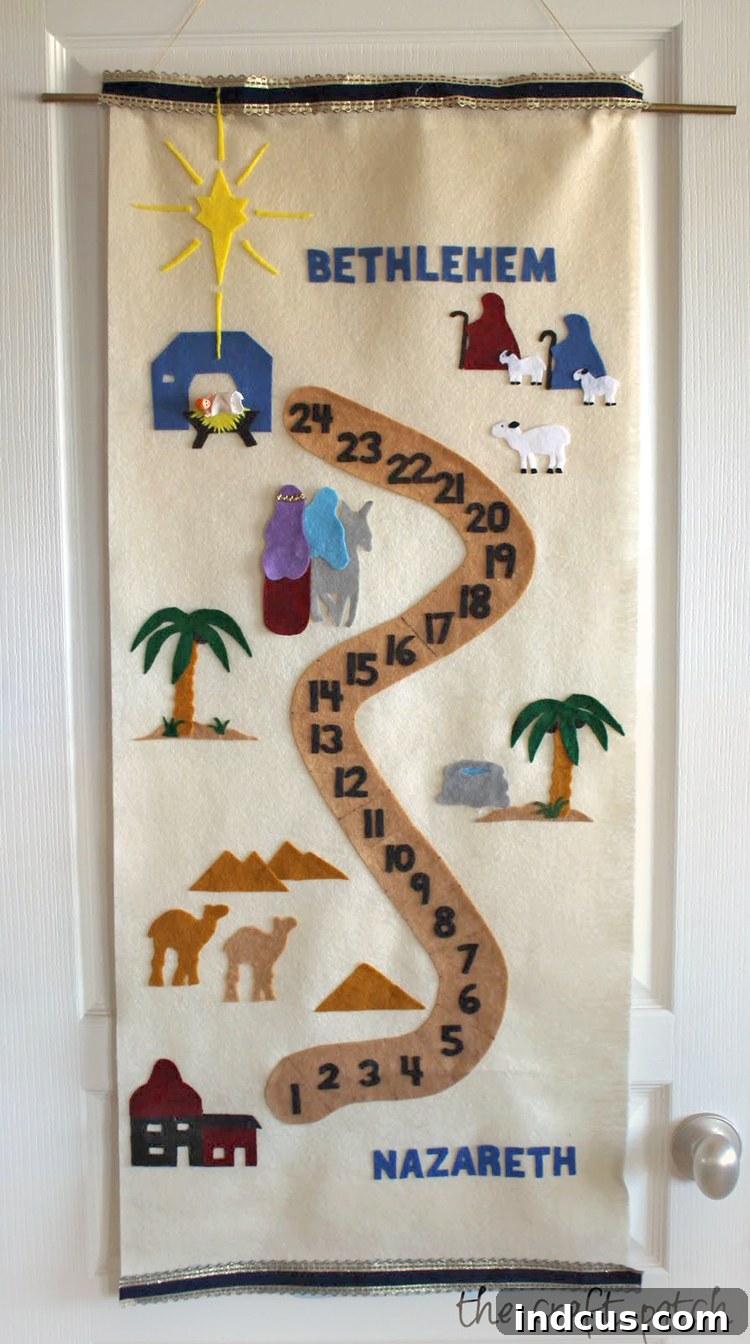
Imagine the joy and anticipation in your home as Christmas approaches, brought to life by a truly special, handmade advent calendar. This isn’t just any countdown; it’s a beautiful, interactive felt Nativity advent calendar that chronicles the sacred journey of Mary and Joseph to Bethlehem. We’re thrilled to share the complete printable pattern and a comprehensive tutorial, allowing you to create this cherished family heirloom and make your holiday season even more meaningful.
Many of you have eagerly requested the pattern for this unique calendar, and we’re excited to finally make it available! Just last night, my mother brought over the very advent calendar she crafted years ago, allowing me to meticulously trace all the pieces and prepare a pattern for you. Get ready to embark on a delightful crafting adventure that will fill your home with the spirit of Christmas!
There’s so much to adore about this calendar. Its unique design narrates the poignant story of Mary and Joseph’s pilgrimage to Bethlehem for the census, transforming a simple countdown into a daily reminder of the true meaning of Christmas. The moment of pulling out the tiny plastic Baby Jesus on Christmas morning is a highlight that sparks pure delight and wonder. The inherent handmade charm, coupled with its profound storytelling, makes it an invaluable addition to any family’s holiday traditions. And now, this heartwarming tradition can become a part of your family’s Christmas celebrations too!
A Legacy of Creativity: The Inspiring Origin of This Beloved Calendar
This advent calendar holds a deeply personal significance for me, having been a cherished part of my childhood. But its story goes even deeper, connecting crafters across generations. Recently, I had the immense pleasure of receiving an email from the daughter of the calendar’s original creator – what a wonderful small world we live in! Carol Ann Thompson first designed and crafted this calendar in 1965 for a church craft night in Rexburg, Idaho. From that humble beginning, her beautiful pattern gracefully spread across the country, eventually making its way into my mother’s hands and, consequently, into our family’s holiday traditions.
We extend our heartfelt gratitude to Carol Ann for her timeless and beautiful creation. It is an immense honor to share her pattern here, continuing the wonderful tradition of beloved craft ideas being lovingly passed down from one creative woman to another. This calendar is more than just a craft; it’s a piece of history, a testament to shared creativity, and a vessel for countless future memories. By making this calendar, you’re not just crafting a decoration; you’re becoming a part of this enduring legacy, adding your own chapter to its heartwarming story.
Why Craft This Unique Nativity Advent Calendar?
In a world of mass-produced holiday decorations, a handmade advent calendar stands out. This particular Nativity calendar offers unique benefits that make it a truly special project:
- Engaging Storytelling: Unlike traditional advent calendars that simply count down days, this calendar visually unfolds the Nativity story. Moving Mary and Joseph daily makes it a powerful educational tool for children and a meaningful daily reflection for all, reinforcing the spiritual essence of Christmas.
- Handmade Charm: There’s an irreplaceable warmth and character that only a handmade item can bring. Your calendar will be a unique piece of art, imbued with your personal touch, effort, and love. It tells a story not just of Christmas, but of your family’s creativity.
- Lasting Family Tradition: This calendar is designed to be brought out year after year, fostering a beautiful family tradition that children will eagerly anticipate and remember for a lifetime. It creates shared moments and cherished memories.
- Interactive Experience: The act of physically moving Mary and Joseph along the path each day creates an interactive element that keeps children engaged and excited about the impending arrival of Christmas, teaching patience and anticipation.
- Meaningful Countdown: Shift the focus from commercial aspects of Christmas to its spiritual essence by recounting the journey to Bethlehem and the birth of Jesus, grounding your celebrations in historical and religious significance.
- Customizable and Personal: While we provide the patterns, there’s ample room for personal touches in felt color choices, embellishments, and even the addition of names or dates, making it truly unique to your family.
- Durable Heirloom: With proper care, this felt calendar is built to last, becoming a treasured heirloom that can be passed down through generations, carrying with it years of family memories.
Materials Needed for Your DIY Felt Nativity Advent Calendar
(Affiliate links are provided to help you easily find materials, but feel free to source locally and support your community craft stores!)
- Pattern Pieces: Essential templates for all figures and elements (download link provided below). These are your starting point for precise cutting.
- Cream-colored Felt (approx. 19″x46″): This will form the main background for your calendar, providing a neutral yet warm canvas for the vibrant Nativity scene. Opt for a good quality felt for better durability and appearance.
- Camel-colored Felt (one long piece): Used for the numbered path that Mary and Joseph will traverse. Its earthy tone beautifully complements the desert journey theme and provides contrast.
- Scraps of Felt in Various Colors: Get creative! You’ll need various colors for Mary, Joseph, the donkey, palm trees, stars, the stable, and other small details. Consider blues, browns, greens, yellows, and whites to bring your scene to life.
- Fabric Glue: A strong fabric glue ensures your felt pieces stay securely in place without stiffening too much. While hot glue can also work in a pinch, it may result in a stiffer finish and is less forgiving if you need to adjust placement.
- Iron-on, One-sided Heavy Fusible Webbing: Crucial for adding stiffness and durability to the moving pieces (Mary, Joseph, and the donkey), ensuring they withstand daily handling and maintain their shape over time.
- Two Pieces of Velcro (scratchy side only): You’ll need the “hook” side of the Velcro to allow Mary and Joseph to securely attach to the felt background as they move along the path without sliding.
- One Tiny Plastic Baby: Wrapped in a small scrap of fabric, this Baby Jesus piece is the grand reveal on Christmas morning. You can often find these in the baby shower party section of craft stores or dollar stores.
- One Wooden Dowel (spray painted gold): This will be inserted into the top pocket of your calendar for hanging, providing essential structure and a decorative touch.
- Decorative Ribbon for the Top and Bottom Edges (optional): Adding a polished, finished look. Choose a color that complements your felt scheme for extra elegance.
- Twine or Ribbon for Hanging: To create a sturdy loop for hanging your finished advent calendar prominently on a wall or door.
Step-by-Step Tutorial: Crafting Your Felt Nativity Advent Calendar
Creating this advent calendar is a rewarding project that can be completed over a few relaxed crafting sessions. Follow these detailed steps to bring the beloved Nativity story to life through felt, creating a treasured piece for your family.
Step 1: Download and Prepare Your Pattern Pieces
Begin your crafting journey by downloading the pattern pieces from the link provided at the end of this tutorial. It’s essential to ensure they print correctly to scale on standard paper for accurate sizing. To do this, simply right-click on the image files at the bottom of this post to save them to your computer, then print. Before you start cutting felt, double-check dimensions against a ruler if possible to confirm correct sizing and avoid any discrepancies.
Step 2: Precisely Cut All Small Felt Pieces
Now, with your patterns ready, carefully cut out all the smaller felt pieces. These include Mary, Joseph, the donkey, palm trees, stars, and the stable. Refer to the main photograph of the finished calendar for a helpful color guide when selecting your felt scraps; this will ensure your calendar has the classic look. Remember a crucial detail: one of the palm tree patterns will need to be flipped over before cutting to ensure it leans in the opposite direction, creating a balanced and natural scene. Precision in cutting at this stage will significantly contribute to a much neater and professional-looking final product.
Step 3: Create the Numbered Felt Path
Next, it’s time to create the winding path that Mary and Joseph will follow on their journey. Freehand cut the long, camel-colored felt piece into the desired shape for your numbered path. Don’t worry if you don’t have a single piece of felt long enough; you can easily cut it from several smaller sections. Simply glue these smaller pieces together, ensuring the seams are placed strategically and joined closely so they are barely noticeable. This path will serve as the visual anchor for their daily progress and countdown.
Step 4: Assemble and Reinforce Mary, Joseph, and the Donkey Figures
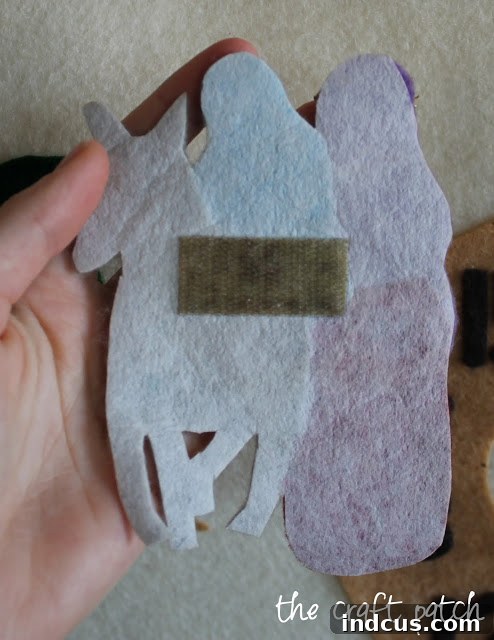
Carefully glue together the individual felt pieces that form Mary, Joseph, and the donkey. Allow the glue to dry thoroughly. Once assembled and dry, line the entire back side of this combined moving piece with the iron-on, one-sided heavy fusible webbing. This step is absolutely critical because these figures will be handled and moved daily; the fusible webbing provides essential stiffness and sturdiness, preventing them from flopping, wrinkling, or wearing out quickly. After the webbing is applied and cooled according to the manufacturer’s instructions, add a strip of Velcro (ensure it’s the scratchy, “hook” side) to the back. This will allow the figures to firmly attach to the felt background as they journey along the path each day.
Step 5: Craft Your Numbers and Words
There are several creative and accessible ways to add the numbers 1-24 and the words for your calendar (e.g., “Bethlehem,” “Journey,” etc.). You can type them up on a computer, print them out, and then use them as stencils to cut felt shapes. For a more professional or consistent finish, consider cutting the letters and numbers out of craft vinyl using a Silhouette or Cricut machine. Alternatively, many craft stores offer pre-cut felt or vinyl letters and numbers, which can be a significant time-saver depending on your budget, skill level, and available tools. My mother, with her incredible artistic talent, freehanded the numbers shown in the original calendar by cutting same-sized rectangles and then skillfully forming them into each number or letter. Choose the method that best suits your skills and resources for this detail.
Step 6: Arrange and Secure All Smaller Pieces
Before gluing anything down permanently, take your time to arrange all the smaller felt pieces—the stable, stars, palm trees, the numbered path, and words—onto your large cream-colored background felt. This dry-fit stage is crucial. Experiment with their placement until you are completely satisfied with the overall composition and flow of the story. Once you have everything perfectly positioned, carefully glue each piece down securely. Work methodically from the bottom up or background elements first to avoid misalignments or accidental smudges.
Step 7: Create the Dowel Pocket for Hanging
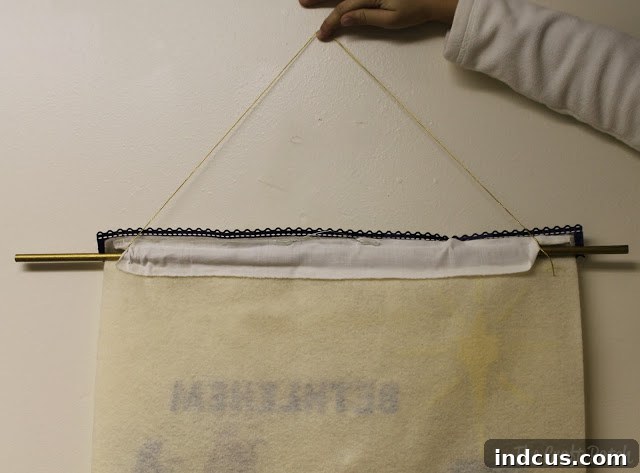
To prepare your calendar for hanging, you need to create a sturdy pocket for the wooden dowel at the top. Fold the top edge of your large background felt over by a few inches (enough to comfortably fit your dowel) to form a sleeve. Alternatively, you can sew or glue a separate long strip of extra felt or coordinating fabric to create this pocket. When gluing, apply adhesive only to the very edge of the fold or strip. Be extremely careful not to glue too far inward, as this would prevent the dowel from sliding smoothly through the pocket. It’s a good idea to test the dowel fit before the glue fully dries, if possible, to ensure functionality.
Step 8: Add Decorative Ribbons (Optional but Recommended)
This step is entirely optional but highly recommended for a truly finished and polished look that elevates the overall aesthetic. Carefully glue decorative ribbon along the top and bottom edges of your advent calendar. Choose a ribbon that complements your felt colors and adds an extra touch of elegance and visual interest. If you prefer a simpler aesthetic, leaving the edges plain works perfectly well too! This detail, however, truly finishes off the wall hanging nicely, giving it a more professional and complete appearance.
Step 9: Insert Dowel and Attach Hanging Twine
Once all the glue on your calendar is completely dry and cured, carefully slide the gold-painted wooden dowel through the pocket you created in Step 7. Ensure it passes through smoothly and evenly. Then, take your chosen twine or ribbon and tie it securely onto the protruding ends of the dowel. Create a sturdy loop that will serve as the hanger for your beautiful, completed advent calendar. Make sure the knots are tight and the calendar hangs evenly.
Step 10: Prepare the Baby Jesus Figure
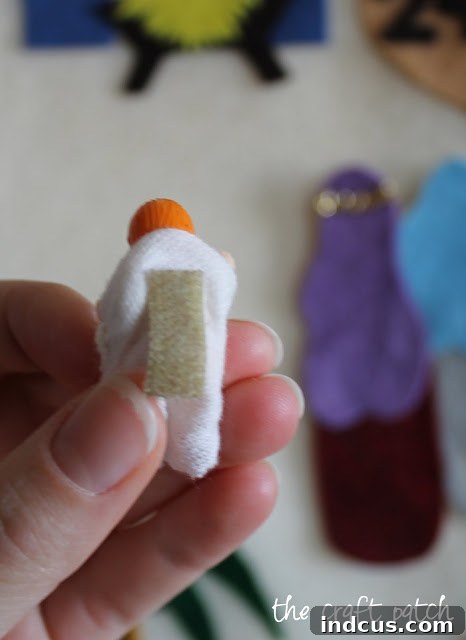
Finally, prepare the tiny Baby Jesus figure for its grand entrance on Christmas morning. Add a small piece of Velcro (again, ensuring it’s the scratchy “hook” side) to the back of the wrapped baby. This will allow you to securely place him in the stable on Christmas morning, marking the culmination of Mary and Joseph’s journey and the joyous, sacred arrival of Christ. This is the moment everyone looks forward to!
Tips for Success & Customization of Your Felt Nativity Calendar
To ensure your advent calendar is a lasting success and truly reflects your family’s style, consider these additional tips:
- Quality Felt Matters: Investing in good quality felt will make your calendar more durable, vibrant, and resistant to pilling. While craft felt is suitable, wool blend felt offers a luxurious feel and greater longevity for an heirloom piece.
- Precision Cutting: Take your time with cutting, especially for intricate shapes. Sharp fabric scissors make a huge difference, resulting in clean edges and a more professional finish.
- Glue Wisely: Use fabric glue sparingly to avoid stiffness, visible residue, or soaking through the felt. Apply a thin, even layer, pressing firmly for a few seconds. Allow ample drying time between steps.
- Personalize It: Make your calendar truly unique! Consider adding the year or your family’s initials to the calendar with felt letters, embroidery, or fabric paint. You could also choose different background colors, add glitter glue for extra sparkle on stars, or incorporate small beads or sequins for embellishments.
- Embrace Imperfection: Remember, this is a handmade item! Small imperfections add to its charm and tell the story of your craftsmanship. Don’t strive for perfection, but for the joy of creation.
- Proper Storage: When the holiday season ends, carefully roll or gently fold your calendar (avoiding sharp creases on the felt pieces) and store it in a dry, cool place away from direct sunlight. This will preserve its vibrant colors and structural integrity for years to come.
Creating a Cherished Family Tradition for Generations
This DIY felt Nativity advent calendar is far more than just a craft project; it’s a powerful opportunity to build a rich and meaningful family tradition that will resonate for years to come. Each day, as you and your loved ones move Mary and Joseph one step closer to Bethlehem, you’re not only counting down to Christmas but also actively retelling the sacred story of hope, expectation, and the birth of Jesus. Children will eagerly anticipate their turn to participate, learning about the Nativity narrative in a tangible, interactive, and deeply engaging way. This hands-on experience creates lasting memories and fosters a deeper appreciation for the spiritual significance of the holiday season.
Imagine your children, and someday their children, gathering around this very calendar, sharing stories of past Christmases and the joy it brought. This handmade heirloom will become a treasured part of your family’s history, passed down through generations, each stitch holding a story and each day marked a step closer to the heart of Christmas. It’s a wonderful way to connect your family to the broader narrative of faith and celebration.
And just like that, you are done! This project comes together more quickly than you might expect, especially if you tackle it in enjoyable stages. Simply put on your favorite holiday movie or podcast, gather your materials, and immerse yourself in the meditative process of cutting out felt pieces and bringing your vision to life. Before you know it, you’ll have a stunning, meaningful advent calendar ready to grace your home and become a cherished part of your family’s Christmas celebrations for many years to come.
Love this meaningful Christmas craft? Don’t forget to Pin it to save for later and share with friends!