Transform Your Window: Crafting a Dazzling Faux Stained Glass Masterpiece with Transparent Glitter Vinyl
Are you searching for a unique way to infuse your home with festive cheer and sparkling beauty this holiday season? Imagine a stunning stained glass window, glowing with vibrant colors and shimmering light, right in your own living space. While traditional stained glass is an intricate and costly art, we’re thrilled to share a brilliant DIY alternative that’s not only incredibly fun to make but also yields breathtaking results: a faux stained glass window crafted with the magic of transparent glitter vinyl!
This innovative craft utilizes a special type of adhesive vinyl that’s both transparent and infused with glitter, mimicking the luminous quality of genuine stained glass perfectly. When light passes through, the colors become incredibly vibrant, and the glitter adds an extra layer of enchantment. It truly feels like painting with light, and the process itself is wonderfully engaging, much like assembling a beautiful sticker puzzle. Get ready to embark on one of the most creatively satisfying projects you’ll undertake!
This delightful crafting journey is proudly brought to you by Expressions Vinyl, our top recommendation for high-quality craft vinyl. Please note that affiliate links may be used throughout this post.
Ready to add a touch of handcrafted artistry to your home? Let’s gather the essentials for this captivating project:
Materials You’ll Need for Your Faux Stained Glass Project
- Transparent Glitter Vinyl: You’ll want an assortment of at least six distinct colors to achieve that classic stained glass look. This unique material is the star of our show, providing both vivid hues and a captivating shimmer. Its see-through nature is crucial for allowing light to pass through and illuminate your design.
- Black Permanent Adhesive Vinyl: This will form the “leading” or outlines of your stained glass design, providing structure and definition to your artwork. A strong, permanent adhesive is essential to ensure your beautiful design holds together firmly on the glass.
- Silhouette Cameo 3 Craft Cutting Machine (or similar): This precision cutting machine will accurately cut your intricate designs from the vinyl sheets. While the instructions are tailored for Silhouette Studio, crafters with other machines like Cricut may be able to adapt the concept by creating their own cut files.
- Large Picture Frame with Glass: The glass from a picture frame serves as your canvas. The size of your frame will determine the scale of your stained glass design, so choose one that fits your desired display area. Ensure the glass can be easily removed and replaced.
- Stained Glass Cut File: This pre-designed file for Silhouette Studio will save you considerable time and effort. Unfortunately, this specific file is formatted for Silhouette machines and may not be compatible with Cricut or other cutting software without conversion or redesign. If you have a Cricut, you’ll need to create a similar design from scratch or find a compatible SVG file elsewhere.
- Painter’s Tape: For safety when handling the glass and for temporarily holding pieces in place.
- Weeding Tool: An indispensable tool for cleanly removing excess vinyl from your intricate cut designs. A hook-shaped tool works wonders.
- Transfer Tape: Essential for cleanly transferring your intricate black vinyl outline to the glass surface without distorting the design.
Step-by-Step Instructions: Crafting Your Glowing Window Art
Creating this faux stained glass piece is a journey of precision and creativity. Follow these detailed steps to bring your vision to life:
Step 1. Prepare and Cut Your Vinyl Designs in Silhouette Studio.
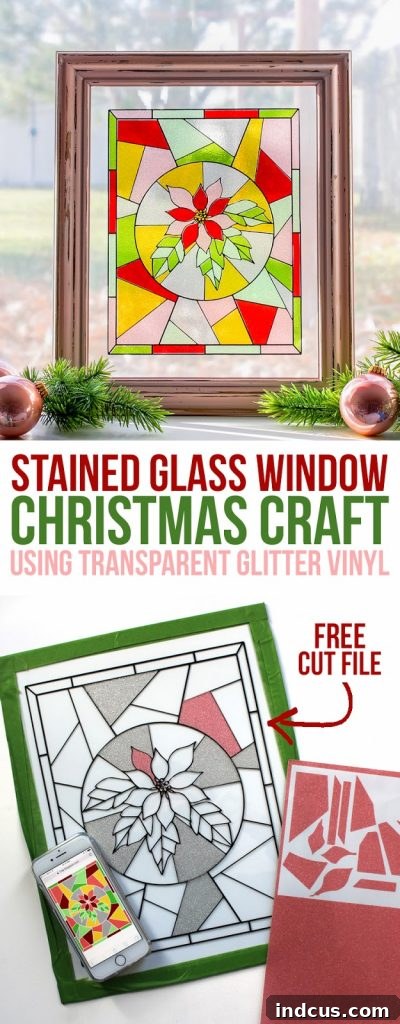
Begin by opening the provided Silhouette Design Studio File. You’ll notice it’s logically divided into three distinct sections. The first section acts purely as a visual reference; it shows the completed design to guide you in how all the individual pieces fit together. You do not need to cut this reference image. The second part of the file contains all the individual colored pieces. These are grouped by color, meaning you’ll need to load and cut each color group separately from its corresponding transparent glitter vinyl sheet. To do this efficiently, move all other color groups off the digital cutting mat in your software, then load one color of vinyl into your machine and cut. Repeat this process for each of your chosen transparent glitter vinyl colors. The third and final part of the file is the intricate black outline, which should be cut from your black permanent adhesive vinyl. It’s crucial that all components, both colored and outline, are perfectly sized for your chosen picture frame. If you need to adjust the dimensions, remember to select *all* parts of the design simultaneously before resizing. This ensures that every piece maintains its correct proportion relative to the others, preventing any misalignment in your final assembly. Paying close attention to your cutting settings for each vinyl type (glitter vs. permanent) will also ensure clean, crisp cuts.
While this project does involve a few more steps than a basic vinyl application, if you’re comfortable navigating your Silhouette machine and have some experience with vinyl, you’ll find it incredibly rewarding and entirely manageable. Don’t be intimidated by the complexity; the detailed cut file simplifies much of the design work for you!
Step 2. Ensure Safety and Cleanliness: Prepare Your Glass Surface.
Carefully remove the glass pane from your picture frame. Glass edges can be surprisingly sharp, so for your safety, we highly recommend wrapping all the exposed edges of the glass with painter’s tape. This creates a protective barrier, preventing accidental cuts during handling. Once the edges are secured, thoroughly clean both sides of the glass with a glass cleaner and a lint-free cloth. Any dust, smudges, or fingerprints could compromise the vinyl’s adhesion and clarity, so ensure the surface is pristine before proceeding.
Step 3. The Art of Weeding: Revealing Your Design.
Weeding is the process of removing all the excess vinyl that isn’t part of your design, leaving only the desired shapes on the backing paper. This step can be meditative but requires patience and a good weeding tool. Start by carefully peeling away the larger outer sections of vinyl from both your black outline and each color group. Then, use your small, pointed weeding tool to meticulously remove the smaller inner pieces from each design element. Take your time, especially with intricate details, to avoid accidentally lifting parts of your actual design. A sharp weeding tool, like the little red one I use, makes a significant difference in precision and ease.
Step 4. Applying the Black Outline: The Foundation of Your Stained Glass.
This is where your design starts to take shape! Carefully apply transfer tape over your weeded black vinyl outline. Use a squeegee or a credit card to firmly burnish the transfer tape onto the vinyl, ensuring good adhesion. Slowly peel the transfer tape and the vinyl outline from its backing. Now, with precision, align the black frame design onto the *front* side of your prepared glass. Take your time to get it perfectly centered and straight. Once positioned, firmly press down and burnish the vinyl onto the glass. Then, slowly and carefully peel back the transfer tape, leaving the black vinyl outline securely adhered to the glass. Watch for any bubbles and smooth them out gently with your finger or a squeegee if needed.
Step 5. The Grand Finale: Filling in with Vibrant Colors.
Now for the most enjoyable part – turning your project over and starting to fill in your “stained glass” with the individual transparent glitter vinyl pieces! This step truly feels like putting together a beautiful, sparkling puzzle, but with stickers. Working from the *back* side of the glass, carefully peel each colored vinyl piece from its backing and place it into its corresponding section within the black outline. The advantage of working from the back is that your black outline, which defines the crisp edges of your design, remains smooth and protected on the front. To ensure accuracy, keep the provided reference image (or the one below) handy on your phone or tablet. Since you are working from the back, the image on the glass will be mirrored compared to the front view. Take your time, enjoy the process, and watch as your window art comes to life with each shimmering piece you place.
As you meticulously place each vibrant piece, you’ll appreciate the reference image even more. Simply click on the image below to enlarge it, making it easier to see precisely where each colored “sticker” should go as you build your stunning window art from the reverse side.
The Unveiling: A Glimmering Masterpiece
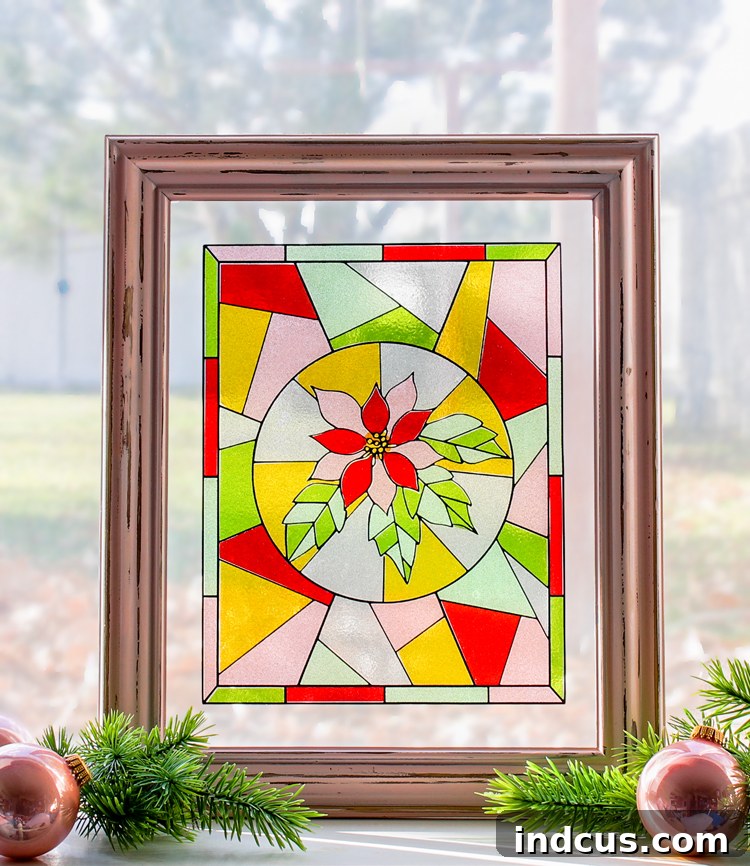
Once every single transparent glitter vinyl piece is perfectly placed, you’ll step back to admire your handiwork: a truly gorgeous faux stained glass window! The transformation is magical, and the finished piece is even more sparkly and enchanting in person than any photograph can convey. The way the light interacts with the glitter and the varying hues is simply captivating.
One of the most fascinating aspects of this project is how the appearance of your stained glass changes with the lighting. In ambient light, without direct sunbeams streaming through, the colors tend to appear soft, muted, and beautifully pastel. However, the moment sunlight or a strong artificial light source shines directly through the glass, a truly spectacular transformation occurs: the colors burst forth with incredible vibrancy, and the glitter comes alive, sparkling with an almost ethereal glow. It’s a dynamic piece of art that continuously offers new perspectives throughout the day.
Why Choose Faux Stained Glass with Glitter Vinyl?
This project offers numerous advantages over traditional stained glass. It’s significantly more affordable, requires no special glass-cutting skills or soldering, and can be easily customized to fit any frame size or design preference. The transparent glitter vinyl is forgiving to work with, allowing for adjustments during placement, and its adhesive nature ensures a durable finish. Plus, the glitter adds a modern, festive twist that traditional stained glass often lacks.
Tips for a Flawless Finish
- Cleanliness is Key: Always start with a perfectly clean, dust-free glass surface.
- Patience with Weeding: Don’t rush the weeding process; precision here ensures clean lines in your final design.
- Burnish Thoroughly: When using transfer tape, ensure you firmly burnish the vinyl to the tape, and then the vinyl to the glass, to prevent bubbles and ensure strong adhesion.
- Air Bubbles: If you encounter small air bubbles after applying vinyl, you can often gently push them to the edge with a soft cloth or pinprick them with a fine needle and smooth them out.
- Creative Freedom: While we provide a cut file, feel free to experiment with your own designs once you get comfortable with the technique! Think about seasonal motifs, abstract patterns, or even personalized names.
This faux stained glass project is more than just a craft; it’s an opportunity to create a stunning piece of art that will brighten your home and captivate anyone who sees it. Whether displayed in a window to catch the sunlight or simply placed on a shelf, this glitter vinyl masterpiece will add a unique, handcrafted charm to your decor. We encourage you to try this incredibly rewarding DIY and experience the joy of making something truly special. Share your dazzling creations with us – we can’t wait to see your faux stained glass windows glow!