Elevate Your Craft Space: A Simple & Stylish DIY Sewing Machine Cover Tutorial
Welcome, fellow makers and sewing enthusiasts! Keeping your beloved sewing machine in pristine condition is essential for its longevity and smooth operation. Dust, lint, and accidental spills are the enemies of delicate machinery, and a simple, yet effective, solution is a custom-made sewing machine cover. Not only does it offer vital protection, but it also adds a touch of personal style and organization to your creative workspace. This comprehensive tutorial will guide you through crafting a beautiful and functional dust cover that’s perfect for protecting your machine when not in use.
Whether you’re a seasoned sewist or just starting your journey, this project is designed to be straightforward and rewarding. It’s an excellent opportunity to practice basic sewing skills like measuring, cutting, and stitching straight seams, all while creating something truly useful and aesthetically pleasing. Imagine your sewing machine, nestled under a cover that perfectly complements your craft room decor, staying dust-free and ready for your next project. Let’s dive into making your very own custom sewing machine cover!
Why Your Sewing Machine Needs a Cover
Your sewing machine is an investment, a tool that brings your creative visions to life. Protecting it from environmental factors is paramount. Here’s why a dust cover, especially a handmade one, is an absolute must:
- **Dust Prevention:** The most obvious benefit. Dust can accumulate in the machine’s intricate parts, leading to friction, blockages, and potential malfunctions. A cover keeps dust and lint from settling on and inside your machine.
- **Protection from Debris:** Beyond dust, covers protect against threads, fabric scraps, pet hair, and other craft room debris that might find their way into the machine.
- **Shield Against Spills:** Accidental spills of coffee, water, or other liquids can cause significant damage. A cover provides an immediate barrier.
- **Minor Impact Protection:** While not heavy-duty protection, a fabric cover can offer a slight buffer against minor bumps and scratches, especially if your machine is frequently moved.
- **UV Protection:** If your machine is near a window, a cover can help protect plastic components and finishes from fading or becoming brittle due to prolonged sun exposure.
- **Aesthetic Appeal:** A handmade cover allows you to personalize your workspace. Choose fabrics that inspire you and match your decor, transforming a functional item into a decorative one.
- **Organization:** A covered machine looks tidier and more organized, contributing to a calm and inspiring creative environment.
What You’ll Need: Materials and Tools
Before we begin, gather all your supplies. Having everything ready will make the sewing process smooth and enjoyable.
- **Main Fabric:** Approximately 1 yard of your chosen decorative fabric. Consider quilting cotton, canvas, or home décor fabric for durability and style. This will be the exterior of your cover.
- **Liner Fabric:** Approximately 1 yard of a coordinating or contrasting fabric. Quilting cotton works well for the interior, providing a clean finish.
- **Ribbon:** About 2 yards of 1/2-inch to 1-inch wide ribbon. Choose a color that complements your fabrics.
- **Matching Thread:** High-quality polyester all-purpose thread.
- **Fabric Scissors or Rotary Cutter and Mat:** For precise cutting.
- **Measuring Tape or Ruler:** Essential for accurate measurements.
- **Pins or Fabric Clips:** To hold fabric layers and ribbon in place.
- **Sewing Machine:** Your trusty tool!
- **Iron and Ironing Board:** For pressing seams, which is crucial for a professional finish.
- **Optional Embellishments:** Contrasting fabric for a decorative band, pom-pom trim, lace, or other decorative elements to make your cover unique.
Step-by-Step Guide: Crafting Your Custom Sewing Machine Cover
Step 1. Measure Your Sewing Machine Accurately
The foundation of a well-fitting cover lies in precise measurements. Grab your measuring tape and let’s get started. You’ll need two primary measurements:
First, measure your machine from side to side to determine its **width**. Place your tape measure across the widest part of your machine, typically from one outer edge to the other. Remember to account for any knobs, spools, or handle extensions that might add to the overall width.
Next, measure the **length**. This measurement should go from the bottom front edge of your machine, gracefully over the very top, and then down to the bottom back edge. This ensures your cover will drape perfectly over the entire machine. Visualize the path the fabric will take to fully enclose it.
Once you have these core dimensions, we need to add seam allowances. For this project, a 1/2-inch seam allowance is recommended for all edges. So, add 1 inch to both your measured width (1/2 inch for each side) and your measured length (1/2 inch for the front, 1/2 inch for the back). This extra allowance will be consumed when you stitch the pieces together, ensuring your final cover has the exact dimensions needed to slip easily over your machine.
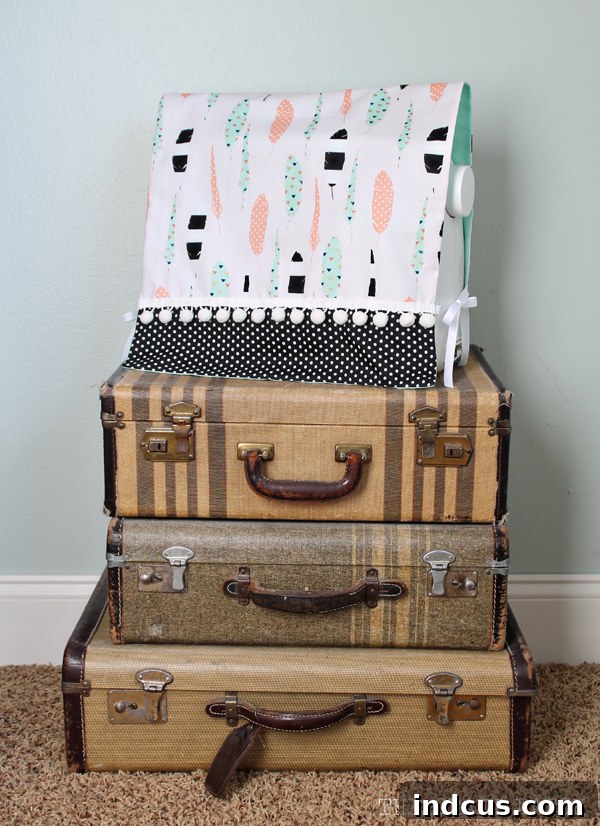
Now, cut out two large rectangles based on these adjusted measurements: one from your main (exterior) fabric and one from your liner (interior) fabric. For example, if your machine measured 15 inches wide and 27 inches long, your cut rectangles would be 16 inches x 28 inches. My sample rectangles turned out to be 16 inches x 28 inches. The fabulous feather fabric shown is from Hobby Lobby, offering a fantastic example of a cheerful main fabric choice.
This is also the perfect stage to add any decorative elements to your main fabric. If you desire a contrasting band, like the black and white polka dot strip in the example, cut a strip of this fabric to the full width of your main fabric and the desired height (e.g., 4 inches). Sew it to one end of your main fabric piece, right sides together, and press the seam open or towards the darker fabric. This is also the time to attach any pom-poms, lace, or other trim along the edge of your contrasting band or directly onto the main fabric. Remember, adding these “cutesy” details now, before the lining is attached, makes for a much cleaner finish.
Step 2. Secure the Ribbons
The ribbons are not just for aesthetics; they serve a practical purpose, allowing you to cinch the sides of the cover for a snug fit. Cut four pieces of ribbon, each 12 inches long. These will create two ties on each side of the cover. Lay your main fabric rectangle right side up. Pin the ribbons in place, positioning them 4 inches in from each side edge along both of the longer sides of your fabric. So, you’ll have two ribbons on one long side and two on the other, each 4 inches from the top and bottom edges respectively. Ensure the ribbon ends are facing inward, towards the center of the fabric, so they will be correctly positioned when the cover is turned right side out.
To secure the ribbons temporarily and prevent them from shifting during the next step, you can stitch them in place with a small basting stitch (a long, loose stitch) or a very narrow seam allowance, just within your planned 1/2-inch seam allowance. This ensures they don’t get caught or pulled out of place when you sew the main seams.
Step 3. Assemble the Fabric Layers
Now, it’s time to put your fabric pieces together. Place your liner fabric on top of the main fabric, ensuring that their “right sides” are facing each other. The “right side” is the side of the fabric that you want to be visible on the finished project (the pretty side). Align all the edges precisely. Pin the two layers together all the way around the perimeter, paying special attention to the corners and the areas where the ribbons are pinned. Smooth out any wrinkles or puckers as you go to ensure a clean stitch line.
Step 4. Stitch Around the Edges, Leaving an Opening
With your fabrics pinned, head to your sewing machine. Using a 1/2-inch seam allowance, sew all the way around the outer edges of the layered fabric. Start and end your stitching with a backstitch to secure the threads. It’s crucial, however, to leave an unstitched opening along one of the longer sides of the rectangle – typically on the side that will become the back of your cover. This opening, about 4 to 6 inches long, is essential for turning your project right side out. The red lines in the photo illustrate the typical sewing path, highlighting where to leave that turning gap.
Make sure to maintain an even seam allowance throughout. This contributes significantly to the final shape and neatness of your cover. When you reach the corners, pivot your fabric with the needle down to create sharp, precise angles.
Step 5. Clip the Corners for Crispness
Before turning your cover right side out, you need to “clip” the corners. This seemingly small step makes a significant difference in how your corners will look once the fabric is flipped. Using your scissors, carefully snip diagonally across each corner, getting as close to your stitch line as possible without actually cutting through the stitches. You’ll want to remove a small triangle of fabric from each corner.
Clipping reduces the bulk of the fabric in the corners, allowing them to turn out much sharper and more defined. If you skip this step, your corners will likely appear rounded and lumpy. Just be extra careful not to snip through your actual seam stitches, or you’ll end up with a small hole in your corner!
Step 6. Turn Right Side Out and Press Thoroughly
Now for the satisfying part! Reach into the opening you left along one side and carefully pull the entire fabric rectangle right side out. Take your time with this step, gently easing the fabric through the opening. Once it’s completely turned, use a point turner, a chopstick, or even a blunt pencil to carefully push out all four corners from the inside. Be gentle to avoid pushing too hard and creating a hole.
Once your cover is right side out and the corners are nicely formed, take it to your iron and ironing board. Press all the edges thoroughly. This step is crucial for achieving a professional, crisp finish. Pay special attention to the opening you left for turning; turn the raw edges inward so they align with the sewn seam and press them flat. This creates a clean, unstitched edge that will be easy to close in the next step. A good press makes all the difference in the world for the final look of your project.
Step 7. The Finishing Stitch: Optional Topstitching
You have two options for finishing your sewing machine cover here. The first, and often preferred, is to topstitch all the way around the entire perimeter of the cover. Topstitching creates a neat, decorative edge, helps the cover hold its shape, and firmly closes the opening you used for turning. If you choose this route, stitch about 1/8 to 1/4 inch from the edge, ensuring you catch both the main and lining fabrics as you sew over the turning hole.
Alternatively, as demonstrated in the original example, you can opt to only stitch along the back edge to close the turning hole. This creates a slightly softer, less structured look for the other edges. If you choose this, simply sew a straight line close to the edge of the opening, making sure to enclose the raw edges neatly. Whichever method you choose, remember to backstitch at the beginning and end of your stitching to secure the thread.
And just like that, you’ve completed your beautiful, handmade sewing machine cover! It’s truly that simple to create a protective and personalized accessory for your craft space.
Your Machine, Protected and Personalized!
Now for the moment of truth! Slip your newly finished cover over your sewing machine. The fit should be perfect, thanks to your careful measurements. Tie the ribbons on the sides into pretty bows, creating a cinched, elegant silhouette that not only looks charming but also helps keep the cover securely in place. Take a step back and admire your handiwork. You’ve not only created a practical item but also added a unique, handmade touch to your creative haven.
This simple sewing machine cover project is a fantastic way to protect your valuable equipment from dust and debris, ensuring it remains in top working condition for years to come. Plus, it offers endless possibilities for customization, allowing you to reflect your personal style through fabric choices, trims, and embellishments. Imagine changing your cover with the seasons, or making different ones to match various craft room themes!
Care and Maintenance for Your New Cover
To keep your sewing machine cover looking its best, care for it according to the fabric type you’ve chosen. For most quilting cottons, a gentle machine wash in cold water and a tumble dry on low heat or air dry will suffice. Press with a warm iron if needed. Regular cleaning will ensure your cover continues to effectively capture dust and keep your sewing machine sparkling clean.
We hope this detailed guide has empowered you to create a beautiful and functional sewing machine cover. Happy sewing, and may your machines always be dust-free and ready for creativity!