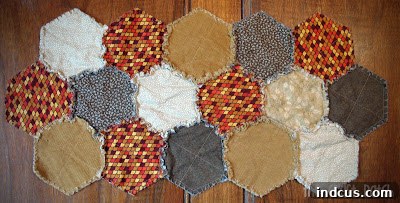
As the vibrant hues of autumn begin to paint the landscape, many of us are drawn to refresh our home decor, embracing the warmth and coziness of the season. A beautifully adorned table is often the centerpiece of this seasonal transformation, especially as we anticipate gatherings for Fall festivities and Thanksgiving. While countless options exist for table decor, there’s a unique satisfaction in creating something truly handmade – something that reflects your personal style and adds a touch of rustic charm to your space. If you’ve been searching for an easy yet distinctive DIY project to elevate your Fall decor, look no further! This guide will walk you through crafting a charming hexagon rag quilt-style table runner, a project that is both enjoyable to make and wonderfully versatile.
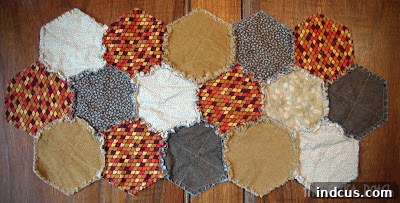
I recently found myself in a similar position, pulling out all my beloved Fall decorations only to realize a crucial element was missing: a seasonal table runner. Having previously created several machine-quilted runners for other holidays, I felt inspired to try something fresh, something less intricate, and definitely something easy this time around. The result? A delightful hexagon rag quilt table runner, perfect for Thanksgiving and beyond, crafted from a playful mix of fall-themed fabric scraps, including a touch of cozy corduroy that just screams autumn to me. This project is not only forgiving for beginners but also a fantastic way to utilize those fabric remnants you’ve been saving. Let’s dive into creating your very own unique rag quilt table runner!
Essential Materials and Tools for Your Hexagon Rag Quilt
Before embarking on this creative journey, gathering all your necessary materials and tools will ensure a smooth and enjoyable crafting experience. One of the best aspects of a rag quilt project is its inherent adaptability, making it an excellent choice for using up fabric scraps.
Fabric Choices:
- Fabric Scraps: You’ll need a variety of fall-themed cotton or flannel fabrics. These materials fray beautifully, which is key to the rag quilt aesthetic. Think warm oranges, deep reds, golden yellows, earthy browns, and rich greens.
- Corduroy (Optional but Recommended): A small amount of corduroy adds wonderful texture and a quintessential fall feel.
- Quantity: For a runner similar to the one shown, aim for enough fabric to cut 32 hexagons (since each rag hexagon requires two layers of fabric). You can easily adjust this quantity based on your desired runner length and width.
Tools You’ll Need:
- Sewing Machine: A basic sewing machine with a straight stitch capability is all you need.
- Thread: All-purpose polyester or cotton thread that complements your fabric colors. Some quilters prefer a slightly contrasting thread to make the “X” stitches pop.
- Sharp Fabric Scissors: Essential for clean cuts, especially when snipping the seams.
- Small Snips or Detail Scissors: These are incredibly helpful for precise snipping of the seam allowances later on.
- Hexagon Template: You can create one easily. A 6-inch hexagon (from point to point) is a great size, but feel free to experiment.
- Printer and Paper: For printing your hexagon template.
- Ball-Point Pen or Fabric Marker: For tracing your hexagon shapes onto the back of your fabric.
- Ruler or Measuring Tape: For checking hexagon dimensions and planning your layout.
- Iron and Ironing Board (Optional): While not strictly necessary for rag quilts, pressing your fabric before cutting can help ensure accuracy.
Step-by-Step Guide to Crafting Your Rag Quilt Table Runner
Step 1: Creating Your Hexagon Templates and Cutting Fabric
The foundation of your rag quilt runner begins with precise hexagon shapes. Don’t be intimidated by the geometry; it’s surprisingly simple!
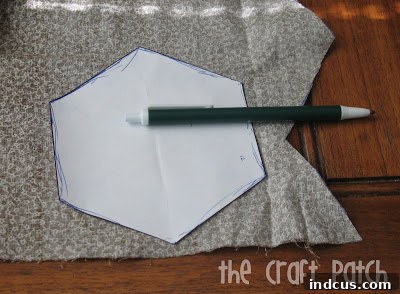
To start, you’ll need a hexagon template. I found it easiest to create a 6-inch hexagon shape using a word processing program like Microsoft Word. Simply insert a hexagon shape, adjust its size to 6 inches from point to opposite point, and print it out. Cut out this paper template carefully. If you prefer, you can also purchase pre-made hexagon templates from craft stores or online.
Once you have your template, lay your chosen fall fabrics flat. Using a ball-point pen (as the marks will be on the wrong side of the fabric and later hidden), carefully trace around your hexagon template onto the back of your fabric. Remember that each finished “rag” hexagon will consist of two layers of fabric, sewn together. For a table runner similar in size to the example, which forms a symmetrical pattern, you will need a total of 32 individual hexagons, meaning 16 pairs. Cut out each traced hexagon with sharp fabric scissors, striving for accuracy in your cuts. Taking your time here will ensure your final pieces fit together nicely.
Step 2: Preparing Your Hexagons for the Rag Quilt Effect
This step is where the unique rag quilt magic begins. Instead of sewing with right sides together as you would in traditional quilting, you’ll be creating double-layered hexagons with right sides facing outwards.
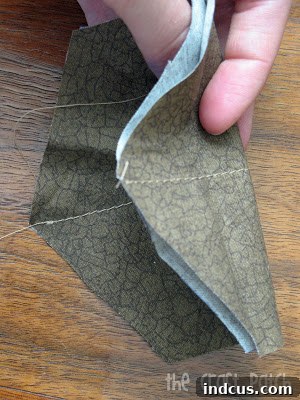
Take two of your cut hexagons and stack them with their wrong sides touching each other and their right sides facing out. This creates a double-thickness hexagon unit. Now, you’ll sew a decorative and functional “X” stitch across the center of this double-layered hexagon. Position your sewing machine needle at one point of the hexagon and stitch across to the opposite point. Then, lift your presser foot, rotate the fabric, and stitch from the center of one flat side across to the center of the opposite flat side. This creates an “X” in the middle of your hexagon, securing the two fabric layers together and providing a foundation for the ragging effect.
Repeat this process for all 16 pairs of hexagons you’ve prepared. Ensure your stitches are secure at the beginning and end by backstitching a few stitches. This central “X” stitching is vital as it prevents the two fabric layers from shifting during the later stages of the project and contributes to the overall texture of your rag quilt. Once completed, both sides of your sewn hexagon unit should clearly display the “right” side of the fabric, ready for assembly.
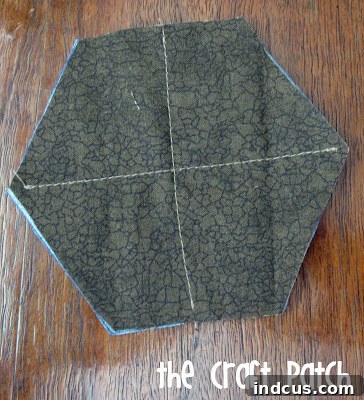
Notice how both sides of the sewn hexagon units beautifully showcase the fabric’s pattern, a hallmark of the rag quilt style!
Step 3: Designing Your Table Runner Layout
Before you begin sewing your hexagon units together, it’s highly recommended to lay them out to visualize your desired pattern. This step is crucial for ensuring a cohesive design and for preventing any mistakes in alignment.
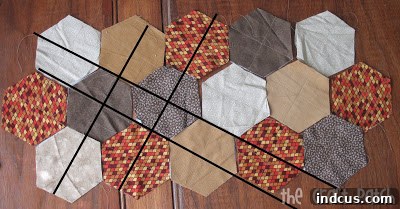
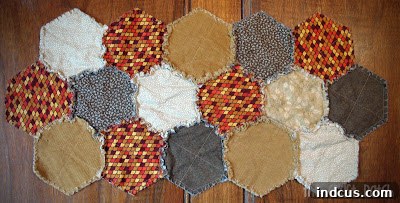
Arrange your 16 double-thickness hexagons on a flat surface, such as a large table or the floor, into the pattern you envision for your table runner. The example runner uses a linear arrangement, but you can experiment with staggered or more intricate layouts. Pay close attention to the orientation of each hexagon. For a clean look, I found it helpful to ensure that all the stitches extending from point to point within the “X” went in the same direction when viewed as a whole. Similarly, all the stitches extending from the center of a flat side to the other center flat side also followed a consistent orientation. Think of it like aligning a subtle grid across your design. This attention to detail will create a more uniform and polished appearance once your runner is complete. Take a moment to admire your potential design and make any necessary adjustments to color placement or orientation before moving to the sewing machine.
Step 4: Assembling Your Hexagon Rag Quilt
Now comes the exciting part: sewing your hexagon units together! This step requires a bit of careful attention to ensure all your seams align correctly and end up on the same side of the runner, which is vital for achieving the signature rag quilt frayed edges.
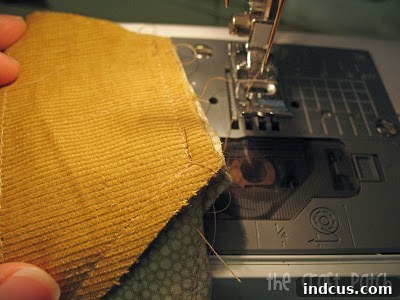
The trickiest part here is managing the seam allowance placement. For a rag quilt, all the seams that will be snipped and frayed need to be on the *same side* of your finished project. To avoid any frustrating unpicking, I highly recommend adopting a methodical approach: lay out your entire planned project next to your sewing machine. Pick up two adjacent hexagon units you wish to join. Pinch the edges together in the exact way they are supposed to be sewn, ensuring the seam allowances will face the side you’ve designated as the “ragging” side (typically the top, as it’s easier to snip). Bring these pinched pieces to your sewing machine and stitch them together using a 1/2-inch seam allowance. This larger seam allowance provides ample fabric for fraying. When sewing, be precise: start your stitch exactly at the corner point of one hexagon and end precisely at the corner point of the joining hexagon. Do not sew off the edge of the fabric, as this would create an unsightly gap or an uneven seam when joining subsequent pieces. The stitches should meet cleanly in the corner, not extend past each other, as shown in the accompanying image. After sewing a seam, take the joined pieces back to your layout to confirm alignment and then pinch the next two pieces together before sewing. This “pinch, sew, replace, pinch” method proved incredibly effective for me, saving me from having to unpick a single stitch!
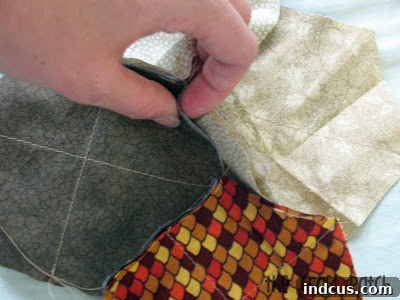
Remember the precision with your stitches—they should meet cleanly at the corners, not extend beyond!
Step 5: The Signature Rag Quilt Snips
This is arguably the most satisfying step, as it truly transforms your sewn pieces into a rag quilt. The goal is to create numerous little snips in the seam allowances, which will then fray in the wash, giving your runner its characteristic soft and textured appearance.
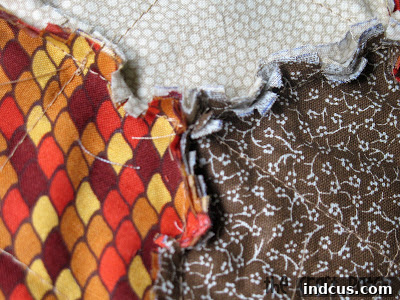
With a pair of very sharp fabric scissors or small snips, carefully cut into all the exposed seam allowances you’ve created. Remember, these are the seams that are all facing the “ragging” side of your runner. Make your snips approximately every 1/4 to 1/2 inch, cutting almost up to your stitch line, but being absolutely sure not to snip *through* the stitches. Cutting through a stitch line will compromise the integrity of your seam and could cause your runner to fall apart. Take your time and work methodically around the entire runner, snipping all the seams. The more snips you make, the fuller and softer the frayed effect will be after washing. Don’t forget to snip the outer edges of the runner as well, creating a lovely frame of fringe.
Step 6: Washing and Finishing Touches
You’re almost there! The final step brings your rag quilt to life and reveals its beautiful, fluffy texture.
Place your snipped table runner into your washing machine. Use cold water and a gentle cycle to start. The agitation of the washing machine, combined with the snipped seams, will encourage the fabric edges to fray. You’ll likely see a good deal of loose threads and lint during this first wash, so it’s a good idea to clean out your lint trap afterwards! For maximum fraying and fluffiness, tumble dry the runner on a low setting. The heat and tumbling action will further enhance the rag quilt effect. Once it emerges from the dryer, you’ll find your runner transformed. There might be some lingering loose threads that need a quick trim with your scissors to tidy up the edges, but otherwise, your stunning hexagon rag quilt table runner is complete!
Tips for Success and Customization
Fabric Selection is Key:
While cotton and flannel are ideal for their fraying properties, don’t shy away from incorporating other fabrics like the corduroy used here, or even denim scraps for a more rustic look. Just ensure the fabric type you choose will fray well. Mixing textures adds visual interest and depth to your runner.
Customize Your Size:
The beauty of this DIY project is its flexibility. Adjust the number of hexagon units you create to make your runner longer or shorter, or even wider by adding more rows. You could even create placemats or a full rag quilt blanket using the same technique!
Seasonal Versatility:
While perfect for Fall and Thanksgiving with autumn hues, this method can be adapted for any season or holiday. Imagine a spring runner with floral patterns, a patriotic version with red, white, and blue, or a winter wonderland theme with whites, silvers, and blues. The possibilities are endless!
Care and Maintenance:
Rag quilts generally become softer and more “ragged” with each wash. For best results, wash in cold water and tumble dry on low. Expect some lint in your dryer trap, especially during the first few washes.
Why Choose a Rag Quilt for Your Home Decor?
Rag quilts offer a unique blend of charm, comfort, and character that makes them a wonderful addition to any home. Their rustic, inviting texture instantly adds warmth and coziness, making them perfect for creating a welcoming atmosphere, especially during the colder months. Unlike traditional quilts, the “ragged” edges forgive imperfections, making them an excellent project for beginner sewers or those looking for a relaxing, less precise craft. They are also incredibly durable and improve with age and washing, becoming softer and more luxurious over time. Furthermore, rag quilts are a fantastic way to upcycle fabric scraps, promoting sustainability and allowing you to create a truly one-of-a-kind piece that tells a story through its varied textiles. Embrace the handmade aesthetic and enjoy the satisfaction of creating a functional work of art.
Conclusion
Crafting a hexagon rag quilt table runner is a truly rewarding DIY project that offers both simplicity and stunning results. It’s a wonderful way to infuse your home with personalized Fall decor, creating a cozy and inviting atmosphere for family and guests. The rustic charm of the frayed edges, combined with the versatility of fabric choices, means your finished runner will be a unique expression of your creativity. Whether you’re a seasoned crafter or just starting your sewing journey, this easy-to-follow guide empowers you to create a beautiful, handmade centerpiece that will be cherished for many seasons to come. So, gather your fabrics, fire up your sewing machine, and get ready to add that perfect touch of handmade warmth to your home this Fall. Happy crafting!