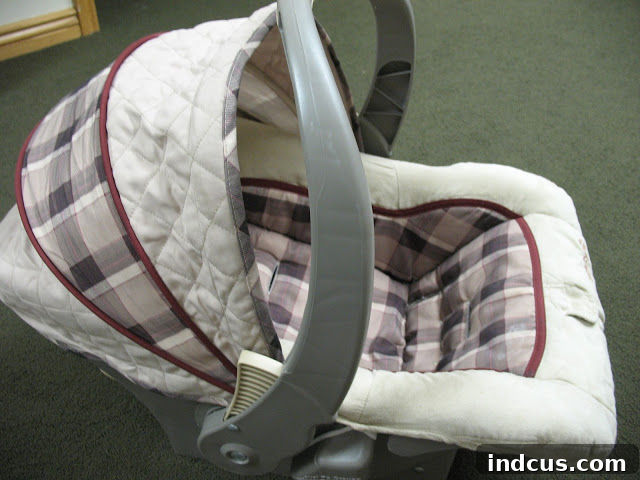
Embarking on a sewing project, especially one as intricate as reupholstering an infant car seat, can be a daunting prospect. This week, I took on just such a challenge – a project that initially filled me with a significant amount of trepidation. A wonderful friend, whose child-rearing days are complete, generously gifted me her gently used infant car seat. While incredibly grateful to save on the expense, the existing design was, to put it mildly, a bit too masculine and rather plain for my taste. The vision of transforming it into something vibrant and distinctly feminine took root in my mind, a persistent idea that my “crazy pregnant brain” simply couldn’t shake.
I knew from experience how often these car seats are carried everywhere during those first crucial six months. A plain, somewhat boyish aesthetic just wouldn’t do for our little girl. I tried to reason with myself, to talk myself out of such an ambitious undertaking. My primary fear was dismantling the entire cover only to find myself utterly unable to reassemble it, undoubtedly leading to a cascade of hormonal tears and deep frustration. For about a week, I wavered, caught between the desire for a beautiful custom car seat cover and the very real possibility of failure. This internal debate was intense, but ultimately, the creative urge won out.
The Grand Reveal: A Custom Car Seat Transformation!
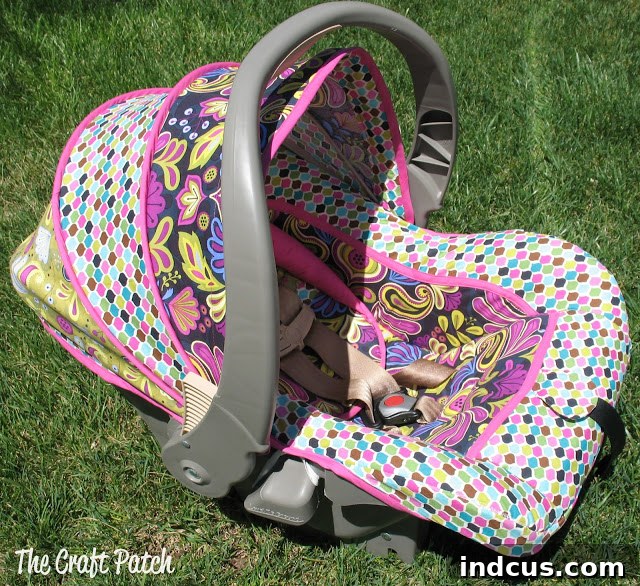
And obviously, I conquered my fears and completed the project, because here I am, sharing the glorious results! Ha ha! Behold the incredible transformation:
*SQUEAL*! Oh, the sheer joy! I truly did it! The project was a resounding success! The car seat now boasts a design that is utterly cute, cheerful, and perfectly girly! It’s a vast improvement over the drab tan plaid it once wore. Every hour spent was absolutely worth it, and I’m thrilled to report that not a single tear of frustration was shed during the process! I won’t mislead you by claiming it was an effortless endeavor. This DIY car seat upholstery project demanded many hours of dedicated effort—we’re talking upwards of 15 hours. My sewing skills were significantly put to the test, and I gained an immense amount of knowledge and experience. In fact, I’m already contemplating tackling the baby swing next, invigorated by this achievement!
Considering a DIY Car Seat Upholstery Project? Read This First!
If you’re contemplating giving your car seat a new lease on life with a custom cover, my advice is to absolutely go for it… provided you are a seasoned and fearless seamstress. This is unequivocally not a project suitable for beginners. The sheer number of complex pieces and the intricate sewing techniques involved make it quite challenging. While incredibly rewarding, it requires patience, precision, and a solid foundation in sewing.
I found invaluable guidance in Ashley’s tutorial atMake It and Love It, which provided an excellent overview and helped me grasp the fundamental steps. However, it’s crucial to understand that creating a universal, one-size-fits-all tutorial for car seat reupholstery is simply impossible. The reason? Each car seat model is unique, and you must use your existing car seat cover as the precise pattern for your new fabric. This personalized approach is what makes each project truly custom.
The Golden Rule of Car Seat Reupholstery: Document Everything!
So, where do you begin your journey to a beautiful custom infant car seat cover? The very first and arguably most critical step is meticulous documentation. Before you even think about cutting, start by taking dozens of photographs and labeling every single component. Can I emphasize enough how absolutely vital this stage is? You might believe you’ll easily recall how each piece fits back together, but trust me, under the pressure of countless fabric pieces and complex seams, your memory will likely fail you. You will undoubtedly need to refer back to your detailed pictures and labels. I found it incredibly helpful to use a Sharpie directly on the old car seat cover, clearly marking each section:
Ensure you capture photographs of all the tricky, nuanced areas where different pieces connect or where special sewing techniques are evident. Pay particular attention to how the buckles and straps are attached and integrated into the cover. Take far more pictures than you initially believe you’ll need, capturing every possible angle and detail. Think of yourself as a forensic investigator documenting a scene – every tiny detail matters for successful reassembly.
Disassembly: The Unraveling Process
Once your documentation is complete, the next phase involves meticulously picking the entire old cover apart. This stage felt like an eternity and resulted in me and my entire sewing room being covered in a blizzard of threads and fabric scraps. To combat the monotony of this detailed process, I found that catching up on my favorite TV shows helped immensely. It’s a tedious but necessary step, as each piece of the original cover will serve as your invaluable pattern.
Precision Cutting: Creating Your New Custom Car Seat Cover Pieces
With all the pieces of the old cover carefully separated, you’ll then use each one as a precise pattern to cut out your new fabric. For this particular infant car seat cover, I ended up utilizing approximately three yards of fabric in total—a little less than two yards for the front sections and just over a yard for the back. As you cut, it’s absolutely crucial to transfer all the intricate markings from your old pattern pieces to the new fabric. This includes noting where different sections align, the precise locations for elastic bands, and identifying which seams were originally serged (or finished in a particular way). These details are paramount for achieving a professional and functional finish.
The Sewing Odyssey: Navigating Challenges and Embracing Lessons
After all your new fabric pieces are meticulously cut, it’s time to embark on the exciting, yet challenging, sewing phase! I opted to reuse the original batting from the car seat, as it was still in excellent condition and provided the necessary padding and structure. My car seat’s original design featured tan fabric around the outer edges and a plaid pattern in the center. Initially, I considered simplifying the project by making the entire cover from a single fabric, thereby skipping the maroon binding and the second fabric pattern. This, I thought, would make my DIY car seat upholstery project significantly easier.
However, I quickly learned a profound lesson that is absolutely worth sharing: you often cannot deviate from the original design. The manufacturers sewed it together in a specific way because it *had* to be that way. In my specific case, that seemingly decorative maroon binding around the center section was, in fact, functional, holding a second layer of batting securely in place. The takeaway here is to trust the expertise of the professionals who originally designed and assembled the car seat. Copy their methods and construction exactly; their choices are often driven by function and safety.
That notorious center panel proved to be the most challenging section to sew. It required a sewing technique that seemed utterly backward at first glance:
Despite feeling counter-intuitive, I persistently referred back to the original cover, striving to replicate its appearance. In the end, my pink binding didn’t line up with absolute perfection, but at that point, having invested so many hours, I was certainly not going to undo seams to fix a minor imperfection! When dealing with the substantial bulk of two layers of batting combined with two or even more layers of fabric in certain areas, my walking foot proved to be an indispensable tool. It significantly aided in feeding all that thick material smoothly through my sewing machine, preventing frustrating fabric shifting and puckering.
The Imperfectly Perfect Result: A Labor of Love
Did my custom reupholstered car seat turn out absolutely perfectly? No, not entirely. There are small areas where the fabric is a little puckery, or a seam is slightly crooked, or a binding doesn’t meet with millimeter precision. However, these minor imperfections are barely noticeable in the grand scheme of things. And I might, just might, have resorted to a teensy bit of hot glue in a couple of stubborn spots where traditional sewing simply wasn’t cooperating to my satisfaction. Sometimes, a little creative problem-solving is necessary!
Despite these tiny flaws, I still think the finished product is pretty darn cute and a true testament to personal effort and creative vision.
The transformation is undeniable, and it’s certainly a significant improvement over the original! As an added bonus, I have just enough fabric remaining to craft one of those adorable car seat canopy tents. However, I’m genuinely torn about using it. After all that hard work and dedication, I might not want to cover up my beautiful, custom creation!
Conclusion: Embrace the Challenge, Cherish the Craft
Reupholstering an infant car seat proved to be a challenging but ultimately deeply satisfying project. It pushed my sewing skills to new limits and instilled a renewed confidence in my abilities. For the fearless seamstress looking for a rewarding DIY project, transforming a dull car seat into a personalized masterpiece is an incredible journey. It’s a testament to creativity, patience, and the joy of crafting something truly unique for your little one. Don’t let fear hold you back from tackling those projects that seem overwhelming; the reward of a custom-made item, crafted with your own hands, is truly priceless.