Unlock DIY Potential: The Ultimate Guide to Contact Paper Projects for Faux Frosted Glass & Home Decor
In the realm of home decor, finding versatile, budget-friendly materials that can transform a space without demanding permanent commitment is like striking gold. Enter contact paper – an often-underestimated hero in the DIY world. While traditionally known for lining shelves, its potential stretches far beyond, particularly when it comes to mimicking the elegant look of frosted glass or adding a touch of personalized flair to almost any surface. This guide will explore the myriad ways contact paper can elevate your home decor, offering simple projects, creative ideas, and essential tips for flawless application.
Imagine giving an ordinary item a sophisticated, custom upgrade with minimal effort and cost. That’s precisely the magic contact paper brings to the table. Its temporary nature, unlike permanent etching creams or expensive custom glass, makes it the perfect medium for experimentation, seasonal changes, or rental-friendly decorating. Get ready to unleash your inner designer and discover how this humble material can open up a whole new world of home transformation.
Transform Your Space with Faux Frosted Glass: A Simple Mirror Makeover
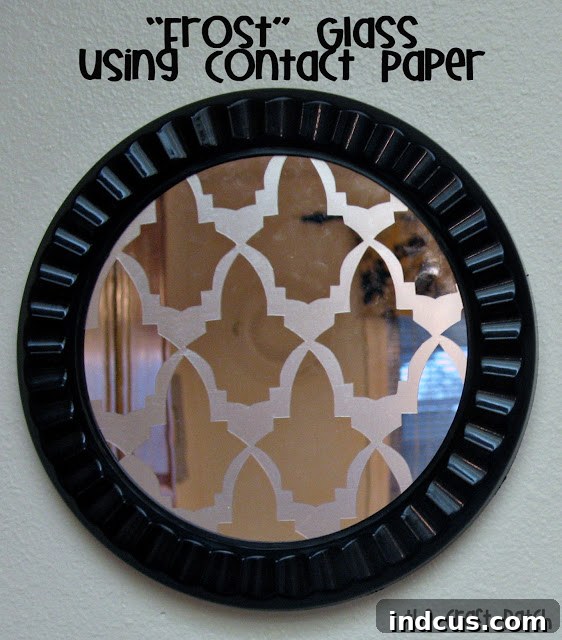
Let’s kick things off with a project that perfectly illustrates the simplicity and impact of contact paper: a chic mirror makeover. Starting with a humble round mirror, perhaps one you picked up at a dollar store or have tucked away in a drawer, you can achieve a sophisticated frosted design that looks anything but inexpensive. The process is incredibly straightforward, making it an ideal first foray into the world of contact paper crafts.
The Inspiration: From Dollar Store Find to Chic Decor
My own journey began with a small, unadorned mirror. While functional, it lacked character. The goal was to “spice it up” without investing in expensive supplies or committing to a permanent alteration. Clear contact paper emerged as the perfect solution. Its semi-transparent quality beautifully mimics the appearance of frosted glass, allowing light to pass through while obscuring a direct view, creating a soft, diffused effect. This particular project utilized a simple, organic web-like pattern, but the beauty of this technique is its adaptability to any design you can imagine.
Step-by-Step Guide to Your First Frosted Design
- Gather Your Materials: You’ll need your mirror, a roll of clear contact paper, scissors, a pencil, and some paper for creating a template. A craft knife (like an X-Acto knife) can be helpful for intricate designs, and a squeegee or old credit card will be invaluable for smooth application.
- Create Your Template: On a piece of regular paper, draw or print the design you wish to apply to your mirror. This could be a simple geometric shape, a floral pattern, or an abstract motif. For the web design I used, I simply drew it freehand, ensuring it fit within the mirror’s dimensions.
- Trace Onto Contact Paper: Place your template over the paper backing of the contact paper and trace the design carefully with a pencil. Make sure to trace on the backing, not the adhesive side, to avoid marks on your finished product.
- Cut Out Your Design: Using sharp scissors or a craft knife, meticulously cut out your traced design. Precision here will contribute to a clean, professional look. Take your time, especially with curves or sharp angles.
- Prepare the Surface: Before applying, ensure your mirror (or any glass surface) is immaculately clean and dry. Any dust, lint, or smudges will be trapped beneath the contact paper and will be visible. Use a glass cleaner and a lint-free cloth.
- Apply the Contact Paper: This is where patience pays off. Carefully peel a small section of the paper backing from your cut design. Position the exposed adhesive edge onto your mirror. Slowly and steadily, continue peeling the backing paper away with one hand while simultaneously smoothing the contact paper onto the mirror with your other hand, using a squeegee or credit card. Work from the center outwards or from one edge to the other to push out any air bubbles. If bubbles appear, gently lift the edge of the contact paper and re-smooth, or for stubborn tiny bubbles, you can carefully prick them with a pin and smooth them down.
And just like that, you’ve transformed a basic mirror into a personalized piece of decor. The “clear” contact paper provides that sought-after frosted look, diffusing reflections and adding an ethereal touch. The beauty is, if you ever tire of the design, it peels off cleanly, leaving no residue, ready for your next creative endeavor.
Beyond the Mirror: Endless Possibilities with Contact Paper
The mirror makeover is just the tip of the iceberg when it comes to contact paper’s potential. Its non-permanent nature and ease of use unlock a vast realm of possibilities, allowing you to experiment with design without long-term commitment. Let’s explore some more innovative applications for this versatile material around your home.
Enhanced Privacy and Style for Windows and Doors
- Bathroom Mirror Accents: Elevate your bathroom mirror from purely functional to a spa-like feature. Use an electronic cutter (like a Cricut or Silhouette machine) to precisely cut out elegant words like “Relax,” “Refresh,” or “Spa” in a beautiful script. Alternatively, create intricate frosted borders, subtle floral patterns, or geometric motifs to add a custom, high-end feel. These designs offer a touch of privacy for vanity items while allowing light to bounce beautifully.
- Front Door Sidelights and Transoms: Those narrow windows flanking your front door, or the decorative window above it (transom), often compromise privacy. Contact paper offers an elegant solution. Apply frosted contact paper to these panes, either fully covering them for maximum privacy or creating a decorative pattern (e.g., stripes, a repeating geometric design, or a botanical silhouette) that allows light in but obscures direct views. This instantly enhances your home’s curb appeal and provides peace of mind.
- Kitchen Cabinet Glass Panels: Update the look of your kitchen without a full renovation. If your kitchen cabinets feature glass panels, contact paper can be used to “frost” them. This not only provides a contemporary aesthetic but also discreetly conceals any clutter within the cabinets, making your kitchen appear tidier and more cohesive. You can frost the entire panel or apply decorative elements such as a patterned border or a central motif.
Decorative Touches for Glassware and Accessories
- Apothecary Jars or Glass Candlesticks: Give everyday glass items a bespoke feel. Add initials, monograms, simple stripes, polka dots, or intricate scrollwork designs to apothecary jars, serving pitchers, or glass candlesticks. This transforms them into unique decorative pieces perfect for gifting or enhancing your own home’s ambiance. Imagine a set of candlesticks with a delicate frosted leaf pattern for autumn, easily removable when spring arrives.
- Vases and Picture Frames: Extend the creative application to glass vases or the glass in picture frames. A simple frosted design can turn a plain vase into an artistic statement. Similarly, adding a frosted border or design to the glass of a picture frame can highlight the photo within and add depth to your display.
Seasonal and Personalized Decor That Evolves With You
- Seasonal Decor: The temporary nature of contact paper makes it perfect for holiday and seasonal decorating. Imagine snowflakes or festive phrases frosted onto windows during winter, playful ghosts or spiders for Halloween, delicate flowers or butterflies for spring, or autumnal leaves for fall. The ability to simply peel off the old design and apply a new one makes seasonal transitions fun and effortless, keeping your home fresh and relevant throughout the year.
- Children’s Room Personalization: Create a magical and evolving space for your child. Frost their name onto a mirror or a window in their room, surrounded by whimsical designs like stars, planets, cartoon characters, or animal silhouettes. As they grow, or as their interests change, these designs can be easily updated, ensuring their room always reflects their current personality without any permanent changes.
Artistic Flair for Everyday Spaces
- Kitchen Window Art: Infuse your kitchen with artistic charm. Create a subtle design in one corner of your kitchen window – perhaps delicate branches reaching inwards, a cluster of stylized flowers, elegant swirls, or even a geometric pattern. This adds visual interest without obstructing your view, creating a unique focal point that can be easily updated.
The Unbeatable Advantages of Contact Paper for DIY Projects
While various methods exist for achieving frosted glass effects, contact paper stands out for several compelling reasons. Its unique characteristics make it a superior choice for many DIY enthusiasts, particularly those who value flexibility, affordability, and ease of use.
Temporary Transformations: Flexibility at Your Fingertips
The single most significant advantage of contact paper over traditional methods like etching cream is its impermanence. Etching cream uses chemicals to permanently alter the surface of glass, making any design irreversible. Contact paper, however, offers:
- Freedom to Experiment: If a design doesn’t quite turn out as planned, or if you simply want to try a new look, contact paper can be peeled off and replaced without damage to the underlying surface.
- Seasonal Updates: As mentioned, this makes it perfect for holiday-specific decor that can be changed out multiple times a year, keeping your home decor dynamic and fresh.
- Rental-Friendly Decor: For renters who want to personalize their space without violating lease agreements, contact paper is a dream come true. It allows for significant transformations that can be fully reversed upon moving out.
- Error Forgiveness: Mistakes happen! With contact paper, minor misalignments or bubbles can often be corrected by gently lifting and reapplying, a luxury not afforded by permanent etching.
Budget-Friendly Beauty for Every Home
Beyond its flexibility, contact paper is an incredibly economical option compared to its alternatives:
- Cost-Effective: A roll of clear contact paper is significantly cheaper than a kit for chemical glass etching, custom-cut frosted glass, or professional installation of privacy film.
- Accessible to All: Its low cost and ease of use make sophisticated decorative effects accessible to everyone, regardless of budget or prior DIY experience. You don’t need specialized tools or training to achieve beautiful results.
- Safe Alternative: Unlike etching creams that involve caustic chemicals and require careful handling and ventilation, contact paper is a non-toxic and safe material to work with, making it suitable for projects involving children (with supervision, of course!).
Mastering Contact Paper: Tips for Flawless Application
To ensure your contact paper projects look professional and last as long as you desire, a few simple tips can make all the difference:
Preparation is Key:
- Clean Surfaces Thoroughly: Always start with a clean, dust-free, and dry surface. Use a mild cleaner (like glass cleaner for glass surfaces) and a lint-free cloth. Any speck of dust or residue will show through clear or frosted contact paper and can compromise adhesion.
Measuring and Cutting:
- Measure Twice, Cut Once: This old adage holds true. Accurately measure the area you intend to cover.
- Use a Grid: Most contact papers come with a grid on the paper backing, which is invaluable for cutting straight lines and precise shapes. Always cut on the backing side.
- Sharp Tools: Use very sharp scissors or a fresh blade in your craft knife for clean edges. Dull tools will tear the paper and result in messy lines.
Smooth Application Techniques:
- Work Slowly and Steadily: Do not rush the application process. Peel off only a small section of the backing paper at a time (e.g., an inch or two).
- Start from One Edge: Align the contact paper carefully at one edge of your surface. Slowly press it down, working your way across.
- Use a Squeegee: A plastic squeegee (often used for vinyl applications), an old credit card, or even a soft cloth can be used to smooth the contact paper as you apply it. This pushes out air bubbles and ensures firm adhesion. Work from the center outwards or from the already-applied section towards the new section.
- Dealing with Bubbles: If a stubborn air bubble appears, gently try to smooth it towards the nearest edge. For very small, trapped bubbles, you can carefully prick them with a fine pin and then smooth them down.
- Wet Method for Large Areas: For very large surfaces (like entire window panes), a “wet method” can be incredibly helpful. Lightly mist the clean glass surface with a spray bottle containing water mixed with a tiny drop of dish soap. This lubricates the surface, allowing you to reposition the contact paper easily before it fully adheres. Once positioned correctly, use your squeegee to push out the water and bubbles.
Removal:
- Gentle Heat: If contact paper has been on for a long time or is proving difficult to remove, a little heat from a hairdryer on a low setting can soften the adhesive, making it easier to peel off without leaving residue.
- Clean Residue: If any adhesive residue remains, rubbing alcohol, Goo Gone, or a citrus-based cleaner can usually remove it effectively.
A Glimpse into Other Innovative Contact Paper Creations
I’m certainly not the only one who has discovered the magic of contact paper. The DIY community abounds with brilliant and inspiring projects that leverage this versatile material. Here are a few examples from fellow creatives that highlight different applications and clever techniques:
The Clever ‘Back Door Makeover’ for Instant Curb Appeal
One particularly insightful project I stumbled upon was a Back Door Makeover. What made this stand out was the ingenious approach. While my initial thought for intricate designs was to cut out the design itself and apply it (leaving the “negative space” clear), this creator brilliantly used the *center pieces* of her cut design. This meant less intricate cutting for the part that adheres and often a more striking visual impact. It’s a simple yet profound shift in perspective that makes large-scale or detailed projects much more manageable and efficient. This technique can save significant time and frustration, especially for patterns with many internal cutouts.
Creating a Serene ‘Frosted Privacy Window’
Another inspiring example is the Frosted Privacy Window project. This showcases how effectively contact paper can address a common household dilemma: the need for privacy without sacrificing natural light. Perfect for bathrooms, entryways, or any window facing a close neighbor, this project demonstrates how easily a once-exposed window can be transformed into a stylish, private feature. It’s a testament to how contact paper can improve functionality and aesthetics simultaneously, creating a softer, more serene atmosphere in a room.
The Stylish ‘Private Pantry Door’ Solution
The concept of a Private Pantry Door offers yet another ingenious application. Many pantry doors feature glass panes, which while aesthetically pleasing, often reveal the sometimes-less-than-tidy contents within. Applying frosted contact paper to these panels provides an instant visual decluttering solution. It’s a functional upgrade that maintains the architectural integrity of the door while adding a touch of sophisticated charm to the kitchen or dining area. This project beautifully merges practicality with design, proving that contact paper can solve real-world problems with elegance.
Tackling Large Areas: Wisdom from ‘Don’t Mind The Foggy Shadow’
Finally, for those considering larger-scale projects, the article Don’t Mind The Foggy Shadow provides invaluable tips on how to apply contact paper to expansive surfaces. This resource goes beyond just showing a finished product; it delves into the practicalities of working with large sheets, offering advice that can prevent bubbles, wrinkles, and misalignment. It often highlights the aforementioned wet method (using soapy water) and the benefit of having an extra pair of hands for seamless application, turning what might seem like a daunting task into a manageable and rewarding DIY experience.
Your Turn to Create: The World of Contact Paper Awaits!
From simple dollar store mirror makeovers to elaborate window privacy solutions and personalized home accents, the potential of contact paper is truly immense. Its affordability, ease of use, and most importantly, its non-permanent nature, make it an unparalleled tool for anyone looking to refresh their space, experiment with designs, or add a touch of personal flair without long-term commitment. It empowers you to be your own decorator, adapting your home’s aesthetic as often as your mood changes or the seasons turn.
Now that you’ve explored the diverse applications and advantages of this unassuming craft supply, it’s your turn to get creative. What would you do with contact paper? Are there any hidden gems in your home just waiting for a faux frosted glass transformation or a personalized touch? Please share your brilliant ideas, experiences, and project suggestions in the comment section below. We can’t wait to see what you’ll create!