Illuminate Your Independence Day: Craft Stunning Patriotic Flag Luminaries!
As the vibrant spirit of the Fourth of July approaches, the air buzzes with anticipation for barbecues, parades, and spectacular fireworks displays. What better way to enhance your holiday decor than with a charming, handmade touch? This year, let your creativity shine by crafting beautiful patriotic flag luminaries made from simple paper napkins and wooden craft sticks. This incredibly easy DIY project is perfect for adding a warm, festive glow to your home and yard, celebrating America’s Independence Day in style.
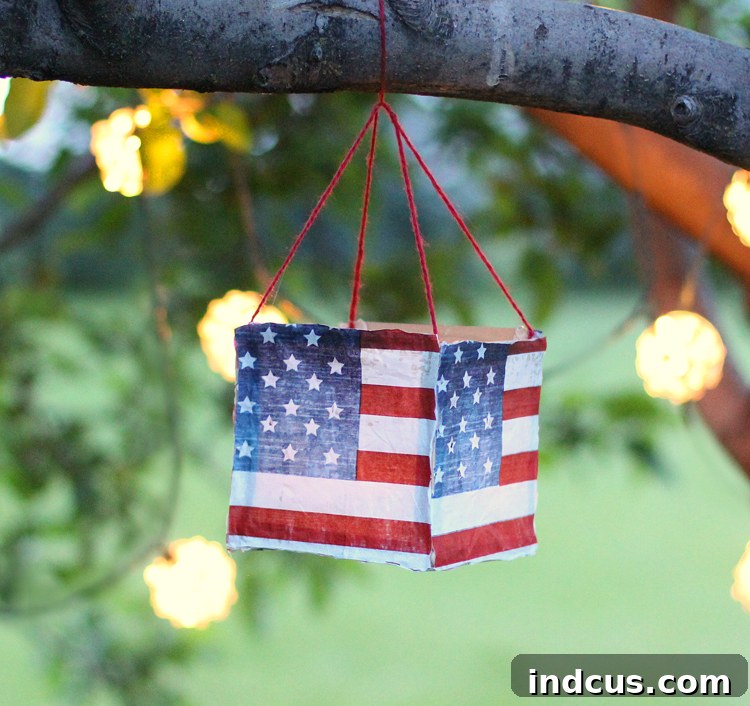
Imagine these delightful luminaries gracing your porch, illuminating your patio, or gently swaying from tree branches as dusk settles. They possess a captivating appeal, looking equally charming and decorative during daylight hours, and transforming into mesmerizing beacons of light when evening arrives, powered by safe, flickering LED tea lights. This craft is not only fun but also offers a wonderful opportunity for family bonding as you prepare for the celebrations. Are you ready to embark on this creative journey and craft your very own bespoke decorations for the Fourth of July? Let’s gather our supplies and begin making these radiant symbols of national pride!
Before we dive into the step-by-step creation process, let’s ensure you have all the necessary materials ready. The beauty of this craft lies in its simplicity and the accessibility of its components. You likely have some of these items already, or they can be easily found at your local craft store or even a general merchandise retailer. Gathering everything beforehand will make the crafting experience smooth and enjoyable, allowing you to focus on the creative aspects without interruptions.
Gather Your Crafting Arsenal: Detailed Materials Guide
- Tissue Paper or Printed Paper Napkins: This is arguably where your luminary will get its most striking patriotic flair! While plain tissue paper in classic red, white, and blue shades can certainly create an elegant and simple luminary, opting for themed paper napkins opens up a world of design possibilities. Many retailers offer an incredible variety of napkins pre-printed with flag designs, Americana patterns, stars, stripes, and other festive motifs. These prints are often vibrant and instantly infuse your project with holiday spirit. Look for 2-ply or 3-ply napkins; the thicker options tend to be more durable and forgiving to work with, especially when applying glue. Major stores like Walmart, Hobby Lobby, or even party supply shops are excellent places to find unique and eye-catching designs, particularly in the months leading up to the Fourth of July. I was personally thrilled to discover some truly adorable flag-themed napkins that instantly elevated the charm of these luminaries far beyond my initial plan for plain tissue paper. The intricate designs truly make these creations shine!
- Wooden Craft Sticks: Commonly known as popsicle sticks, these humble yet versatile wooden sticks will form the sturdy structural skeleton of your luminary. Standard-sized craft sticks (typically around 4.5 inches long) work perfectly for creating a luminary that is either small enough to be held or suitable for hanging as a decorative accent. You’ll need enough sticks to construct five identical squares, which will serve as the top, bottom, and four sides of your luminary cube. These are inexpensive and can be purchased in large bulk packs, ensuring you have an ample supply for this project and perhaps even for other creative endeavors. Their uniform size and inherent sturdiness make them an ideal choice for building a reliable and aesthetically pleasing frame.
- Hot Glue Gun + Glue Sticks: A hot glue gun will quickly become your invaluable companion for this craft. Its primary advantage lies in its rapid adhesion and ability to form strong, instant bonds, which is crucial for securely assembling the wooden craft sticks and then delicately attaching the paper elements. If children are assisting with the craft, a low-temperature hot glue gun is highly recommended to significantly minimize the risk of burns. Always exercise a degree of caution when handling any hot glue gun, and ensure you have a generous supply of extra glue sticks on hand, as you will be doing a considerable amount of gluing throughout the assembly process!
- LED Tea Light: For paramount safety and ultimate convenience, an LED tea light is an absolutely indispensable component for these luminaries. Traditional open-flame candles pose a significant fire hazard, especially when combined with paper crafts. In contrast, LED lights provide a beautiful, authentic-looking flickering glow without any associated risks of open flames, excessive heat, or messy wax drips. These battery-operated lights are both affordable and widely available in convenient multipacks, making them the safest and most practical choice for illuminating both indoor and outdoor displays. Before your crafting session, double-check that you have fresh batteries for each LED tea light to ensure optimal glow time and enjoyment!
- Twine, Ribbon, or String: To elegantly suspend your finished luminaries, you will require a suitable material for hanging. Natural jute twine lends a wonderfully rustic and charming aesthetic, while a festive ribbon in classic red, white, or blue can introduce an additional touch of patriotic elegance and vibrancy. Any strong, durable string capable of securely holding the lightweight luminary will function effectively. When making your selection, consider the overall aesthetic you wish to achieve for your final display; the choice of hanger can subtly influence the entire look.
Choosing your materials carefully and with a creative eye is the very first exciting step in bringing your vision to life. The more thoughtful and imaginative you are with your napkin or tissue paper selection, the more unique and personalized your flag luminaries will become. With all your supplies now meticulously gathered, let’s move on to the actual construction phase!
Now that you have meticulously gathered all your supplies, it’s time for the truly exciting part: transforming these simple components into stunning, glowing flag luminaries. While a quick video tutorial can be incredibly helpful for a visual overview of the entire assembly process, especially for those who prefer to see it in action, I will also provide detailed written instructions below. This ensures you won’t miss any crucial steps and can follow along at your own comfortable pace, pausing to perfect each stage of your unique creation. These instructions are specifically designed to be clear, concise, and easy to follow, allowing even novice crafters to achieve truly fantastic and professional-looking results. Get ready to build!
The Creative Process: Step-by-Step Flag Luminary Tutorial
- Prepare Your Napkins or Tissue Paper: Begin by carefully unfolding each paper napkin completely. Most decorative paper napkins are typically folded into quarters. Using sharp scissors, precisely cut each napkin along these existing fold lines into four equal, smaller squares. If you’re opting to use solid tissue paper instead, cut it into squares that are roughly the same size as the craft stick squares you will soon be constructing. Remember, the thinner the paper you choose, the more translucent your finished luminary will be, allowing the LED light to glow through more brightly and effectively. Handle these delicate cut napkin or tissue paper pieces very gently, as they can tear quite easily.
- Construct the Craft Stick Squares: Lay out four wooden craft sticks on a flat, protected surface to form a perfect square. Using your hot glue gun, apply a small, neat dot of glue at each of the four corners where the ends of the sticks overlap. Press them firmly together to securely join them. Repeat this precise process five times in total to create five identical squares. These five squares will serve as the essential structural components: one for the top, one for the bottom, and four for the sides of your luminary cube. Precision in this step is key to ensuring a well-balanced and aesthetically pleasing final structure.
- Assemble the Cube Frame: Take four of your newly constructed craft stick squares. Stand them upright on their edges and, using your hot glue gun, carefully attach them edge-to-edge. Work methodically to form a hollow, open-sided cube. Crucially, leave one entire side completely open – this will serve as the convenient access point for inserting and removing your LED tea light later on. Once these initial four sides are firmly and securely glued together, take the fifth square and attach it to one of the remaining open ends, which will form either the top or the bottom of your luminary, effectively closing off one end. Double-check that all joints are firm and that the cube structure feels stable and robust. You should now have a complete wooden cube frame with just one side remaining open.
- Apply the Napkin Panels (Sides 1-4): This particular step requires a steady hand, a keen eye, and a bit of speed, as hot glue dries quickly. Apply a thin, even line of hot glue along one entire exposed edge of your craft stick cube. Immediately and smoothly press one of your pre-cut napkin squares onto the freshly glued edge. Gently stretch the napkin tautly across the craft stick frame, working quickly to smooth out any wrinkles or slack before the glue sets. The objective is to create a perfectly flat, smooth, and unblemished paper surface for each side of the luminary. Repeat this exact process for the remaining three closed sides of your cube. If your napkins feature a specific pattern or design, take a moment to carefully align it to achieve your desired aesthetic.
- Apply the Napkin Panel (Final Side): Now, carefully apply the very last napkin square to the fifth side of the cube – the one that you designated as either the top or the bottom during the initial frame assembly. Similar to the previous step, apply a consistent bead of hot glue along all the edges of that specific craft stick square and gently but firmly press the napkin into place, meticulously smoothing it out to ensure a wrinkle-free finish. This step successfully completes the paper covering for all five of the closed sides of your luminary.
- Trim Excess Paper: Once all the glue has had ample time to completely dry and the napkins are thoroughly and securely attached to the wooden frame, it’s time for a crucial precision step. Using a very sharp pair of scissors, meticulously trim away any excess napkin paper that extends beyond the outer edges of the craft stick frame. This is a critical step for achieving a professional and polished finish for your luminary. It’s imperative to go slowly and cut neatly along the wooden edges, taking great care. Remember, these edges will be clearly visible in your finished product, so a clean, crisp trim will significantly enhance the overall appearance of your patriotic luminary.
- Attach the Hanger: To prepare your exquisite luminary for hanging, cut four equal lengths of your chosen twine, ribbon, or string. Securely glue one end of each of these four strings to one of the four top corners of your luminary cube, ensuring the glue adheres firmly to the wooden frame. Allow the glue to dry completely to create a strong, reliable bond. Once all four strings are attached and dry, gently gather them together evenly directly above the center of the luminary and tie them securely with a robust knot. This careful arrangement creates a perfectly balanced hanger, allowing your luminary to hang straight, evenly, and beautifully. Always test its balance briefly before hanging it permanently.
- Add the LED Tea Light, Hang, and Enjoy! Finally, with your luminary fully assembled and ready, gently place an LED tea light inside the open side of your cube. You might want to switch the tea light on before carefully inserting it. Now, find the absolute perfect spot to hang your finished masterpiece – perhaps elegantly draped on your porch, charmingly suspended from a tree branch, or even beautifully placed as a glowing centerpiece on your Independence Day table. Step back, take a moment, and truly admire the warm, patriotic glow emanating from your handcrafted creation!
Visual Aid: Video Tutorial
For those who benefit immensely from seeing the crafting process in action, a detailed video tutorial illustrating each step of this patriotic luminary craft is often a fantastic resource. Watching the assembly from start to finish can significantly clarify any uncertainties, provide invaluable visual tips for handling delicate materials, and guide you through the precise actions needed for successful construction. We encourage crafters to search for “Patriotic Luminaries DIY” or “Popsicle Stick Flag Crafts” online to find helpful video guides that can further enhance your crafting experience and ensure your project turns out perfectly.
I am absolutely thrilled with how these fun and festive luminaries turned out! There’s something undeniably uplifting and heartwarming about working with the classic red, white, and blue color palette. Seeing these vibrant, symbolic colors come together to create such a charming and meaningful piece of holiday decor simply fills my heart with immense joy. The subtle, gentle glow they emit is truly enchanting, perfect for setting a wonderfully celebratory and serene mood for any Independence Day gathering.
Tips for Success & Customization Ideas
To ensure your patriotic luminaries are not only beautiful but also durable, long-lasting, and uniquely reflective of your personal style, consider incorporating these additional tips and customization ideas into your crafting process:
- Involve the Family: This craft is a fantastic activity for all ages! Younger children can safely assist with simpler tasks such as selecting napkins, laying out craft sticks, or even applying glue (with close adult supervision, especially for hot glue guns). This fosters a wonderful sense of participation and pride in their contributions to the holiday preparations.
- Reinforce Glue Joints for Durability: For an extra layer of durability and stability, particularly if you plan on hanging your luminaries outdoors where they might be exposed to breezes or light winds, consider applying a small, discreet bead of hot glue to the inside corners of your craft stick frame after the initial assembly. This reinforces the structure and helps it withstand the elements better.
- Experiment with Diverse Paper Options: While pre-printed flag napkins are undeniably wonderful and convenient, don’t limit your creativity! Explore using different patriotic-themed scrapbook papers for a firmer structure, or even plain tissue paper that you can stencil, stamp, or paint with your own unique star or stripe patterns for a truly bespoke and artistic look.
- Vary Luminary Sizes for Dynamic Displays: If you’re aiming to create a truly captivating and dynamic display, consider using different lengths of wooden craft sticks – miniature, standard, or jumbo – to construct luminaries of varying sizes. Grouping these different-sized luminaries together creates an interesting visual hierarchy and adds depth to your holiday decor.
- Add Embellishments for Extra Sparkle: Before you even apply the delicate napkins, you could paint the wooden craft sticks themselves in coordinating shades of red, white, or blue for an additional pop of color. After the entire assembly is complete, consider adding subtle lines of glitter glue along the edges of the paper panels or adhering small, self-adhesive stars for an extra touch of festive sparkle and shine.
Displaying Your Patriotic Luminaries
Once your exquisite luminaries are lovingly complete, the enjoyment continues with the exciting decision of where best to showcase them! Their inherent versatility makes them perfectly suitable for enhancing a wide variety of settings, both indoors and out:
- Creating Outdoor Ambiance: For a magical evening display, hang your luminaries from sturdy tree branches, drape them along your porch railing, or suspend them from elegant shepherd’s hooks strategically placed throughout your garden. The soft, gentle glow of the LED tea lights will effortlessly create an enchanting and festive atmosphere as evening descends, setting the perfect mood for outdoor gatherings and watching those spectacular fireworks.
- Enhancing Indoor Festivities: Bring your patriotic spirit indoors by placing these charming luminaries on windowsills to share your holiday cheer with passersby. Arrange them as a captivating centerpiece on your dining table, or use them to beautifully line a mantelpiece or bookshelf. They add a delightful accent and a warm glow without occupying excessive space.
- Perfect Party Decor: These handcrafted luminaries serve as excellent and memorable party decorations. Use them to subtly define pathways for your guests, or strategically cluster them in different areas to create beautifully illuminated focal points throughout your celebration space, adding a cohesive and charming theme.
The true beauty and value of these DIY flag luminaries extend beyond just their aesthetic appeal. They embody the personal touch that only handmade crafts can provide, adding a unique charm to your Independence Day celebrations. They stand as a testament to creative expression and serve as a wonderfully heartfelt way to convey your patriotic spirit and love for your country.
I genuinely cannot wait for the Fourth of July to finally arrive, anticipating those long, balmy evenings spent under the twinkling stars, watching spectacular fireworks burst and paint dazzling patterns across the night sky, all while these lovely patriotic luminaries cast their gentle, welcoming glow in the background. They promise to add an extra layer of warmth, enchantment, and cherished memories to the festivities for many years to come.
So, gather your materials, unleash your inner creativity, and get ready to illuminate your Independence Day with these charming, exquisitely handcrafted flag luminaries. Happy crafting, and may you have a wonderfully joyous and truly patriotic celebration!