Transform Your Infant Car Seat: A DIY Reupholstery Journey
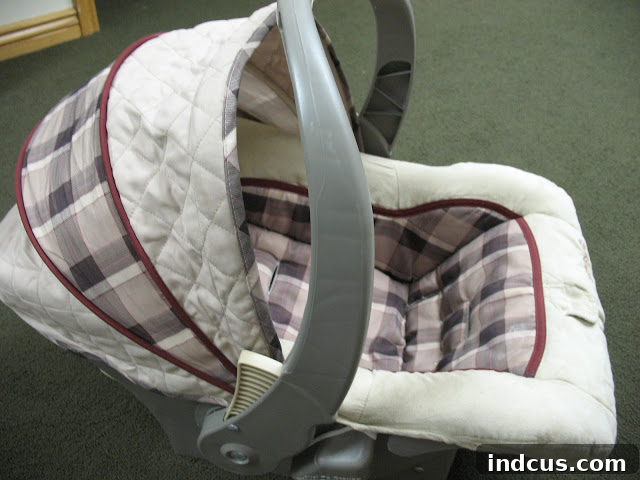
Embarking on a sewing project can be exhilarating, especially when it involves transforming something functional into a personalized masterpiece. This week, I took on such a challenge: reupholstering an infant car seat. Receiving a gently used car seat from a kind friend, a true lifesaver for our budget, presented a unique opportunity. While incredibly grateful, the original tan plaid design felt a tad generic and, dare I say, a little boyish for our incoming bundle of joy.
The idea of giving it a complete makeover lodged itself firmly in my pregnant brain. I knew from experience that these car seats become an extension of you for the first six months, accompanying you everywhere. Why not make it something truly special and reflective of our style? Despite the allure of a custom car seat, apprehension lingered. The thought of disassembling it, only to be unable to reassemble it without a flood of hormonal tears, kept me wavering for a solid week. The complexity of the task, the intricate straps, and the sheer number of pieces were intimidating.
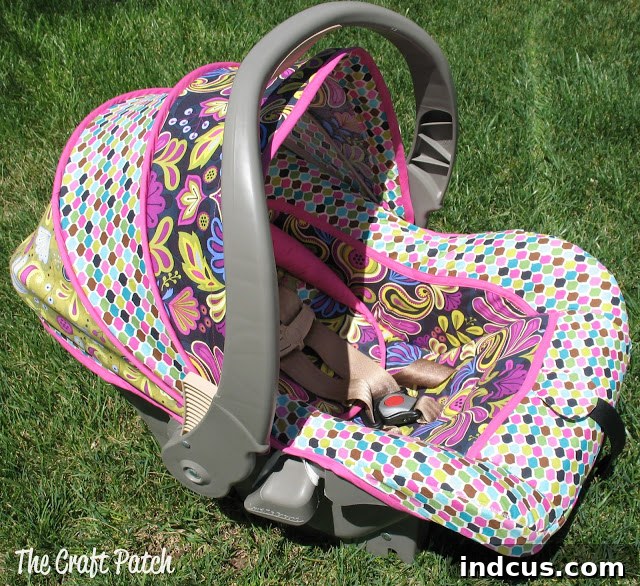
But as you can see, the urge to create won out! And I’m thrilled to share the stunning results. Here’s a peek at the transformed car seat:
The transformation is utterly delightful! It’s everything I envisioned: cute, cheerful, and perfectly girly. A vast improvement over the drab tan plaid. This project was absolutely worth every stitch and, miraculously, not a single tear was shed – a true testament to overcoming a significant sewing challenge! I won’t sugarcoat it; this wasn’t an easy undertaking. It demanded over 15 hours of dedicated effort, pushed my sewing skills to new limits, and was an incredible learning experience. So much so that I’m now eyeing the baby swing for its own custom upgrade!
Is DIY Car Seat Reupholstery Right for You? Setting Expectations
If you’re contemplating recovering a car seat, my advice is to go for it – but only if you consider yourself a fearless and experienced seamstress. This is unequivocally not a project for beginners. The sheer number of components, the complex curves, and the need for precision sewing techniques make it quite demanding. You’ll encounter challenging seams, multiple layers of fabric and batting, and areas requiring careful manipulation around straps and buckles.
My journey was significantly aided by Ashley’s insightful tutorial atMake It and Love It. It provided a solid conceptual framework for the project. However, it’s crucial to understand that a universal, one-size-fits-all tutorial for car seat covers doesn’t exist. Each car seat model is unique, meaning your existing car seat cover will serve as your indispensable pattern. Adhering strictly to the original design is paramount, not just for aesthetics, but also for maintaining the car seat’s structural integrity and safety features.
The Golden Rule: Document Everything!
The first and most critical step in this entire process is meticulous documentation. Before you even think about cutting a single thread, arm yourself with a camera and a permanent marker. Take an abundance of photographs and label every single piece as you remove it. You might think you’ll remember how everything fits back together, but trust me, under the pressure of reassembly, those memories will fade. Labeling directly onto the old car seat pieces with a Sharpie proved invaluable:
Pay special attention to intricate areas: where different sections of fabric meet, how seams are constructed, and any unique sewing challenges. Crucially, capture detailed images of how the buckles, straps, and harnesses are attached and threaded. These elements are vital for the car seat’s safety, so replicating their original configuration precisely is non-negotiable. Take more pictures than you think you could possibly need, from every conceivable angle – future you will thank you!
Deconstruction and Pattern Creation: The Tedious but Essential Phase
Once your documentation is complete, it’s time for the painstaking process of taking the entire original cover apart. This phase is lengthy and can be messy, often leaving you and your workspace covered in threads and fabric scraps. I found that a good distraction, like catching up on a favorite TV show, helped ease the monotony of seam ripping and careful unpicking.
Each piece of the old car seat cover will then serve as your exact pattern for cutting out the new fabric. I ended up using approximately three yards of fabric in total: just under two yards for the main front sections and a little over a yard for the backing. As you cut, transfer all critical markings from the old pattern pieces to your new fabric. This includes alignment points, placement for elastic bands, and indications for specific seam types, such as serged edges. Precision in this stage will save you immense frustration during sewing.
The Sewing Challenge: Replicating Original Design for Safety and Fit
With all your new fabric pieces meticulously cut, the real sewing begins! I opted to reuse the original batting, ensuring the new cover retained the same level of padding and comfort. The original car seat featured a tan fabric around the perimeter and a plaid pattern in the center. Initially, I considered simplifying the design by making the entire cover from a single fabric, thereby skipping the maroon binding and the second fabric choice. However, I quickly learned a crucial lesson that I implore you to heed:
You cannot simply change fundamental aspects of the original design. The manufacturers stitched the car seat cover together in a specific way because it *had* to be that way. In my specific case, the original maroon binding around the center section was not merely decorative; it was essential for securely holding a second layer of batting in place. Trust the expertise of the professionals who originally designed and assembled the car seat. Your best approach is to meticulously copy every detail, every seam, and every structural element they incorporated. Deviating from the original design, particularly with something as critical as a car seat, could compromise its safety and fit.
That challenging center panel proved to be the most difficult part to sew. The construction seemed counter-intuitive, almost sewn inside out, to achieve the final smooth finish. Here’s a glimpse into the tricky sewing required:
Despite how backwards it felt, I continuously referenced my photos of the original cover, striving to replicate its appearance exactly. While my new pink binding didn’t line up with absolute perfection, at that advanced stage of the project, undoing seams to achieve flawless alignment was simply not an option!
Working with multiple layers—two layers of batting plus two or more layers of fabric in certain areas—demanded the use of a walking foot on my sewing machine. This essential tool proved invaluable, helping to feed all that bulky material through the machine evenly, preventing shifting and puckering. Without it, the project would have been infinitely more frustrating and the results far less satisfactory.
The Final Reveal: Imperfections and Pure Satisfaction
Did it turn out absolutely perfect? In all honesty, no. There are minor imperfections—small areas that might be slightly puckered or a seam that’s not perfectly straight. However, these are hardly noticeable, especially to anyone unfamiliar with the original design. And yes, a tiny bit of hot glue may have been employed in a couple of discreet spots where traditional sewing simply wasn’t yielding the desired result. Such minor cheats are part of the DIY journey!
Despite any minuscule flaws, I still think it’s incredibly cute and a true reflection of the effort and love poured into it. The satisfaction of seeing the transformation from a plain, hand-me-down car seat to this vibrant, custom piece is immense.
It’s undeniably a significant improvement, adding character and charm to an essential piece of baby gear. And as a bonus, I even have just enough fabric leftover to create one of those adorable car seat canopy tents! Though, I might hesitate to use it too often – it would cover up all this hard work and dedication!
Beyond Aesthetics: Important Safety Considerations for Car Seat Covers
While the aesthetic appeal of a custom car seat cover is undeniable, it’s absolutely crucial to address safety. When modifying or replacing any part of a car seat, particularly the fabric cover, always prioritize safety above all else. Here are some key points to remember:
- Follow Manufacturer Guidelines: Always consult your car seat’s user manual regarding replacement covers or any modifications. Many manufacturers specify that only their brand’s approved replacement covers should be used to ensure the seat functions correctly in a crash.
- Replicate Exactly: As emphasized throughout this guide, it is paramount to replicate the original cover’s design, padding, and strap openings precisely. Any alteration that interferes with the harness system, strap positioning, or overall fit could compromise the car seat’s ability to protect your child.
- Materials Matter: Ensure the fabric and any reused batting do not add significant bulk that could alter the harness fit or compress in a crash, affecting safety. Avoid adding extra padding or non-original components under or around the child.
- No Aftermarket Products Without Approval: While this project reuses the original structure and batting, generally, aftermarket products (like additional inserts or strap covers not specifically approved by the car seat manufacturer) should be avoided as they can interfere with safety.
- Ensure Snug Fit: The new cover must fit snugly and not interfere with the harness tightening or the car seat’s installation.
By meticulously following the original design and prioritizing these safety considerations, you can enjoy the beauty of a customized car seat with peace of mind. This project is a testament to the power of DIY, transforming a necessary item into a cherished, personalized piece of baby gear, brimming with personality and love.