DIY Matchbox Advent Calendar: A Budget-Friendly & Joyful Christmas Craft
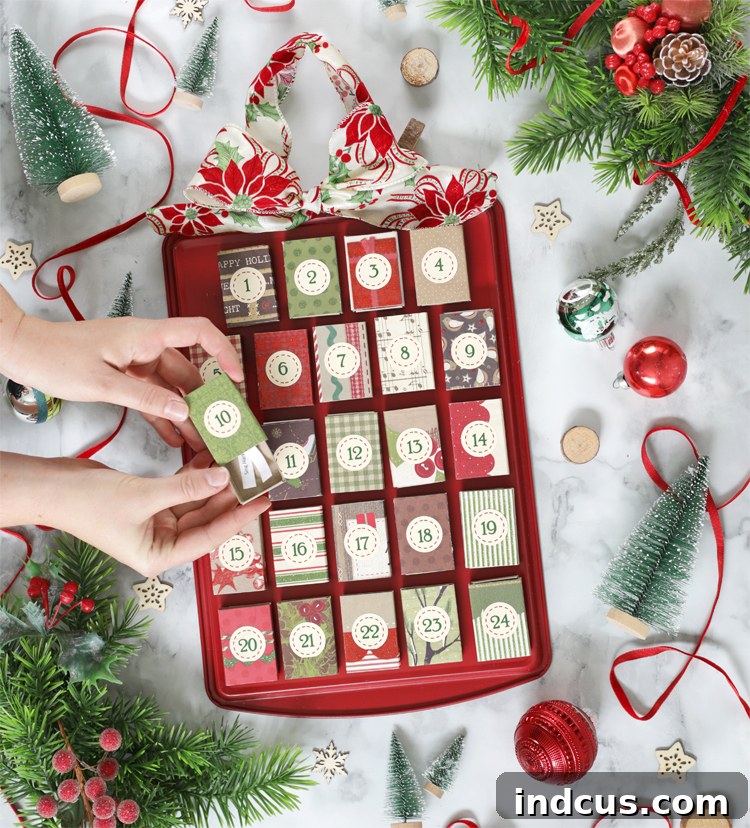
The holiday season is a cherished time, brimming with anticipation, joy, and the warmth of family traditions. Among these, the advent calendar stands out as a beloved ritual, marking each day with a delightful surprise as we count down to Christmas. While commercial options abound, there’s an unparalleled charm and personal satisfaction that comes from creating a handmade advent calendar. We are thrilled to share an incredibly easy, highly customizable, and remarkably budget-friendly DIY Christmas advent calendar project that anyone can master, regardless of crafting experience.
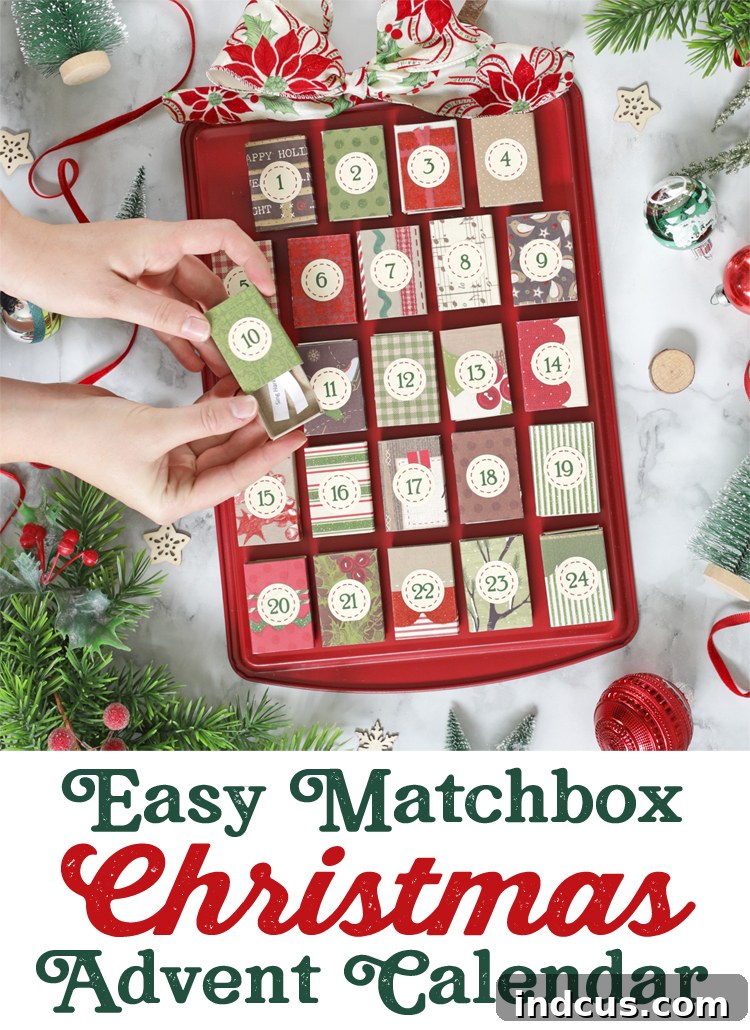
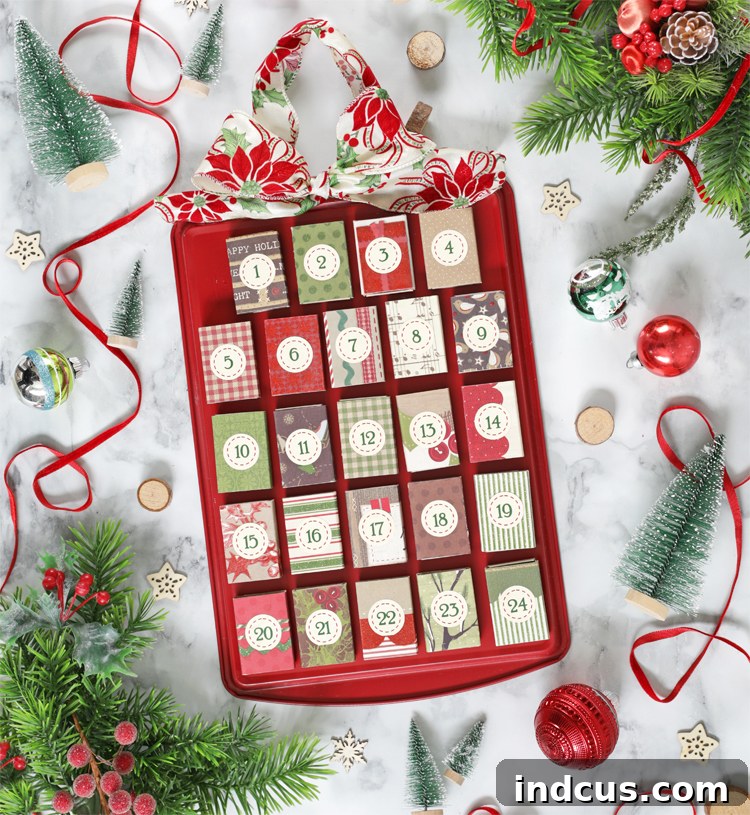
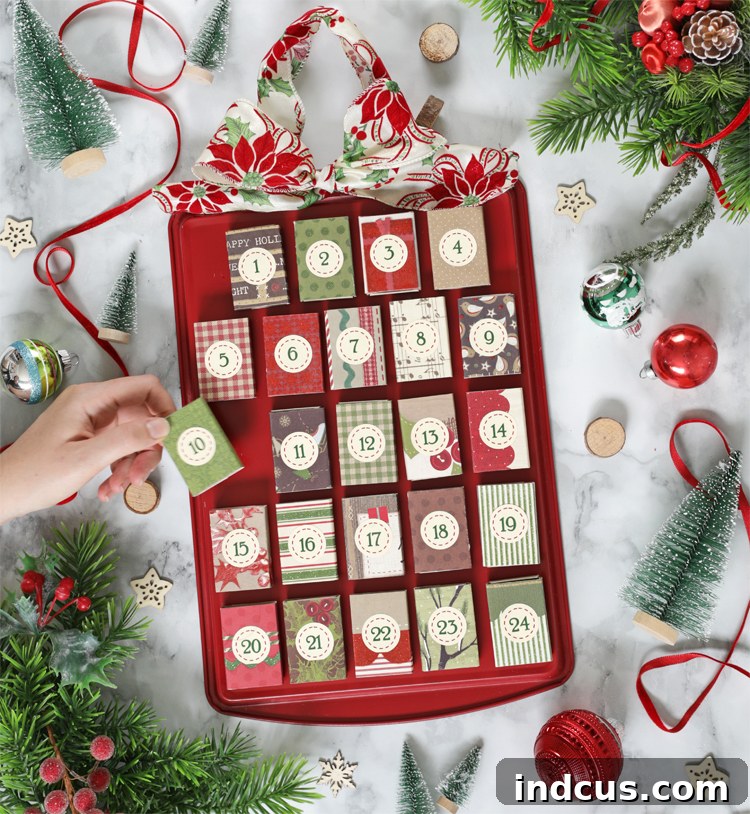
This ingenious project transforms humble dollar store items – a simple metal cookie sheet and a collection of matchboxes – into a truly magical holiday centerpiece. Imagine the sparkle in your children’s eyes each morning as they open a tiny, festive matchbox to discover a sweet treat, a fun activity idea, or a heartwarming message. Each matchbox is adorned with beautiful Christmas paper and a corresponding number, fitted with a small magnet on its back, allowing it to adhere perfectly to the painted cookie sheet. This design ensures daily interaction, making the countdown to Christmas an engaging and memorable experience for the entire family.
Crafting your own advent calendar is more than just a creative endeavor; it’s an opportunity to infuse your home with personalized holiday spirit, create lasting family memories, and embark on a rewarding journey of handmade artistry. Say goodbye to generic store-bought calendars and embrace the joy of creating something truly unique and meaningful. This comprehensive guide will walk you through every step, from gathering your affordable supplies to adding those final, enchanting touches. Get ready to create a cherished holiday decoration that will be enjoyed for years to come!
Gather Your Supplies: What You’ll Need for Your Handmade Advent Calendar
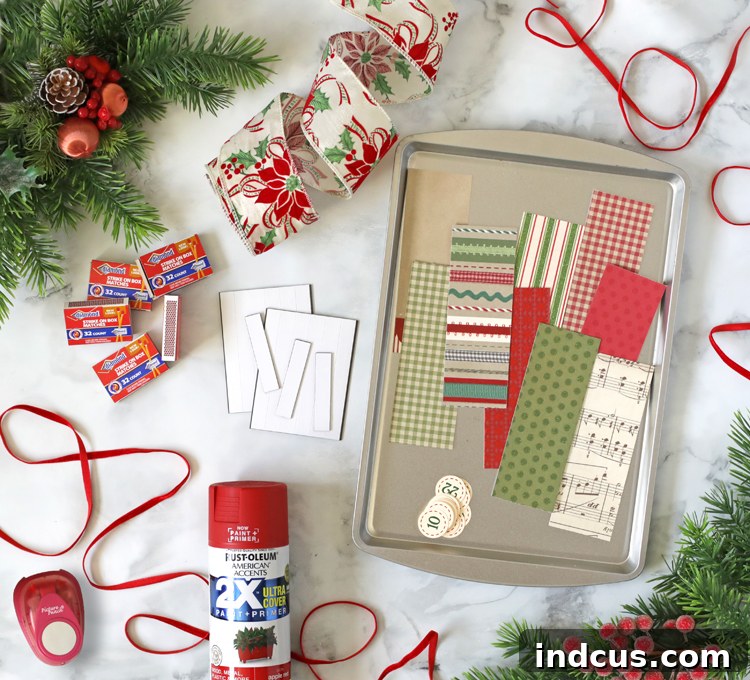
One of the best aspects of this DIY advent calendar is its accessibility and affordability. Many of the core components can be found at your local dollar store, making this a truly budget-friendly craft. Here’s a detailed list of the materials you’ll need to bring your festive vision to life:
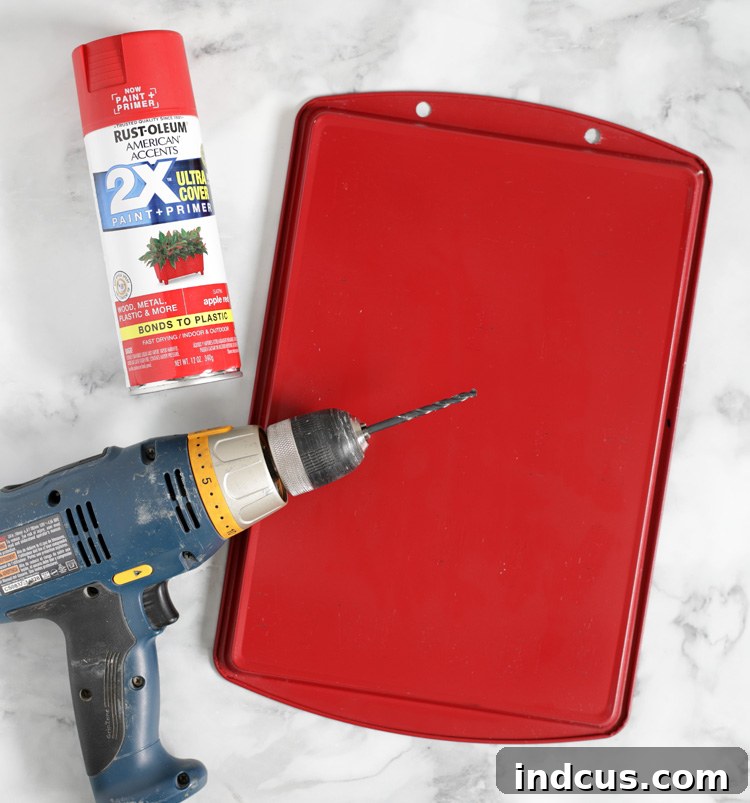
- Metal Cookie Sheet: This serves as the sturdy base for your advent calendar. Look for a standard-sized metal cookie sheet at Dollar Tree or similar discount retailers. Its ferrous surface is essential for the magnets.
- Drill or Metal Punch: You’ll need a tool to create holes for hanging your calendar. A standard power drill equipped with a small drill bit (e.g., 1/8 to 1/4 inch) is ideal. A heavy-duty metal punch can also work if you don’t have a drill.
- Spray Paint: Choose a festive color that complements your existing holiday decor. Classic choices include Christmas red, forest green, elegant white, or shimmering metallic gold or silver. Ensure it’s suitable for metal surfaces.
- Christmas Scrapbook Paper: Select a variety of patterns and designs to add visual interest and holiday cheer to your matchboxes. Look for festive prints, glitter details, or traditional holiday motifs.
- Paper Trimmer: For precise and efficient cutting of your scrapbook paper strips. A good paper trimmer will ensure straight, clean lines, which are crucial for a polished finish. A sharp craft knife and ruler can be an alternative.
- Glue Stick or Adhesive Runner: You’ll need a reliable adhesive for securely attaching the paper to your matchboxes. A strong glue stick or a permanent adhesive runner works best.
- 24 Matchboxes: These are the star components of your daily countdown. Dollar Tree often sells small matchboxes in multi-packs (e.g., 10 or 12 per pack), so plan to purchase enough to yield 24 individual boxes.
- Set of Numbers (1-24): These can be pre-made number stickers, stenciled numbers, or numbers you print and cut yourself from cardstock.
- 1 Inch Circle Punch: This tool is incredibly useful for cutting out perfectly uniform circles for your numbers, giving your calendar a professional look.
- Magnets: Small, flat magnets are essential for allowing your matchboxes to stick to the metal cookie sheet. Self-adhesive magnetic strips are often convenient, but you might need to reinforce them.
- Ribbon for Hanging: A beautiful festive ribbon, twine, or even a sturdy piece of jute to create a hanger for your finished advent calendar.
Important Notes on Sourcing Supplies & Crafting Tips:
- Matchbox Management: When you buy matchboxes in bulk, you’ll need to carefully empty them. Instead of simply discarding the matches, consider repurposing them for camping trips, lighting candles, or starting a wood stove. If disposal is necessary, do so responsibly to prevent any fire hazards. You could also offer the matches to friends or neighbors who might have a use for them.
- Scrapbook Paper Selection: For a truly unique calendar, choose individual sheets of Christmas scrapbook paper with varying patterns, textures, and color palettes. This allows for a delightful assortment of designs. If you’re undertaking this project with a group or prefer a cohesive, curated look with minimal effort, purchasing a Christmas paper pad is a cost-effective and convenient solution. These pads typically offer a range of coordinating designs, simplifying your choices.
- Magnet Reinforcement: Inexpensive sticky craft magnets, often found in strips, are readily available and can be cut to fit the back of each matchbox. However, the adhesive on these magnets might not always be strong enough for long-term hold, especially with the added weight of candy or small items inside the boxes. To ensure your matchboxes remain securely in place throughout the entire advent season, it’s highly recommended to reinforce the magnets with a stronger adhesive such as hot glue or super glue. Apply a small dab to each magnet after positioning it on the matchbox, and allow it to dry completely. This extra step guarantees durability and prevents any frustrating slippage.
Step-by-Step Instructions: Assembling Your Festive Matchbox Advent Calendar
With all your materials gathered, it’s time to embark on the creative process of assembling your beautiful advent calendar. Follow these detailed steps to ensure a smooth and enjoyable crafting experience:
Step 1: Prepare Your Cookie Sheet for Hanging
Your first task is to transform the plain metal cookie sheet into a functional base for your calendar. Using a power drill fitted with an appropriate drill bit (typically 1/8 to 1/4 inch, depending on the thickness of your chosen ribbon), carefully drill two holes into one of the shorter ends of the cookie sheet. Aim for symmetry: position the holes about 1 to 1.5 inches from the top edge and roughly 1 inch from each side edge. Always work on a stable, protected surface and wear appropriate safety gear when using power tools. If a drill isn’t available, a sturdy metal punch can also create the necessary openings, though it may require more physical effort.
Step 2: Add a Splash of Festive Color with Spray Paint
Once the hanging holes are drilled, it’s time to give your cookie sheet a festive makeover. Take your cookie sheet to a well-ventilated area, preferably outdoors or in a garage with open doors. Lay it flat on a drop cloth, old newspaper, or cardboard. Apply an even, thin coat of your chosen spray paint, holding the can approximately 8-10 inches away from the surface and moving it in steady, sweeping motions. Avoid applying too much paint at once to prevent drips. For full coverage and a smooth, professional finish, you may need two to three light coats. Allow ample drying time between each coat and before proceeding, following the specific instructions on your spray paint can.
Step 3: Precisely Cut Your Decorative Paper Strips
This step requires accuracy for neat matchbox wrapping. Using your paper trimmer, carefully cut 24 individual strips from your Christmas scrapbook paper. Each strip should measure precisely 2 1/8 inches in width by 4 1/2 inches in length. The paper trimmer is invaluable here for creating clean, straight edges, which are essential for a polished look. If you don’t have a trimmer, a sharp craft knife, a metal ruler, and a self-healing cutting mat can achieve similar results with careful execution. Feel free to mix and match different patterns and colors for a visually appealing array of matchboxes.
Step 4: Artfully Wrap Each Matchbox
Take one of your precisely cut paper strips and one empty matchbox (the outer sleeve, not the inner tray). Center the matchbox on the paper strip, ensuring an even overlap. Wrap the paper snugly around the exterior of the matchbox sleeve. Apply a generous but even amount of glue stick or adhesive runner to the overlapping edges of the paper strip to secure it firmly in place. Ensure the paper is taut but not so tight that it prevents the inner matchbox tray from sliding in and out easily. Repeat this careful process for all 24 matchboxes, transforming each into a beautifully decorated mini package.
Step 5: Create or Source Your Number Circles (1-24)
There are several creative avenues for producing the numbers for your advent calendar. The most straightforward method involves typing numbers 1 through 24 on your computer, selecting a festive font, printing them onto sturdy cardstock, and then using your 1-inch circle punch to cut out perfectly uniform circles. For those who own a Silhouette or Cricut machine, you can design the numbers in their respective software (Silhouette Studio or Cricut Design Space) and utilize the “Print and Cut” feature for professional-quality results. Alternatively, many craft stores like Hobby Lobby offer pre-made number stickers or specialized advent calendar number sets, providing a quick and convenient option. Choose the method that best aligns with your available resources and desired aesthetic.
Step 6: Securely Attach Numbers to the Matchboxes
Before you start gluing, it’s a good idea to lay out your newly wrapped matchboxes on a flat surface. Arrange them in the order you envision them appearing on the cookie sheet – perhaps in neat rows or a more playful, staggered pattern. This preliminary arrangement allows you to plan the placement of different paper patterns and ensures a harmonious visual flow for your finished calendar. Once you’re satisfied with the layout, apply a small dab of glue stick or craft glue to the back of each number circle and carefully center it on the front of its corresponding matchbox. Press firmly and ensure each number is straight and well-adhered.
Step 7: Affix Magnets to Each Matchbox Back
This critical step is what allows your matchboxes to magically adhere to the cookie sheet. Cut your magnetic strips into small pieces, roughly the size of the back of each matchbox. Peel off any adhesive backing (if applicable) and firmly press one magnet piece onto the center of the back of each decorated matchbox. As highlighted earlier, if you are using budget-friendly sticky magnets, reinforce them with a small drop of hot glue or super glue for added security. Allow the adhesive to dry completely, ensuring the magnets are firmly attached and ready for display.
Step 8: Final Assembly, Arrangement, and Hanging
With all 24 matchboxes beautifully decorated and magnetized, it’s time for the grand reveal! Thread your chosen ribbon, twine, or jute through the two holes you drilled in the cookie sheet in Step 1. Tie a sturdy knot or an elegant bow at the top to create a secure hanger. Now, carefully arrange your numbered matchboxes onto the spray-painted cookie sheet. The magnets will effortlessly hold them in place. Experiment with different arrangements until you achieve a look you love. Once satisfied, find the perfect prominent spot on your wall or door to hang your brand new, handmade advent calendar. Step back, admire your festive creation, and get ready to enjoy a month of holiday magic!
Organizing a Group Craft Project: Dollar Store Advent Calendars
This matchbox advent calendar project is not only ideal for individual crafting but also shines as an exceptionally engaging and cost-effective group activity. Imagine hosting a “Super Saturday” craft day, a community workshop, or a festive gathering with friends! For a group of 18 women, for example, pre-preparation is paramount to ensure a smooth, enjoyable, and timely crafting experience for all participants. The key to success lies in handling the more time-consuming steps beforehand.
Consider dedicating some time in advance to paint all the metal cookie sheets, pre-cut the Christmas scrapbook paper into precise strips, and punch out all 24 number circles for each calendar. This significant pre-work streamlines the main crafting session, allowing participants to focus solely on the most enjoyable and personalized aspects: wrapping their matchboxes with festive paper, gluing the numbers, affixing the magnets, and tying the final decorative bows. The approximate cost per person for this project is remarkably affordable, often around $6.50, making it an excellent choice for budget-conscious organizations, schools, or social groups looking for a rewarding hands-on activity. The collective joy and sense of accomplishment as everyone leaves with their own beautiful, handmade advent calendar is an incredibly fulfilling experience.
Inspiring Ideas for Filling Your Matchbox Advent Calendar
The true heart of any advent calendar lies in the daily surprises hidden within its compartments. This is where your creativity truly shines, transforming each tiny matchbox into a moment of anticipation and joy. Here are expanded and diverse ideas for filling your 24 matchboxes, designed to bring wonder and meaningful engagement to your holiday season:
- Mini Candy Bars & Small Edible Treats: A universally loved classic! Think miniature versions of popular chocolates like Mr. Goodbar, Crunch bars, Hershey’s Kisses, or festive foil-wrapped chocolates. Other delightful edibles could include gumdrops, seasonal jelly beans, a small bag of M&Ms, or even a tiny homemade Christmas cookie. Ensure any chosen treat fits snugly within the matchbox to avoid damaging the paper.
- Christmas-Themed Activities & Experiences: Elevate your countdown by transforming each day into a memorable family experience. Write down simple, engaging activities on small slips of paper. Examples include:
- “Bake and decorate Christmas cookies together”
- “Read a Christmas storybook aloud”
- “Cut out paper snowflakes to decorate windows”
- “Make homemade hot chocolate with marshmallows”
- “Drive around to look at Christmas lights”
- “Write letters to Santa or send holiday cards”
- “Watch a classic Christmas movie as a family”
- “Decorate a mini gingerbread house”
- “Have a Christmas-themed scavenger hunt”
- “Make handmade ornaments for the tree”
- “Volunteer or perform a random act of kindness”
- “Sing Christmas carols together”
These activities foster family bonding, create cherished traditions, and add unique memories to your holiday narrative.
- Bible Verses Detailing the Nativity Story: For a faith-focused approach, write out a short Bible verse each day that narrates a portion of the Nativity story, culminating in the birth of Jesus on December 24th. This can be a beautiful and reflective way to connect with the spiritual meaning of Christmas throughout Advent.
- Christmas Movies & Shows: Turn your calendar into a daily movie guide! List classic or new Christmas movies and holiday specials. Each day, pulling out a movie title can prompt a cozy family film night, complete with popcorn and blankets. Consider including animated classics for younger viewers.
- Christmas Songs to Sing: Encourage musical merriment by suggesting a different Christmas carol or holiday song to sing together each day. You might even include a tiny print-out of the lyrics for less familiar tunes, turning each day into a mini-caroling session.
- Christmas Books to Read: For avid readers, especially children, suggest a Christmas-themed book to read aloud or for independent enjoyment. You could include a tiny note with the book title or even a miniature character from a favorite story to pique interest.
- Small Toys or Trinkets: Tiny erasers, sheets of stickers, temporary tattoos, bouncy balls, mini figurines, or small craft supplies (like a few beads, sequins, or a miniature spool of ribbon) can be exciting discoveries, particularly for younger children.
- Personalized Messages: Occasionally, tuck in a handwritten note with a compliment, a loving message, a fond shared memory, or a special “coupon” for extra cuddles or a chosen activity. These personal touches add immense sentimental value to the calendar.
The most delightful advent calendars often feature a thoughtful mix of these ideas, creating an element of exciting unpredictability. When planning your fillings, consider your family’s schedule and preferences. On busier weeknights, a simple candy bar or a short Bible verse might be ideal. For quieter weekend days, a craft activity or a family movie night can be a wonderful way to connect. For example, if you already have plans to drive around and admire Christmas lights, you could include a note that says, “Enjoy warm apple cider on our light tour!” to enhance the experience without adding extra work. This balanced approach ensures your advent calendar adds magic and anticipation to your Christmas season, rather than becoming an overwhelming chore.
Watch the Magic Unfold: DIY Advent Calendar Video Tutorial
For those who are visual learners or simply want an extra boost of confidence, seeing this project come to life can be incredibly helpful. Our detailed video tutorial provides a comprehensive walkthrough of each step, from drilling the cookie sheet to artistically arranging your finished matchboxes. It offers invaluable visual guidance, extra tips, and real-time demonstrations to ensure your DIY matchbox advent calendar turns out beautifully. Click the link below to watch the transformation unfold and get inspired!
[Video Link Placeholder – e.g., Watch the DIY Matchbox Advent Calendar Tutorial]
Loved this creative Christmas craft idea? Don’t forget to save it! Pin this project to your favorite holiday boards on Pinterest so you can easily find it again next year, share the joy with others, and inspire fellow crafters!