DIY Ugly Dolls: An Easy Sewing Project for Beginners
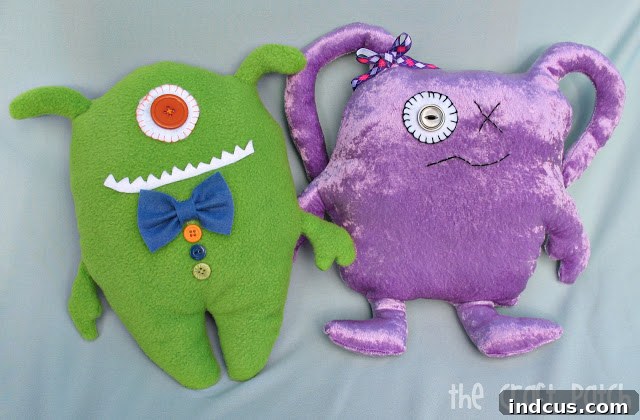
Have you ever encountered the delightfully quirky charm of Ugly Dolls? These beloved plush characters, known for their endearing imperfections, are widely available (you can find them here), but there’s an even more satisfying way to welcome them into your life: by making your very own! Imagine crafting a custom Ugly Doll, tailored to your unique vision, for a mere fraction of the retail price. This engaging project is not only incredibly budget-friendly, often costing less than $5 even if you purchase all new materials, but it’s also surprisingly quick. I managed to sew two delightful monsters in just about two hours, utilizing fabric scraps and stuffing I already had on hand. This makes it an ideal last-minute gift idea, perfect for surprising the little ones on your list during the festive season or any time of year.
Whether you’re a complete novice to the world of sewing or an experienced crafter looking for a quick and satisfying project, creating your own Ugly Doll is an incredibly rewarding experience. These aren’t just toys; they’re quirky companions that celebrate uniqueness and imperfection. This comprehensive guide will walk you through every step, ensuring you have all the knowledge and confidence to bring your one-of-a-kind plush friend to life. Get ready to unleash your creativity and embrace the beautiful “ugly”!
Why Create Your Own Ugly Doll?
Embarking on a DIY Ugly Doll project offers numerous benefits beyond just having a new stuffed animal. It’s a journey of creativity, resourcefulness, and personal satisfaction.
- Unleash Personalization: Unlike mass-produced dolls, your handmade Ugly Doll will be truly one-of-a-kind. Choose any fabric, color, and design details to create a character that perfectly reflects your personality or that of the recipient. Want a three-eyed monster with polka dots? Go for it!
- Incredible Cost Savings: As highlighted earlier, this project is remarkably affordable. By repurposing old fabrics, clothes, or using small remnants, you can craft a cherished toy for next to nothing. Even buying new materials won’t break the bank, making it a smart choice for budget-conscious crafters.
- Perfect for Beginners: The beauty of Ugly Dolls lies in their deliberate “ugliness.” This means there’s no pressure for perfection, making it an incredibly forgiving and confidence-building project for those new to sewing. Crooked seams or asymmetrical features only add to their charm!
- Meaningful Handmade Gifts: A handmade gift carries an extra layer of love and thoughtfulness. An Ugly Doll crafted by your own hands shows genuine effort and care, creating a cherished keepsake that will be remembered long after store-bought presents are forgotten.
- Sustainable Crafting: Repurposing fabric scraps reduces waste and gives new life to materials that might otherwise be discarded. It’s a small step towards more sustainable living through creative crafting.
Essential Materials and Tools for Your Ugly Doll Project
Before you dive into the sewing, gathering your materials and tools will ensure a smooth and enjoyable crafting experience. Most of these items are standard sewing supplies, making this an accessible project for many.
Fabrics: Choosing Your Doll’s Skin
The choice of fabric greatly influences your Ugly Doll’s personality and feel. For beginners, stretchy knits or non-fraying fabrics are generally easier to work with. Consider:
- Fleece: A popular choice for plush toys due to its softness, warmth, and non-fraying edges. It’s easy to cut and sew, making it excellent for beginners.
- Crushed Velvet Knit: As used in the example, this offers a luxurious texture and slight stretch, adding a unique tactile experience.
- Felt: While not ideal for the main body due to its stiffness and potential to pill, felt is fantastic for adding details like eyes, mouths, and patches without needing to hem the edges.
- Minky Fabric: Super soft and cuddly, similar to fleece but with a shorter pile. It can be a bit slippery to sew, so use plenty of pins.
- Old Clothing: Give new life to an old sweatshirt, T-shirt, or blanket. This is the ultimate budget-friendly and sustainable option!
You’ll need two pieces of your chosen main fabric, one for the front and one for the back of your doll. Small scraps of contrasting fabric or felt will be perfect for facial features and other embellishments.
Stuffing: Giving Your Doll Volume and Cuddliness
The heart of any plush toy is its stuffing. Polyester fiberfill is the most common and recommended choice due to its resilience, washability, and hypoallergenic properties. It holds its shape well and provides that satisfying squeezable quality.
Pattern Material: Designing Your Shape
Simple materials work best for creating your pattern:
- Newspaper: Readily available and perfect for sketching out and cutting your initial doll shape.
- Craft Paper or Cardboard: If you plan to make multiple dolls or want a more durable pattern to trace repeatedly, craft paper or thin cardboard can be more robust.
Basic Sewing Tools: Your Crafting Arsenal
These are the essentials you’ll need:
- Sewing Machine: Highly recommended for speed and consistent stitches, but this project can absolutely be hand-sewn if you prefer or don’t have a machine.
- Hand Sewing Needles: Assorted sizes for closing the opening and attaching small details.
- Thread: All-purpose polyester thread that matches or complements your fabric colors.
- Fabric Scissors: Sharp scissors specifically for fabric will ensure clean cuts and prevent fraying.
- Pins: To hold your fabric pieces and pattern securely in place during cutting and sewing.
- Fabric Marker or Chalk: For tracing your pattern onto the fabric.
- Hot Glue Gun and Glue Sticks: An excellent tool for quickly attaching felt eyes, mouths, and other decorative elements, especially if you’re not sewing them on.
- Iron and Ironing Board (Optional): Useful for pressing seams flat, although less critical for plush projects where seams are often hidden.
Step-by-Step Ugly Doll Tutorial: Crafting Your Quirky Companion
Step 1: Design Your Ugly Doll’s Unique Shape and Create a Pattern
This is where the fun begins! Grab your newspaper or craft paper and a pencil. Let your imagination run wild with the shape of your Ugly Doll. It could be a blob, a square with arms, a classic monster silhouette, or something entirely abstract. Remember, “ugly” is the goal, so embrace irregular shapes and quirky proportions.
Once you have a general idea, start drawing your doll’s outline directly onto the paper. To ensure both sides of your doll are symmetrical (unless you deliberately want an asymmetrical look!), draw one half of your design, then fold the paper in half and cut along your drawn line. This will yield a perfectly symmetrical pattern when unfolded. Don’t forget to include arms, legs, or ear-like protrusions as part of your main body shape if you want them.
Step 2: Prepare Your Fabric Pieces for Sewing
With your unique pattern ready, it’s time to transfer it to your chosen fabric. Lay your fabric flat and smooth. Place your paper pattern on top and pin it securely in place to prevent shifting. Using your fabric marker or chalk, carefully trace around the entire perimeter of your pattern. You will need to cut two identical pieces from your main fabric – one for the front of your Ugly Doll and one for the back. If your fabric has a “right side” (the side you want to be visible) and a “wrong side” (the inside), make sure you trace on the wrong side. Carefully cut out both fabric pieces using sharp fabric scissors. For a clean finish, ensure your cuts are smooth.
Step 3: Assemble the Main Body by Sewing the Edges
Now, it’s time to bring your doll’s body together. Take your two cut fabric pieces and place them right sides together. This means the side of the fabric you want to be on the outside of your finished doll should be facing inward. Pin the edges all the way around, leaving an opening of about 3-4 inches (7-10 cm) along a straight edge or a less conspicuous curve. This opening will be used for turning the doll right side out and for stuffing.
Using your sewing machine (or hand-sewing with a backstitch for strength), sew around the pinned perimeter with a consistent seam allowance, typically 1/4 to 1/2 inch (6 mm to 1.2 cm). Remember to backstitch at the beginning and end of your seam, and especially at both sides of the opening you left, to reinforce these areas. For curves, you might want to clip notches into the seam allowance after sewing to help the fabric lay smoothly when turned, being careful not to cut through your stitches.
Step 4: Turn Your Doll Right Side Out and Refine the Shape
Once your sewing is complete, carefully reach into the opening you left and begin turning your doll right side out. This step requires a bit of patience, especially for any narrow parts like arms or ears. Use a turning tool, a blunt pencil, or even a chopstick to gently push out all the seams and corners, making sure they are as smooth and defined as possible.
A common challenge for beginners is making the connection between limbs and the body too small, which can make turning very difficult or impossible. If you find your doll’s arms or ears aren’t turning smoothly, don’t despair! You might need to carefully unpick a small section of the seam, widen the connection, turn the doll, and then hand-sew that small section closed later. For future projects, consider making arms and other appendages slightly wider to avoid this extra step. The goal here is to achieve a neat and shapely exterior, ready for stuffing.
Step 5: Bring Your Ugly Doll to Life with Stuffing
Now for the magical transformation! Begin stuffing your doll with polyester fiberfill through the opening. Take small handfuls of stuffing and push them into the doll, starting with the furthest corners and appendages (like ears and arms) first. This helps to achieve an even and firm fill without creating lumps. Use your turning tool or chopstick to pack the stuffing tightly into these smaller areas.
Continue to fill the main body, ensuring you pack it nice and full. Remember that stuffed animals often get a lot of love – squeezed, dragged, and cuddled – which tends to compact the stuffing over time. A generously stuffed doll will maintain its plump, smooth, and delightfully “fat Ugly” shape for longer. Aim for a firm but still squishy feel. Don’t be shy with the fiberfill; it’s what gives your doll its lovable personality and resilience.
Step 6: Closing the Opening – The Invisible Finishing Touch
With your Ugly Doll fully stuffed, it’s time to close the opening. This is best done with a hand-sewing technique called the ladder stitch, or invisible stitch. This stitch creates a nearly seamless closure that blends beautifully with your machine stitching. Fold the raw edges of the opening inward, aligning them with the main seam line. Pin them in place to hold them while you sew.
To perform the ladder stitch, start by anchoring your thread inside the doll. Then, pick up a small stitch from one folded edge, directly across from it, pick up a small stitch from the other folded edge. Continue alternating between the two folded edges, keeping your stitches small and evenly spaced, creating a ladder-like appearance. When you gently pull the thread, the “rungs” of the ladder disappear, pulling the opening closed seamlessly.
Here’s a clever finishing trick, courtesy of my high school home-ec teacher, Mrs. Grow, which is perfect for plush toys! When you reach the end of your ladder stitch and the opening is fully closed, tie several secure knots right at the seam line. Instead of clipping the thread tail immediately, put your needle down into the fabric right next to your knot. Push the needle through the stuffing and bring it out of the fabric several inches away from where it entered. Pull the thread taut and snip it off flush with the fabric. Like magic, the thread tail will retreat inside your project, leaving a perfectly clean finish with no visible loose ends!
Step 7: Personalize Your Ugly Doll with Decorations and Embellishments
Your Ugly Doll is almost complete! This is the most exciting step where you get to truly personalize your creation. Think about eyes, mouths, eyebrows, scars, patches, or any other quirky details that will make your doll uniquely “ugly.”
You have two main options for attaching decorations:
- Hot Glue: This is a quick and easy method, especially for felt pieces. I hot glued all the decorative elements onto my dolls after they were fully stuffed and sewn. This allows you to experiment with placement before committing. Ensure the hot glue is applied securely, especially if the doll is for a young child, to prevent small parts from detaching.
- Sewing: If you prefer a more durable and traditional attachment, you can sew on felt pieces or embroider facial features. If sewing, it’s often easiest to attach these elements to the “front” fabric piece *before* you sew the front and back pieces of the doll together in Step 3. This way, you’re only working on a single layer of fabric.
Don’t be afraid of asymmetry or imperfections here – a crooked smile or uneven eyes only add to the charm and character of an Ugly Doll. Use contrasting felt colors, embroidery floss, or even fabric paint to bring out your doll’s personality. Remember, the less “perfect,” the more authentic your Ugly Doll becomes!
Tips for First-Time Ugly Doll Makers
To ensure your first Ugly Doll project is a roaring success and an enjoyable learning experience, keep these helpful tips in mind:
- Start Simple: For your very first doll, choose a basic, rounded shape without too many narrow appendages. This will make cutting, sewing, and turning much easier.
- Embrace Imperfections: The core philosophy of Ugly Dolls is that their flaws are their features. Don’t stress over perfectly straight lines or symmetrical eyes. These quirks are what make your doll truly special.
- Practice Makes Perfect (or Perfectly Ugly!): If you’re new to sewing, consider doing a few practice stitches on scrap fabric before working on your actual doll fabric.
- Child Safety First: If your Ugly Doll is for a baby or young child, avoid using small, easily detachable embellishments like buttons, beads, or loosely glued felt pieces. Embroider facial features or securely sew on large felt shapes instead.
- Overstuff, Don’t Understuff: A generously stuffed doll holds its shape better and is more resilient to countless hugs and adventures.
Caring for Your Handmade Ugly Doll
To keep your cherished Ugly Doll looking its best for years to come, gentle care is recommended:
- Spot Cleaning: For minor spills or dirt, use a damp cloth with a mild soap to gently spot clean the affected area.
- Machine Washing (Gentle): If a deeper clean is needed, place your Ugly Doll in a mesh laundry bag to protect it. Wash on a delicate cycle with cold water and a mild detergent. Air dry thoroughly or tumble dry on a very low heat setting. Avoid high heat, as it can melt certain synthetic fibers and stuffing.