
Crafting Sentimental Keepsakes: Your Guide to Embroidering Any Building onto a Pillow
There’s something uniquely special about a handmade gift, especially one that captures a cherished memory or a significant place. Imagine immortalizing your first home, a beloved church, a meaningful temple, or even an iconic landmark, not just in a photograph, but as a beautifully embroidered piece of home decor. This detailed guide will walk you through the rewarding process of creating a custom embroidered pillow featuring any building you desire, transforming a simple piece of fabric into a timeless keepsake.
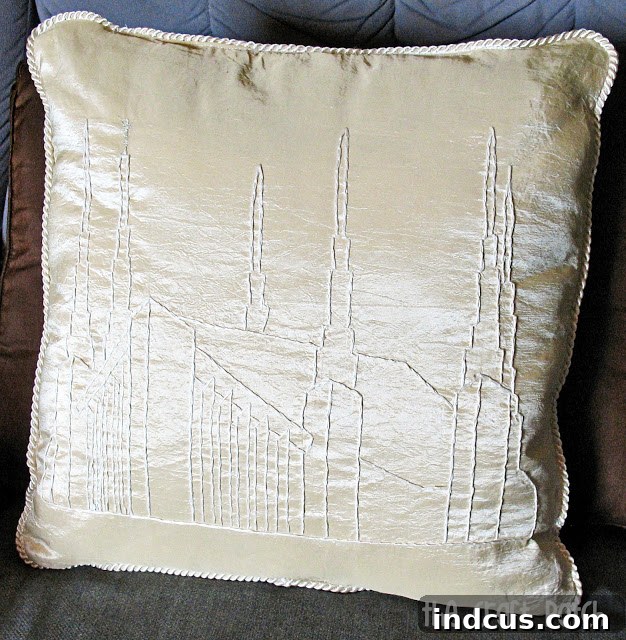
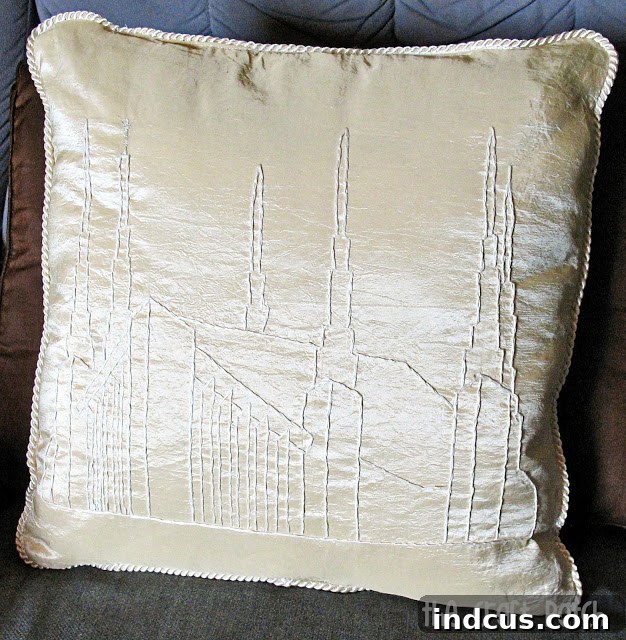
The inspiration for this project stemmed from a desire to celebrate a momentous occasion for a dear friend: her sealing in the magnificent Las Vegas LDS temple. Wanting to create a truly meaningful and lasting memento, I embarked on crafting a throw pillow adorned with an intricate embroidery of the temple itself. This project, while requiring patience and attention to detail, yields an undeniably rewarding result – a personalized, elegant, and deeply sentimental item. Whether you’re commemorating a wedding, a new home, a significant life event, or simply celebrating a place close to your heart, this guide will empower you to create your own cherished embroidered masterpiece.
Essential Materials You’ll Need for Your Embroidered Pillow Project
Before diving into the stitching, gathering the right materials is crucial for a smooth and successful project. Thoughtful selection of each component will not only make the process more enjoyable but also significantly impact the final look, feel, and durability of your embroidered pillow.
1. Fabric Selection: The Canvas for Your Creation
- Base Fabric: For my temple pillow, I chose a gorgeous cream-colored fabric that offered a luxurious feel and an elegant backdrop for the embroidery. When selecting your fabric, consider its weight, weave, transparency, and how it complements your desired aesthetic.
- Medium-Weight Cotton or Linen Blends: These are excellent choices, especially for beginners. They are stable, easy to work with, and hold stitches well.
- Velvet or Silk: For a truly opulent and sophisticated finish, these fabrics offer a rich texture. However, they can be more challenging to embroider due to their delicate nature or pile.
- Burlap or Coarse Linen: To achieve a more rustic, homey, or farmhouse-chic aesthetic. These fabrics add unique texture and character, perfect for a cozy, country-inspired look.
Ensure your chosen fabric is opaque enough to conceal the back of your stitches, or consider adding a lining if it’s too sheer. A good quality fabric will also withstand the tension of embroidery without excessive puckering.
- Backing Fabric: Select an equally beautiful and complementary fabric for the back of your pillow. This can match your front fabric for a cohesive look or provide a subtle contrast for added visual interest.
2. Embroidery Thread: Bringing Your Design to Life
- Cotton Embroidery Floss (e.g., DMC): This is the most common and versatile choice for hand embroidery. It typically comes in skeins of six strands, allowing you to adjust the thickness of your stitches by using fewer or more strands. For an outlined building, 2-3 strands usually provide a good balance of detail and visibility.
- Perle Cotton: A mercerized, non-divisible thread that boasts a beautiful sheen. It creates a bolder, more defined line, adding a different textural quality to your embroidery.
- Color Choice: I opted for an embroidery thread a shade lighter than the cream fabric to create a subtle, elegant outline of the temple, offering a sophisticated monochromatic effect. You can choose a contrasting color for a dramatic statement, maintain a monochromatic palette for understated elegance, or even incorporate multiple colors to highlight specific architectural details.
- Quantity: Be aware that intricate designs can be thread-intensive. I used approximately three packs of thread for the temple design, so it’s always wise to have extra skeins on hand to avoid running out mid-project.
3. Piping Cord and Fabric (Optional but Highly Recommended)
- Piping: Adding coordinating piping around the edge of your pillow instantly elevates its professional finish. It provides structure, defines the edges, and lends a polished, custom-made look. You can create your own piping using bias tape and cording or purchase pre-made piping for convenience.
- Piping Fabric: Choose a fabric that perfectly complements or matches your main pillow fabric for a harmonious design.
4. Essential Tools and Supplies
- Embroidery Needles: Sharp-pointed needles (often called crewel needles) with an eye large enough to comfortably accommodate your chosen thread.
- Embroidery Hoop: Essential for keeping your fabric taut and preventing puckering or distortion as you stitch. A good quality wooden or plastic hoop with a strong tension screw is highly recommended.
- Sharp Scissors: For precise trimming of threads.
- Masking Tape: Crucial for securely attaching your printed pattern to the back of the fabric.
- Printer and Paper: To print a clear, crisp line drawing of your chosen building.
- Pillow Form or Stuffing: To fill your finished pillow and give it its desired shape and plumpness.
- Sewing Machine (or Hand Sewing Supplies): For assembling the pillow cover.
- Iron and Ironing Board: For pressing fabric, seams, and finishing your embroidered piece.
Step-by-Step Guide: Embroidering Your Chosen Building
Now that you have all your materials meticulously gathered, let’s embark on the creative journey of bringing your building design to life with needle and thread. Patience is paramount, and each carefully placed stitch brings you closer to your unique, handcrafted masterpiece.
1. Preparing Your Design and Fabric
- Selecting Your Building Image: Begin by choosing a clear photograph or illustration of the building you wish to embroider. For optimal results, look for images with distinct architectural lines and recognizable features.
- Creating a Line Drawing: Convert your chosen image into a simple, clean line drawing. Many online tools or graphic design software can help simplify photos into outlines. Alternatively, you can hand-trace the main features from a printed photo onto a separate piece of paper. The goal is a clear, uncluttered outline that precisely defines the building’s structure.
- Printing the Pattern: Print your line drawing to the desired scale and size for your pillow. Ensure the lines are sufficiently dark and clear enough to be visible through your fabric.
- Preparing Your Fabric: Cut your main fabric to the appropriate size for your pillow, remembering to add seam allowances. Press it thoroughly to remove any wrinkles or creases. Place your fabric securely into an embroidery hoop, ensuring it’s taut like a drum without distorting the weave of the fabric.
2. Transferring the Design to Your Fabric
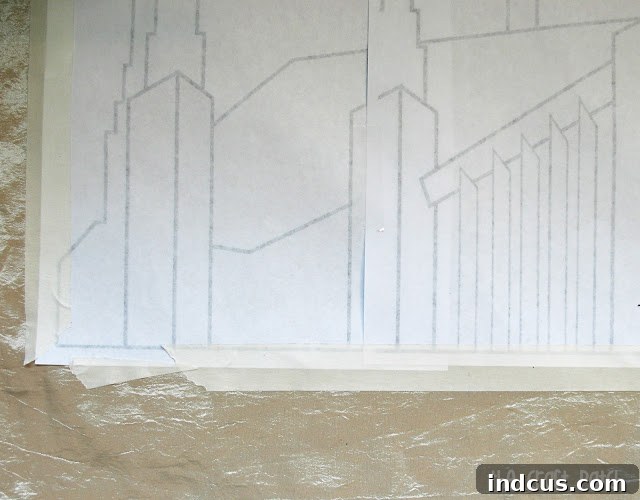
This method leverages the transparency of your fabric, making it one of the simplest and most effective transfer techniques for suitable materials. The primary objective is to have the lines of your printed pattern clearly visible from the front of your fabric to guide your needle.
- Positioning the Pattern: Carefully place your printed line drawing beneath your fabric. Center it precisely where you envision the embroidery appearing on your finished pillow.
- Securing with Masking Tape: Using masking tape, firmly attach the printed pattern to the backside of your fabric. Double-check that it’s secure and won’t shift during the embroidery process, as this is crucial for maintaining the accuracy of your design.
- Visibility Check: With the pattern taped in place, hold your fabric up to a strong light source (such as a sunny window, a light pad, or even a bright lamp). If your fabric is adequately transparent, you should easily see the black lines of your pattern showing through on the front side of the fabric. This clear visibility will serve as your direct guide for stitching.
- Alternative Transfer Methods (If Fabric is Opaque): If your fabric proves to be too opaque for this method, don’t worry—you still have options! Other effective transfer methods include:
- Light Box: Placing the fabric over a light box with the pattern underneath provides excellent illumination for tracing.
- Water-Soluble Pens/Pencils: Tracing the design directly onto the fabric’s front with a specialized pen or pencil whose marks wash away easily with water.
- Carbon Paper (Dressmaker’s Tracing Paper): Placing tracing paper between the pattern and fabric and tracing the lines with a stylus or dull pencil.
- Heat Transfer Pens: Drawing your design on paper with a heat-transfer pen and then ironing it onto the fabric.
However, for the specific project type and fabric suggested, the masking tape method is highly efficient and straightforward.
3. The Art of Embroidery: Bringing the Outline to Life
This is where the magic happens, transforming simple lines into a textured, artistic representation of your chosen building. While it can be time-consuming, many find it to be a wonderfully meditative and relaxing process.
- Choosing Your Stitch: For outlining buildings and architectural details, a backstitch or a stem stitch works beautifully. The backstitch creates a solid, continuous line, providing a clean and defined look, while the stem stitch offers a slightly rope-like, elegant texture.
- Backstitch Technique: Bring the needle up at point A, down at point B, then up at point C (a short distance from B), and back down at point B. Continue this motion, always bringing the needle up a short distance ahead and down into the end of the previous stitch.
- Stem Stitch Technique: Similar to backstitch, but the thread is kept consistently to one side of the needle (either above or below the working line) to create its characteristic twisted, textural line.
- Starting Your Stitching: Begin by securing your thread at the back of the fabric with a small, discreet knot or by weaving it through a few initial stitches that will be covered. Work slowly and methodically, following the lines of your printed pattern precisely.
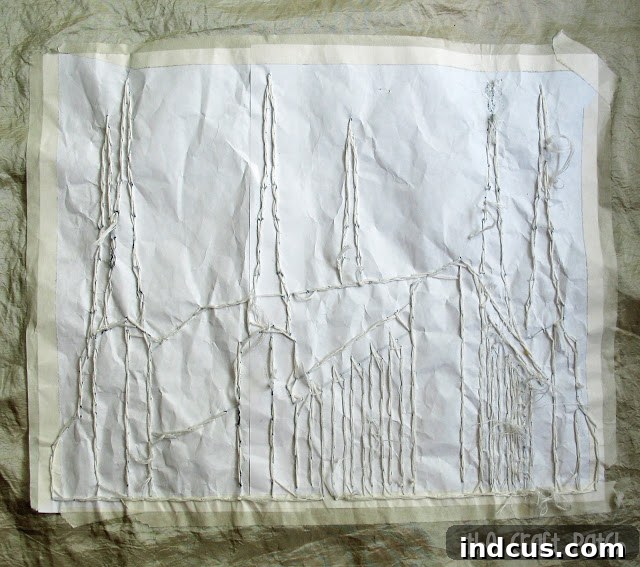
- Stitching Through Paper: As noted in the original project, you will be stitching directly through both the fabric and the underlying paper pattern. This technique is surprisingly effective; the paper acts as an excellent stabilizer, preventing the fabric from distorting and ensuring your lines remain crisp and accurate. Do not worry about the paper — it will be removed later.
- Thread Management: Use 2-3 strands of embroidery floss for a clear, elegant outline, or adjust as desired for different effects. Maintain consistent stitch length for a neat, uniform finish. Avoid pulling your stitches too tight, which can pucker the fabric, or leaving them too loose, which can appear sloppy.
- Embrace the Process: Hand embroidery is not a race; it’s a journey. This temple design took a considerable amount of time for me, often accompanied by saved shows on the DVR! Allow yourself to fully enjoy the repetitive, calming rhythm of stitching. Ensure you have good lighting and a comfortable working position to make the experience more pleasurable.
- Thread Quantity: Be prepared to use a fair amount of thread. For intricate and detailed designs, having extra skeins on hand is always a prudent choice to avoid interruptions.
4. The Revelation: Removing the Paper Pattern
Once every line of your building has been meticulously stitched, it’s time for the immensely satisfying step of removing the paper pattern to fully reveal your completed embroidery.
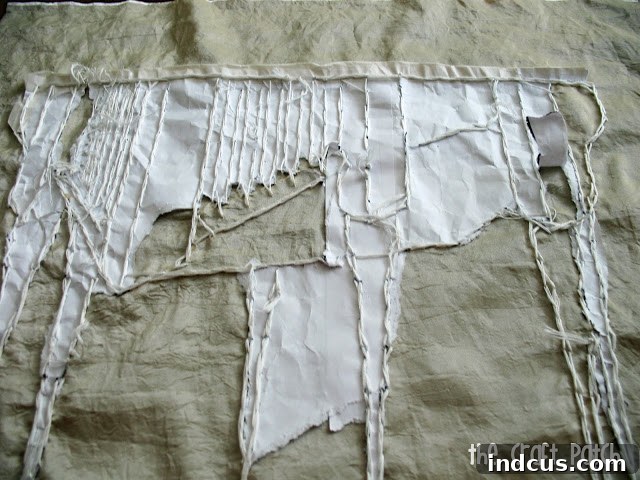
- Tearing Away the Paper: Carefully begin tearing the paper away from the backside of your embroidered fabric. Because the paper has been perforated by thousands of needle holes, it should come away relatively easily, almost dissolving into small pieces.
- Gentle Removal: Work slowly and gently around all the stitched lines. For any small, stubborn bits of paper that might cling between stitches, use a pair of fine-tipped tweezers to carefully pick them out. Avoid pulling too hard on the fabric or the embroidery itself, which could distort your stitches.
- Inspect and Clean: After all the paper is removed, thoroughly inspect your embroidery for any stray paper fragments or fibers. You can use a soft brush or a piece of sticky tape gently dabbed over the embroidery to remove any remaining debris. This step ensures a pristine, professional finish.
5. Admiring Your Handiwork: The Finished Embroidery
Take a well-deserved moment to appreciate the intricate details and the precision of your stitches. This completed embroidery is the heart of your pillow, a truly unique piece created entirely by your own hands and vision.
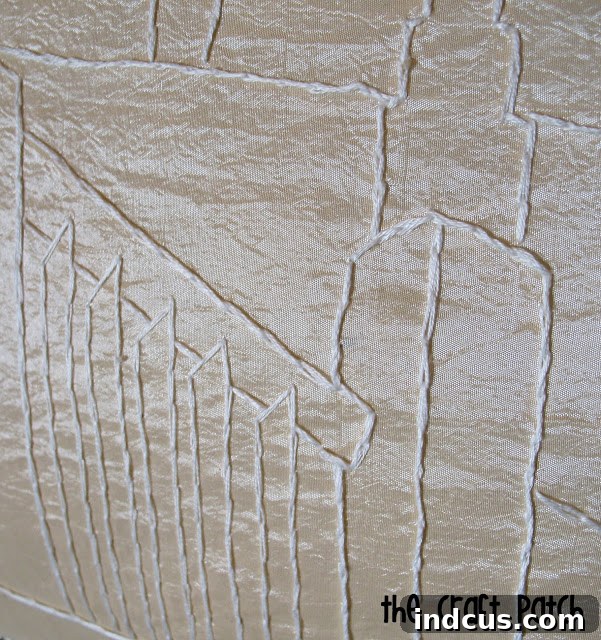
At this stage, you might want to gently press your embroidered piece from the back to ensure it lies perfectly flat and smooth. Use a pressing cloth and a moderate iron setting, especially if your fabric is delicate, to protect your stitches and fabric.
Finishing Touches: Transforming Your Embroidery into a Pillow
The final step in this creative journey is to expertly sew your beautiful embroidery into a functional and decorative pillow. This stage allows you to combine your needlework with your sewing skills to create a complete, professional-looking item that’s ready for display or gifting.
1. Assembling the Pillow Cover
- Cutting Fabric: Cut the backing fabric for your pillow to the exact same dimensions as your embroidered front piece, remembering to include appropriate seam allowances.
- Adding Piping (If Desired): If you’re incorporating piping, now is the ideal time to attach it. Pin and baste the piping around the raw edge of your embroidered front piece, ensuring the raw edge of the piping tape is aligned with the raw edge of the fabric. The cord of the piping should face inwards, towards the center of your pillow front.
- Sewing the Pillow Sides: Place the embroidered front piece (with piping attached, if applicable) and the backing fabric right sides together. Pin securely around the entire perimeter. If you’ve added piping, sew slowly with your sewing machine foot positioned close to the piping cord to create a neat, defined edge. Remember to leave an opening of about 6-8 inches along one side. This opening is crucial for turning the pillow right side out and for inserting your pillow form.
- Trimming and Clipping: Trim the seam allowances down to about 1/2 inch (1.25 cm) to reduce bulk. Clip the corners diagonally to ensure they turn out crisp and sharp. If you have piping, snip into the seam allowance of the piping tape around any curves to allow it to lie flat without puckering.
2. Finishing the Pillow
- Turning and Pressing: Carefully turn the pillow cover right side out through the opening you left. Use a blunt tool (such as a chopstick or a specific corner turner) to gently push out all the corners, creating sharp points. Press all seams flat with an iron for a crisp, professional finish.
- Inserting the Pillow Form: Carefully insert your chosen pillow form or stuffing into the cover through the opening. Fluff and arrange the filling until the pillow is evenly filled and has achieved your desired shape and plumpness.
- Closing the Opening: Hand-stitch the opening closed using a ladder stitch (also known as an invisible stitch) for a neat, seamless, and professional finish that blends into the seam. Alternatively, you can use your sewing machine to topstitch the opening closed, though this will result in a more visible seam line.
Design Versatility and Personalization Ideas
One of the most exciting aspects of this project is its incredible versatility. The thoughtful choice of fabric, embroidery thread color, and finishing touches can drastically alter the overall aesthetic, making each embroidered pillow truly unique and perfectly tailored to its purpose.
- Fabric Choices and Aesthetics:
- Luxurious Fabrics (Velvet, Silk, High-Quality Cotton Sateen): These materials lend themselves beautifully to an elegant, sophisticated, and refined look, much like the original cream fabric used for the temple pillow. They are perfect for formal living spaces or for creating a truly special, high-end gift.
- Rustic Fabrics (Burlap, Linen, Homespun Cotton): These natural materials evoke a more homey, country, or farmhouse-inspired charm. The inherent textures of these fabrics add character and a sense of warmth, making them ideal for a cozy, inviting setting.
- Brightly Colored Fabrics: For a more playful, modern, or whimsical touch, consider using vibrant colors for your base fabric, perhaps paired with a contrasting thread color to make the embroidery pop.
- Thread Colors and Details:
- Monochromatic Schemes: Using various shades of the same color for both fabric and thread creates a subtle, understated elegance that is sophisticated and calming.
- Contrasting Hues: Boldly contrasting thread colors can make the building design stand out dramatically, drawing the eye and making a strong visual statement.
- Multi-Color Palettes: Incorporate different thread colors to highlight specific architectural features, intricate details, windows, or doors, adding depth, realism, and vibrant character to your design.
- Beyond the Outline: While a simple, elegant outline is often stunning on its own, you can experiment with filling in sections of the building using stitches like the satin stitch for smooth areas or the long and short stitch for a more painterly, blended effect.
- Adding Text: Consider further personalizing your pillow by embroidering a significant date, a family name, a memorable quote, or the building’s name directly beneath or alongside the design.
- Pillow Shapes and Sizes: Don’t limit yourself to traditional square pillows. Rectangular, bolster, or even round pillow shapes can provide a fresh and interesting canvas for your embroidered building design.
- Other Applications: This versatile embroidery technique isn’t just for pillows! You could easily frame your finished embroidery as unique wall art, incorporate it into a quilt block, adorn a tote bag or apron, or even create a one-of-a-kind table runner.
Why an Embroidered Building Pillow Makes the Perfect Gift
Whether for a wedding, an anniversary, a housewarming, or simply to celebrate a cherished memory, an embroidered building pillow is a gift that speaks volumes. It’s not merely a decorative object; it’s a tangible representation of love, effort, and profound personal connection.
- Sentimental Value: It captures the essence of a place that holds deep meaning, be it a newlywed couple’s first home, a place of worship where vows were exchanged, or a favorite vacation spot that holds dear memories.
- Uniqueness: Each pillow is a one-of-a-kind creation, reflecting both the distinctive character of the building itself and the individual artistic touch of the maker.
- Lasting Memory: Unlike many fleeting gifts, an embroidered pillow serves as a beautiful, durable, and ever-present reminder of significant life events, beloved locations, and the thoughtfulness of the giver.
- Customization: The inherent ability to tailor every single aspect of the project – from the type of fabric and thread colors to the size and any additional embroidered details – ensures the gift is perfectly suited to the recipient’s taste and the specific occasion.
Conclusion: Your Journey to a Treasured Heirloom
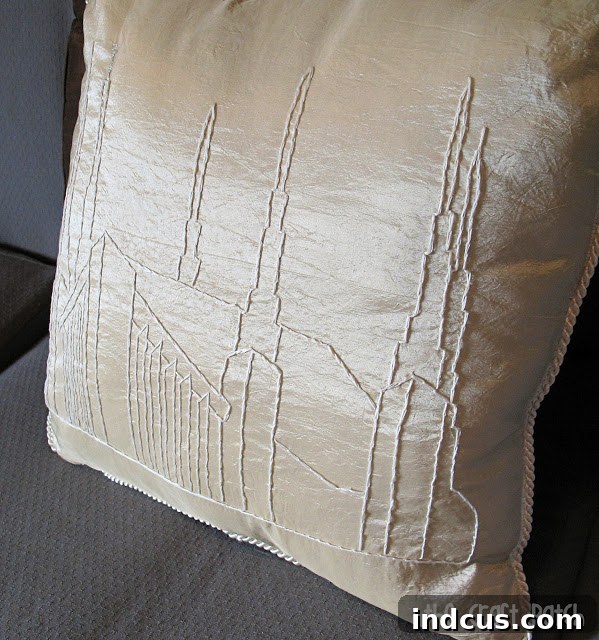
Creating an embroidered building pillow is a project that transcends simple crafting; it’s an act of love, patience, and artistic expression. From carefully selecting the perfect fabric and thread to the final stitch that expertly secures your pillow form, each step contributes to a deeply personal and meaningful outcome. The elegant result, whether achieved with luxurious cream fabric and delicate piping or a more rustic linen, is a testament to the enduring power of handmade items to convey warmth, history, and profound affection. This pillow isn’t just a decorative accessory; it’s a conversation piece, a cherished heirloom, and a constant, beautiful reminder of a place that holds a special spot in someone’s heart.
So, gather your supplies, choose your special building, and embark on this fulfilling embroidery journey. The joy of creating something so unique and personal, coupled with the immense satisfaction of gifting or proudly displaying such a beautiful piece, is truly unparalleled. We encourage you to share your creations and inspire others. Happy stitching!







