
Unveiling Our Home’s Grand Transformation: Hardwood Floors and Beyond!
We’re absolutely thrilled to share a monumental milestone in our home renovation journey: the installation of our stunning new hardwood floors! While a few finishing touches remain – like completing half the staircase, the landing, and a handful of minor details – the dramatic shift in this space is too exciting to keep under wraps. We anticipated a significant change, but truly, the impact is immense. This isn’t just an update; it’s a complete reimagining of our living environment, enhancing both aesthetics and functionality in ways we only dreamed possible.
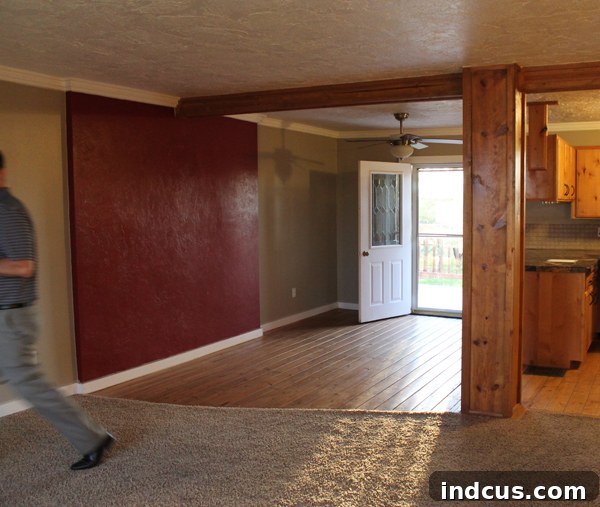
To fully appreciate the scope of this transformation, let’s rewind to the very beginning, back to the day we first stepped into this house with our realtor. It’s always insightful to see where a journey started:
Do you recall the rather awkward beam that awkwardly bisected the dining area? It was a notable design flaw that significantly hindered the open feel of the space, a detail we were eager to address in our home transformation project.
The Kitchen’s Evolution: From Dated to Dynamic
Our kitchen also presented its own set of challenges and opportunities for a modern kitchen remodel. Here’s a glimpse of it in its original state:
And a look from when we first moved in, after giving the fridge a stylish upgrade with stainless steel paint – a DIY project that, remarkably, still holds up perfectly today:
Looking from the dining room into the kitchen, the transformation is particularly striking. Say goodbye to that “nacho cheese” colored wall – a memory that still makes us cringe! This was before we built our convenient walk-in pantry, a structural change that significantly improved both the utility and aesthetics of this central living space.
And here’s a broader view of the living room, a space that has now been dramatically reimagined to reflect our style and needs:
For a clearer perspective on the transformation, this more recent “before” photo highlights the old, uninspiring flooring and the divisive pillar and beam structure that literally cut the room in half, severely limiting its potential as an open-concept living space.
The Pillar’s Demise: Opening Up the Heart of Our Home
And now, a look at what this same space feels like today:
Ahhh! The transformation is truly breathtaking! The first major structural change involved removing the central pillar. Thankfully, it was not load-bearing, simplifying the process considerably. We also undertook necessary electrical rewiring and faced the challenging task of patching the ceiling to ensure a seamless texture blend. This single modification alone has profoundly altered the room’s atmosphere; it now feels at least ten times larger, flowing effortlessly from one area to the next.
As evident in the photos, our kitchen cabinets are still awaiting their Phase 2 makeover. This next stage of the project is extensive, and frankly, after the intensity of the flooring installation, we’re feeling quite exhausted. We’ve decided to postpone the cabinet work until Fall, allowing ourselves a much-needed break to recharge before diving into another major renovation push.
Dining Room Refresh: New Chairs and Future Plans
In the dining room, we’ve already made a significant upgrade by replacing our old dining chairs, which I genuinely disliked. I discovered these fantastic Better Homes and Gardens Cambridge Place chairs online at Walmart, and the price was such an incredible steal that it felt completely justifiable. Even better, I managed to sell our old chairs for $100, making the net cost for our stylish new seating a mere $140. What a savvy deal!
Our future plans for this space include restaining the dining table to achieve a more harmonious color palette. Next to the deep, rich tones of the new hardwood flooring, the table currently appears quite yellow. We also intend to paint the chairs – I’m still weighing options between a sophisticated gray or a slightly darker shade of our wall color – and stain their seats to perfectly complement the table’s refreshed hue. This layered approach ensures a cohesive and elegant dining area.
I remain absolutely captivated by my botanical print gallery wall. It continues to be my absolute favorite feature in the room, adding a touch of natural beauty and personal charm that brings the entire space to life.
Then again, perhaps the corner hutch holds the title for my favorite item in the room. You simply must see its “before” pictures to truly appreciate its incredible transformation. Once an eyesore, it now serves as the perfect display for my cherished dishes and elegantly fills that often-challenging corner of the dining room.
Currently, the hutch is adorned with fresh lilacs nestled in my farmhouse mason jar caddy. Keep an eye out for an upcoming tutorial on how to create your own! It’s quickly become my new favorite way to display fresh flowers. Don’t you wish lilacs bloomed all year? Their heavenly scent is simply unparalleled.
Revolutionizing the Kitchen Layout: From U-Shape to Open Concept
Here’s another perspective of the kitchen, captured just before we moved our furniture back in. This view clearly highlights the fresh, continuous flow of the newly installed wood floors throughout the space:
You might just spot a subtle strip of blue tape on the floor in this photo – that precisely marks the future location of our kitchen island! We’re already absolutely loving the improved kitchen layout. A huge thank you to everyone who offered encouragement to make this change! Previously, the kitchen was a confined U-shape. We strategically removed the cabinets that formed the peninsula and relocated them to sit flush against the back wall. This was, without a doubt, the best decision we made. We only sacrificed one base cabinet, which, truthfully, was mostly filled with clutter anyway. The upcoming island will not only provide three new base cabinets to compensate for the loss but will also offer an abundance of additional counter space and a much-desired bar area, perfect for the kids to sit and chat while I cook.
For now, we’re navigating life with our current countertops, knowing that Phase 2 will eventually bring their much-anticipated upgrade. Speaking of Phase 2, can I take a moment to elaborate? I’ve meticulously planned every detail, and the vision for our future kitchen is incredibly exciting!
Kitchen Renovation: Phase 2 Detailed Plans
Our exciting plans for Phase 2 include:
- **Cabinet Overhaul:** This is a major component. We will address the missing cabinet doors, repaint all cabinets a crisp white for a fresh, modern aesthetic, extend them up to the ceiling, and add elegant molding to create a custom, built-in look.
- **Custom Island with Bar:** As mentioned, we will build a bespoke kitchen island that not only enhances storage and prep space but also incorporates a functional bar area for casual seating and interaction.
- **New Back Door Trim:** The current trim around our back door is an eyesore – every time I see it, I cringe! Replacing it with fresh, modern trim will dramatically improve the kitchen’s finished look.
- **Updated Lighting:** We plan to install stylish pendant lighting over the new island and introduce a sophisticated new chandelier in the dining room, ensuring both ample illumination and aesthetic appeal.
- **Backsplash Extravaganza:** Our backsplash will extend all the way up to the cabinets, and then continue vertically to the ceiling in the open space next to the back door. We’re leaning towards luxurious marble if our budget allows, but elegant subway tile remains a beautiful and cost-effective alternative.
- **Open Shelving with Tile Accent:** In the blank wall space beside the back door, we envision installing open shelving, backed by tile, to provide both practical storage and a decorative focal point.
- **Countertop Upgrade:** We’re planning for sleek black countertops, with the specific material still to be determined based on durability and budget considerations.
Depending on our final budget, we may also seize the opportunity to upgrade the dishwasher, refrigerator, and sink to truly complete our dream kitchen.
This next picture clearly shows the area where the peninsula once stood, defining the U-shaped kitchen. The floor vent you see here will be strategically positioned beneath our new island. This vent efficiently pulls heat from the downstairs fireplace, and we’ve decided to retain it because we truly appreciate the extra warmth it provides during the colder winter months.
The Living Room Unveiled: Gorgeous Hardwood Floors
Here’s the living room, captured before we moved our furniture back in. Just look at that magnificent new wood flooring! The sheer beauty of it truly speaks for itself.
The flooring we selected is Shaw brand maple, featuring a finish called Brant Point Brown. For those interested, THIS is the exact product we used. It truly is the prettiest wood we’ve ever seen! However, a note of caution: it’s notoriously challenging to keep clean, as every tiny crumb and smudge is immediately visible against its dark, lustrous surface.
*** UPDATE (8 Years Later): After living with these dark chocolate wood floors for the past eight years, I genuinely wish we had chosen a different option. While initially beautiful, their solid color and glossy finish have proven to be an absolute nightmare to maintain. Cleaning them feels like a constant, uphill battle. This flooring choice is, by far, my biggest regret among all the remodeling projects we’ve undertaken in this home. As your internet friend, I feel compelled to share this experience and strongly advise against opting for this particular color and finish of wood flooring if ease of maintenance is a priority for you.
Choosing the Perfect Area Rug: A Quest for Comfort and Style
Selecting an area rug for the living room proved to be an unexpectedly challenging endeavor – it felt as significant as choosing a new partner! I visited every store in town, only to find nothing that truly resonated with my vision. The local shopping options left much to be desired, prompting me to pivot my search online. It wasn’t long before Rugs USA emerged as the clear frontrunner. Their pricing was significantly more competitive than anywhere else, and their selection of attractive options was vast. However, this abundance presented its own dilemma: too many rugs I genuinely liked!
Ultimately, I decided on a neutral design with rich texture. I seriously contemplated the Maui Chunky Loop Rug, which boasts incredible reviews for its supposed ease of cleaning. Despite assurances from many that it was soft, it’s inherently a jute rug, and our family spends a considerable amount of time sitting directly on the floor in this room. Prioritizing comfort, I opted instead for an all-wool rug, the Textures Braided Rug, in a soothing light gray. Its softness has added an unparalleled layer of comfort and coziness to the living room, which I absolutely adore!
Here’s a closer look at its intricate texture:
It truly resembles a giant knitted sweater, and I absolutely love its distinctive character! So far, it’s experienced only minimal shedding, which isn’t a major concern. While it appears squishy, it actually has a surprisingly firm feel underfoot, which is quite pleasant. To protect it from the inevitable chaos of children, I thoroughly treated it with Scotch Guard, hoping to preserve its pristine condition against my energetic kids.
*** UPDATE (Several Years Later): I must issue a strong warning: do not purchase this specific rug if it’s intended for a high-traffic area or a room frequently used by a family. While initially charming, it has become a nightmare to vacuum. Children’s crumbs and debris inevitably lodge themselves deep within the intricate holes of the braiding, rendering it virtually impossible to clean thoroughly. Furthermore, it sheds consistently and has started to develop large tufts of fiber that stick up and unravel, significantly compromising its appearance and durability. This rug is emphatically not family-friendly!
Refining the Decor: Vintage Finds and Future Paint Projects
I finally retired my old college apartment torch lamp, upgrading to this exquisite vintage beauty, which adds a touch of timeless elegance to the room:
I sourced this charming lamp from a local Facebook selling page. Doesn’t it perfectly complement the vintage suitcase end table, creating a cohesive and character-filled vignette?
Just one more beautiful image to savor, because sometimes, a picture truly is worth a thousand words:
I’ve been contemplating whether to paint or stain these wicker chairs. What are your thoughts? If you were to give them a refresh, what color would you choose? Your input is greatly appreciated!
The Dramatic Reveal: Before-and-After Shots
And now, for the grand finale – the impactful before-and-after shots that truly illustrate the incredible scope of our home’s transformation!
Reflections on a Grand Project and Future Visions
If you’ve stayed with us through this extensive post, you are truly a champion! This hardwood floor installation and accompanying structural changes represent, by far, the most invasive and demanding remodeling project we’ve undertaken to date. It was undeniably challenging for our family, both physically and emotionally. This is precisely why we’ve decided to press pause before tackling the kitchen’s Phase 2. We are genuinely “pooped” and recognize the importance of dedicating quality time to our family to recover and reconnect before diving into any more large-scale projects.
Of course, I’m itching to finalize the kitchen – the thought of missing cabinet doors, sporadic countertops, and the stark contrast between our old wood elements and the gorgeous new flooring is a constant reminder of unfinished business! However, family always comes first. We’ll resume our remodeling adventures and embrace the next wave of DIY craziness once we feel fully rested and re-energized, ready to breathe new life into the heart of our home.
Discover the stunning completed kitchen remodel here!







