Undermount Sink on Laminate Countertops: The Karran Solution for a Seamless Kitchen
For many homeowners embarking on a kitchen renovation, the dream of a sleek, obstruction-free undermount sink often clashes with the practical realities and budget-friendly appeal of laminate countertops. Traditionally, these two elements were considered incompatible – a design dilemma that forced a compromise. However, I’m thrilled to share how an innovative product allowed me to achieve my ideal kitchen setup: a stunning undermount sink perfectly integrated into my laminate countertops, creating a truly seamless and highly functional workspace.
My desire for an undermount sink wasn’t just about aesthetics; it was fundamentally about practicality. The constant battle against crumbs and grime accumulating along the raised lip of a drop-in sink was a persistent frustration. The vision of effortlessly wiping debris directly from the counter into the basin, without any obstructions or crevices, became a significant aspiration for our new kitchen. This seemingly small detail promised a major improvement in daily cleaning routines and overall kitchen hygiene. Yet, when we opted for the cost-effective and versatile choice of laminate countertops, I assumed this aspiration would remain just that – an unfulfilled wish. The conventional wisdom dictated that installing a standard undermount sink with laminate was a recipe for disaster. The sensitive MDF core beneath laminate surfaces is highly susceptible to moisture damage, leading to swelling, warping, and ultimately, the complete ruin of the countertop. This inherent vulnerability made traditional undermount installations impossible.
Discovering the Game-Changer: Karran Sinks
Refusing to abandon my dream, I immersed myself in the meticulous research that defines any serious DIY project. My search for a viable solution led me down countless internet rabbit holes, eventually unearthing a true innovation: Karran sinks. I was astounded to learn that Karran had engineered a line of sinks specifically designed for undermount installation with laminate countertops. This discovery was nothing short of revolutionary for those of us seeking both durability and modern design without breaking the bank. Karran’s unique construction addresses the core problem of moisture infiltration, offering a waterproof and reliable system that transforms the possibilities for laminate kitchen design.
The moment I realized my long-held kitchen dream was not only achievable but also supported by such a clever design, I was ecstatic. A literal happy dance ensued! I promptly reached out to Karran, eager to collaborate and share this groundbreaking solution with our blog community. Their positive response was incredibly gratifying, and I’m delighted to present the centerpiece of our new kitchen – a magnificent, sparkling, and generously sized undermount sink.
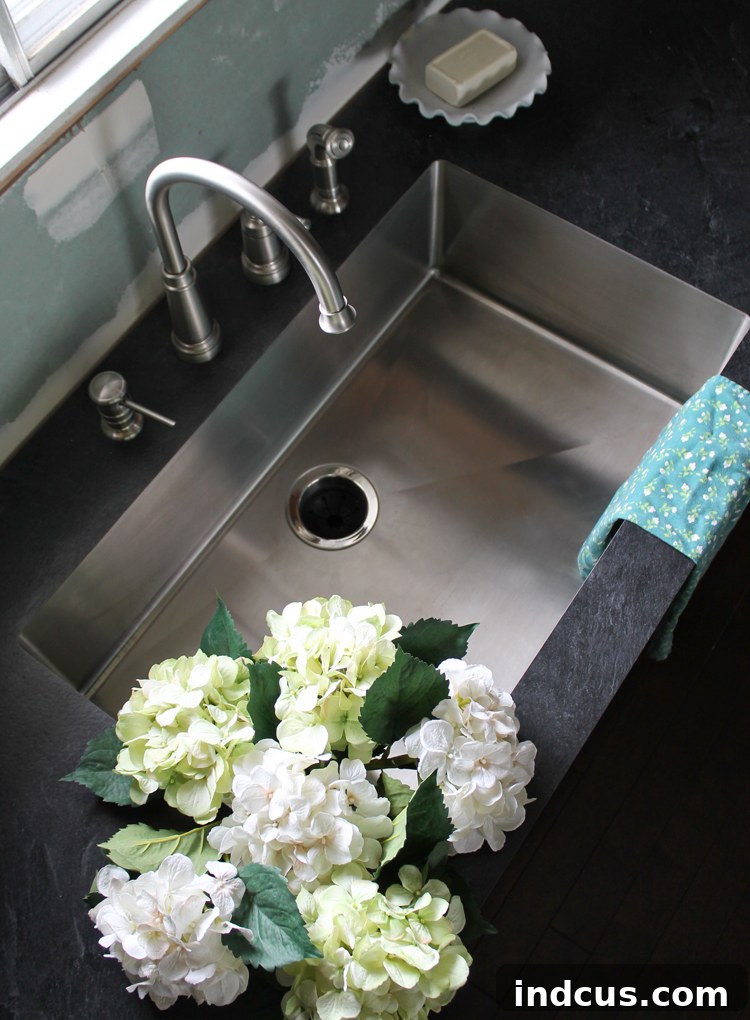
This is the Karran E-540 Edge Series Sink, a testament to thoughtful engineering and elegant design. Its sleek lines and robust stainless steel construction instantly elevate the aesthetic of our kitchen. Karran offers a diverse range of styles and sizes within their Edge Series, all meticulously crafted to be fully compatible with laminate countertops. This extensive selection ensures that homeowners can find a sink that perfectly complements their kitchen’s specific design requirements and personal taste. You can explore the full array of choices on their official website HERE, discovering the ideal fit for your renovation project.
Beyond its visual appeal, the sheer functionality of this Karran sink is remarkable. The spacious basin effortlessly accommodates large items – a full-size cookie sheet and a hefty sauté pan fit with ample room to spare! This incredible depth and generous size are game-changers, making washing oversized pots and pans an absolute breeze and greatly simplifying kitchen cleanup. The thoughtful design means less splashing and more contained washing, enhancing the overall efficiency of our culinary space.
DIY Karran Undermount Sink Installation: A Step-by-Step Guide
While the prospect of installing an undermount sink with laminate might seem daunting, the process, though different from a conventional sink installation, is entirely manageable for a dedicated DIY enthusiast. We successfully tackled this project ourselves, and I’m here to walk you through each critical step. For those considering this DIY endeavor, I highly recommend dedicating time to review Karran’s official installation resources. We found THIS YouTube video particularly invaluable, watching it multiple times to fully grasp the nuances of the installation process. Understanding the specific techniques is crucial for achieving a professional, watertight finish.
Understanding the Karran Sink Design
Before diving into the installation, it’s essential to understand the innovative design that sets Karran sinks apart. Observe the distinctive white band or flange encircling the perimeter of the sink. This is the heart of Karran’s unique system. Unlike traditional undermount sinks, where the sink attaches directly to the underside of the countertop, Karran sinks are designed for this band to sit flush with the surrounding wood substrate (MDF or particleboard) of the countertop. The laminate sheet then extends over this specialized flange, creating a completely seamless, waterproof, and visually integrated installation. This clever design effectively seals the vulnerable MDF core from any potential moisture, preventing the common problems associated with traditional undermounting on laminate.
Step 1: Precise Sink and Faucet Placement
The initial and perhaps most critical step involves meticulously determining the exact placement of your sink and faucet on the bare MDF countertop. Precision here is paramount for both aesthetics and functionality. We began by taping a large piece of paper onto the countertop and carefully drawing the sink outline with a pencil, iteratively adjusting its position until it was perfectly centered beneath our kitchen window. Simultaneously, we marked the desired locations for the faucet and any other accessories, ensuring optimal clearance from the front edge of the counter and comfortable access. Taking the time to visualize and measure multiple times at this stage prevents costly errors later in the process.
Step 2: Cutting the Main Sink Hole
With the placement finalized, the next step is to cut the primary opening for the sink. This hole must be precisely sized to allow the main body of the sink to pass through, while ensuring that the special white flange rests securely on top of the countertop substrate. Begin by drilling a pilot hole large enough to insert your jigsaw blade. From this pilot hole, carefully follow your marked outline using a jigsaw, exercising control and maintaining a steady hand to achieve a clean, accurate cut. Remember, the goal is for the sink’s bowl to drop through while its unique edge flange remains supported by the countertop material.
Once the hole is cut, test fit the sink. The white band should rest evenly and securely on the exposed MDF surface around the perimeter of the hole. This confirms that the initial cut is correct and provides the necessary support for the subsequent steps. Adjustments may be required if the fit is not perfectly flush.
Step 3: Tracing and Routing for a Flush Fit
With the sink temporarily in place, carefully trace around the outer edges of the white band onto the MDF countertop. This outline will serve as your guide for the next critical step: routing. The purpose of this routing is to create a shallow recess in the countertop that precisely matches the thickness of the Karran sink’s flange. This ensures that when the sink is permanently installed, its entire top edge, including the white band, sits perfectly flush with the surrounding countertop substrate. This flush seating is fundamental to creating the seamless and waterproof bond with the laminate overlay.
Using a router with an appropriate straight bit, carefully rout out the traced section. Pay close attention to depth, ensuring that the recess is just deep enough for the sink’s white band to sit perfectly level with the surrounding countertop surface. The result should be a precisely cut ledge, ready to cradle the sink’s flange. Double-check the fit by lowering the sink back into position; the entire white edge should be uniformly flush. Any inconsistencies will require careful adjustment with the router or sanding to achieve a truly seamless transition.
Step 4: Sealing with Bondo
Once the sink sits perfectly flush, the next crucial step is to create a completely monolithic and waterproof surface. This is achieved using Bondo, a high-quality auto body filler. Apply Bondo generously around all the seams where the sink’s flange meets the countertop. This material is excellent for filling any minor gaps or imperfections, ensuring a perfectly smooth transition. Be warned: Bondo has a strong, pungent odor, so ensure your workspace is well-ventilated. Its advantages, however, far outweigh this minor inconvenience; Bondo dries incredibly fast and is remarkably easy to sand, allowing for rapid progress. Once dry, sand the Bondo down until the sink and countertop surface are absolutely seamless, flat, and perfectly smooth to the touch. This smooth, unified surface is essential for the laminate application that follows.
Step 5: Drilling Faucet Holes
After achieving a perfectly smooth and unified sink-to-countertop surface, it’s time to address the faucet and accessory holes. Double-check your initial markings for accuracy. Using appropriate drill bits, carefully drill holes for the faucet, soap dispenser, and any other fixtures you plan to install. Maintain steady pressure and avoid splintering the wood. These holes will later be routed through the laminate, so precision now will ensure a clean finish for your fixtures.
To protect the newly installed sink and surrounding areas during the subsequent laminate application and routing, I highly recommend lining the top edge of the sink with blue painter’s tape. This simple precaution can prevent accidental scratches or adhesive spills, safeguarding your hard work.
Step 6: Applying Laminate and Sealing the Sink Edge
This stage is where the magic truly happens, transforming the raw components into a finished, integrated countertop. The process of installing DIY laminate countertops has its own intricacies, which I’ve detailed in a separate guide HERE. For Karran sinks, a key difference is that the laminate sheet is laid directly over the entire sink area. First, apply contact cement to both the countertop and the back of the laminate sheet, allowing it to dry for the recommended 30 minutes until tacky. This is a critical waiting period. Then, just before you’re ready to lay the laminate, quickly mix and apply a two-part epoxy around the entire routed edge of the sink, where it meets the Bondo-sealed surface. This epoxy creates an impenetrable, waterproof seal directly at the sink-laminate interface. Due to its rapid five-minute drying time, you must work swiftly and precisely to position and adhere the laminate sheet over the sink and countertop. Once the laminate is successfully laid, the sink will be completely concealed beneath it, ready for the final reveal.
Step 7: Routing Out the Sink and Faucet Openings in Laminate
With the laminate firmly in place, the exciting moment arrives: revealing your beautiful undermount sink. Begin by drilling a pilot hole through the laminate directly above the sink opening, ensuring it’s large enough for your router bit to pass through. Then, carefully use a router to cut along the inner edge of the sink. This step is particularly satisfying as the sleek lines of the sink gradually emerge from beneath the laminate. We started with a flush-cut laminate bit for the initial rough opening, followed by an 8-degree chamfer bit for a precise, clean, and slightly beveled edge. While the manufacturer typically recommends a 10-degree bit, the 8-degree alternative worked perfectly and was readily available. After routing, meticulously sand the laminate edges with a metal file to achieve a perfectly smooth, refined finish. This attention to detail ensures not only a beautiful appearance but also a comfortable and durable edge.
The same precise routing process is then applied to the faucet holes. Drill a pilot hole through the laminate above each pre-drilled faucet opening. Then, using an appropriate router bit, carefully cut out the circles, revealing the prepped holes beneath. This ensures clean, professional openings for your fixtures.
To further protect the laminate around the faucet holes from potential moisture infiltration and wear, Karran sinks often come with plastic guards. We meticulously placed these protective guards into the routed holes before proceeding with the faucet installation. This extra layer of defense ensures the longevity and pristine condition of your new countertop. Finally, install your chosen faucet and other fixtures, connecting all plumbing as per manufacturer instructions. With this, your innovative undermount sink on laminate countertops is complete!
The Finished Product: A Dream Kitchen Achieved
Are you eager to witness the stunning culmination of this unique DIY project? Of course, you are! The reveal of our finished kitchen sink is truly a moment of profound satisfaction.
Isn’t it magnificent? My long-cherished wish for an undermount sink, which once seemed an unattainable luxury with laminate countertops, has become a beautiful reality, thanks to Karran’s ingenuity. The seamless transition from countertop to sink is not just visually appealing; it has revolutionized our kitchen’s functionality. The ability to effortlessly wipe crumbs and spills directly into the sink, without any obstructive ridges or stubborn crevices where grime can accumulate, makes daily cleanup a joy. Beyond the practical benefits, the clean, streamlined aesthetic of this installation significantly enhances the modern appeal of our entire kitchen. It’s a testament to how innovative design can overcome traditional limitations, offering both beauty and unparalleled convenience.
I am absolutely thrilled – truly over-the-moon – with our new Karran sink. It represents the perfect fusion of aesthetics, durability, and practicality, proving that you don’t have to sacrifice style for affordability in kitchen design. A sincere thank you to Karran for developing such an ingenious and high-quality product that empowers DIY enthusiasts and homeowners to achieve their dream kitchens without compromise. This innovative approach to sink design has not only solved a common renovation challenge but has also elevated the standard for what’s possible with laminate countertops. We couldn’t be happier with the result.
For a comprehensive guide on our complete DIY laminate countertop installation process, including detailed steps and tips, be sure to read our companion article HERE. Combining these two DIY projects can help you create a stunning, high-end kitchen look at a fraction of the cost, demonstrating that innovative solutions make aspirational designs achievable for everyone.