Create a Stunning DIY Tabletop Balloon Arch: The Ultimate Guide for Easy, Budget-Friendly Party Decor
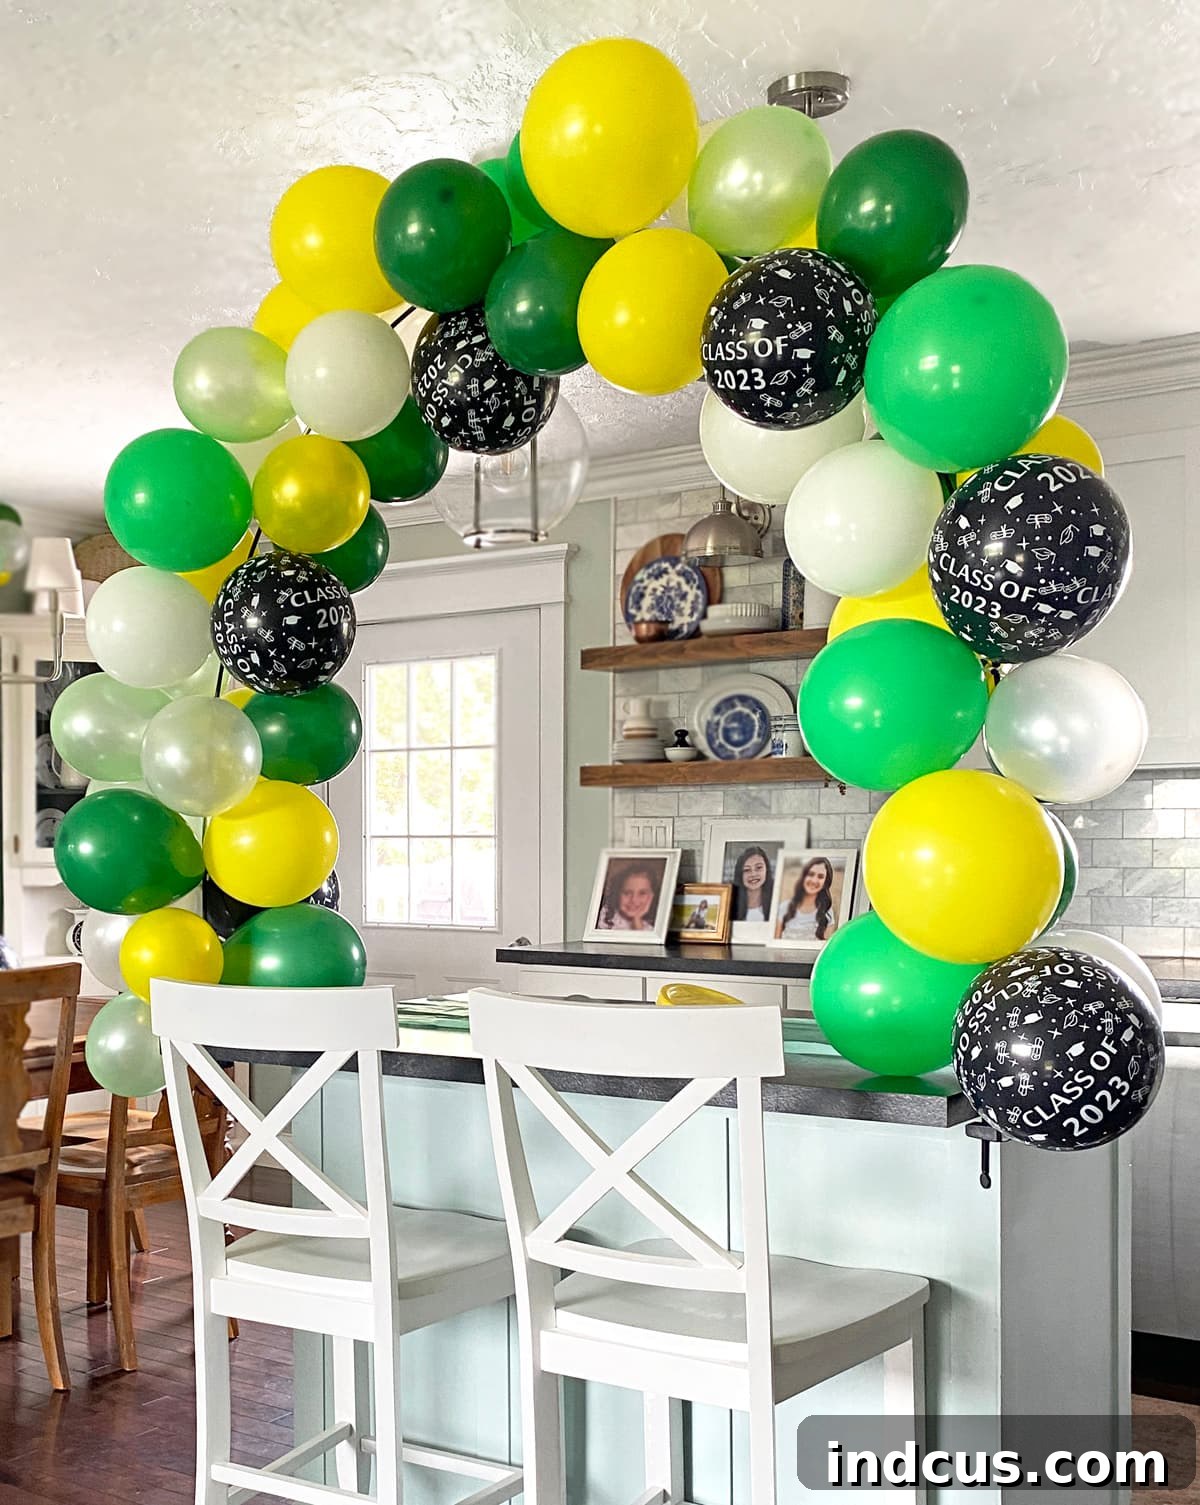
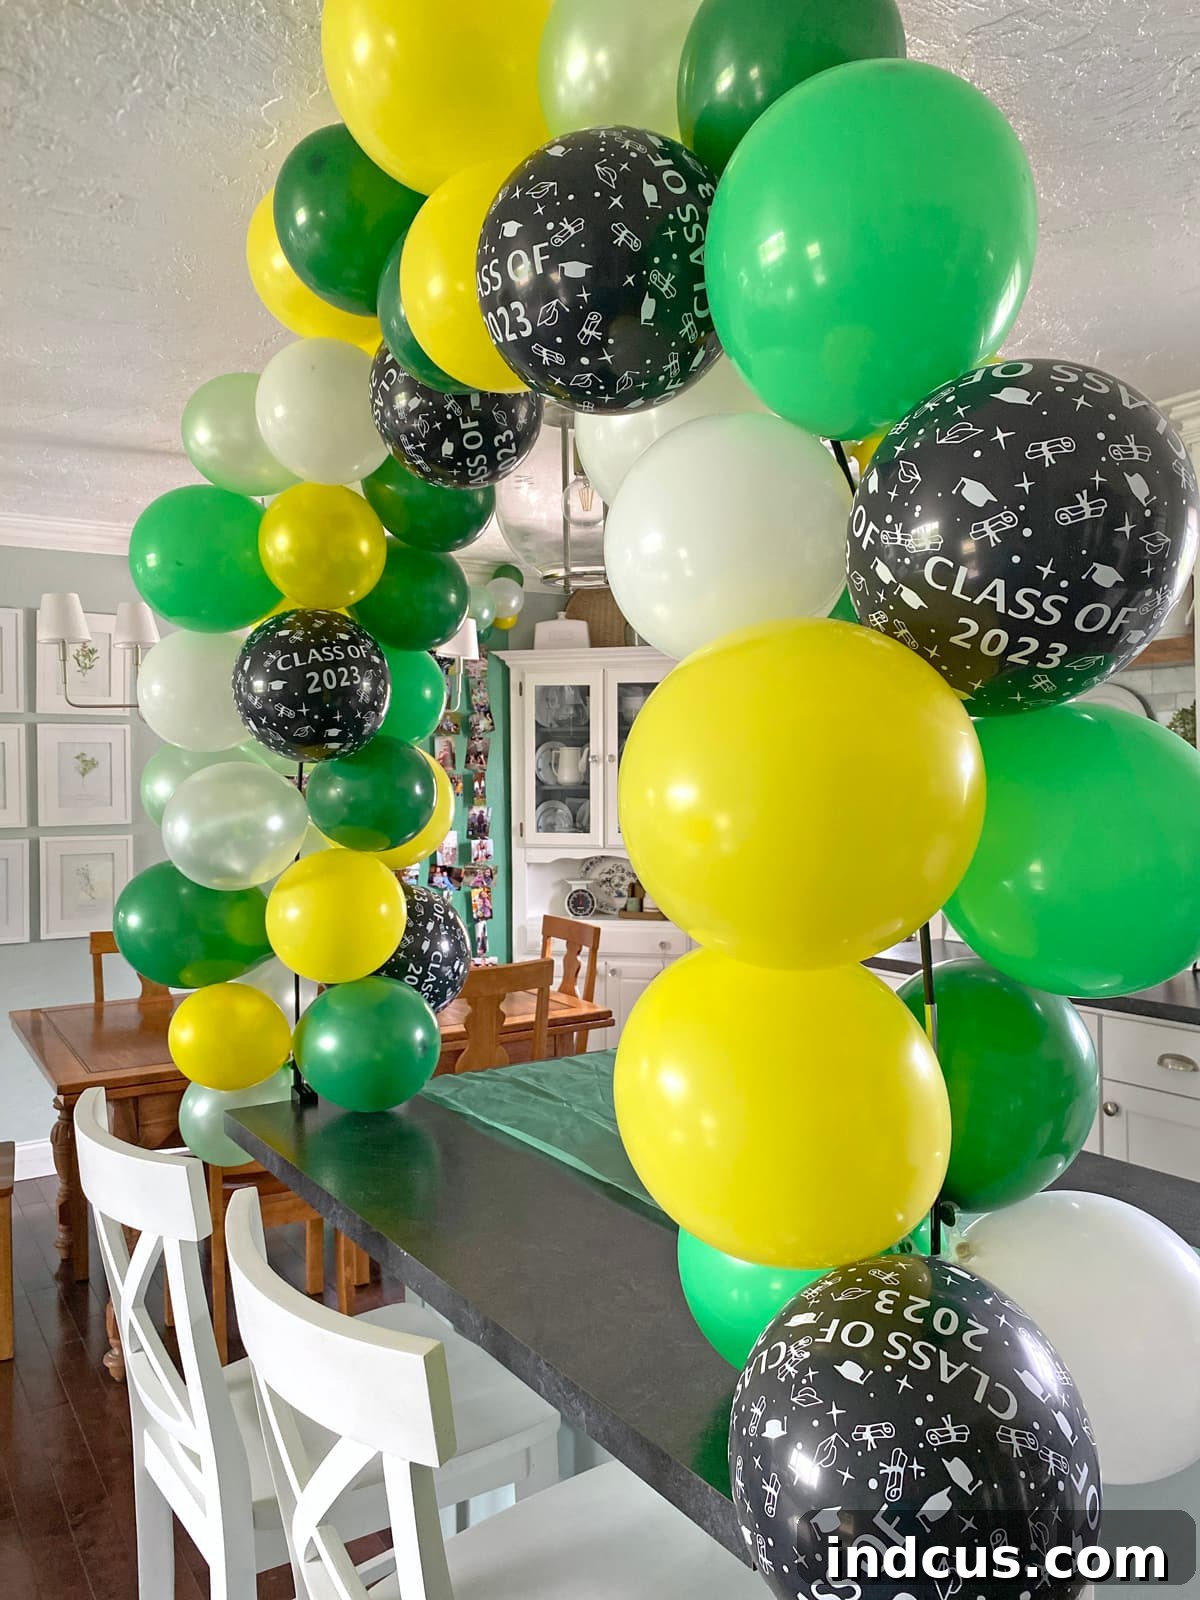
Planning a memorable party doesn’t have to break the bank or require professional event planners. Sometimes, the most impactful decorations are the ones you craft yourself! Recently, I hosted a delightful graduation luncheon for my daughter, and the star of our decor was an absolutely adorable and surprisingly simple tabletop balloon arch. It transformed our space, creating a vibrant, festive atmosphere that was both eye-catching and incredibly budget-friendly.
This DIY balloon arch is a fantastic way to add a celebratory touch to any event, from birthdays and baby showers to graduations and holiday gatherings. The best part? It clamps directly onto your tabletop or kitchen island, making it versatile and perfect for creating a focal point without taking up precious floor space. I’m excited to walk you through exactly what you’ll need and how effortlessly you can put together this show-stopping party decoration.
Why Choose a Tabletop Balloon Arch for Your Celebration?
While large, freestanding balloon arches are impressive, a tabletop version offers a unique set of advantages that make it an ideal choice for many events:
- Space-Saving Design: Perfect for smaller venues or homes where floor space is at a premium. It utilizes your existing table or counter space to create vertical interest.
- Instant Focal Point: A balloon arch naturally draws the eye, instantly creating a vibrant backdrop for your dessert table, gift station, or even a mini photo booth.
- Budget-Friendly Impact: Achieve a luxurious, custom look for a fraction of the cost of hiring a decorator. The main investment is the reusable arch kit and balloons.
- Versatility: Adaptable for any theme or color scheme. With an endless variety of balloon colors and sizes, you can perfectly match your event’s aesthetic.
- Easy to Personalize: Add ribbons, floral elements, fairy lights, or even themed cutouts to make your arch truly unique.
- Quick Assembly: Once you have your balloons inflated, the assembly process for the arch itself is surprisingly fast, allowing you to focus on other party preparations.
Essential Supplies for Your Stunning Balloon Arch Project
Gathering your materials is the first exciting step in bringing your balloon arch vision to life. The good news is that the core components are easily accessible and often reusable.
The Core Kit: What’s Included & What to Upgrade
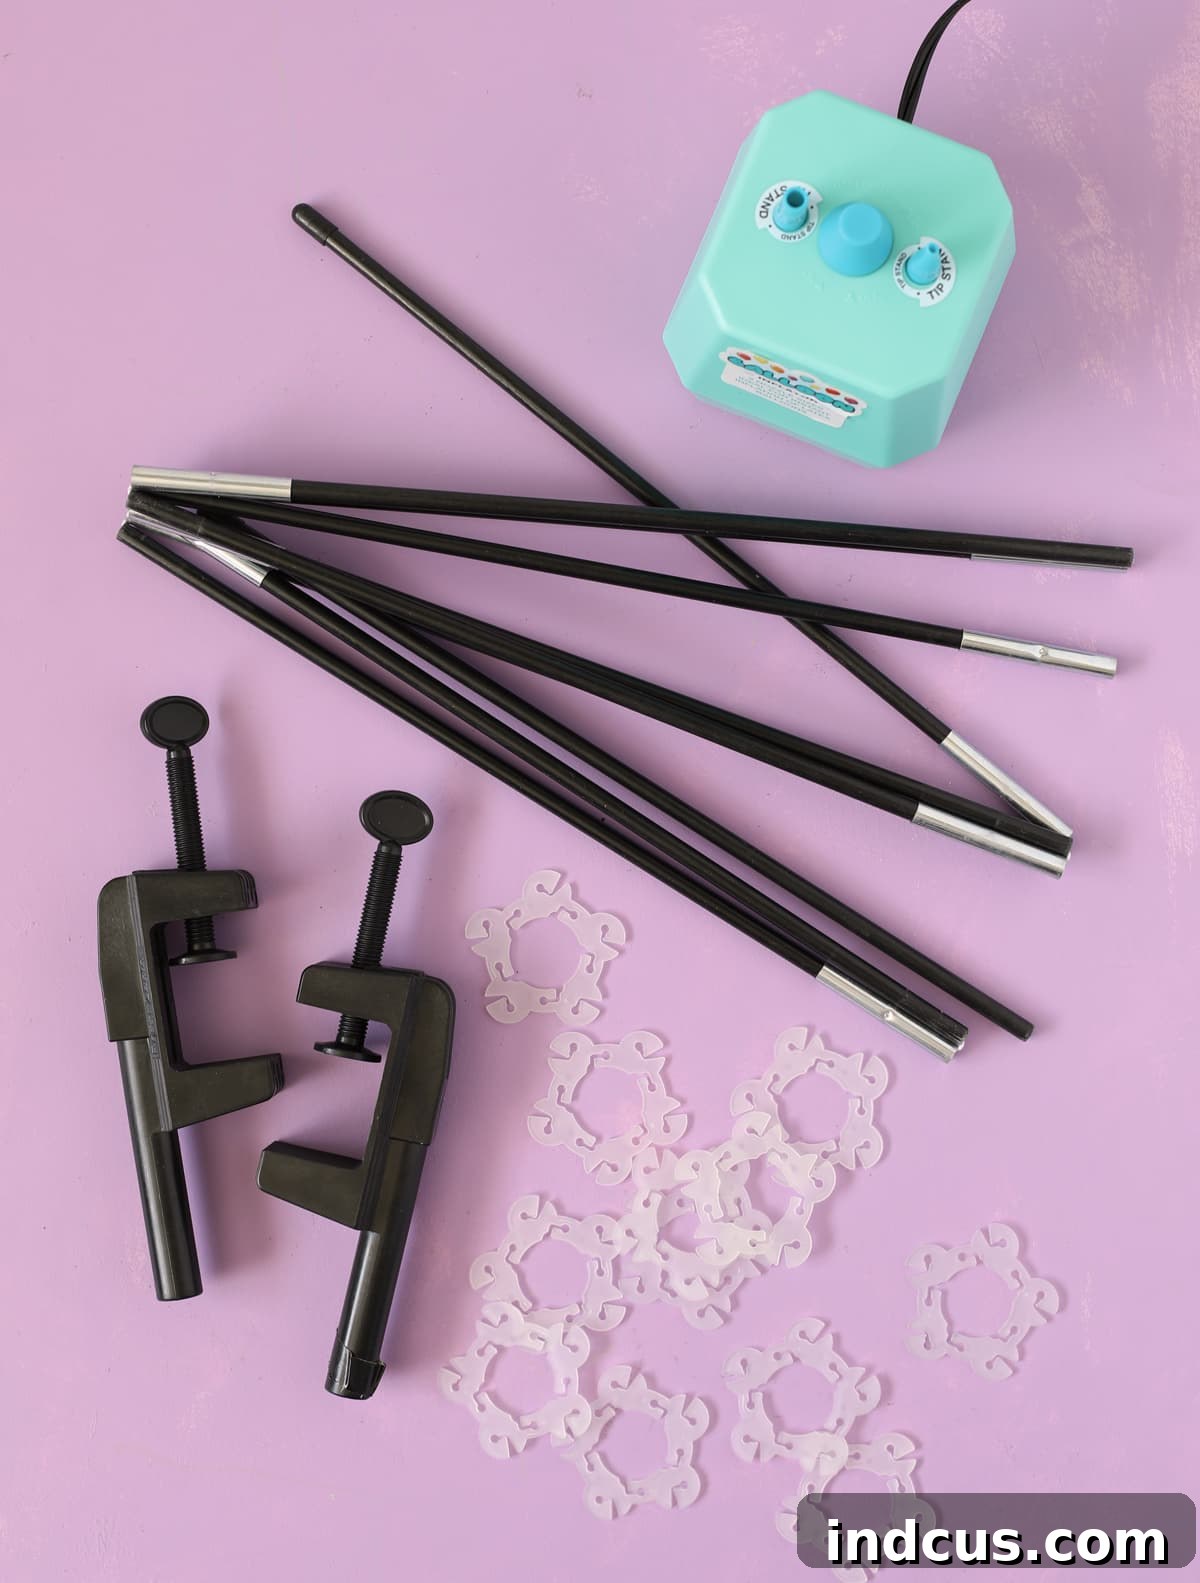
- Balloon Arch Kit: This is the foundation of your project. Most kits typically include:
- Adjustable Clamps: These secure the arch to your table or counter, ensuring stability.
- Collapsible Metal Rod: Similar to tent poles, these rods connect to form the arch’s structure.
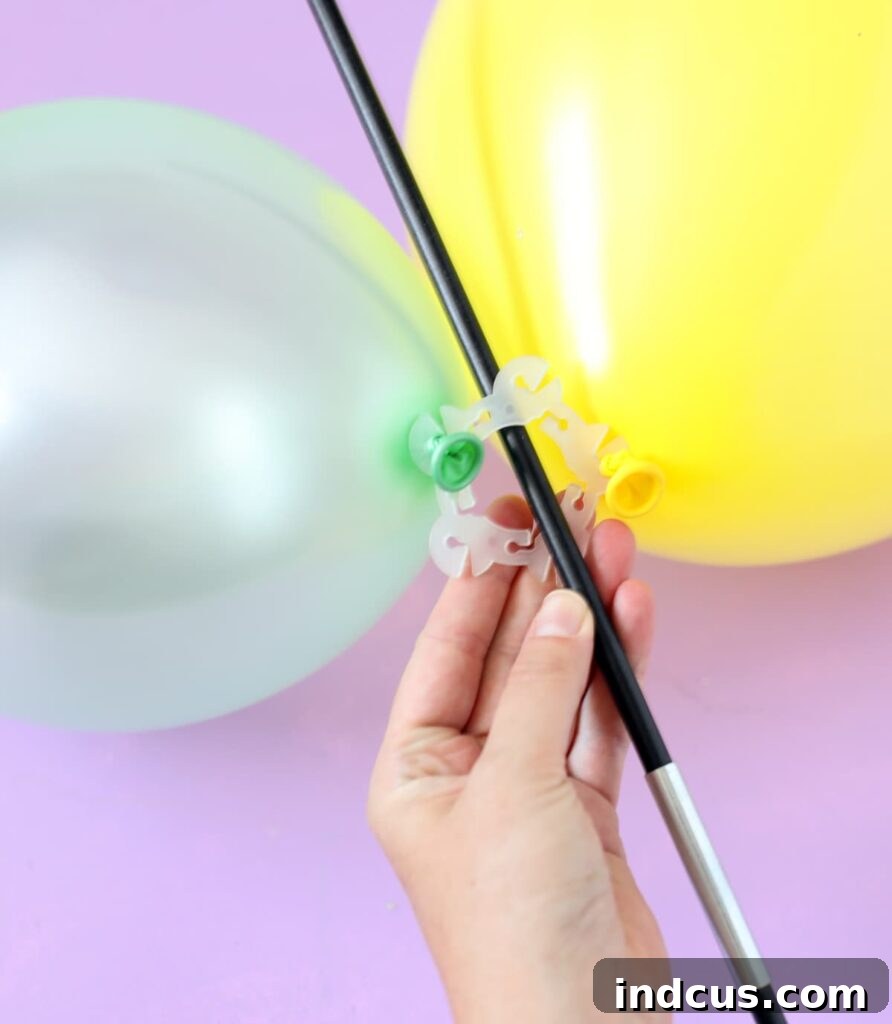
- Plastic Balloon Clips (or Rings): These small clips are ingeniously designed to hold groups of balloons, which then slide onto the main rod.
- Handheld Balloon Pump (usually included): While it works in a pinch, there’s a better option.
- Electric Balloon Pump: This is hands down the most crucial upgrade you can make! I cannot emphasize this enough. While your kit might come with a manual pump, an electric pump will save you hours of strenuous effort and ensure your balloons are consistently inflated. It’s a small investment (around $18) that you’ll thank yourself for every time you use it. This powerful tool is reusable for countless future parties, making it incredibly cost-effective in the long run.
Balloons: The Heart of Your Arch Design
- Assorted Balloons (roughly 60-80 count): The quantity can vary based on the desired fullness of your arch and the size of your balloons. For a standard tabletop arch, aiming for a range of 60-80 balloons will give you a lush, abundant look. Consider purchasing a mix of sizes (e.g., 5-inch, 10-inch, 12-inch, and maybe a few 18-inch) to add dimension and visual interest.
Pro Tip for Balloon Sourcing: I’ve found that big box retailers like Walmart and craft stores such as Hobby Lobby often offer the best selection of colors, patterns, and balloon sizes at competitive prices. Always buy a few extra balloons than you think you’ll need, just in case some pop during inflation or assembly.
Optional Tools for a Flawless Finish (Highly Recommended!)
- Balloon Glue Dots or Strip: These can be incredibly helpful for filling in any small gaps in your arch, attaching smaller balloons for extra texture, or securing embellishments.
- Fishing Line or Clear String: Useful for adding extra stability to your arch, especially if it’s going to be in a high-traffic area, or for attaching larger accent balloons.
- Command Hooks (Small): If your table or counter edge isn’t perfectly flat or you want extra reinforcement for the clamps, small command hooks can provide additional anchoring points on the underside.
- Scissors: For opening balloon bags, cutting string, or other adjustments.
Step-by-Step Guide to Assembling Your DIY Tabletop Balloon Arch
Now that you have all your supplies, let’s dive into the fun part: bringing your balloon arch to life! Follow these simple steps for a seamless assembly.
Step 1: Inflate with Ease (and Volume!)
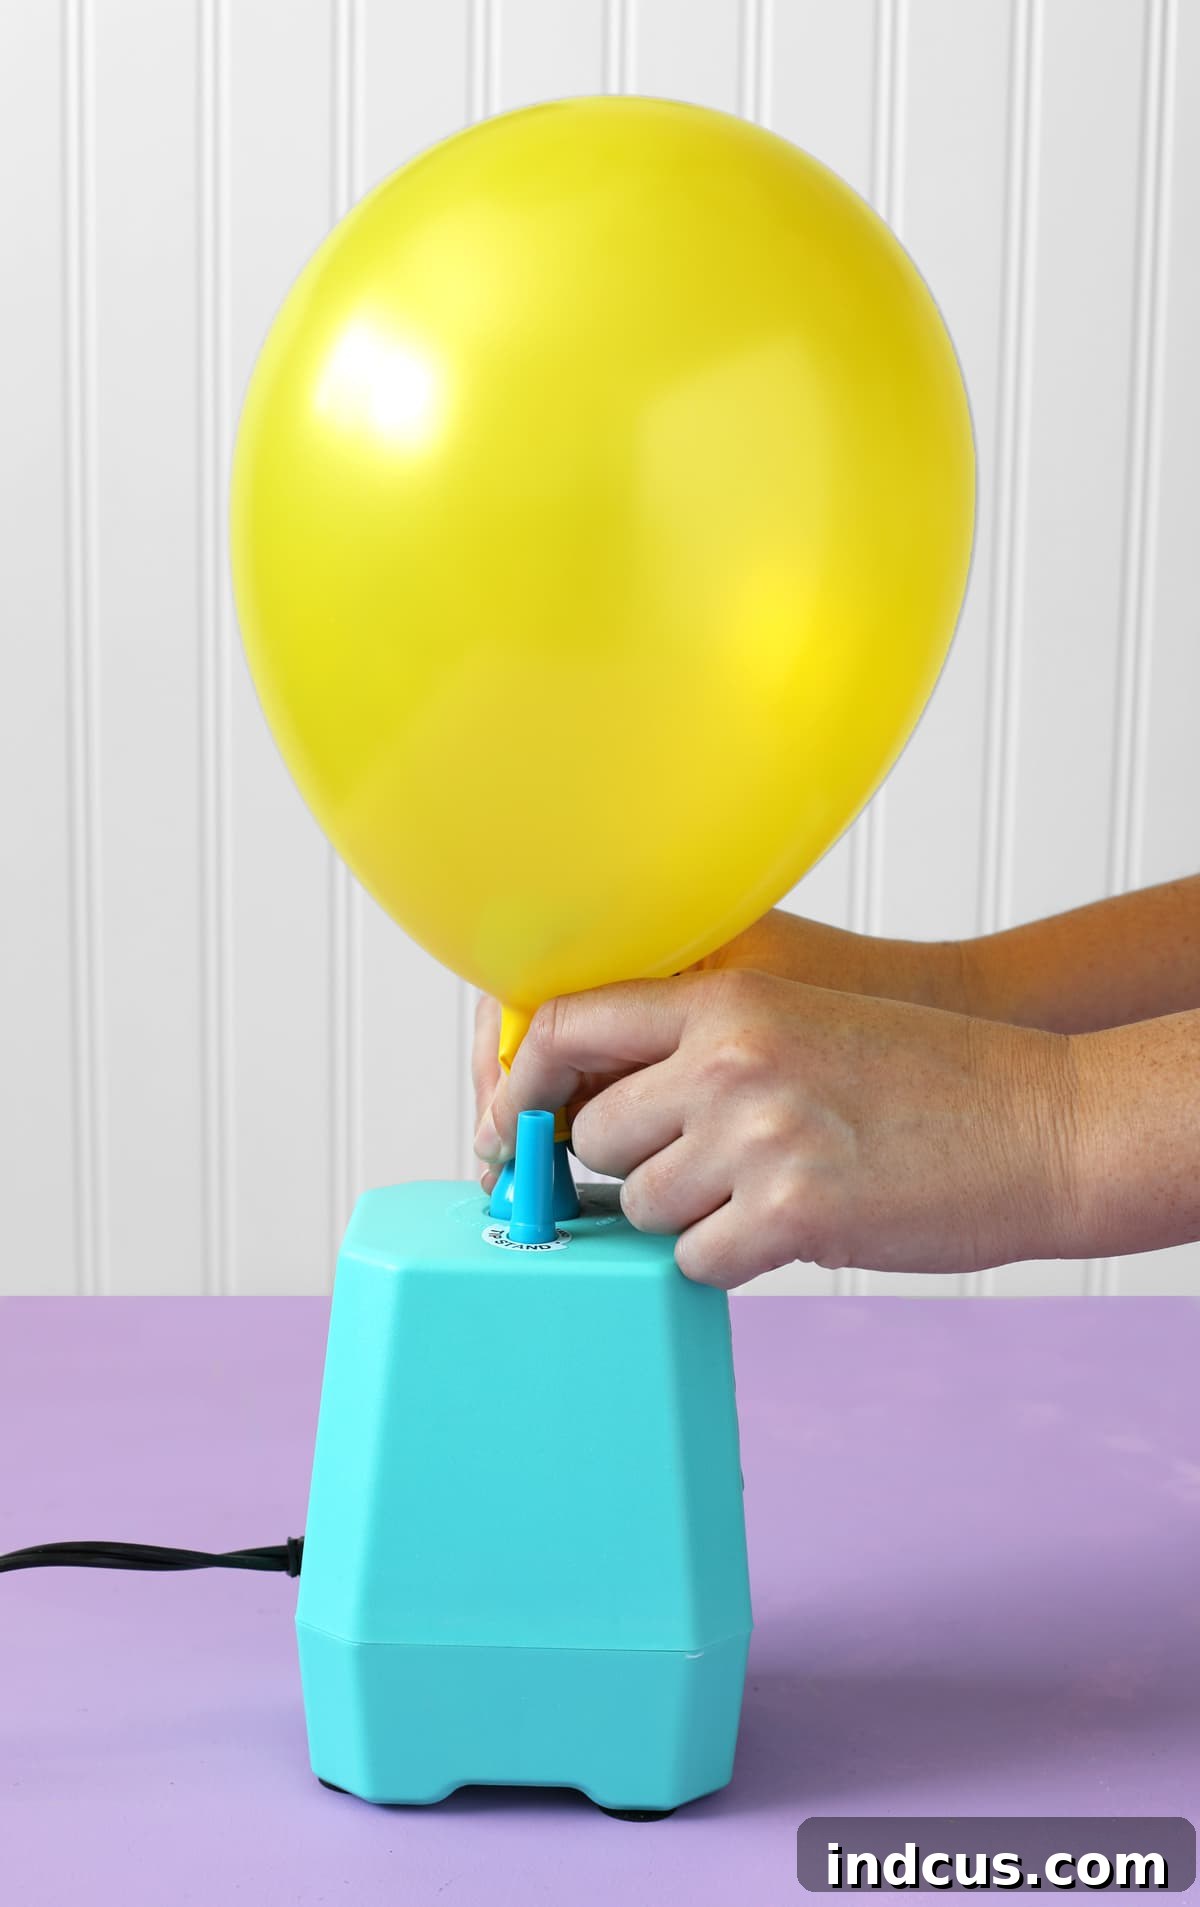
This is where your electric balloon pump truly shines. Set up your pump on a hard, flat surface (important: avoid carpet directly under the pump, as it can block ventilation and cause overheating). Turn on some music or a movie, and start inflating your balloons! Aim for a good mix of sizes if you’re using various dimensions. You’ll be surprised how quickly you can get through a large quantity with the electric pump. Don’t overinflate them; they should be firm but still have a little give. Tie each balloon securely once inflated.
Step 2: Group and Clip Your Balloons for Impact
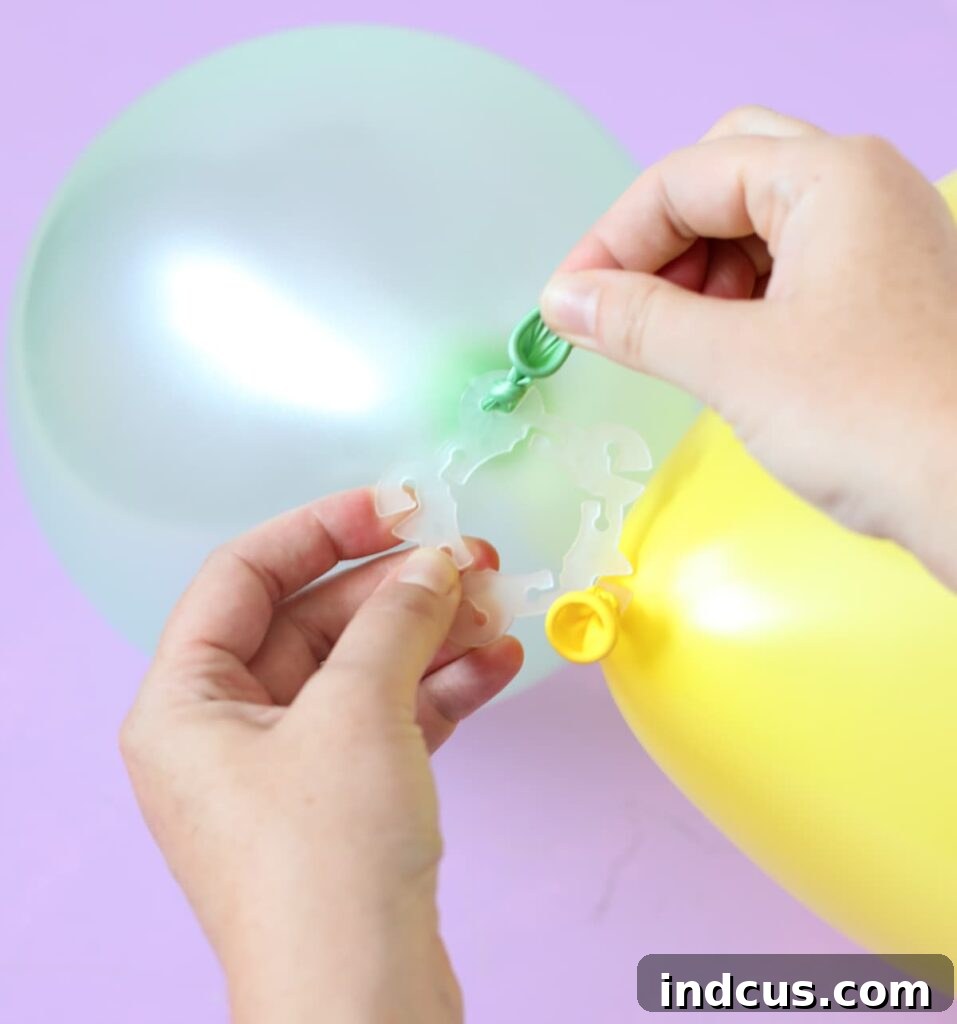
Once you have a substantial pile of inflated balloons, begin grouping them onto the plastic balloon clips. The clips are designed to hold multiple balloons by their tied necks. For a visually appealing and random design, I typically grouped three or four balloons of assorted colors and sizes onto each clip. You can also create a more patterned look by alternating specific colors or sizes if that suits your theme. Ensure the balloons are snugly attached to the clip so they don’t easily fall off.
Step 3: Secure Your Arch Base to the Tabletop
Take the adjustable clamps from your balloon arch kit and secure one to each end of your chosen table or kitchen counter. Make sure they are firmly tightened and stable. Choose a spot where the arch will have maximum visual impact, typically at the center or one end of a serving table.
Step 4: Assemble the Arch Structure and Add Balloons
This step can be done solo, but it’s significantly easier and faster with an extra set of hands!
With a Helper: Connect the pieces of the collapsible metal rod to form the arch. Slip one end of the fully assembled rod into the hole of one secured clamp. Have your helper hold the other end of the arch rod, forming an arc. While they hold it steady, you can easily slide your balloon groupings onto the rod. Arrange them as you go to ensure even distribution and a full appearance.
Working Solo: If you don’t have a helper, assemble the metal rod and lay it flat on the ground. Carefully slide all your balloon groupings onto the rod while it’s flat. Once all balloons are in place, lift the entire arch structure, slip one end into a clamp, then gently bend the rod to insert the other end into the second clamp. This method requires a bit more care to avoid popping balloons.
Step 5: Final Touches and Stability Checks
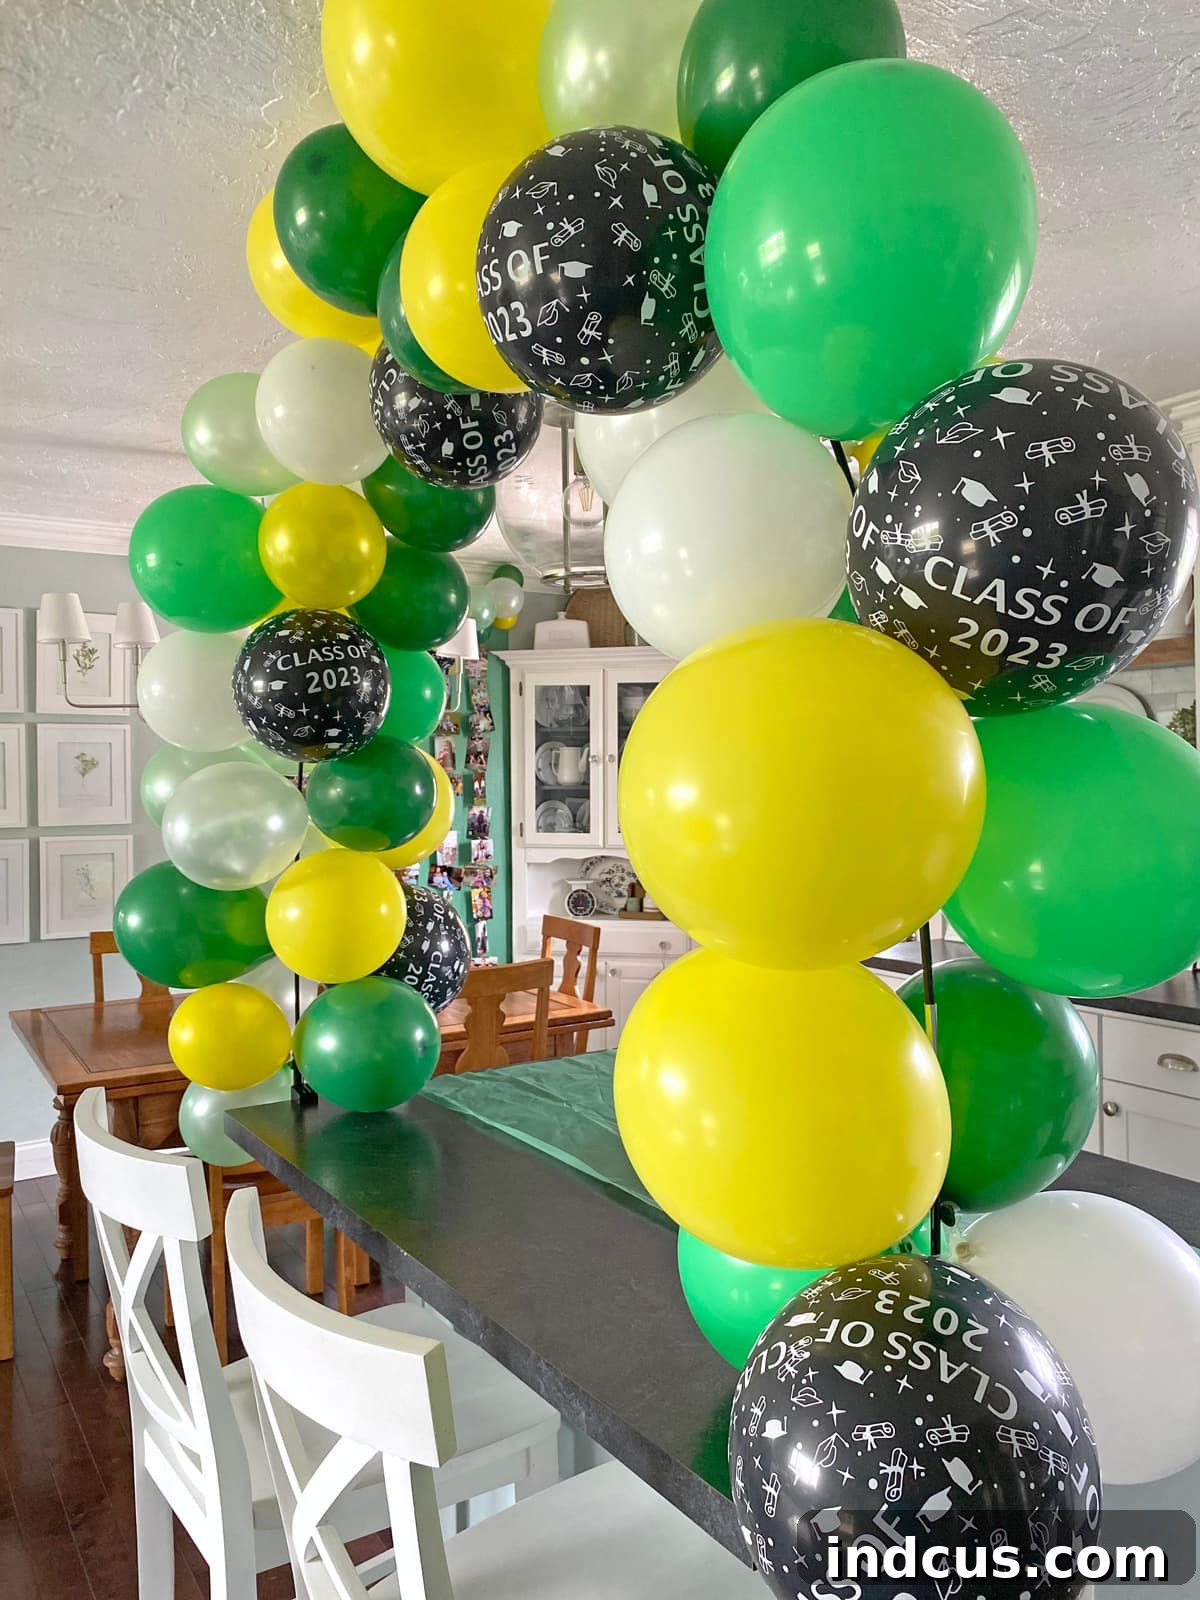
At this point, you might realize (as I often do, LOL!) that you need to inflate a few more balloons to fill in any sparse areas or add extra fullness. Once you’re satisfied with the overall look and density of your arch, take a few pieces of black Duck Tape (or any strong tape that blends with your arch kit) and wrap them around the points where the metal rods connect to the clamps. This provides an extra layer of security, ensuring the arch won’t accidentally shift or come loose during your party, especially if guests might bump into the table. Step back and admire your beautiful creation!
Doesn’t it look absolutely fantastic?! I was genuinely thrilled with the significant impact this simple decoration had on the overall ambiance of the graduation luncheon. The house felt incredibly festive and ready for a big celebration, and that’s precisely the kind of vibe I love!
Design Tips & Customization Ideas for Your Balloon Arch
One of the joys of DIY party decor is the ability to customize it to perfectly suit your event. Here are some ideas to make your tabletop balloon arch truly unique:
Color Palettes & Themes:
- Graduation: School colors (e.g., gold and black, blue and white).
- Baby Shower: Pastel blues/pinks, greens, or gender-neutral whites and yellows.
- Birthday: Bright, fun multi-colors or a specific theme (e.g., mermaid pastels, superhero reds/blues).
- Holiday: Reds and greens for Christmas, oranges and purples for Halloween, metallics for New Year’s.
Mixing Sizes & Textures:
Don’t be afraid to incorporate balloons of different sizes (5-inch, 10-inch, 12-inch, 18-inch) to create depth and visual interest. You can also mix matte, metallic, and clear confetti balloons for varied textures.
Adding Embellishments:
- Foil Balloons: Integrate number balloons (for birthdays/anniversaries) or letter balloons (spelling a name or “Congrats!”) into the arch.
- Fresh or Faux Flowers: Weave small floral stems or artificial flowers throughout the balloons for an elegant touch.
- Fairy Lights: String battery-operated LED fairy lights through the arch for a magical glow, especially beautiful for evening events.
- Ribbons & Tassels: Tie coordinating ribbons or tassels to the balloon clips for extra flair.
- Greenery: Add faux eucalyptus or other greenery for a natural, organic feel.
Perfect Placement:
Consider where your arch will have the most impact. Popular spots include:
- Above the dessert table
- As a backdrop for a gift table
- To frame a beverage station
- As a mini photo booth backdrop
Longevity & Troubleshooting Your Balloon Arch
While balloon arches are relatively sturdy, knowing a few tips can help your creation last longer and address any minor hiccups:
- How Long Do Balloons Last? Air-filled latex balloons generally last anywhere from 3 days to a week, sometimes even longer, depending on environmental factors. Keep them away from direct sunlight, extreme temperatures, and sharp objects for maximum longevity.
- Setting Up in Advance: You can typically inflate your balloons and assemble your arch 12-24 hours before your event without significant deflation, especially if stored indoors in a cool, dark place.
- Dealing with Popped Balloons: It happens! Always have a few extra balloons on hand. If a balloon pops, you can usually untie it from the clip and replace it with a fresh one, or simply use balloon glue dots to attach a new balloon to the existing cluster.
- Sagging Arch: If your arch starts to sag over time, it might be due to a few deflated balloons. Check for any obvious leaks. You can also discreetly use fishing line tied to an overhead fixture (if safe and possible) to give it extra lift in the middle, or reinforce the clamps.
Frequently Asked Questions (FAQ) About DIY Tabletop Balloon Arches
How many balloons do I need for a tabletop arch?
For a standard tabletop arch (approximately 5-6 feet wide), 60-80 balloons will create a full, impactful look. This count can vary depending on balloon sizes and how densely you want the arch to appear.
Can I make this arch in advance?
Yes, you can inflate the balloons and assemble the arch 12-24 hours before your event. For best results, store the finished arch indoors in a cool, temperature-controlled environment away from direct sunlight.
What kind of balloons are best for an arch?
Standard latex balloons (5-inch, 10-inch, 12-inch) are ideal for the bulk of the arch. You can add foil balloons or larger latex balloons (18-inch) for accent pieces and extra flair.
How do I make the arch look fuller?
Use a mix of balloon sizes, adding smaller balloons with glue dots into gaps. Ensure you have enough balloons to create a dense, layered look, and group 3-4 balloons per clip.
Is the electric pump really necessary?
While you *can* use a manual pump, an electric balloon pump is highly recommended. It saves significant time and effort, especially when inflating 60+ balloons, and ensures consistent inflation.
Beyond the Tabletop: Explore More DIY Decor
If you’ve enjoyed the process of creating this tabletop balloon arch and have a wedding or a more formal event on the horizon, I encourage you to check out my DIY Floral Table Arch project. It’s the elegant, dressed-up cousin of this balloon arch, offering a sophisticated alternative that’s equally satisfying to create and impressive to behold!