Enhance Your Home’s Curb Appeal: A Comprehensive Guide to Installing and Planting Window Boxes
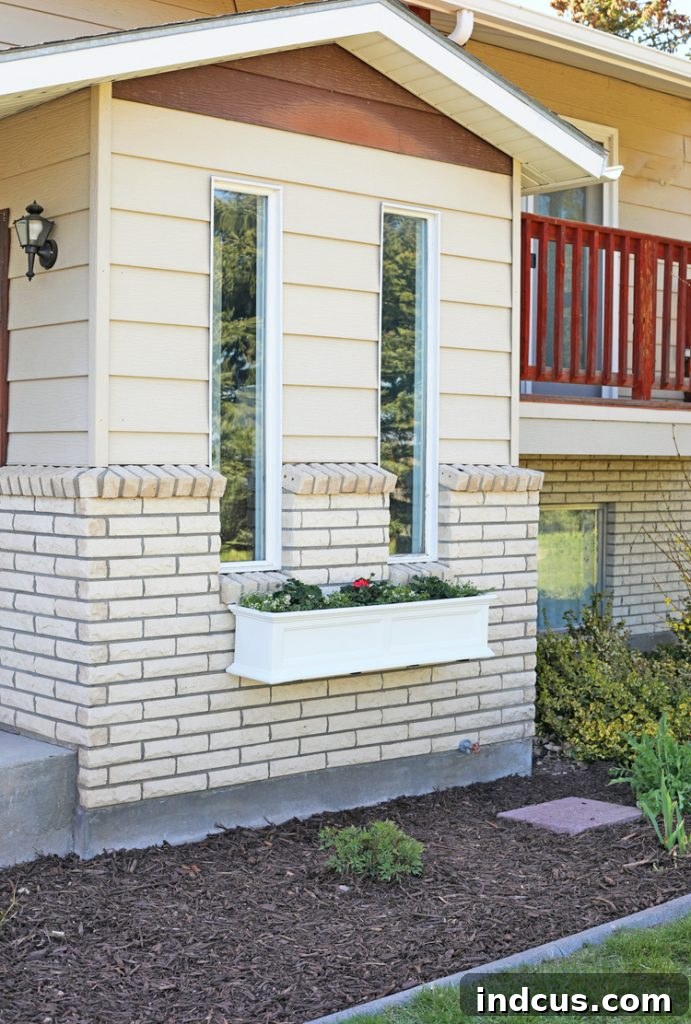
Transforming the exterior of your home is often about focusing on those charming details that truly make a difference. Few additions bring as much instant curb appeal and personalized style as a beautifully planted window box. These versatile planters offer a splash of color and life, effortlessly elevating your home’s aesthetic, whether it’s nestled in a quaint cottage or adorning a modern facade. For years, I envisioned adding a window box to our home, a perfect spot just waiting to be adorned. This past week, that vision finally became a reality, and the impact is already remarkable!
Installing a window box might seem like a daunting task, but with the right guidance and a bit of effort, it’s a rewarding DIY project that can dramatically enhance your home’s exterior. Beyond the installation, selecting the ideal flora to fill your new planter is an art in itself, turning a simple box into a vibrant, living display. This comprehensive guide will walk you through the entire process, from choosing the perfect window box and securely installing it, to mastering the “thriller, filler, spiller” planting technique to create breathtaking floral arrangements that will be the envy of your neighborhood.
Choosing the Perfect Window Box for Lasting Beauty and Convenience
The first step in achieving your dream window box display is selecting the right planter. There’s a vast array of options available, each offering unique benefits in terms of material, design, and functionality. My recent purchase was a 48-inch white vinyl window box from Wayfair, and I couldn’t be happier with the choice. This particular model boasts a hidden self-watering reservoir at the bottom, a feature that significantly reduces the frequency of watering, making plant care much more manageable, especially during hot summer months or for those with busy schedules. It’s a game-changer for maintaining lush, healthy plants with minimal fuss.
When considering your options, think about the material. Vinyl window boxes, like mine, are incredibly durable, weather-resistant, and require little to no maintenance, resisting fading, cracking, and peeling. Other popular materials include wood (offering a classic, rustic charm but requiring more upkeep like sealing and painting), metal (sleek and modern, but can heat up quickly in direct sun), and composite materials (mimicking natural looks with enhanced durability). The Mayne Inc. self-watering window box also comes in various lengths, such as 36-inch and 60-inch, and a selection of colors, ensuring there’s a size and shade to complement almost any architectural style. Browsing through the extensive collection of outdoor planters on Wayfair’s site or at your local garden center can provide endless inspiration for finding the perfect match for your home.
Beyond material, consider the size of your window. Measure the width of the window frame or the space beneath it where you intend to install the box. A good rule of thumb is to choose a window box that is roughly the same width as your window, or slightly wider, for a balanced and aesthetically pleasing look. A box that is too small can look lost, while one that is disproportionately large might overwhelm the window. Thinking about drainage is also crucial; even self-watering boxes typically have overflow holes to prevent root rot. With the right selection, your window box will not only look stunning but also contribute to the long-term health of your plants and the overall ease of maintenance.
Step-by-Step Guide: Securely Installing Your Window Box Planter
Once you’ve chosen your ideal window box, the next step is a careful and secure installation. Proper mounting is essential for both the safety of the planter and the longevity of its contents. This guide focuses on installation onto a brick facade, which requires specific tools and techniques to ensure a sturdy attachment. Always prioritize safety by wearing appropriate eye protection and ensuring you have a stable ladder if working at height.
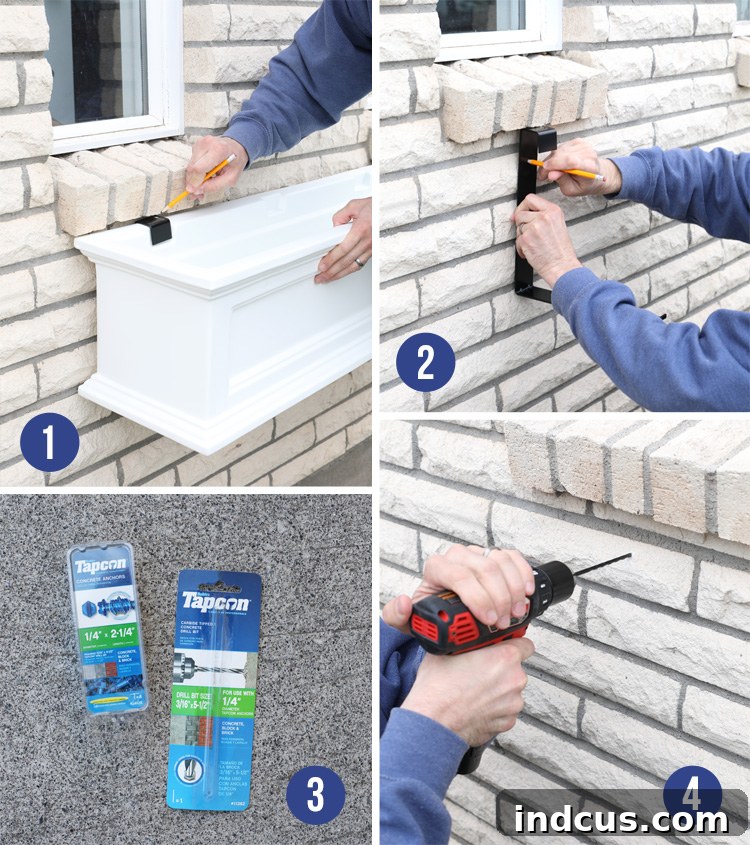
- Determine Optimal Placement and Mark Bracket Locations: Begin by holding your window box in the desired position beneath the window. Use a pencil to lightly mark where the L-brackets, typically provided with the window box, will be positioned. Ensure there is enough clearance from the window sill for watering and plant growth, and that the box will appear centered and level.
- Precisely Mark Drill Holes: Once the bracket positions are finalized, use a pencil to mark the specific spots where you will drill holes through the brackets into your wall. Take your time to ensure accuracy; these marks will guide your drilling.
- Gather Masonry-Specific Tools: If you are attaching the window box to a brick, stone, or concrete surface, you will need specialized hardware. Purchase high-quality masonry screws (often known as tapcon screws) and a corresponding masonry drill bit. These are designed to penetrate hard, dense materials effectively and securely. Standard wood or metal screws and bits will not work and can damage your tools or the wall. Your local home improvement store will have these items.
- Carefully Pre-Drill Holes: Using your power drill fitted with the masonry bit, carefully pre-drill holes at each marked location. It is crucial to hold the drill at a consistent 90-degree angle to the wall to ensure straight holes. Drill slowly and apply steady pressure. For optimal results and to prevent the bit from overheating, occasionally pull the drill bit out of the hole to clear dust.
- Attach the Two Outside Brackets: Begin by securely attaching the two outermost L-brackets using your masonry screws. Drive the screws firmly into the pre-drilled holes until the brackets are snug against the wall. Do not overtighten, as this can strip the holes or damage the brackets.
- Ensure Leveling and Attach Center Brackets: With the outer brackets in place, use a reliable level to ensure that the remaining center brackets (if your box requires more than two) are aligned perfectly. Mark and pre-drill for these, then attach them securely with masonry screws, ensuring the entire mounting system is perfectly horizontal. A level installation is key for aesthetics and preventing water from pooling unevenly.
- Slip the Window Box Onto the Brackets: Once all brackets are firmly installed, carefully lift your window box and slip it onto the brackets. Many modern window boxes are designed to click securely into place, providing an audible confirmation of proper attachment. Ensure all clips or slots engage fully.
- Final Check and Secure Installation: Give the installed window box a gentle tug and push to confirm it is completely stable and shows no signs of wobbling. Ensure it’s level and flush against the wall. Congratulations! Your window box is now securely hung and ready for planting, adding instant charm to your home.
Designing a Dazzling Display: The Thriller, Filler, Spiller Method
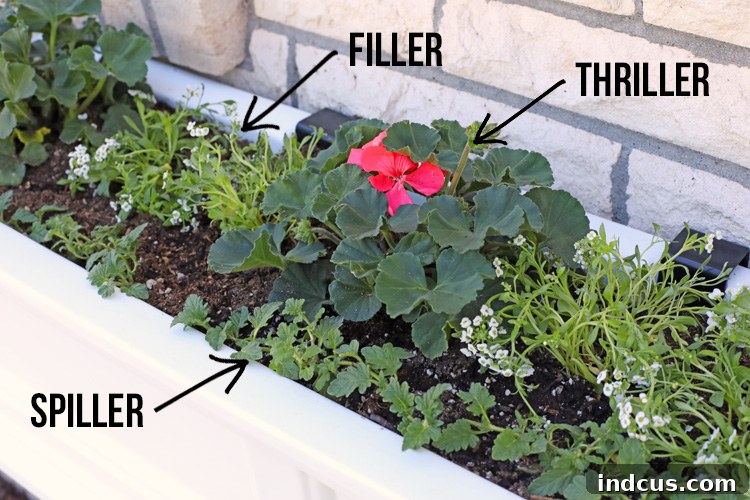
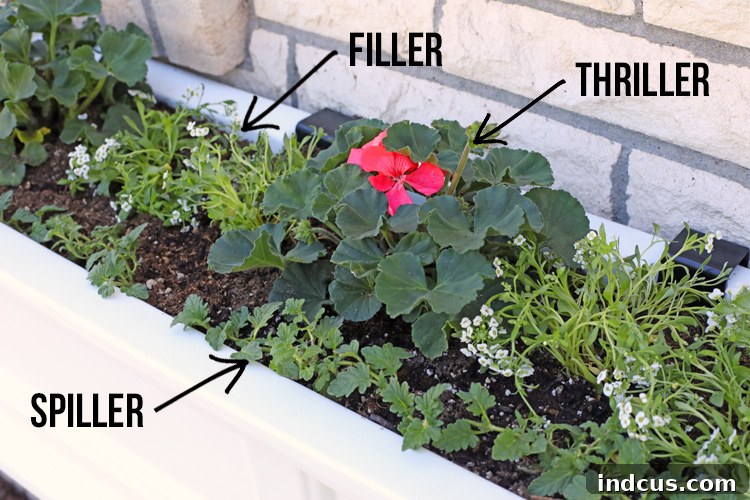
With your window box now securely installed, the exciting part begins: selecting and arranging your plants! To create a truly stunning and professional-looking floral display, a proven design principle is to incorporate “thriller, filler, and spiller” plants. This method ensures a balanced, dynamic, and visually appealing arrangement that offers height, volume, and graceful cascades.
Thrillers are the stars of your window box. These are the tallest and most dramatic plants, typically ranging from 12 to 18 inches in height, that provide vertical interest and act as the focal point of your arrangement. They draw the eye upward and add a sense of grandeur to the composition. Think about plants with striking flowers or interesting foliage that will stand tall and proud.
Fillers are medium-sized plants that, as their name suggests, fill in the space around the thriller plants. They typically have smaller flowers or lush foliage and grow in a mounding or bushy habit, adding volume, texture, and continuity to the display. Fillers soften the overall look and bridge the gap between the taller thrillers and the trailing spillers, creating a full and abundant appearance.
Spillers are trailing plants that cascade gracefully over the sides of the window box. They add a touch of elegance, softness, and drama, creating a lush, overflowing effect that softens the hard edges of the planter and connects the display to its surroundings. Spillers provide movement and complete the three-dimensional look, making the window box truly come alive.
By thoughtfully combining these three types of plants, you ensure a design that is not only beautiful but also harmonious and robust. When choosing your plants, consider their sun exposure requirements, water needs, and bloom times to ensure they will thrive together and provide continuous beauty throughout the growing season.
Best Flowers For Window Boxes: A Curated List for Every Role
Choosing the right plants for your window box is key to a vibrant and long-lasting display. Here’s a curated list of popular and effective options for each category, offering a range of colors, textures, and growth habits to inspire your design. Remember to always check the specific light and water requirements for each plant to ensure compatibility within your box.
Thrillers: The Vertical Stars
- Geraniums: Classic, robust, and available in vibrant reds, pinks, and whites. They offer continuous blooms and thrive in sun.
- Snapdragons: Provide architectural height with unique, upright flower spikes in a variety of hues. Excellent for adding visual interest.
- Dianthus: Known for their delicate, often fringed petals and spicy fragrance. They offer beautiful color and a charming, cottage garden feel.
- Bachelor’s Button: Cheerful, cornflower-like blooms that add a rustic touch and come in shades of blue, pink, and white.
- Calendula: Bright, daisy-like flowers, typically in oranges and yellows, that are easy to grow and add a sunny disposition.
- Lobelia (upright varieties): Offers a profusion of small, delicate flowers, often in blues, purples, or whites, creating a soft, airy look.
- Begonia (upright varieties): Ideal for shadier spots, offering continuous blooms and lush foliage in a spectrum of colors.
- Diascia: Features numerous tiny, slipper-shaped flowers that add a delicate texture and come in soft pinks, oranges, and whites.
- Godetia: Known for their satiny, cup-shaped flowers in vibrant shades of pink, red, and white, bringing a touch of glamour.
- Coleus: Valued for its incredibly diverse and colorful foliage rather than flowers, providing striking patterns and textures.
- Impatiens (upright varieties): Perfect for shady areas, offering abundant, colorful blooms that brighten any corner.
Fillers: The Harmonious Volume Creators
- Sweet Alyssum: Creates a delicate, fragrant carpet of tiny white, pink, or purple flowers. Excellent for softening edges and attracting pollinators.
- Pansies/Violas: Beloved for their cheerful “faces” and wide range of colors. They thrive in cooler weather, making them great for spring or fall.
- Marigolds: Easy-to-grow annuals with bright orange, yellow, or red blooms, known for their pest-repelling qualities and sunny disposition.
- Baby’s Breath: Delicate, airy white flowers that provide a cloud-like texture and perfectly complement other blooms.
- Texas Bluebonnet: A striking native with beautiful blue spires, though often challenging outside its natural habitat.
- Painted Tongue (Salpiglossis): Features unique, trumpet-shaped flowers with intricate veining, adding an exotic touch.
- Dusty Miller: Prized for its velvety, silvery-gray foliage that provides a cool contrast to brighter flowers and adds texture.
- Licorice Plant (Helichrysum petiolare): Offers soft, silvery-green or variegated foliage with a slightly fuzzy texture, excellent for contrast and filling.
Spillers: The Graceful Cascaders
- Verbena (trailing varieties): Features clusters of small, colorful flowers that beautifully spill over the edge, attracting butterflies.
- Sweet Potato Vine (Ipomoea batatas): Offers striking foliage in shades of chartreuse, black, or variegated patterns, providing lush cascades.
- Vinca Vine (Catharanthus roseus or Vinca major): Classic trailing plant with glossy green leaves, sometimes variegated, and delicate flowers (Vinca minor/major) or continuous blooms (Catharanthus).
- Wave Petunias: Exceptionally popular for their vigorous growth and prolific, long-lasting blooms that spill dramatically. Available in a rainbow of colors.
- Lantana (trailing varieties): Features clusters of small, brightly colored flowers that attract butterflies and hummingbirds, excellent for sunny spots.
- Calibrachoa (Million Bells): Resembles miniature petunias, offering an abundance of small, trumpet-shaped flowers in vivid colors that trail beautifully.
- Bacopa: Produces a profusion of tiny white, pink, or blue flowers that create a delicate, lacy cascade.
- Nasturtium (trailing varieties): Edible flowers and leaves add a peppery flavor to salads and offer vibrant color as they trail.
- California Bluebells (Phacelia campanularia): Features intensely blue, bell-shaped flowers, creating a stunning visual impact as it spills.
- Creeping Zinnias (Sanvitalia procumbens): Small, daisy-like yellow flowers that create a dense mat and trail beautifully.
- Creeping Jenny (Lysimachia nummularia): Bright chartreuse-green foliage forms a dense, cascading mat, perfect for adding a pop of vibrant color.
For your convenience, a printable version of this comprehensive plant list is available at the bottom of this post.
To dive deeper into the characteristics and specific growing instructions for each plant, a fantastic resource is the Better Homes and Gardens Plant Encyclopedia. It offers detailed descriptions, images, and care tips that will help you make informed choices for your window box’s unique conditions.
Maximizing Your Display: Essential Planting and Care Tips
Once you’ve selected your plants, it’s time to bring your vision to life! When it comes to window boxes, remember this golden rule: MORE IS MORE. Unlike garden beds where spacing is critical for individual plant growth, window boxes thrive on density. Ignore the suggested spacing on plant tags and fill your window boxes generously. A densely planted box will create a lush, overflowing effect from day one, looking vibrant and full, rather than sparse and “scraggly.” Too few flowers will leave visible gaps and can make the arrangement look unfinished or sad. Aim for a luxurious, abundant display!
Soil Matters: Use a high-quality potting mix specifically designed for containers. This type of soil is lighter, provides excellent drainage, and contains essential nutrients to support vigorous plant growth in a confined space. Avoid using garden soil, which can compact and hinder drainage.
Watering Wisdom: Even with a self-watering reservoir, regular monitoring is crucial. Check the soil moisture daily, especially during hot, sunny periods. The reservoir will reduce the frequency, but it won’t eliminate the need to water entirely. Ensure the plants are getting adequate moisture without becoming waterlogged. Signs of underwatering include wilting, while overwatering can lead to yellowing leaves and root rot.
Feeding for Flourishing Blooms: Window box plants, especially annuals, are heavy feeders. They rapidly deplete the nutrients in their limited soil. Supplement your potting mix with a slow-release granular fertilizer at planting, or use a liquid feed every 2-4 weeks throughout the growing season. This will encourage continuous blooming and healthy foliage.
The Power of Deadheading: To promote continuous flowering and maintain a tidy appearance, regularly deadhead your plants. This involves pinching or snipping off spent flowers. This simple act prevents the plant from expending energy on seed production and redirects it towards producing more beautiful blooms.
Pest Patrol: Keep an eye out for common pests like aphids or spider mites. Early detection allows for easier treatment with insecticidal soaps or neem oil, minimizing damage to your beautiful display.
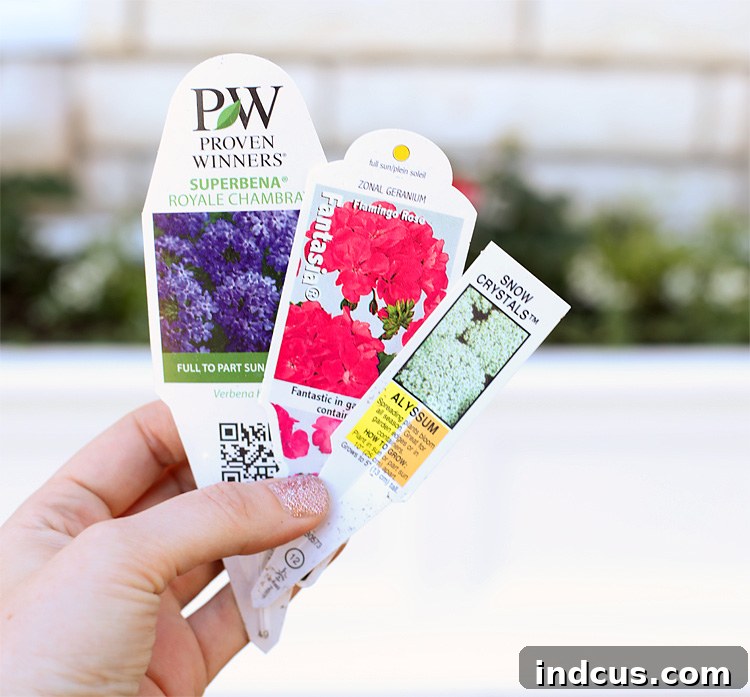
For my own window box, I selected classic geraniums as my thriller, complemented by the delicate charm of sweet alyssum as my filler, and the vibrant verbena as my spiller. While they may appear modest now, I eagerly anticipate their growth and fullness, knowing they will soon create a truly enchanting display.
Beyond the Box: A Vision for Home Transformation
The installation of this window box is just one “baby step” in a much larger journey of transforming our home’s exterior. There’s still a considerable list of projects on the horizon: the faded brown paint on the eaves is definitely due for an update, the balcony railing needs a fresh coat, and a new front door is high on the list. I also dream of adding more flowers to our existing garden beds, replacing those two slot windows with one expansive picture window, and, if we’re truly dreaming big, re-siding the entire house and installing a new roof. The list, as it often does for homeowners, goes on!
However, it’s truly inspiring to witness the significant impact even a single improvement can make. Just adding the window box, alongside tackling some persistent weeds and refreshing the flower beds with new bark mulch, has already brought a noticeable uplift to our home’s curb appeal. These small victories are powerful motivators on the path to a fully realized vision.
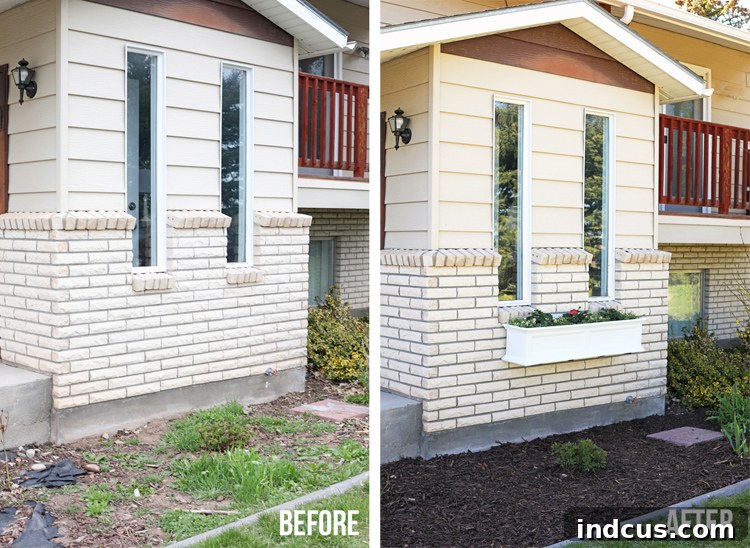
Every journey begins with a single step, and we’ll get there someday! In the meantime, the joy and beauty that this new window box brings are immeasurable. It serves as a constant reminder that thoughtful details can truly transform a house into a cherished home. We encourage you to embark on your own window box project and experience the instant charm it adds.
Click here to get afree printable listof thrillers, fillers, and spillers for window boxes, perfect for your next garden center visit!