
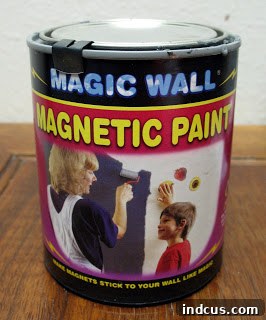
For countless creative individuals and DIY enthusiasts, the quest for innovative materials that can transform ordinary projects into extraordinary interactive experiences is an ongoing journey. One such product that has captured the imagination of crafters, educators, and interior designers alike is magnetic paint. This seemingly simple yet revolutionary paint allows you to turn almost any surface into a magnetic canvas, opening up a world of possibilities for both functional and decorative applications. Specifically, many of you have reached out with questions regarding the particular brand and type of magnetic paint I utilized for my popular magnetic quiet book project. To demystify the process and provide clarity, I wanted to share a detailed look at the product itself, ensuring everyone knows exactly what to look for. I discovered this versatile paint tucked away on a bottom shelf in the paint section of my local Michael’s craft store. It wasn’t immediately obvious, and I even had to enlist the help of a sales associate who, thankfully, knew exactly where to point me. This experience highlights that while magnetic paint might not always be prominently displayed, it’s a readily available and incredibly useful tool for a myriad of projects. Delving into the world of magnetic paint can truly elevate your crafting, allowing for dynamic, repositionable elements that add immense value and engagement to your creations.
Unlocking Creativity: A Comprehensive Guide to Magnetic Paint for DIY Projects
Magnetic paint has emerged as a revolutionary product in the DIY and crafting world, offering an ingenious way to transform ordinary surfaces into interactive, magnetic canvases. Whether you’re a seasoned crafter, a parent looking for engaging educational tools, or an interior designer seeking unique home decor solutions, magnetic paint provides an unparalleled medium for creativity. This guide aims to demystify magnetic paint, offering insights into its composition, application, and a vast array of potential uses, ensuring your next project is not only successful but truly inspiring.
What Exactly is Magnetic Paint? The Science Behind the Magic
At its core, magnetic paint is a latex-based primer infused with fine, iron particles. It’s these microscopic iron components that give the paint its unique ability to attract magnets. Unlike traditional paints that merely provide color and protection, magnetic paint creates a ferromagnetic surface. When magnets are placed against a surface coated with this special paint, they are attracted to the embedded iron particles, allowing them to stick firmly. The paint itself, as I discovered, tends to be a distinct dark grey color and possesses a significantly thicker consistency than standard wall paint, due to the high concentration of metallic dust within its formula. This unique composition is what grants it the power to hold magnets, transforming any wall, board, or even a page in a quiet book into an interactive display.
Why Magnetic Paint is a Game-Changer for Quiet Books and Kids’ Crafts
For parents and educators, magnetic paint is an invaluable resource, especially when creating custom learning tools and toys. My magnetic quiet book project perfectly illustrates its potential. Here’s why it stands out:
- Interactive Learning: Magnetic pages allow for movable pieces like letters, numbers, shapes, or characters, making learning hands-on and engaging. Children can physically manipulate elements, fostering better understanding and retention.
- Versatile Play: The ability to reposition items infinitely means that stories can be changed, puzzles solved, and scenes created in countless ways, extending the play value of any craft. This adaptability encourages imaginative play and critical thinking.
- Durability and Longevity: Once applied and sealed (especially with lamination for quiet books), the magnetic surface is robust. Magnetic pieces can be used, removed, and reused hundreds of times without damaging the underlying surface, making projects long-lasting.
- Sparking Imagination: From creating dynamic farm scenes to intricate dress-up dolls, magnetic paint empowers children to be the architects of their own play and learning environments, fostering creativity and problem-solving skills.
The thick, dark grey paint I used was ideal for backing pages where I wanted elements to stick, providing a reliable magnetic base for interactive components within the quiet book. Despite the initial challenge of keeping pages from wrinkling during application, the end result of an engaging, durable, and infinitely reusable book was well worth the effort.
Choosing the Right Magnetic Paint: What to Look For
Not all magnetic paints are created equal. To ensure the success of your project, consider these factors:
- Magnetic Strength: This is paramount. Look for paints that boast high iron content for a stronger magnetic pull. Some brands offer different strengths, so choose one appropriate for the weight of the magnets you intend to use.
- Color and Finish: While most magnetic paints are dark grey, some brands offer tinted versions or specific topcoats that can alter the final appearance. Remember, you can always paint over magnetic paint with your desired color.
- Brand Reputation and Reviews: Research reputable brands known for quality and effective magnetic properties. Reading user reviews can provide real-world insights into a product’s performance.
- Coverage and Drying Time: Pay attention to the manufacturer’s recommendations for coverage per can and the recommended drying time between coats. These factors will influence your project timeline and budget.
My experience at Michael’s showed that even within a common craft store, finding the specific magnetic paint might require a bit of searching or asking for assistance, as it can sometimes be a specialized item not displayed prominently.
Preparing Your Surface for Magnetic Paint: Essential Steps for Success
Proper surface preparation is key to achieving a smooth, durable, and effective magnetic surface. While my quiet book pages presented unique challenges, these general principles apply:
- Cleanliness is Key: Ensure the surface is clean, dry, and free from dust, grease, or any loose particles. For quiet book pages, this means clean paper or cardstock.
- Sanding (If Applicable): For non-paper surfaces like walls, a light sanding can help the paint adhere better, especially if the surface is glossy.
- Priming (Optional but Recommended): While magnetic paint often acts as its own primer, a dedicated primer can sometimes improve adhesion and provide a more uniform base, particularly on porous or uneven surfaces.
- Protecting Your Workspace: Magnetic paint can be messy. Lay down drop cloths or old newspapers to protect your work area from spills and splatters.
For my quiet book, the “surface” was paper, and the main challenge was preventing the pages from buckling or wrinkling under the weight and moisture of the thick paint. Using sturdy cardstock and applying the paint carefully was crucial.
Mastering the Application: Techniques for a Flawless Magnetic Finish
Applying magnetic paint requires a slightly different approach than regular paint due to its unique composition and thickness. Here’s a detailed guide based on my experience and best practices:
Step-by-Step Application Guide:
- Stir Thoroughly and Consistently: This is arguably the most critical step. Due to the heavy iron particles, magnetic paint separates quickly. The paint I used was particularly thick and required stirring approximately every sixty seconds to prevent the lead (iron particles) from settling at the bottom of the can. Use a paint stirrer or a stick to mix the paint from the bottom up until it has a uniform consistency.
- Apply Thin, Even Coats: Resist the urge to apply a single thick coat. Multiple thin, even layers will result in a stronger magnetic surface and a smoother finish. For my quiet book, I found that a foam brush was excellent for applying the paint to the backs of the pages, ensuring even coverage without excessive dripping.
- Use the Right Tools: For larger surfaces like walls, a short-nap roller is recommended to spread the paint evenly. For smaller, detailed work like quiet book pages, a foam brush, as I used, or a high-quality synthetic brush works best. Avoid brushes that leave bristles behind.
- Allow Ample Drying Time: Follow the manufacturer’s instructions for drying time between coats. Rushing this step can lead to an uneven finish and compromised magnetic strength. For quiet book pages, I let each side dry completely before flipping to avoid sticking.
- Consider Multiple Layers: For optimal magnetic strength, apply at least 2-3 coats of magnetic paint. Some projects might benefit from 4-5 coats, especially if you plan to paint over it with several layers of regular paint. The more iron particles, the stronger the magnetic pull.
A significant challenge I encountered with the quiet book pages was keeping the paper from wrinkling as the thick, heavy paint dried. To combat this, I found that laminating the pages after the paint had fully cured was incredibly helpful. Not only did it smooth out any lumpy parts and prevent future wrinkling, but it also added a protective, durable layer, perfect for little hands.
Finishing Touches: Enhancing and Protecting Your Magnetic Surface
Once your magnetic paint has dried, you might want to add a topcoat or protective layer, especially for high-traffic areas or craft projects.
- Topcoats for Durability: For walls, you can paint over the magnetic layer with any latex or acrylic paint of your desired color. For a whiteboard effect, consider applying a dry-erase paint topcoat. Just remember that each additional layer of paint will slightly reduce the magnetic pull, so ensure your base magnetic layer is sufficiently strong.
- Laminating for Quiet Books: As mentioned, laminating the quiet book pages was a game-changer. It encased the magnetic paint, preventing wrinkles, offering protection against wear and tear, and creating a smooth, wipeable surface. This step is highly recommended for any paper-based magnetic craft.
- Decorative Overlays: For purely aesthetic projects, you can adhere thin fabric, wallpaper, or decorative paper over the magnetic paint, as long as these materials are not too thick to impede the magnetic attraction.
Beyond Quiet Books: Creative Applications of Magnetic Paint
The versatility of magnetic paint extends far beyond children’s quiet books:
- Magnetic Feature Walls: Transform a wall in your kitchen or office into a dynamic message board, photo gallery, or art display.
- Interactive Learning Spaces: Create a magnetic learning station in a child’s bedroom or classroom where maps, letters, and numbers can be rearranged for educational games.
- Art and Photo Displays: Say goodbye to sticky tape and pushpins. Use small magnets to display artwork, photos, or postcards without damaging your walls or the items themselves.
- Kitchen Command Centers: Design a central hub for grocery lists, recipes, chore charts, and important reminders, all held securely by magnets.
- Workshop Organization: Magnetic strips or boards can be integrated into a workshop for holding small metal tools, screws, or bits, keeping them organized and easily accessible.
Troubleshooting Common Magnetic Paint Issues
While magnetic paint is fantastic, you might encounter a few challenges:
- Weak Magnetic Hold: This is often due to insufficient coats of magnetic paint or too many layers of regular paint applied on top. Solution: Apply more coats of magnetic paint.
- Uneven Application: Can result from improper stirring or rushing the application. Solution: Ensure consistent stirring and apply thin, even coats, sanding lightly between dry layers if needed for walls.
- Cracking or Peeling: Usually caused by poor surface preparation or applying coats that are too thick. Solution: Ensure surfaces are clean and dry, and apply thinner, well-dried coats.
Safety First: Important Considerations When Using Magnetic Paint
As with any painting project, safety should be a priority. Magnetic paint contains metallic particles, so proper ventilation is crucial to avoid inhaling dust or fumes. Work in a well-ventilated area, and consider wearing a mask and gloves, especially if you are sensitive to paint fumes. Always read and follow the manufacturer’s safety guidelines and instructions.
Tips for Maximizing Your Magnetic Paint Project
To ensure your magnetic paint project is a resounding success, keep these expert tips in mind:
- Test First: If you’re unsure about the magnetic strength or paint adhesion, test a small, inconspicuous area or a scrap piece of material first.
- Invest in Quality Magnets: The effectiveness of your magnetic surface also depends on the quality of your magnets. Stronger neodymium magnets will generally hold better than weaker ferrite magnets.
- Patience is a Virtue: Allow adequate drying and curing time for all coats of paint. Rushing the process can compromise both the magnetic strength and the durability of your finish.
- Clean Tools Promptly: Magnetic paint can be thick and difficult to remove once dry, so clean your brushes, rollers, and stirring tools immediately after use with soap and water.
Conclusion: Embrace the Magnetic Possibilities
Magnetic paint is a truly innovative product that empowers crafters, educators, and DIY enthusiasts to create dynamic, interactive, and endlessly adaptable surfaces. From the engaging pages of a magnetic quiet book to a stylish, functional command center in your kitchen, the possibilities are limited only by your imagination. Understanding its unique properties, mastering the application techniques, and embracing a bit of creativity will allow you to unlock the full potential of this remarkable material. So, go ahead, find that elusive can of dark grey, thick magnetic paint, stir it well, and start transforming your world into a captivating magnetic canvas. Hopefully, this comprehensive guide has taken all the mystery out of this fantastic product and inspired you to embark on your own magnetic adventures!







