Craft Stunning Beaded Heart Charms: An Easy Step-by-Step DIY Tutorial
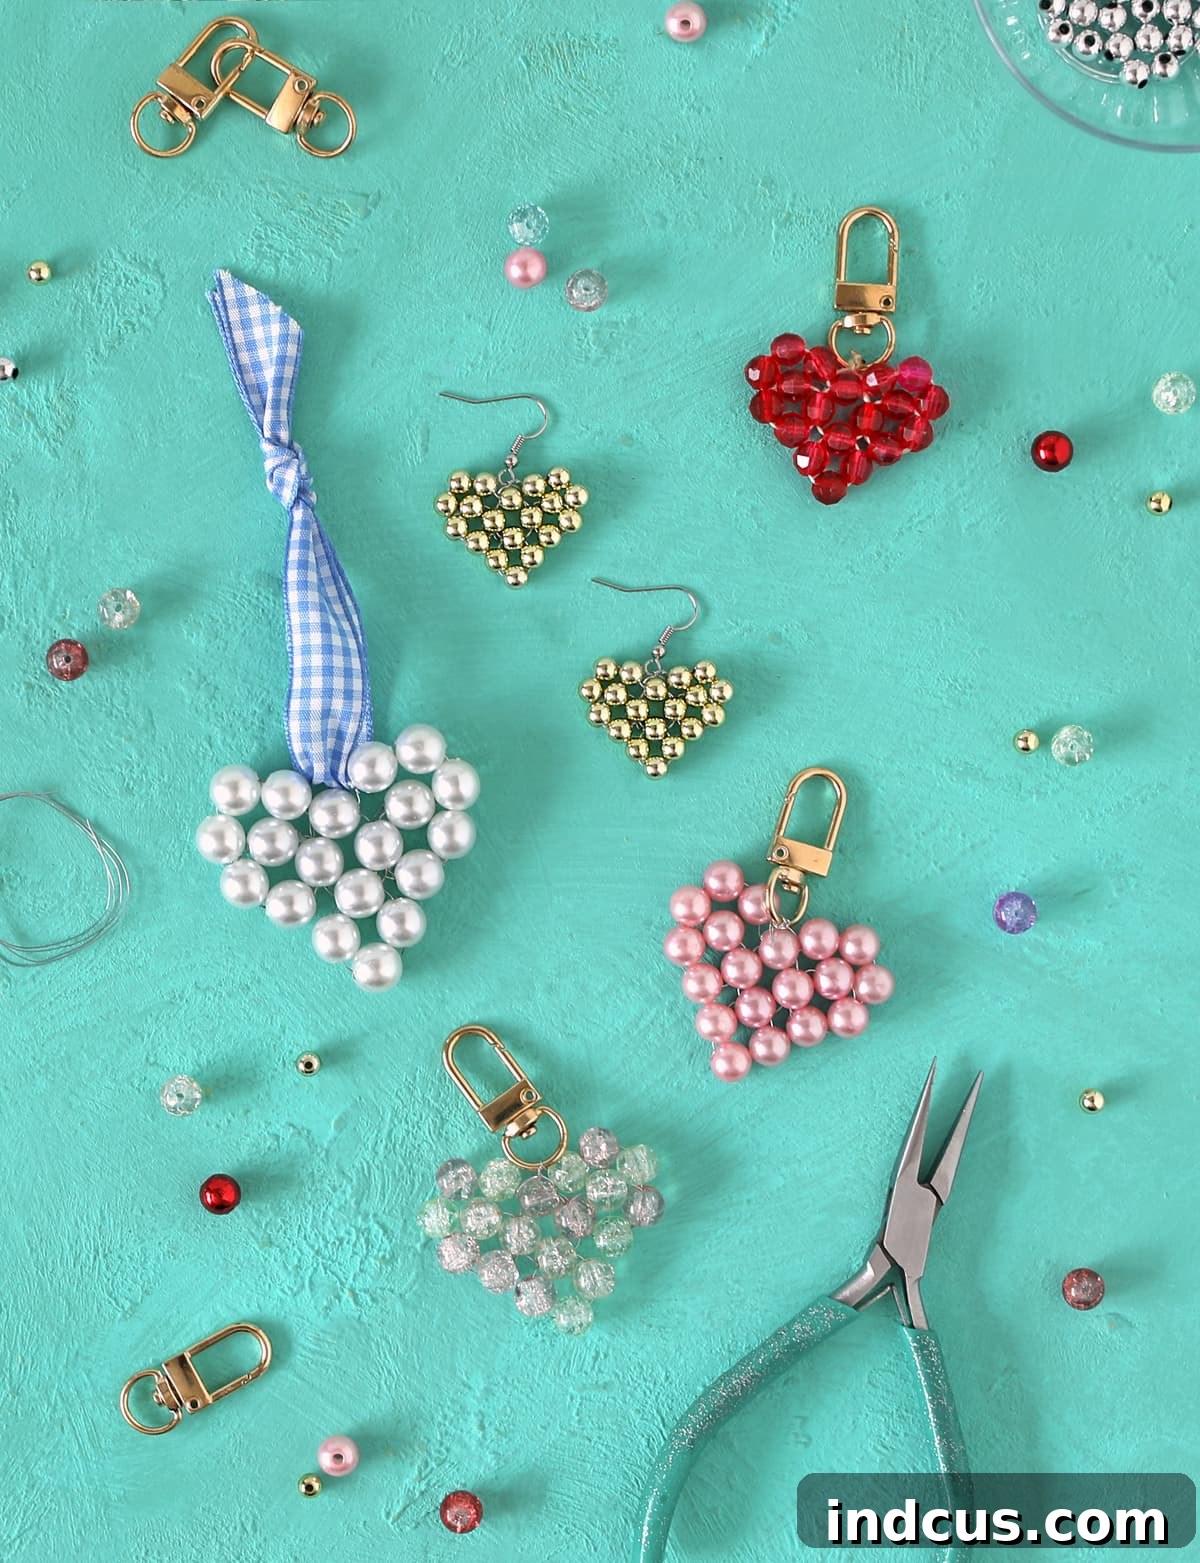
Welcome, fellow crafting enthusiasts! Get ready to unlock your creativity with a truly delightful and surprisingly simple bead project today. We’re going to embark on a creative journey to transform ordinary round beads into the most adorable heart-shaped charms you can imagine. This detailed tutorial, complete with clear photos and a helpful video, will guide you through every step, ensuring a beautiful result.
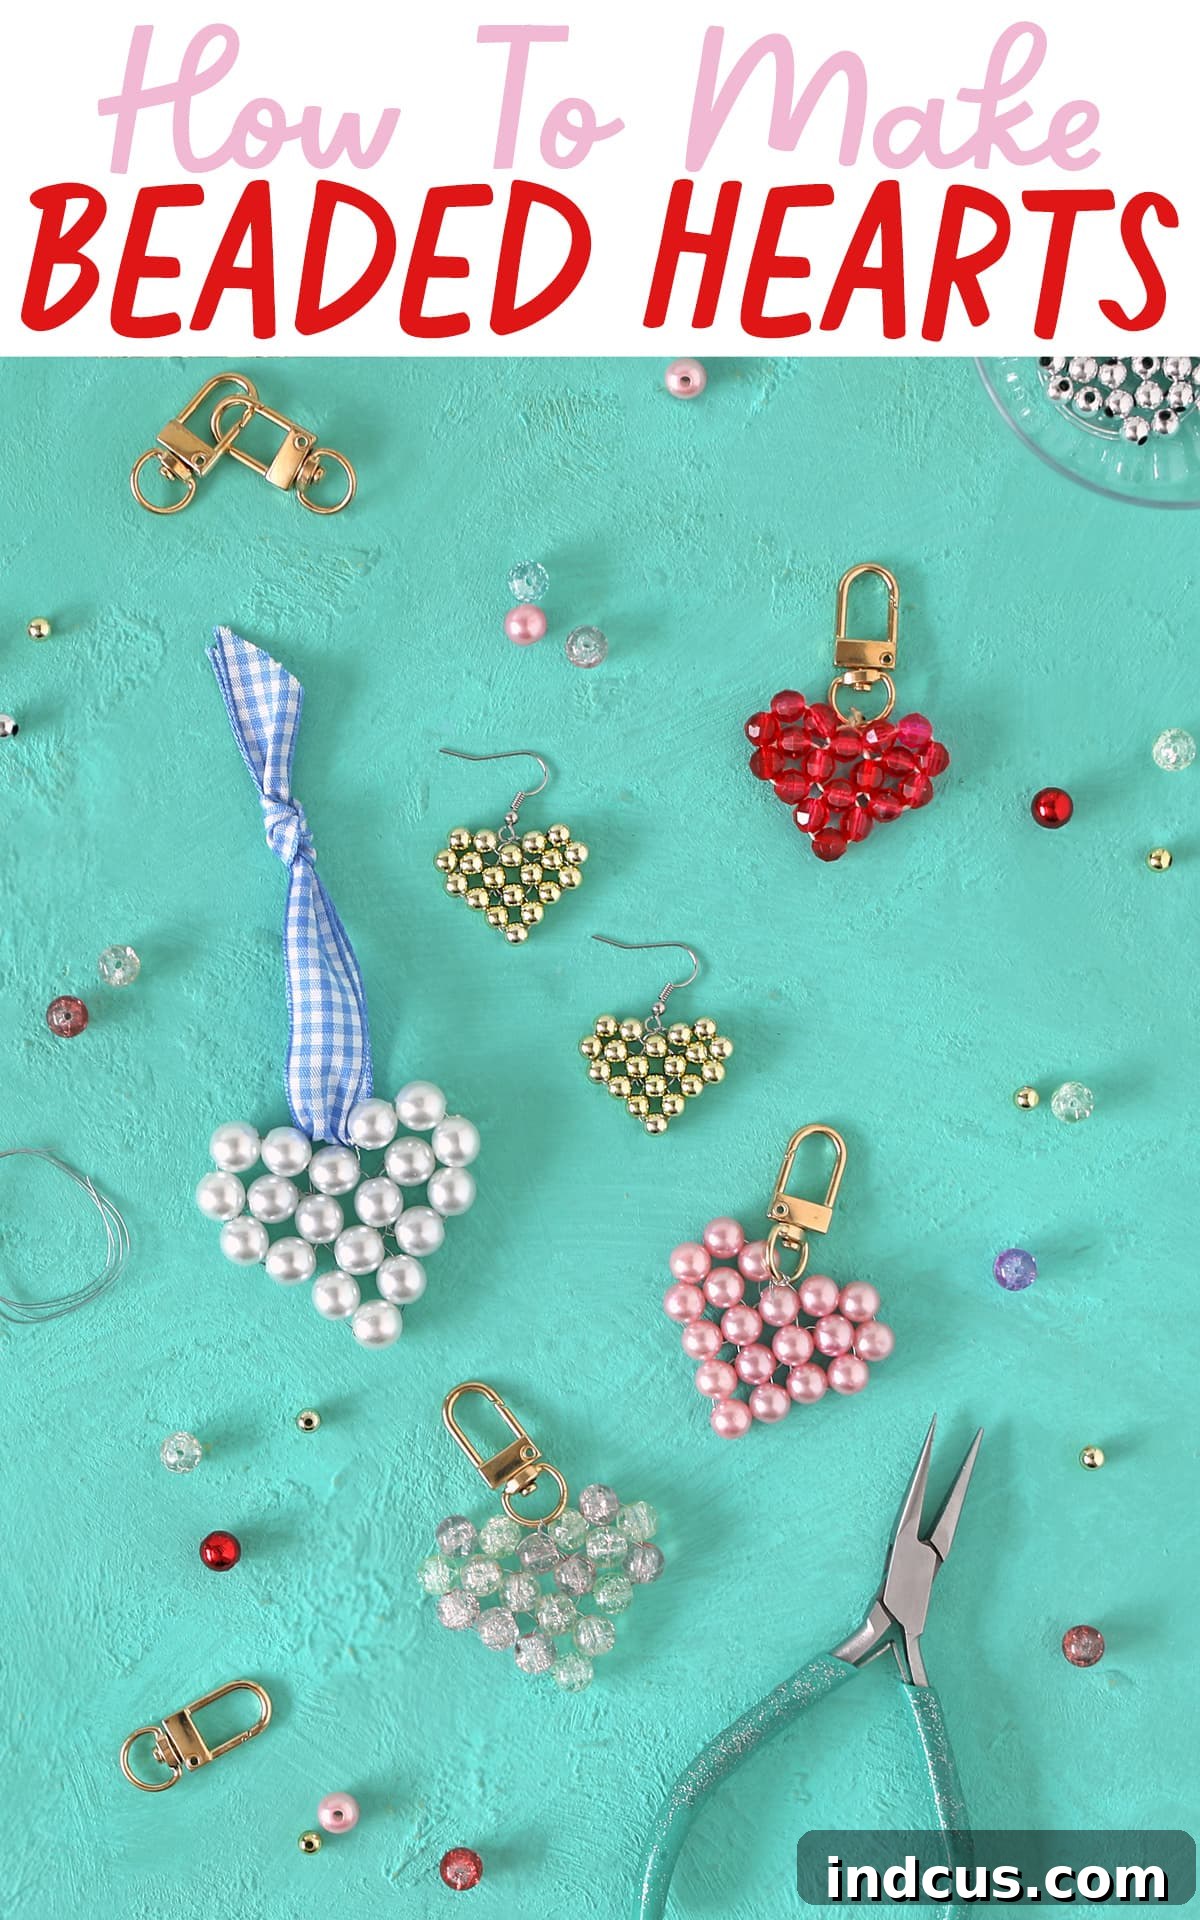
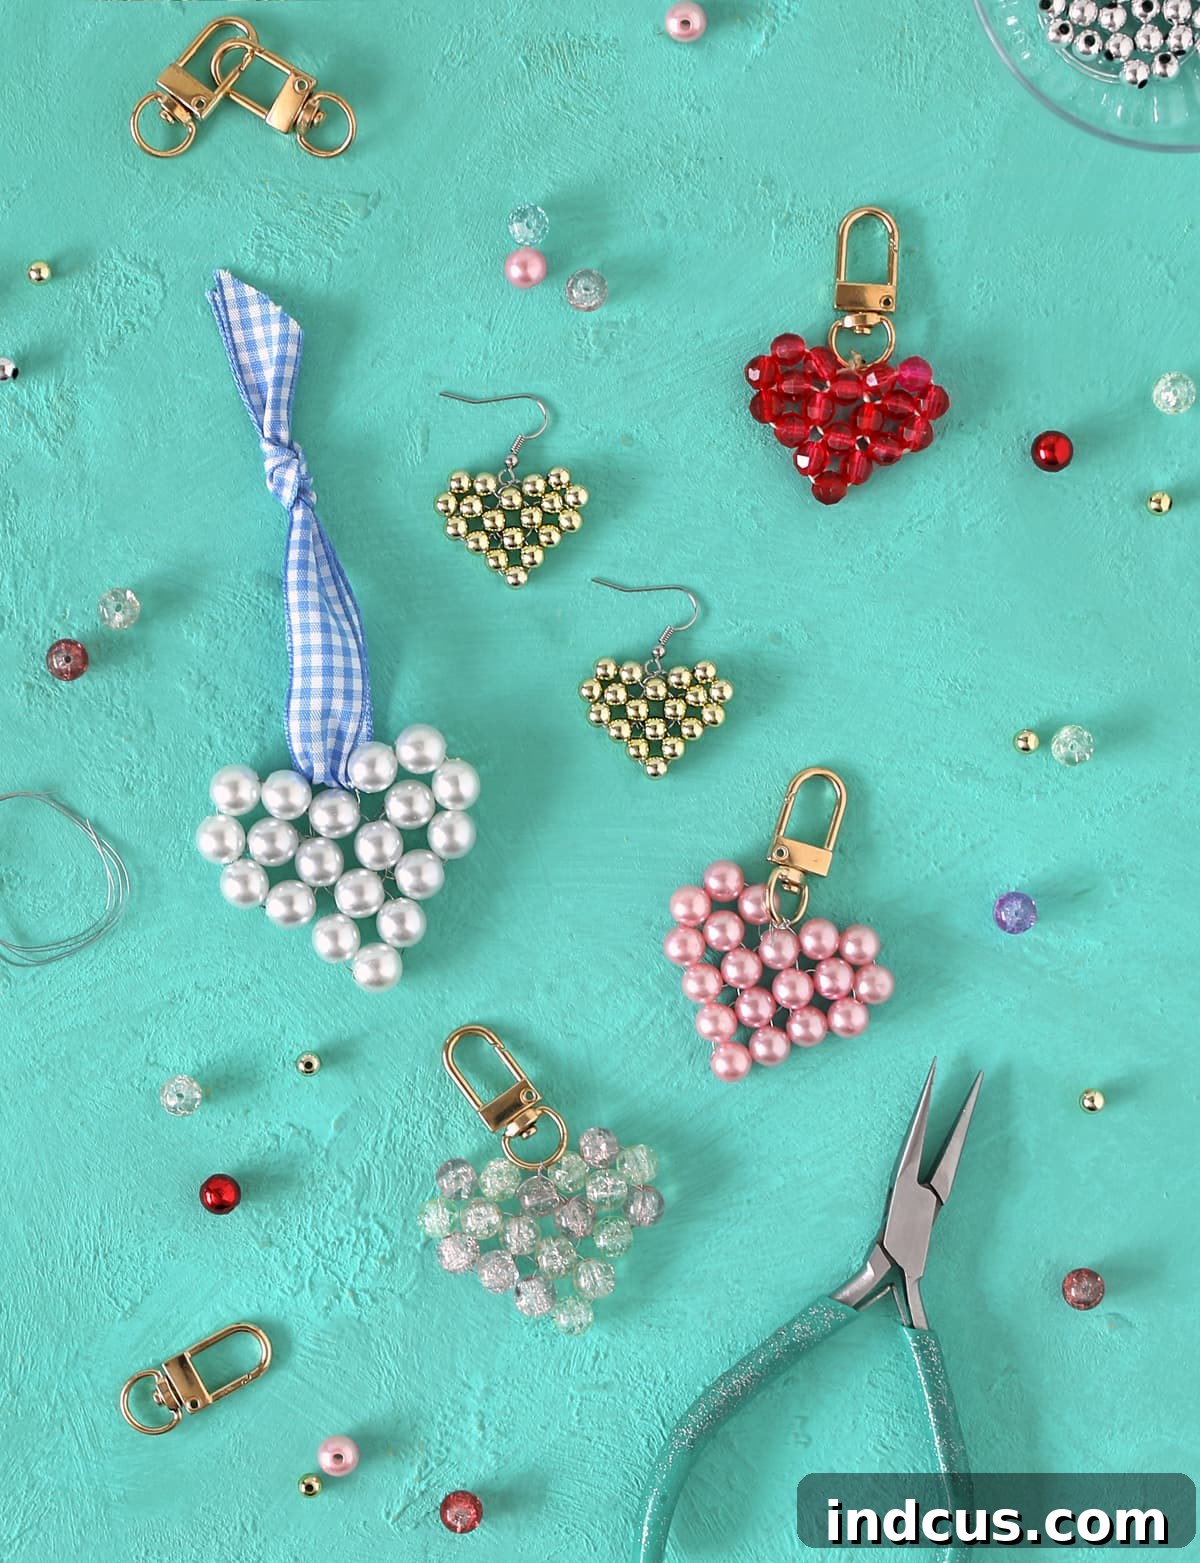
These darling little beaded hearts are incredibly versatile. Imagine them as charming earrings that add a touch of handmade elegance to your outfit, unique keychains that make your keys stand out, or delicate pendants for a necklace. The possibilities are truly endless – limited only by your imagination! The best part? You only need a handful of basic supplies, and once you master the technique, you’ll be able to whip up these cutie pies in under 30 minutes. They make perfect personalized gifts for loved ones, thoughtful tokens for Valentine’s Day, or just a lovely treat for yourself.
Whether you’re a seasoned crafter or just starting your DIY adventure, this project is designed for everyone. It’s a wonderful way to explore wire wrapping and beadwork without needing advanced skills. So, gather your materials, find a cozy spot, and let’s dive into making these captivating beaded heart charms!
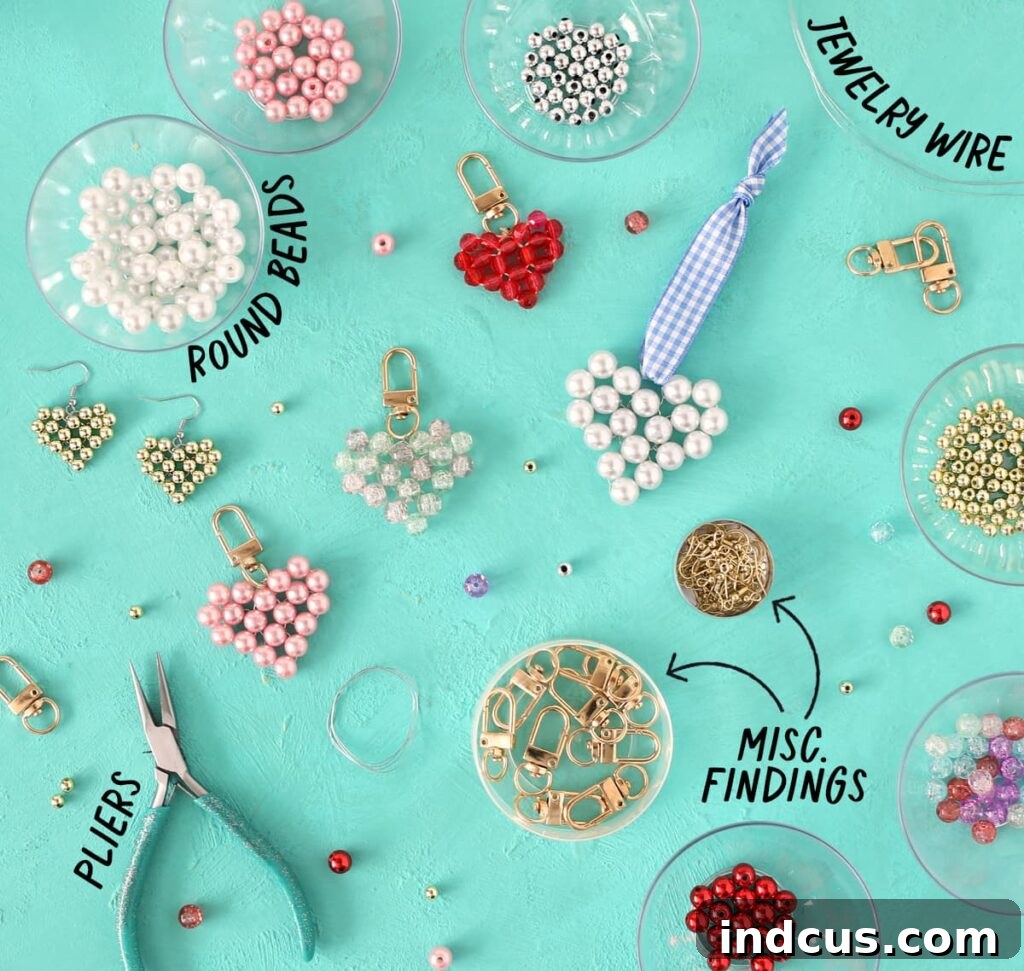
Materials You’ll Need for Your Beaded Heart Project
For your convenience, click on any highlighted item in the supply list for more information or to purchase. Affiliate links may be used, which means I might earn a small commission at no extra cost to you.
- Round Beads: The heart of your project! You can use any type of round bead – glass, acrylic, wood, semi-precious stones, or even pearls. Experiment with different sizes and colors to create unique looks.
- Jewelry Wire – 26 Gauge: This specific gauge (26) is highly recommended. It’s thin enough to pass through bead holes multiple times, yet sturdy enough to hold its shape. You can opt for silver, gold, copper, or colored wire to complement your beads.
- Jewelry Pliers: A basic set of jewelry pliers, particularly round-nose and chain-nose pliers, along with wire cutters, will be invaluable. They help with shaping the wire, creating loops, and trimming excess.
- Keychain Clasps, Earring Hooks or Other Jewelry Findings: These are the components that transform your beaded heart into a functional accessory. Choose according to your desired finished item. Jump rings are also useful for attaching these findings securely.
When selecting your beads, remember that variety adds character. While any round bead works, consider how different materials will affect the final look and feel of your charm. For instance, tiny seed beads create a delicate heart, while larger wooden beads offer a more rustic appeal. The bigger your chosen beads, the larger and more prominent your finished heart charm will be, allowing for a range of styles from subtle accents to statement pieces.
The choice of wire is also crucial. A 26-gauge wire offers the perfect balance of flexibility for intricate weaving and strength to maintain the heart’s shape. Thinner wire might be too flimsy, and thicker wire might not pass through the bead holes easily. Always ensure your wire can comfortably fit through the bead holes at least twice, as this is essential for the structure of the design.
Crafting Your Beaded Heart: Step-by-Step Instructions
While I’ll do my absolute best to provide clear, written instructions, some visual learners might find it easier to grasp the technique by watching it in action. Therefore, I highly recommend scrolling down to the end of this guide to watch the comprehensive **video tutorial**. It provides a dynamic view of each step, often clarifying details that are harder to convey purely through text. The combination of both methods ensures you’ll master this beautiful craft!
Below, you’ll find an overview photo illustrating each stage of the process, followed by detailed instructions for every step. I’ve also included diagrams where helpful, using different colors to highlight the various parts of the heart and show the wire’s path, making the process even more intuitive.
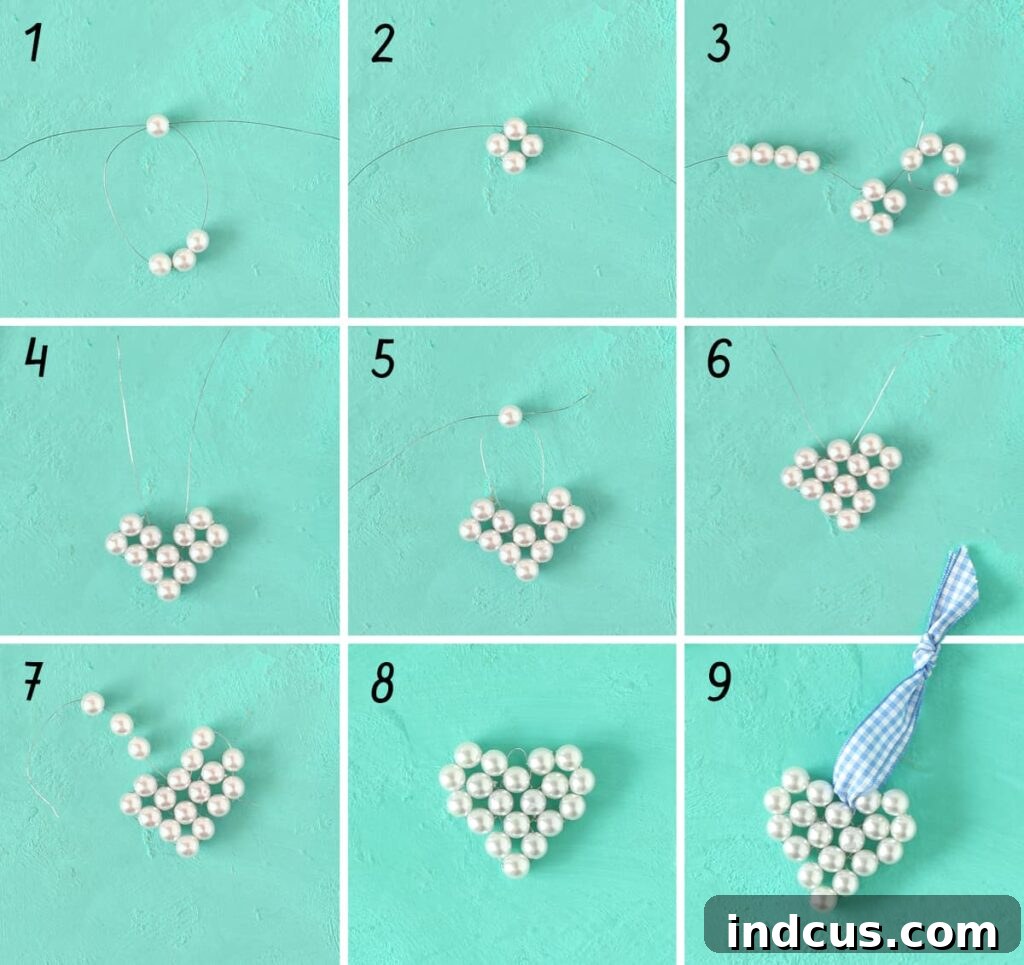
Each step is designed to build upon the last, forming the distinctive heart shape. Pay close attention to the direction of the wire and the tightness of your pulls to achieve a neat, professional finish. Don’t be afraid to take your time and review the photos and video as often as needed.
Step 1: Prepare Your Wire and Initial Beads
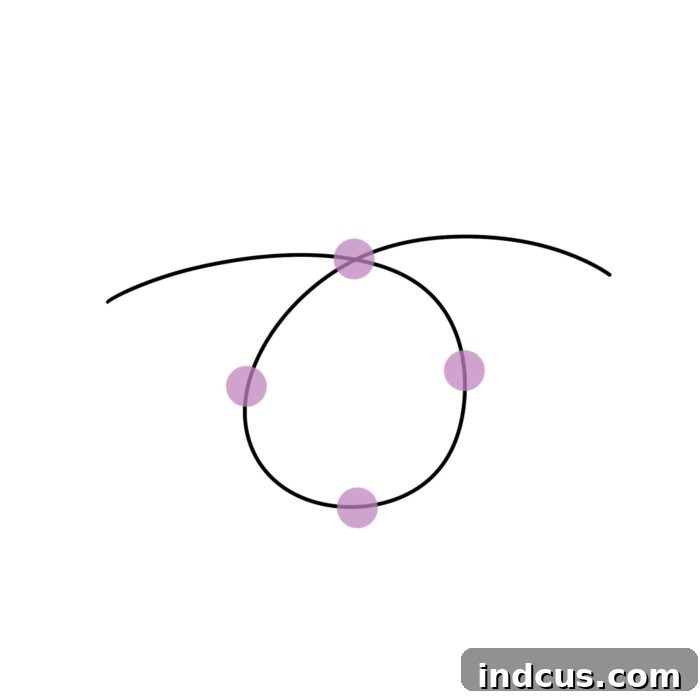
Begin by cutting a length of jewelry wire. A good starting point is 18 to 24 inches (approximately 45-60 cm). If you’re using particularly large beads, you might need a bit more wire, while smaller beads may require less. It’s always better to have extra length to work with than to run out mid-project. To start forming the base of your heart, string four round beads onto the center of your wire. Once the beads are on, take one end of the wire and string it back through the very last bead you added, moving in the opposite direction from which you originally threaded it. This creates a loop with the first bead.
Step 2: Secure the Base
Gently pull both ends of the wire until the four beads are pulled tight against each other, forming a small cluster. It’s important to ensure that the two wire tails on either side of this bead cluster are roughly even in length. This balance will be crucial for the symmetrical formation of the heart in subsequent steps. Take care not to pull too forcefully, which could kink the wire, but ensure the beads are snug to prevent gaps.
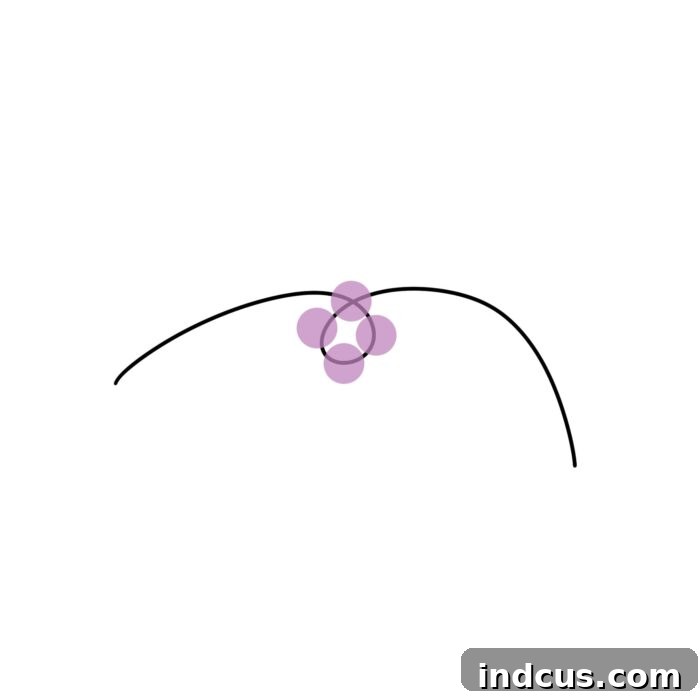
Step 3: Create the First Side Loops
Now, take one of the wire tails and string four new beads onto it. Once these four beads are on, loop the same wire end back through the *first* bead of this newly strung group (the one closest to the initial four-bead cluster). Pull the wire gently until these beads sit flush against the central cluster, taking up all the slack in the wire. This forms one of the distinct side sections of your heart. Repeat this exact process on the other side, using the second wire tail and four more beads. You should now have two identical side loops extending from your central base.
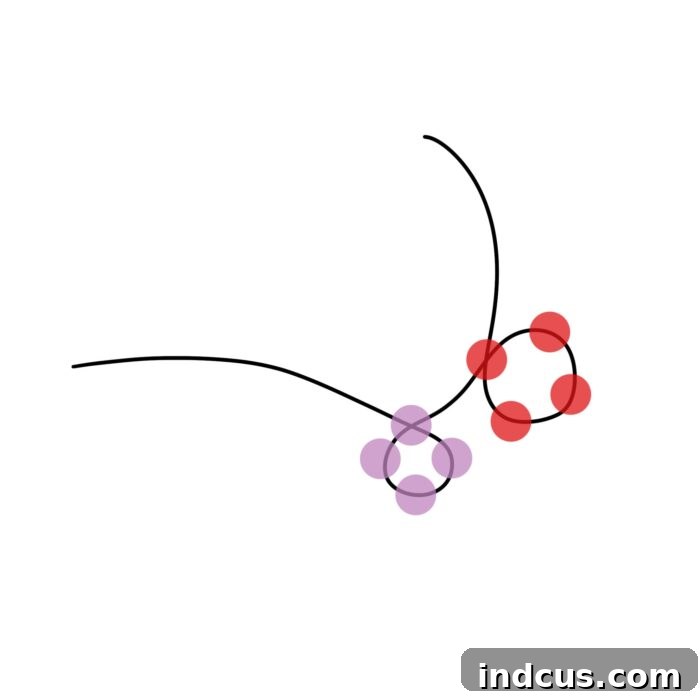
Step 4: Verify Your Progress
At this stage, take a moment to observe your work. Your nascent heart shape should clearly show three distinct groupings of four beads each. One grouping forms the initial base, and two symmetrical groupings extend from its sides. This is the structural foundation of your beaded heart. If it looks correct, you’re well on your way! If not, gently retrace your steps for any loose wires or misaligned beads.
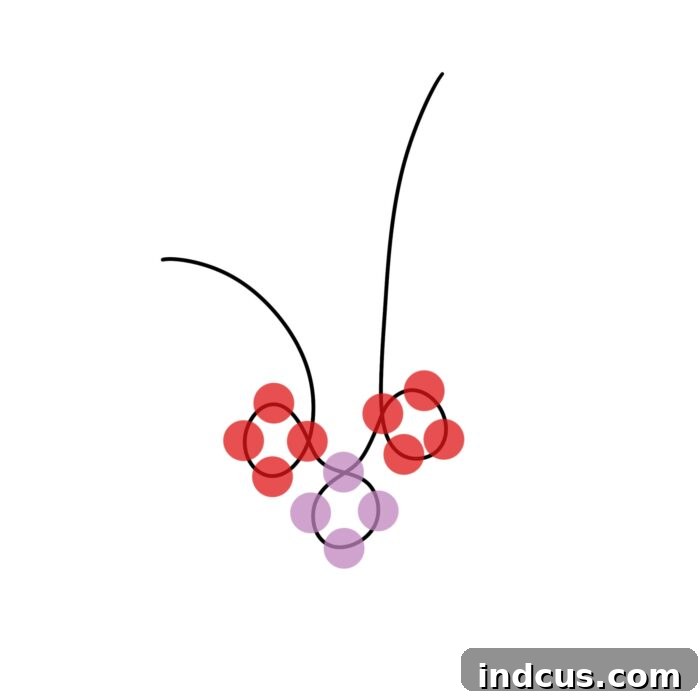
Step 5: Connect the Base with a Central Bead
Now, let’s bring the two sides of the heart together at the bottom point. Take one of your remaining wire ends and string a single new bead onto it. Then, take the *other* wire end and insert it through this same bead, but in the opposite direction. Essentially, both wire ends should now be threaded through this one central bead, crossing paths inside it. This bead will become the very bottom tip of your heart.
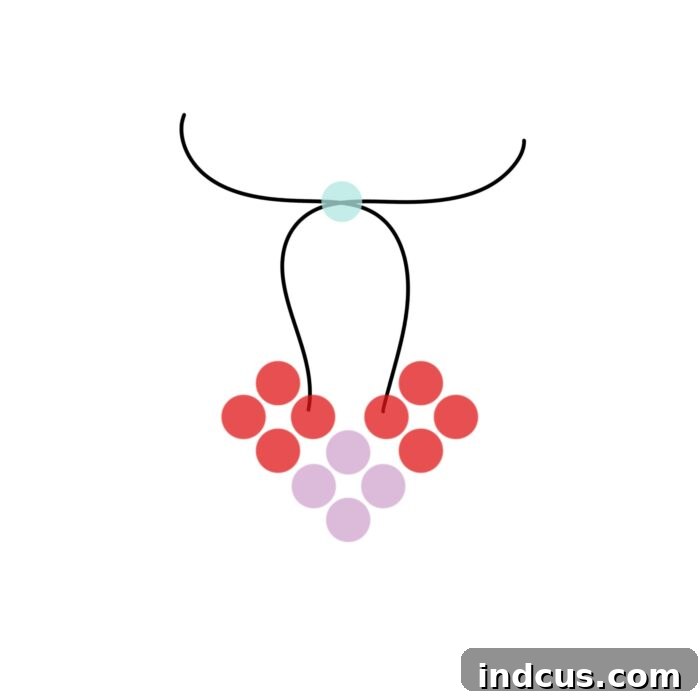
Step 6: Cinch and Shape the Point
Carefully pull on both wire ends simultaneously. As you pull, you’ll see the beads come together, and the single central bead will firmly form the pointed bottom of your heart. Continue pulling until all the beads are snug and the wire is taut, creating a smooth and defined heart shape. Ensure there are no loose wires or gaps between the beads. This step really brings the heart’s outline to life.
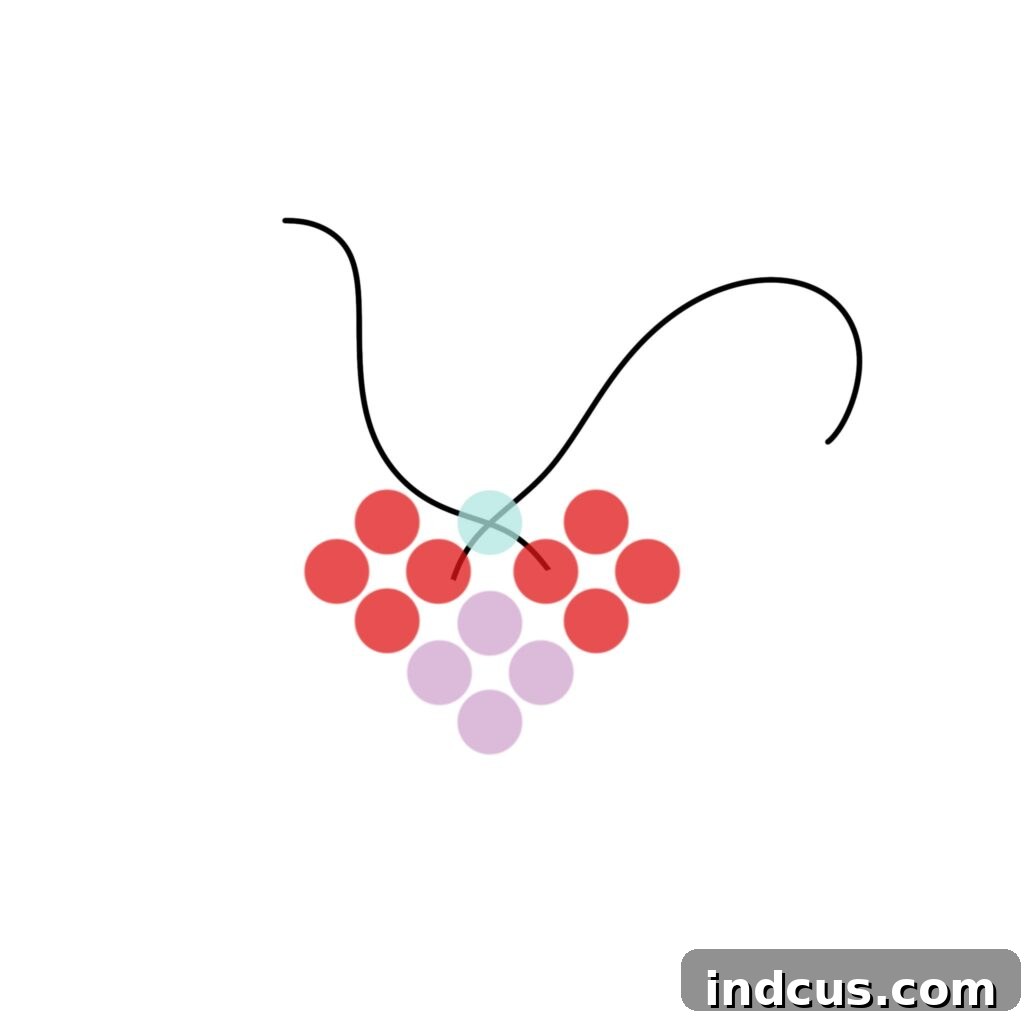
Step 7: Form the Curved Top of the Heart
With your heart’s base and point established, it’s time to create the iconic curved top. Take one of your wire ends and string three new beads onto it. After stringing, loop the wire end *down* through the outermost bead of the adjacent four-bead grouping that forms one of the heart’s upper lobes. This action will naturally curve the three new beads, forming one of the humps of the heart. Repeat this process identically on the other side with the second wire end and three more beads, looping it through the corresponding outermost bead. When finished, you should see the complete, recognizable heart shape.
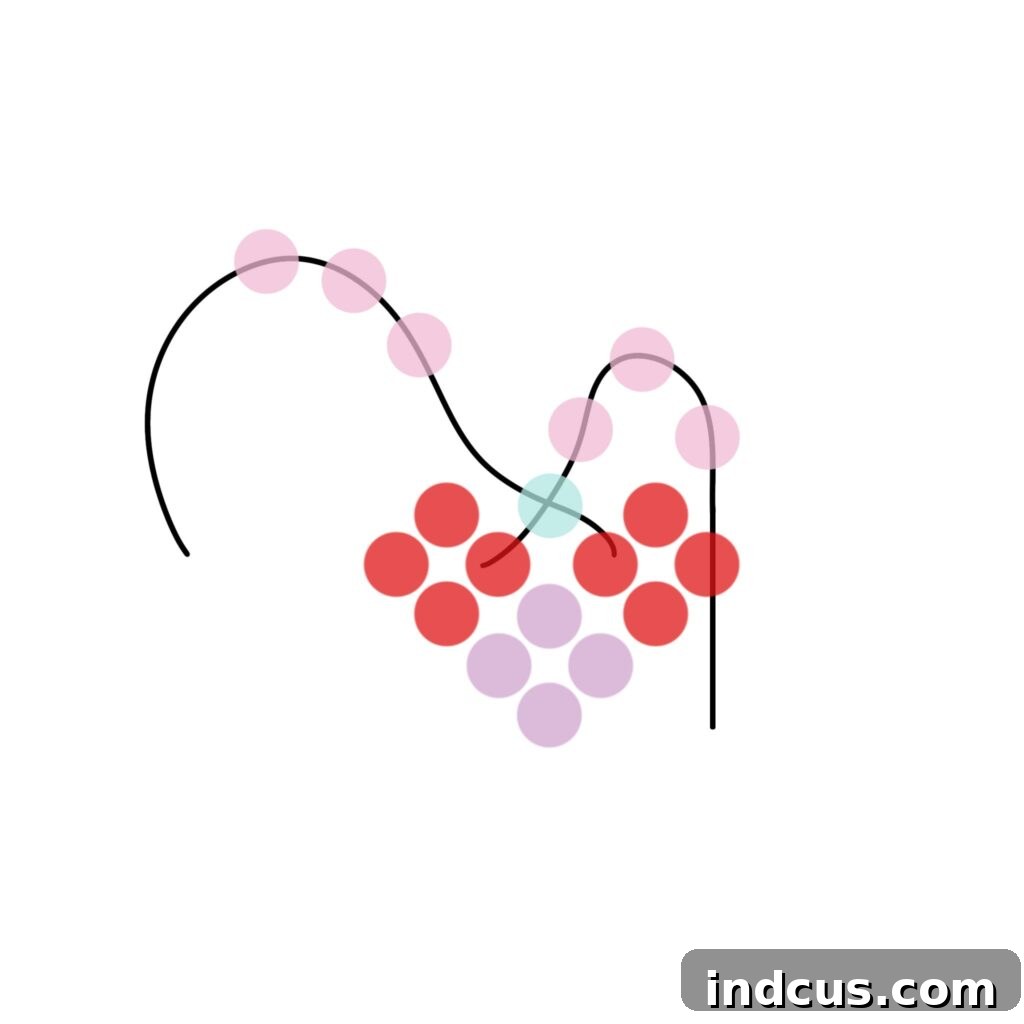
Step 8: Prepare for Attaching Findings
Your beaded heart shape is now fully formed! The final structural step is to prepare it for attaching your chosen jewelry hardware. Take the two remaining wire ends and carefully weave them back through the beads. The goal is to bring both wire ends together at the very top center of the heart, ideally emerging from the same bead or from two adjacent beads at the peak. This central top position is where you’ll attach your earring hook, keychain clasp, or pendant bail. Weaving the wires back through the beads also helps secure the entire structure and hides any loose ends.
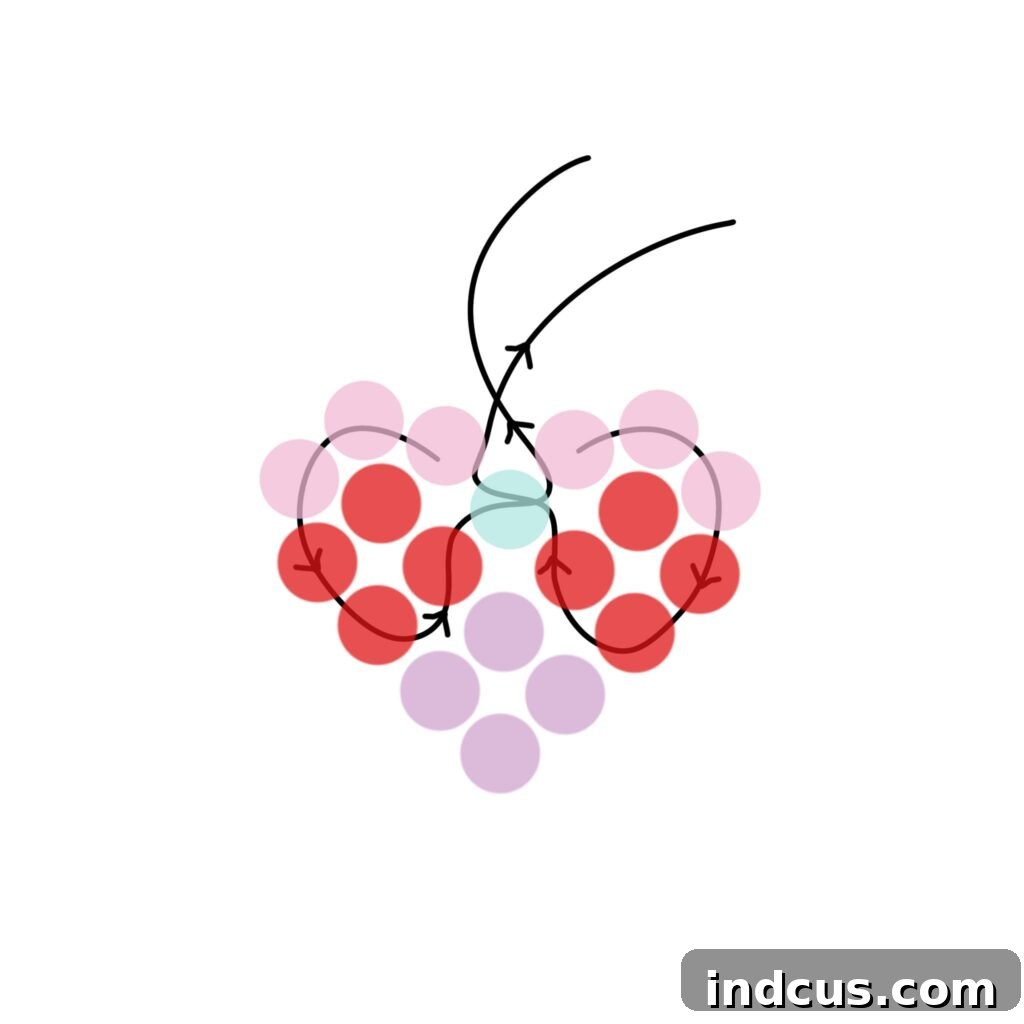
Step 9: Attach Hardware and Finish
With both wire ends emerging at the top center, it’s time to finalize your charm. Use your jewelry pliers to twist and secure your chosen hardware (like a jump ring and then an earring hook or keychain clasp) onto the combined wire ends. Ensure the attachment is robust and won’t easily come undone. Once your hardware is securely in place, carefully trim off any excess wire ends using your wire cutters. Tuck any sharp edges into the beads or flatten them with pliers to ensure a smooth, snag-free finish. Your beautiful, handmade beaded heart charm is now complete and ready to be shown off!
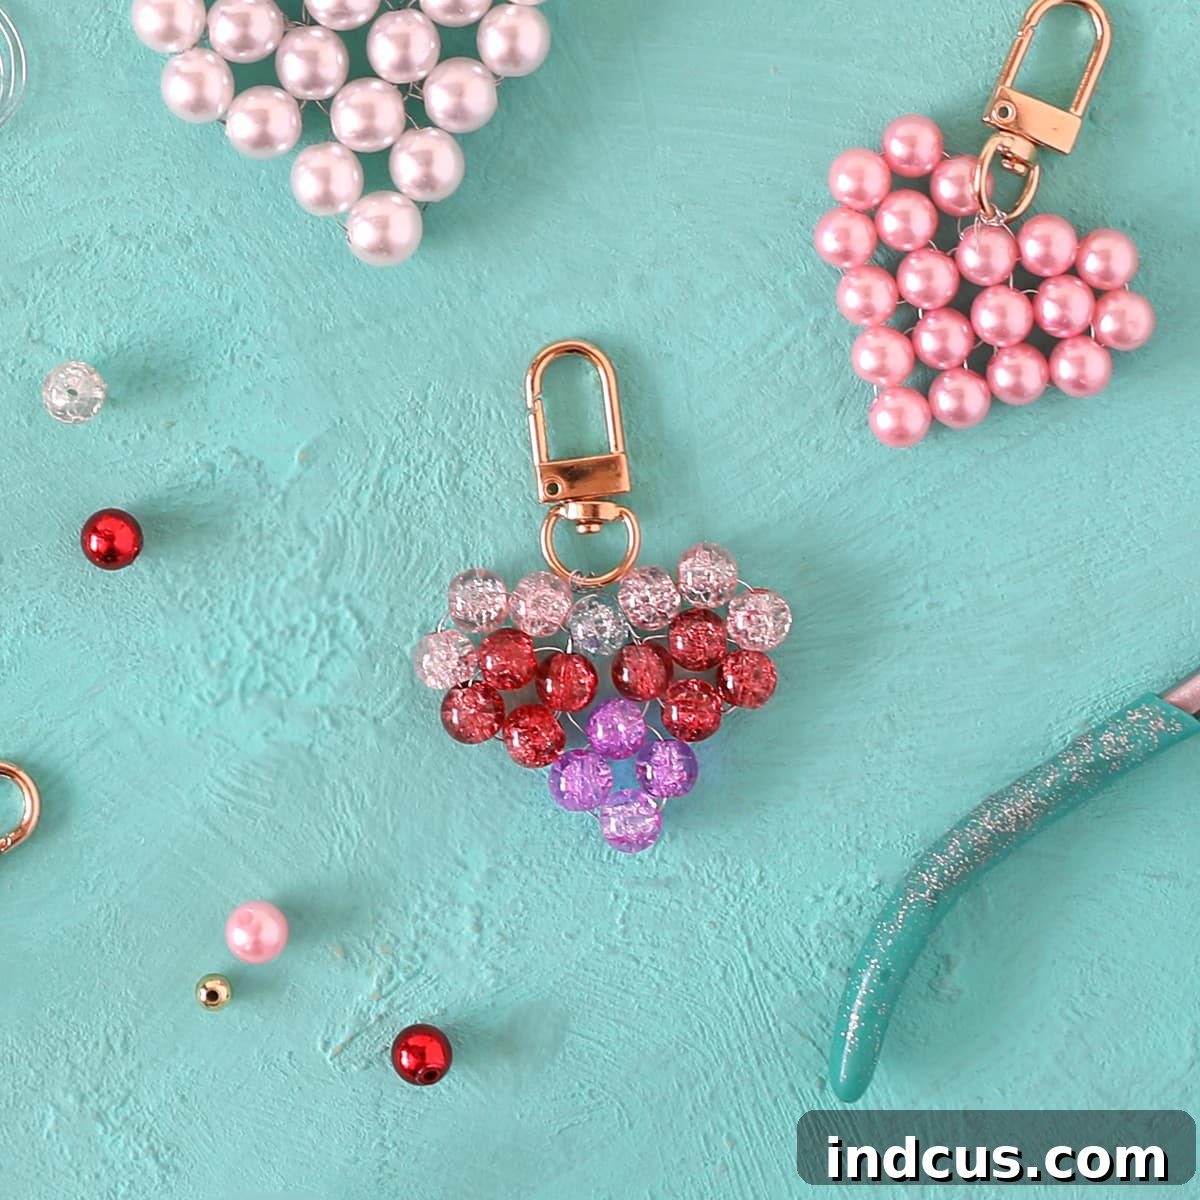
Watch the Beaded Heart Charm Video Tutorial
Sometimes, seeing is truly believing, especially with intricate wire and bead work. This video tutorial provides a real-time, step-by-step demonstration of everything described above. It’s an invaluable resource for understanding the wire’s path, the tension needed, and the overall rhythm of the crafting process. Play it, pause it, and rewind it as many times as you need!
Unleash Your Creativity with Beaded Heart Designs
So, what are your thoughts? Are you excited to try your hand at this charming project? I had an absolute blast making various samples, experimenting with different bead sizes, textures, and color combinations. Each choice truly brought a unique personality to the finished heart. And now, I have a lovely pair of handmade heart earrings perfect for Valentine’s Day – or any day I want to add a touch of handcrafted love! This project is not just about making a charm; it’s about the joy of creation and the satisfaction of wearing or gifting something truly unique.
Consider these additional tips to personalize your beaded heart charms:
- Color Play: Use a single color for a classic look, or mix and match colors for a vibrant, multi-hued heart. Ombre effects with graduating shades can also be stunning.
- Texture Variation: Combine smooth glass beads with faceted ones for sparkle, or add a single pearl bead for a touch of elegance.
- Size Matters: Create a collection of hearts in various sizes – tiny ones for delicate earrings and larger ones for bold statement necklaces or bag charms.
- Embellishments: Once your heart is complete, you can add small dangle beads or other tiny charms to the bottom point or along the sides for extra flair.
- Gift Ideas: These beaded hearts make thoughtful, personalized gifts for birthdays, anniversaries, Mother’s Day, or as party favors.
If you’ve enjoyed crafting these beautiful beaded hearts and are eager for more beadwork adventures, be sure to check out my other fun tutorial for making enchanting beaded bows! They are just as delightful and offer another fantastic way to utilize your beading skills.
Don’t forget to share your creations with us in the comments below, or tag us on social media! We love seeing how you interpret these tutorials and make them your own. Happy crafting!
Loved this project? Pin it to your favorite crafting board on Pinterest so you can easily find it later and share it with your friends!