
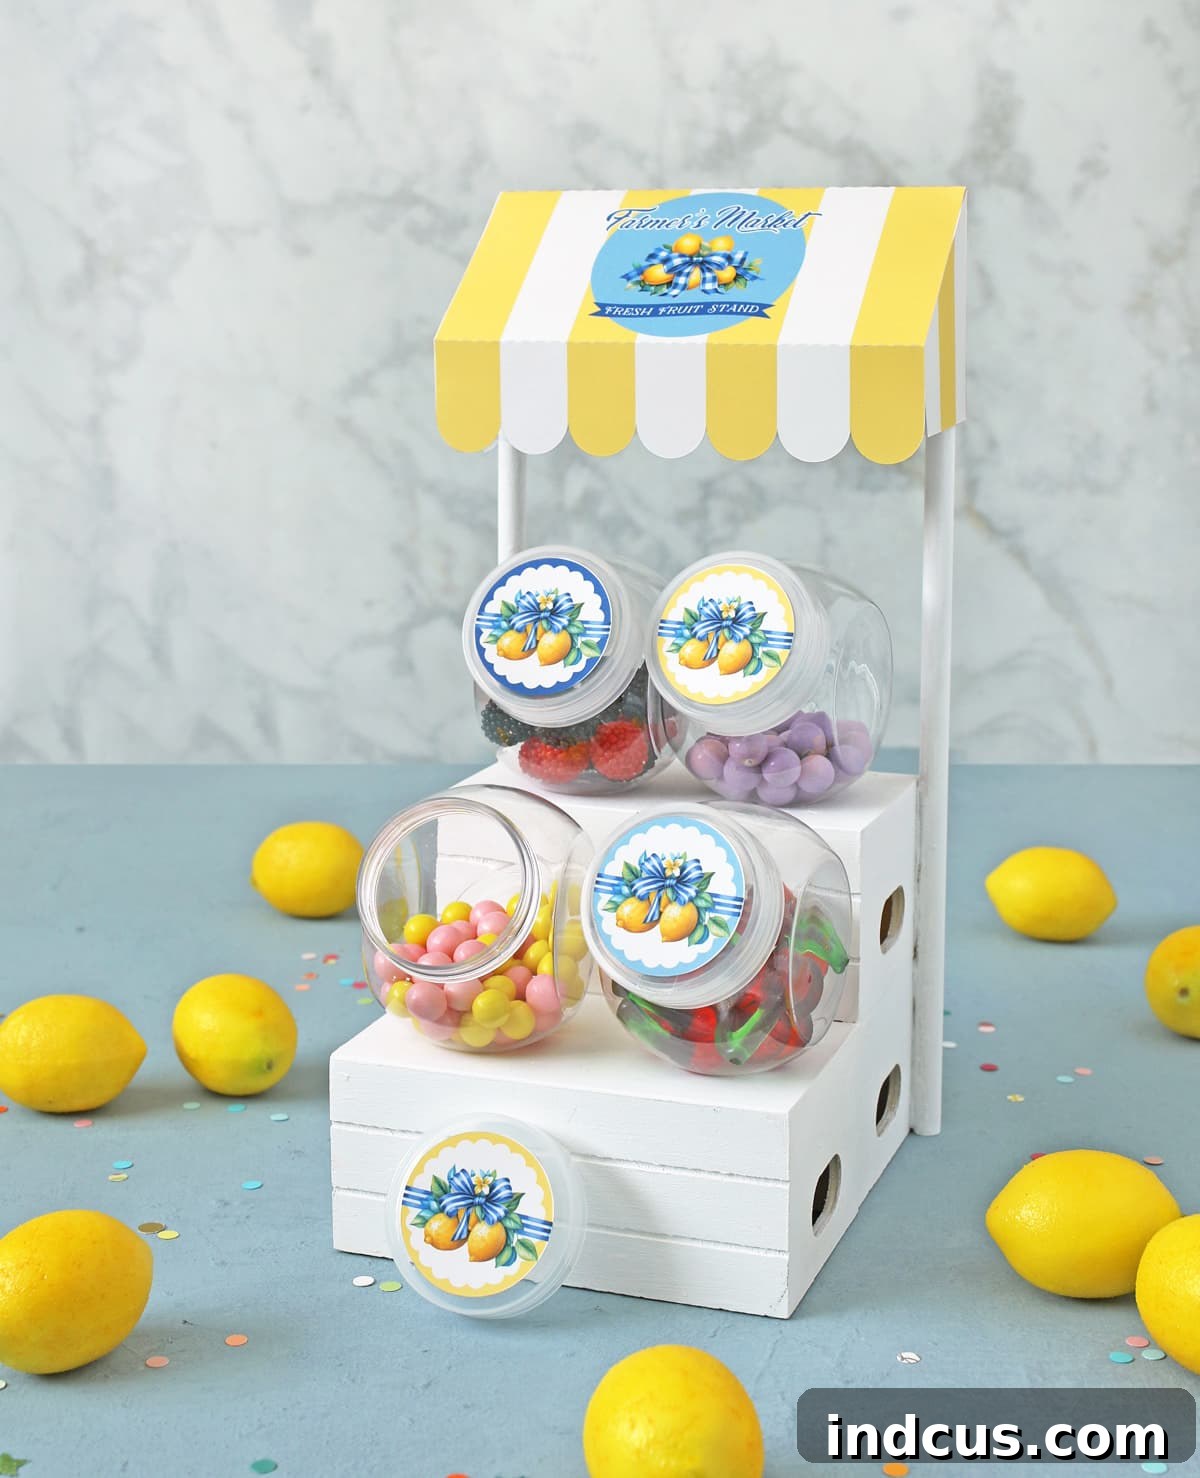
Create a Charming Farmer’s Market Fruit Stand Candy Shop with Dollar Tree Supplies: An Ultimate Summer Craft Guide
There’s nothing quite like the satisfaction of crafting something beautiful and fun on a budget, especially when it sparks joy for every season. Earlier this year, I embarked on a delightful crafting journey, creating a series of miniature candy shops using readily available dollar store supplies. The process was so enjoyable and rewarding that it quickly became a year-long project, inspiring unique versions for various holidays and seasons. So far, our collection boasts adorable candy shops themed for Valentine’s Day, a festive St. Patrick’s Day display, a sweet Easter setup, and a patriotic tribute for the Fourth of July. Each iteration brings its own unique charm, proving just how versatile and enchanting these mini stands can be. And now, as summer arrives with its vibrant colors and refreshing flavors, we’re thrilled to introduce our latest creation: a whimsical Farmer’s Market Fruit Stand Candy Shop!
This summer-inspired craft isn’t just a decoration; it’s an invitation to imagination. Imagine a miniature bustling market, overflowing with colorful, fruity treats. It’s the perfect project to bring a touch of summertime cheer to your home, a classroom, or even as a charming gift. The best part? It’s incredibly easy to make, and almost all the supplies come from your local Dollar Tree, making it an exceptionally budget-friendly endeavor.
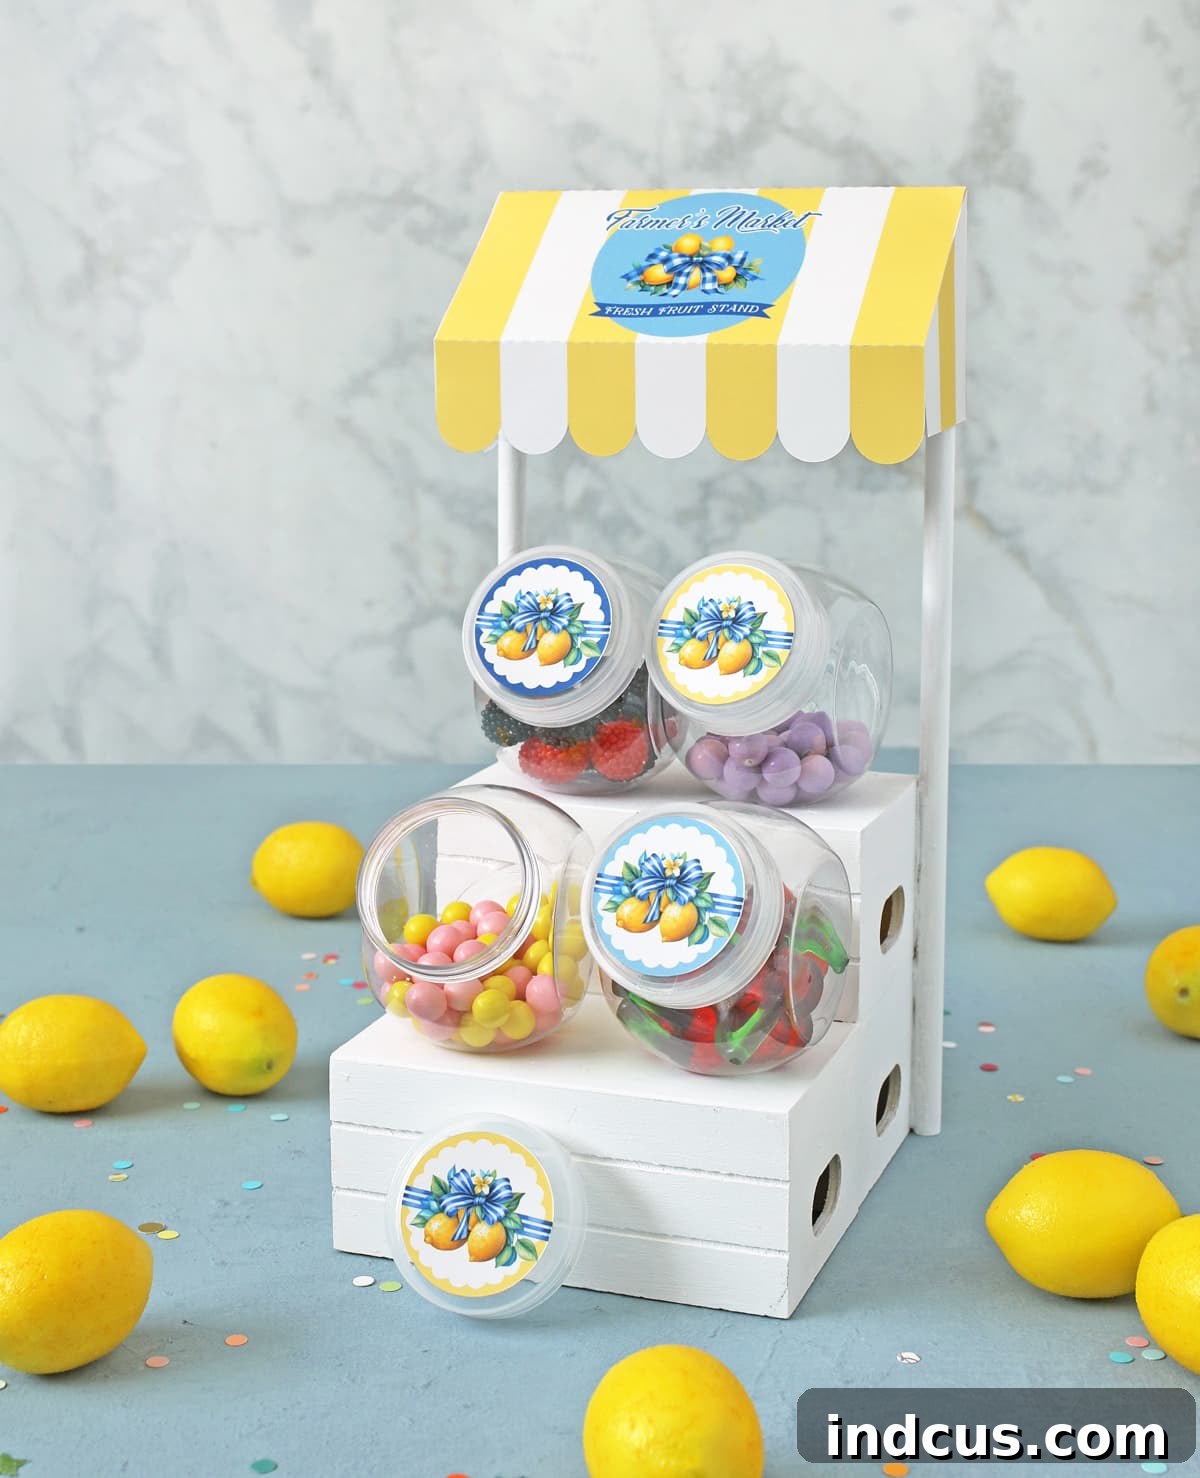
Our farmer’s market fruit stand is brimming with possibilities! The most exciting aspect of this particular version is the sheer creativity it inspires when choosing fruit-themed candies to fill it. I opted for vibrant gummy cherries and delicious gummy raspberries, which added a wonderful splash of color and a playful texture. But don’t stop there! Think of other delightful options like classic strawberry hard candies, the fruity variety of Runts, tangy lemon drops, or chewy peach rings. The candy aisle is a treasure trove of fruit-shaped and fruit-flavored confections just waiting to be discovered. You could even incorporate tiny plastic fruits for a more realistic market feel. The possibilities are endless, and each choice adds to the unique personality of your miniature market. This craft is not just about assembly; it’s about infusing it with your own creative spirit and delight.
Ready to bring this adorable summer craft to life? I’m excited to guide you through each step of creating your very own Dollar Tree candy shop. It’s a project that promises fun, creativity, and a delightful end product. Let’s gather our supplies and get started!
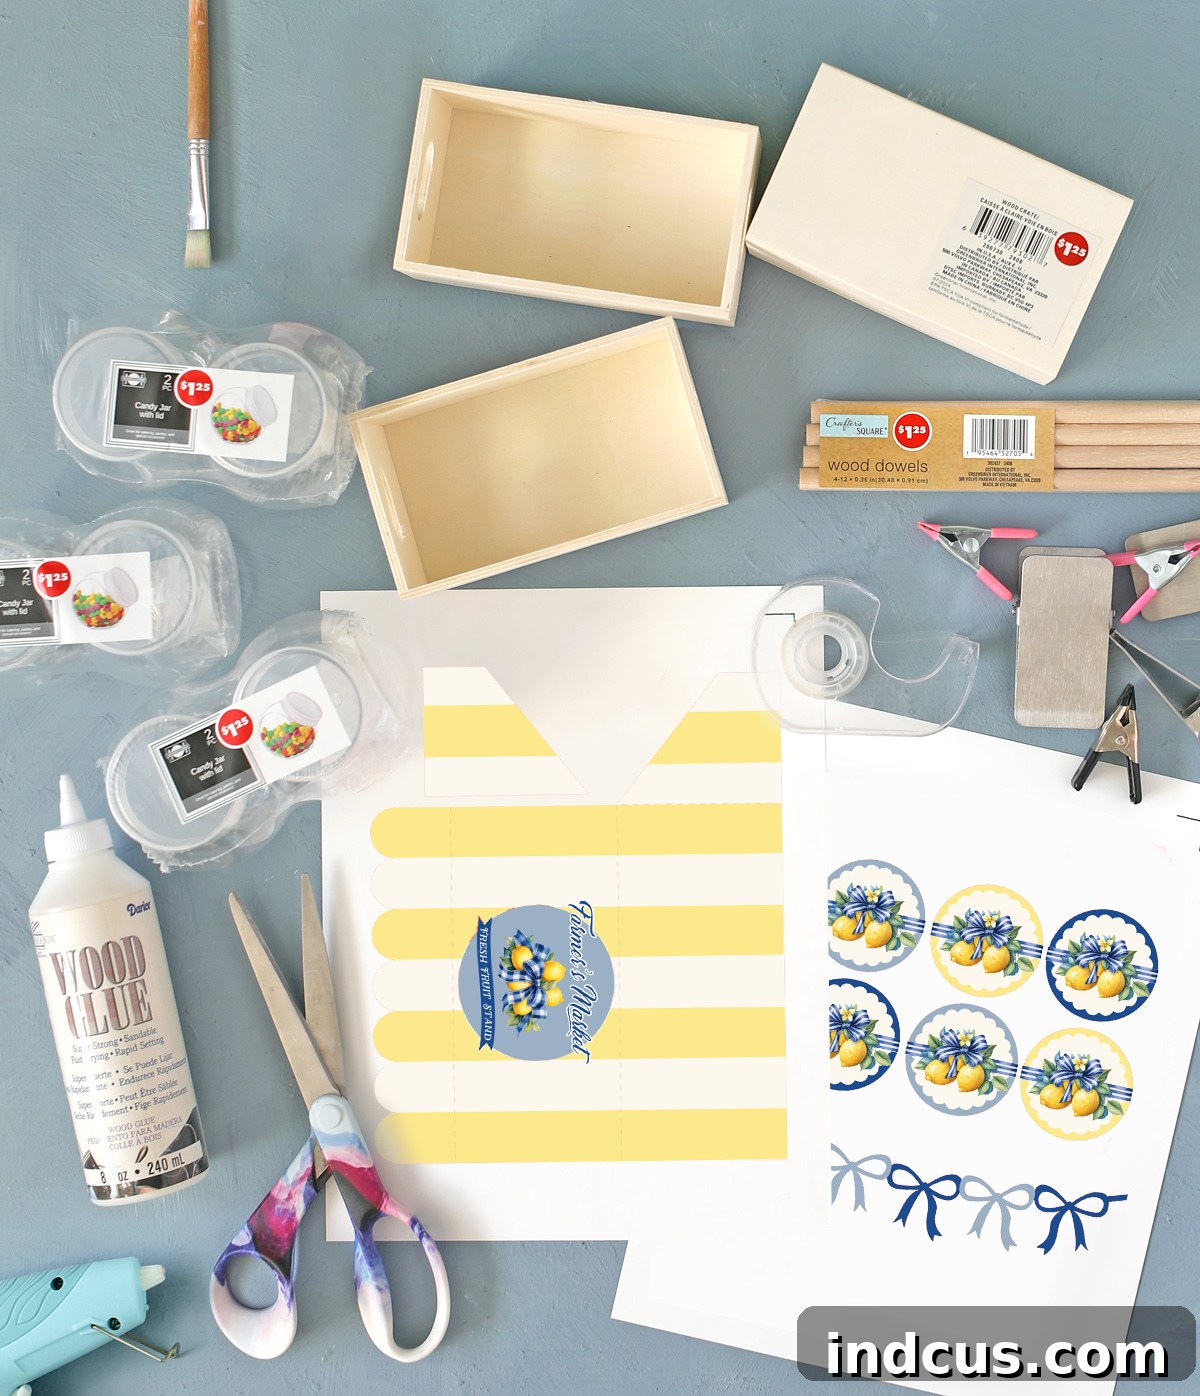
Materials Needed for Your Dollar Tree Fruit Stand Candy Shop
Crafting this charming fruit stand is incredibly straightforward, especially when you have all your materials ready. Here’s a detailed list of what you’ll need to pick up from Dollar Tree and your craft stash. Remember, the beauty of this project lies in its affordability and accessibility.
- Printable Fruit Stand Awning: This is the custom touch that truly defines your market stand. You’ll find the download link for this unique design at the very bottom of this post, available in both SVG and PDF formats to suit your crafting method.
- 3 Wooden Crates: These form the sturdy foundation and display shelves of your stand. I specifically used the Crafter’s Square Wood Crates with Handles from Dollar Tree. Their compact size is perfect for miniature projects.
- Wooden Dowels: Essential for supporting the awning, these create the classic market stall structure. Look for the Crafter’s Square Wood Dowels (4-count pack) at Dollar Tree. You’ll only need two for this project, leaving you with extras for future crafts!
- Small Candy Jars with Lids (4 total): These adorable mini jars are perfect for showcasing your fruit-themed candies. The Mini Candy Jars with Lids (2-pack) from Dollar Tree are ideal. While I initially purchased six, four proved to be the perfect number for a balanced display.
- White Cardstock: This provides a firm and clean surface for printing your awning and other decorative elements. Standard 8.5″ x 11″ white cardstock is recommended for durability.
- Wood Glue: For a strong and lasting bond between the wooden crates, a good quality wood glue is indispensable. This ensures your stand is stable and robust.
- Clamps: These are crucial for holding the wooden crates securely in place while the wood glue dries. I used Crafter’s Square Metal Craft Clamps (6-count packs) from Dollar Tree.
- Hot Glue Gun + Glue Sticks: Your trusty hot glue gun will be invaluable for quick, secure attachments, especially for the dowels and awning. Make sure you have plenty of glue sticks on hand.
- Clear Tape: A simple yet effective tool for attaching the awning and jar lid decorations. Clear tape allows for easy removal if you ever wish to swap out designs.
- White Craft Paint + Paint Brush: White paint provides a clean, versatile base for your fruit stand, allowing the colorful awning and candies to truly pop. Acrylic craft paint works perfectly.
A quick note on purchasing: I’ve linked to the exact Dollar Tree items online so you can easily identify them. However, it’s generally more practical and economical to visit your local Dollar Tree store. Many items are sold in bulk online (e.g., cases of 24), which is far more than you’ll need for this single project. Heading to the store allows you to pick up just the right quantities.
Regarding the candy jars, as mentioned, I initially grabbed six but ultimately used only four for my stand. My original thought was to place two jars on the bottom “table” section in front of the main stand, but I found the aesthetic wasn’t quite what I envisioned. Feel free to experiment with the arrangement and number of jars to suit your personal preference and the look you desire for your fruit stand.
Step-by-Step Instructions: Building Your Farmer’s Market Fruit Stand
Let’s dive into the fun part: assembling your charming fruit stand! Follow these detailed steps to create a sturdy and adorable base for your summer market.
Step 1: Assemble the Wooden Crate Base for Stability
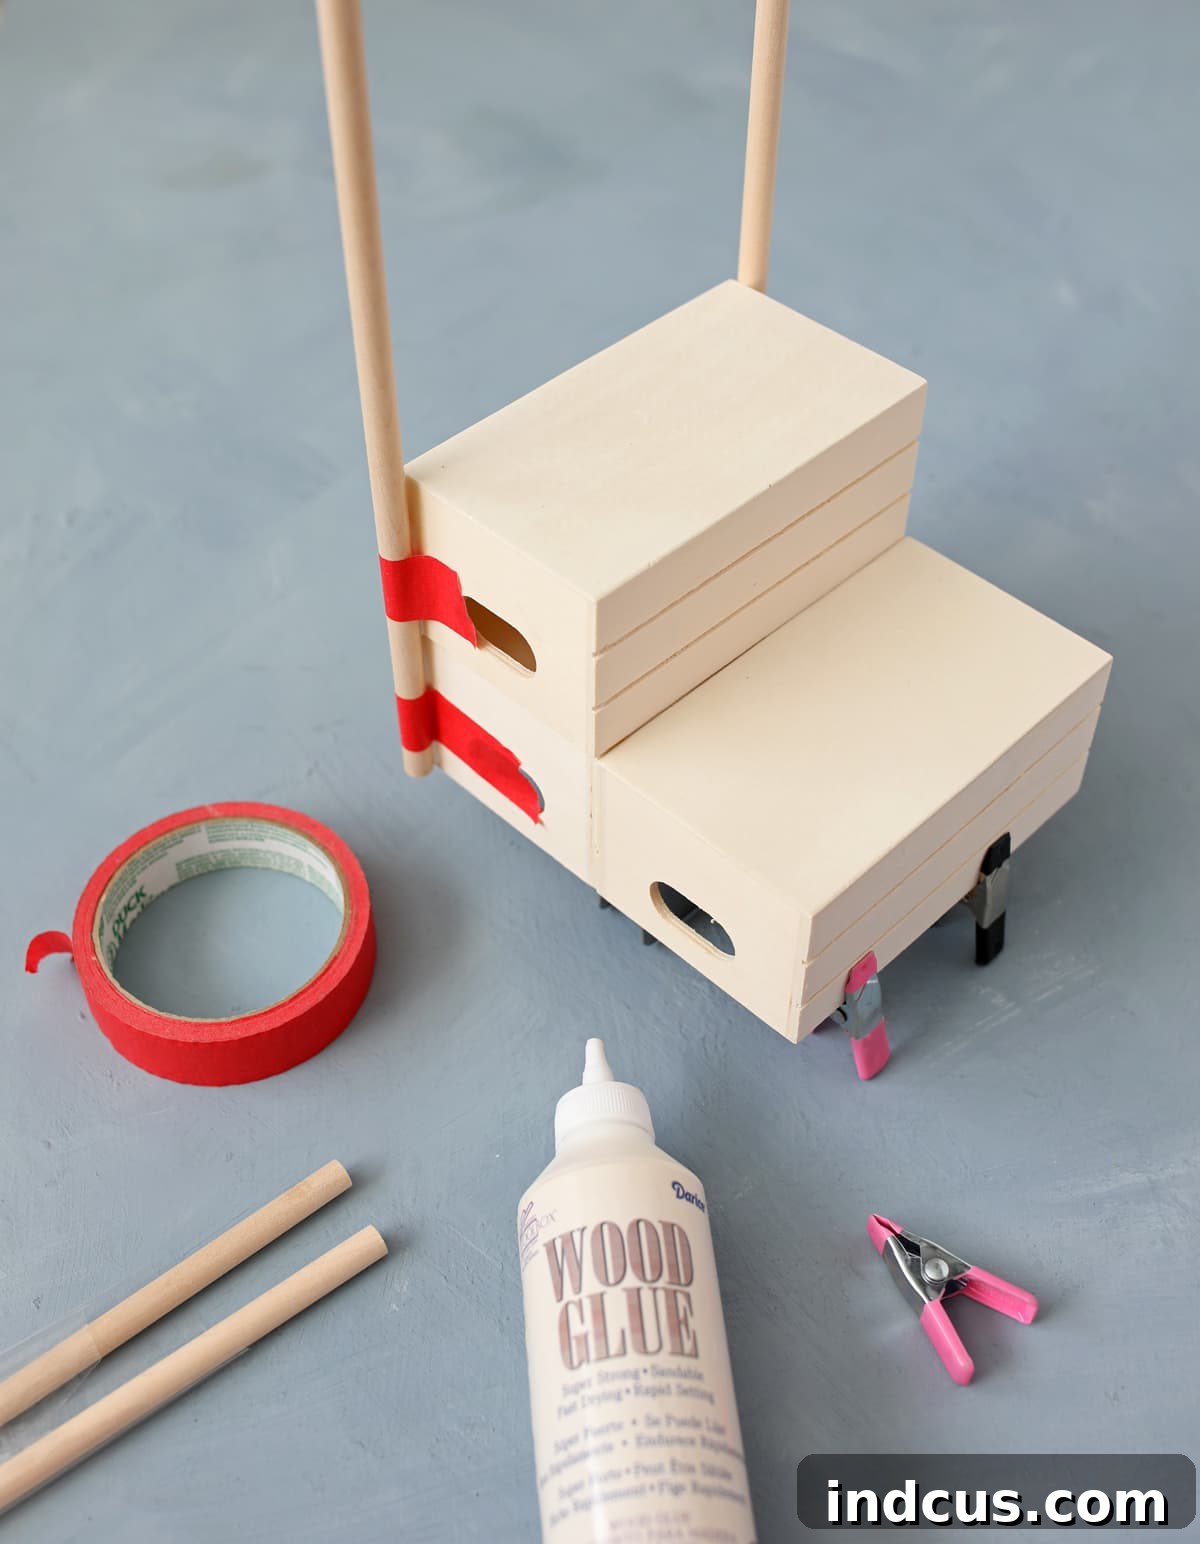
Begin by preparing your three wooden crates. Carefully remove any store stickers from all surfaces to ensure a clean finish. Once cleaned, you will arrange and glue them together to form the main structure of your stand. Position two crates side-by-side on the bottom, forming the base. Then, stack the third crate directly on top, centered over the two bottom crates. Crucially, you want all crates to be placed upside down, so their solid bottom sides face upwards. This creates flat surfaces for your display shelves. Apply a generous amount of wood glue to the edges where the crates meet. Wood glue provides a much stronger and more durable bond than hot glue for structural components. Once glued, immediately use your clamps to hold the crates tightly together. Apply firm, even pressure to ensure a secure bond. Allow the wood glue ample time to dry, ideally a minimum of one hour, or even longer if possible. This patience will be rewarded with a very stable and robust foundation for your fruit stand.
Step 2: Securely Attach the Dowels for the Awning Structure
Once your crate assembly is completely dry and stable, it’s time to add the vertical supports for your awning. Grab your hot glue gun for this step – it’s the perfect adhesive for dowels! Position one wooden dowel on each side of the top, stacked crate. You’ll want them attached to the back corners of this uppermost crate, standing vertically. Apply a generous amount of hot glue directly to the crate surface where the dowel will sit, then press the dowel firmly into the glue. The hot glue works wonderfully here because it quickly sets and can fill any slight unevenness between the dowel and the crate surface, creating excellent adhesion. I initially attempted to use wood glue for this step and found it far too messy and unstable, causing the dowels to slide. Trust me, the hot glue gun is your best friend here for instant, strong results.
Step 3: Paint Your Fruit Stand Base
Now that your fruit stand structure is fully assembled and dry, it’s time to give it a fresh coat of paint. You have a couple of options here: spray paint offers a smooth, even finish quickly, while regular craft paint applied with a brush allows for more control and detail. I highly recommend painting your entire assembled structure white. White provides a clean, classic farmer’s market aesthetic that truly makes the colorful fruit-themed awning and candies pop. Furthermore, painting it white offers incredible versatility; if you decide to change the theme for a different season or holiday in the future, you can simply swap out the awning without having to repaint the entire stand. Apply two thin coats for better coverage, allowing each coat to dry thoroughly before applying the next. This ensures a professional and long-lasting finish.
Step 4: Prepare and Assemble Your Custom Awning
The awning is the crowning glory of your fruit stand, adding character and defining its theme. This step involves printing and assembling this key decorative element. You’ll need to print the awning design onto white cardstock. Cardstock is crucial here because it’s sturdier than regular paper, allowing the awning to hold its shape beautifully and withstand a bit of handling.
To accommodate different crafting preferences and tools, I’ve thoughtfully created two variations of the awning file: an SVG file, perfect for those with electronic cutting machines like Silhouette or Cricut, and a PDF version, ideal for hand-cutting. Both file types will be available in the download folder found at the very bottom of this post, so please ensure you select and download the one that best suits your equipment and comfort level.
Both printable files are designed with a practical approach. They include the main, larger awning shape and one smaller, separate piece that will form one of the awning’s sides. This design choice was made deliberately to ensure that the entire awning, when printed, fits perfectly onto a standard piece of paper (8.5″ x 11″). You’ll combine these two pieces during assembly to create the full, three-dimensional awning.
Please note: To streamline the tutorial process and make this craft available to you sooner, some of the instructional photos for the awning assembly are reused from my Cupid’s Candy Shoppe project. Rest assured, the methods and techniques for preparing and assembling the awning are exactly the same, regardless of the specific design.
Detailed Instructions for Electronic Cutting Machine Users (Silhouette/Cricut)
If you are fortunate enough to own a Silhouette or Cricut machine, you’ll find the SVG file a game-changer for this project. It enables you to utilize your machine’s “print and cut” feature, making the process incredibly fast, precise, and effortless. If you’re new to using a Silhouette machine or simply need a quick refresher on the print and cut functionality, I highly recommend consulting this comprehensive Print and Cut tutorial. It covers all the essential steps to ensure a perfect cut every time.
Here are a couple of crucial tips to keep in mind for a successful print and cut:
– Registration Marks are Essential: Before you send your design to the printer, it is absolutely vital to turn on your registration marks within your cutting machine’s software. These small marks printed on the corners of your page serve as a guide for your machine’s optical sensor, telling it exactly where the printed design is located on the page. Without correctly detected registration marks, your machine won’t be able to align the cut lines precisely with the printed design, resulting in miscuts. Always double-check that they are enabled and correctly configured.
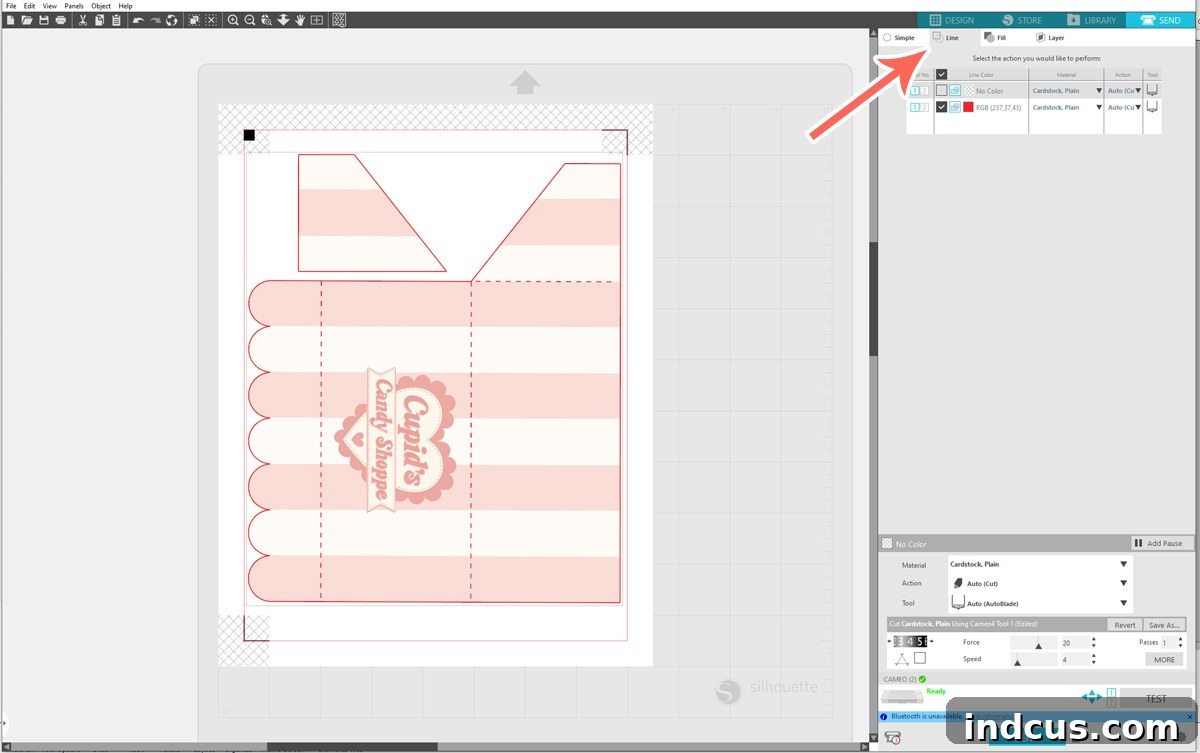
– Adjusting Cut Settings in the SEND Tab: After printing, when you navigate to the “SEND” tab (or equivalent in your software) to send the design to your machine for cutting, you might sometimes notice a multitude of unnecessary cut lines appearing all over the design, particularly if the design includes both printed patterns and cut lines. To rectify this, you’ll need to select the “LINE” sub-tab within your software’s cut settings. This option allows you to instruct the machine to only cut along the designated cut lines that define the perimeter of your design, rather than cutting every internal printed detail. Your screen should display a clean outline around the awning shape when it’s properly configured and ready to send to your machine, as illustrated in the image below.
Instructions for Cutting by Hand (No Electronic Machine Required)
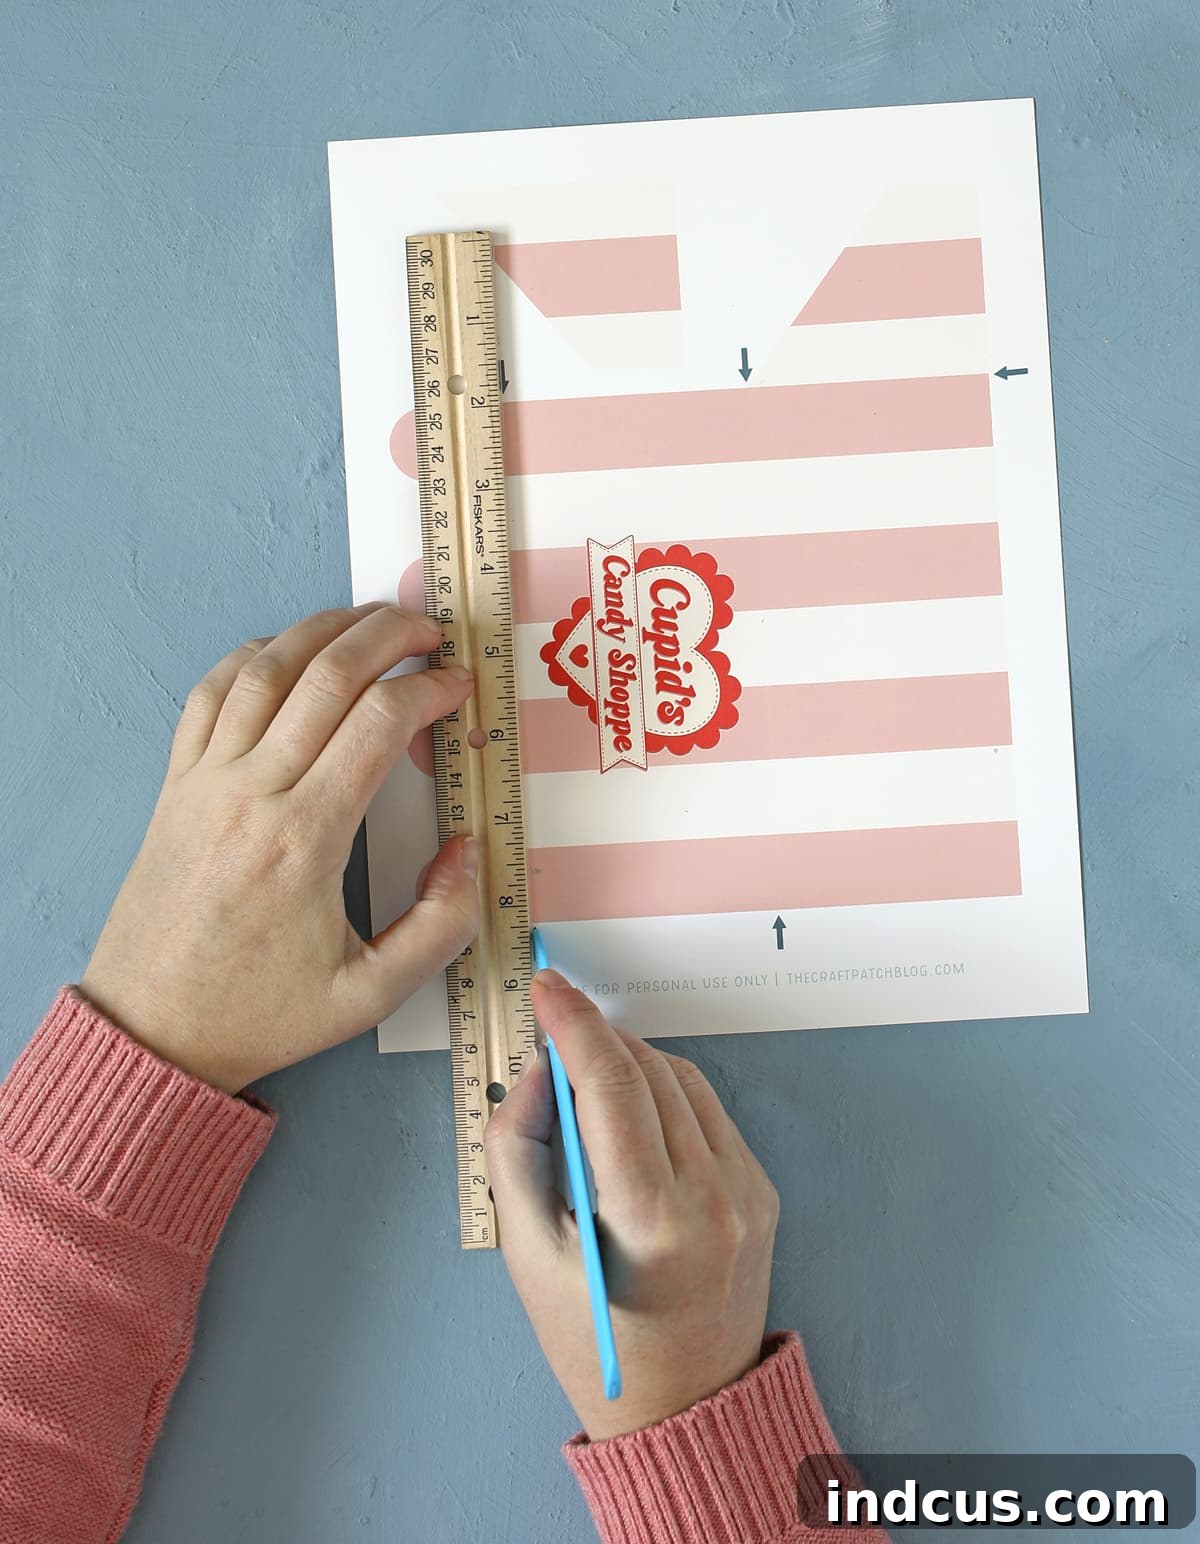
Don’t have an electronic cutting machine? No problem at all! You can absolutely still create this charming fruit stand craft with ease. Simply download the PDF version of the awning design and print it onto your white cardstock. This version is specifically designed for manual cutting, featuring clear lines to guide you. Before you begin cutting, take a moment to locate the subtle gray arrows on the printable. These arrows indicate where your fold lines should be. Using a scoring tool (or the back of a butter knife if you don’t have one) and a ruler, carefully score along these indicated lines. Scoring creates a clean, crisp fold and prevents the cardstock from cracking. After scoring, carefully cut out both the main awning shape and the small separate side piece. I purposefully designed the PDF in this manner – with scoring lines and strategic cuts – so that there are no visible lines on your finished, beautifully assembled awning, giving it a professional and polished appearance.
Once you’ve scored your fold lines (if cutting by hand), proceed to cut out both shapes. Look closely at the photo below, where I’ve outlined the shapes to clearly show you where to make your cuts. Pay particular attention to the smaller, extra piece and mentally note where it will attach to the main awning structure. This visual guide should help clarify the cutting process for a perfect result.
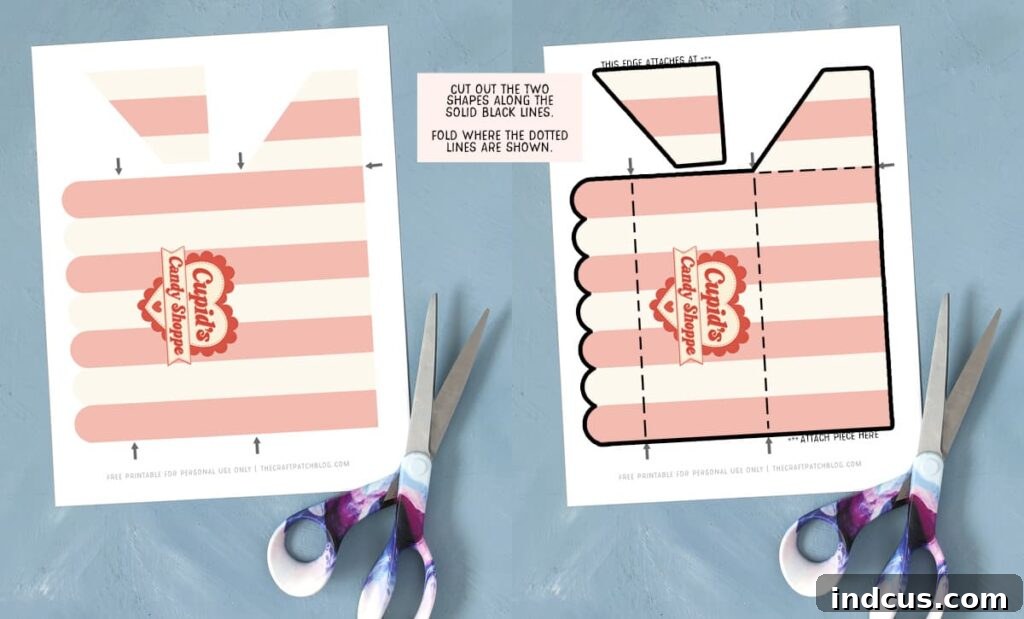
With both pieces precisely cut out, the next step is to begin folding and assembling your awning to give it its characteristic shape.
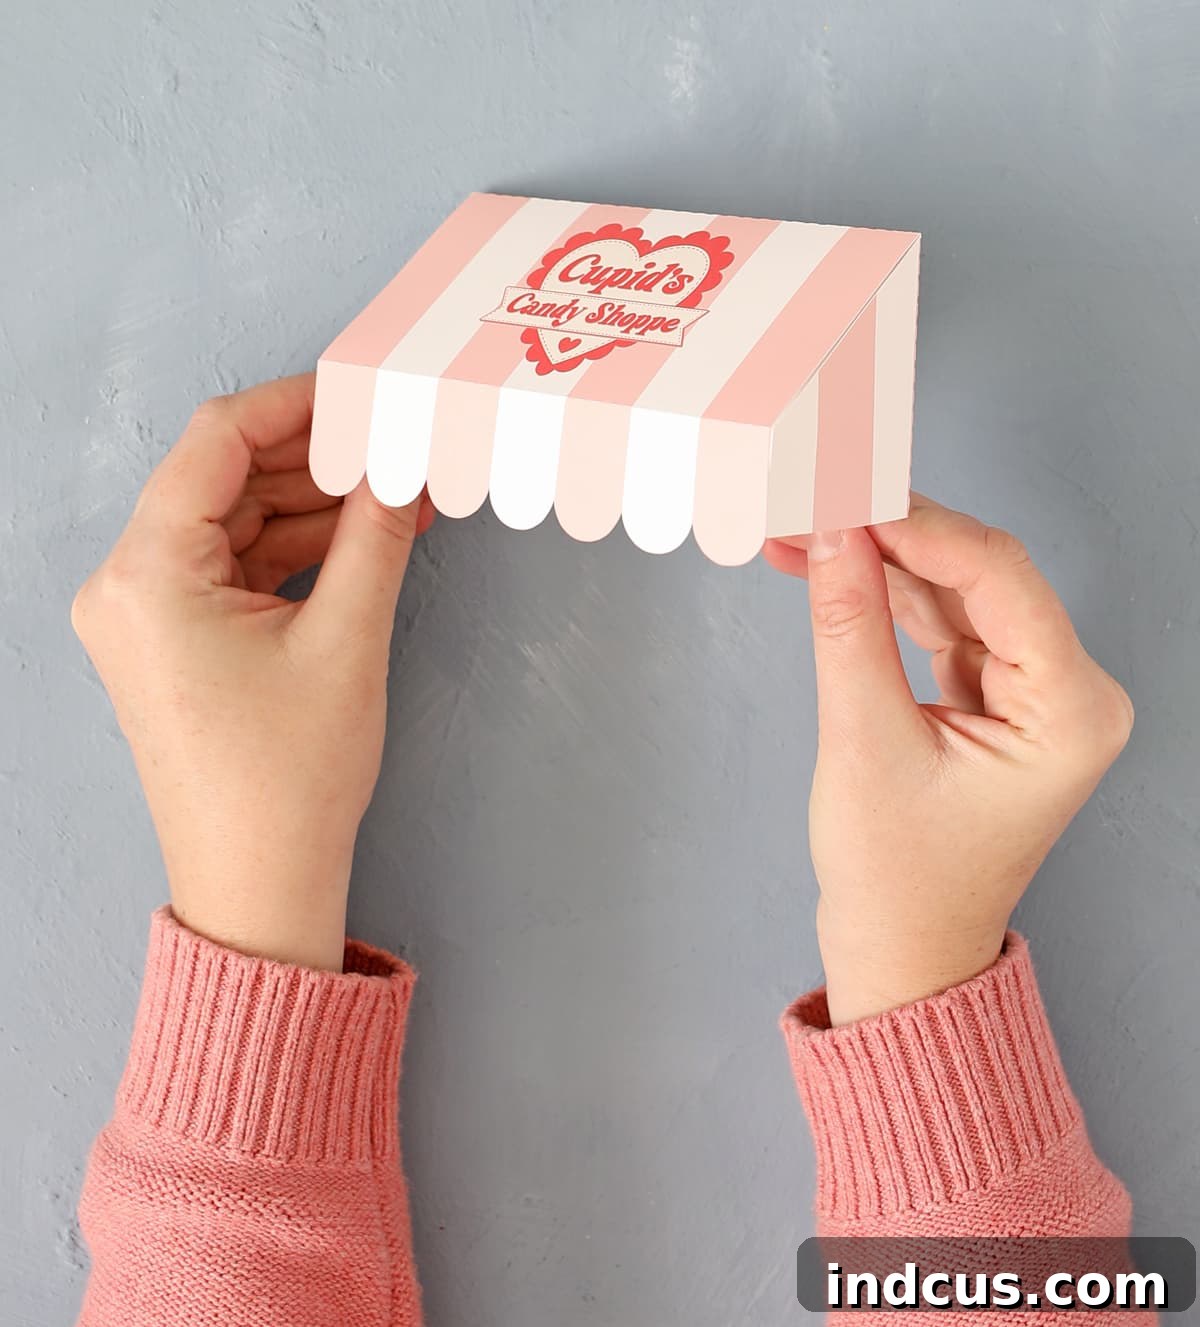
Carefully fold all of the designated fold lines *away* from you. This creates the correct inward curve for the awning. Once folded, use clear tape to securely attach the side pieces of the awning to the main center section. The clear tape creates a seamless look and allows for easy adjustments. If you’re unsure about the folding and attachment process, don’t hesitate to refer to the video tutorial provided below in this post – it offers a clear visual demonstration. When completed, your awning should have a lovely, three-dimensional form, resembling the image here:
Step 5: Attach the Awning to Your Stand
Now for the finishing touch that truly brings your fruit stand to life: attaching the colorful cardstock awning to the wooden dowels. This step is designed for flexibility. Use a few small pieces of clear tape to secure the awning to the top of the two dowels. The clear tape is intentionally used here because it offers a temporary, yet secure, hold. This ingenious method allows you to easily peel off the tape and swap out the awning for a different design when you want to re-theme your candy shop for another holiday or season down the road. This ensures your Dollar Tree craft remains versatile and enjoyable year-round!
Step 6: Add Thematic Labels to Your Candy Jar Lids (Optional Fun Extra)
To further enhance the farmer’s market theme and add an extra layer of adorable detail, I designed matching printable labels for the lids of the candy jars. These small additions truly elevate the overall look of your fruit stand, making it feel more authentic and cohesive. You’ll find these charming printables included in the same downloadable folder as the awning design, so they’re readily available if you choose to incorporate them into your project.
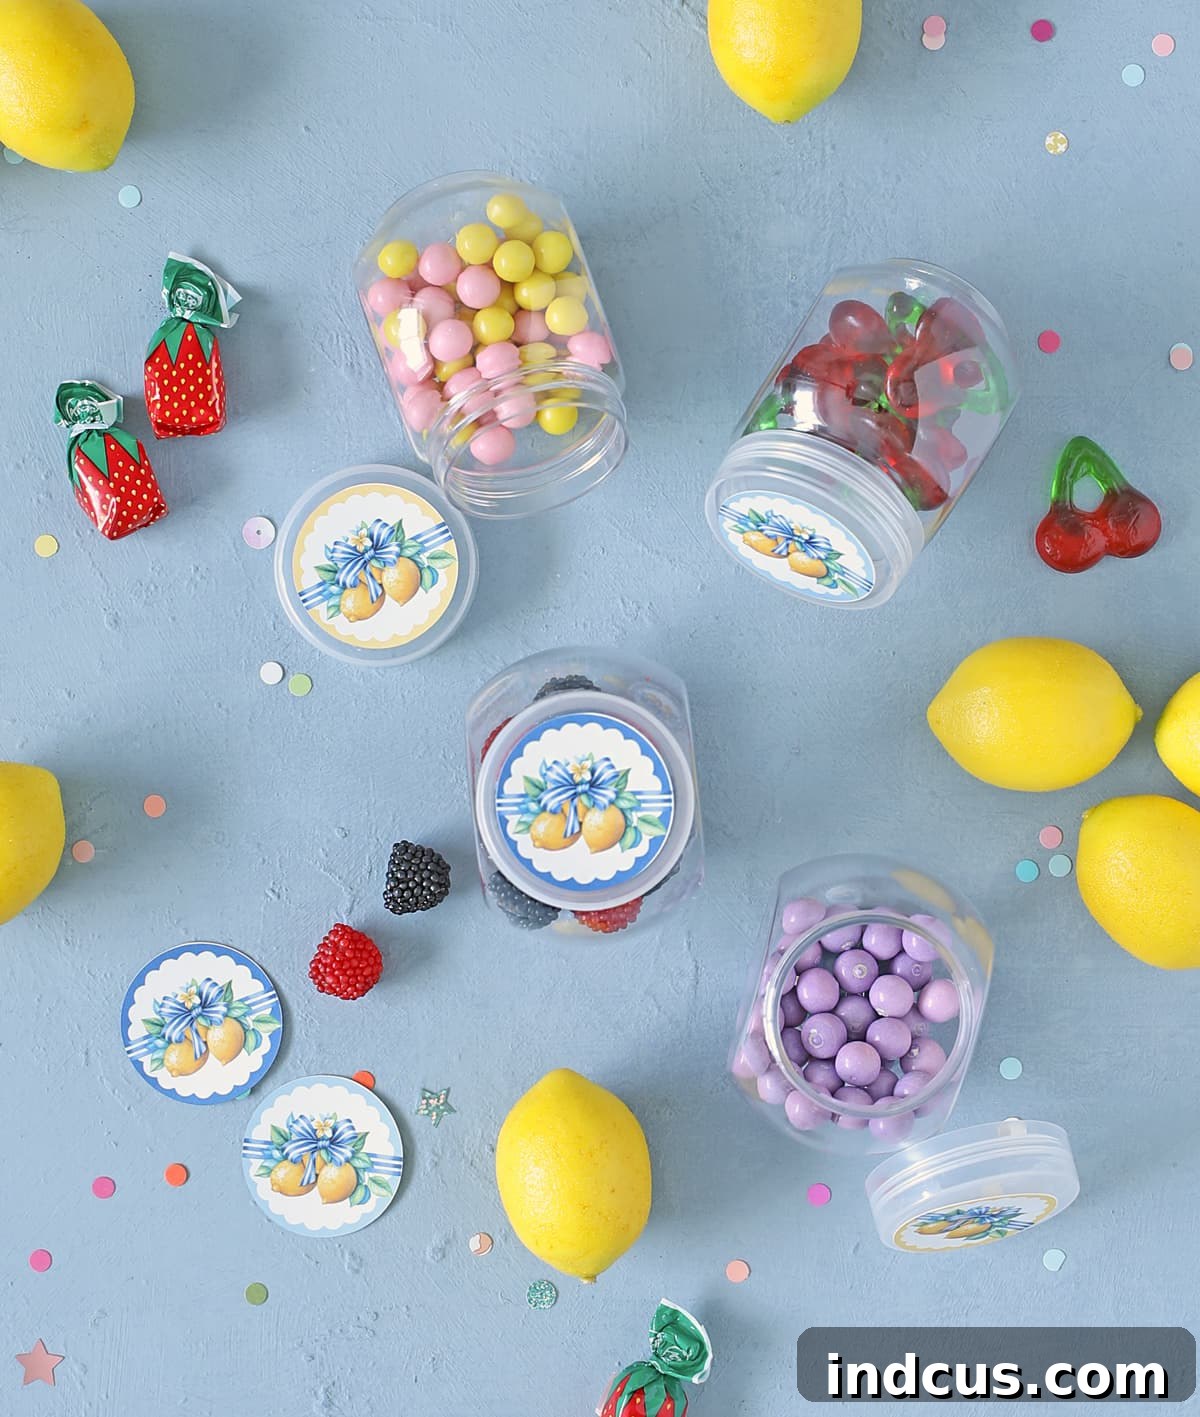
The process is incredibly simple: just print them out onto white paper or cardstock (paper is fine for this as they won’t bear any weight), then carefully cut around each circular design. To attach them to your candy jar lids, create a small loop with a piece of clear tape, sticky side out, and place it on the underside of the printed label. Then, simply press the label firmly onto the center of each jar lid. This creates a neat, easy-to-remove attachment, allowing you to change themes or clean the jars effortlessly. It’s a small detail that makes a big difference!
Video Tutorial: Watch Your Fruit Stand Come to Life!
Sometimes, seeing a craft in action makes all the difference. For those visual learners or anyone who wants an extra layer of guidance, I’ve put together a comprehensive video tutorial. This video walks you through each step of the assembly process, from gluing the crates to attaching the awning, providing helpful tips and tricks along the way. It’s especially useful for visualizing the folding and assembly of the awning. Grab your supplies, hit play, and craft along with me!
Watching the video will help clarify any steps and give you the confidence to complete your beautiful farmer’s market fruit stand with ease.
Isn’t this just the most charming and delightful little craft for summer? I’ve been so touched by the feedback from several readers who’ve shared that they made these miniature candy shops for their grandchildren. What an incredibly sweet and thoughtful idea! Imagine the sheer delight on a child’s face visiting grandma’s house, and discovering a beautifully themed little candy shop waiting just for them, filled with their favorite treats. And with the interchangeable awnings, it can transform for every visit, becoming a year-round source of wonder and joy. It’s a wonderful way to create lasting memories and add a touch of magic to everyday moments. This craft isn’t just about glue and paper; it’s about creating happiness, fostering imagination, and building connections.
Beyond being a fantastic activity to do with children or grandchildren, this fruit stand candy shop makes a lovely decorative piece for your kitchen, a child’s room, or even as a unique centerpiece for a summer party. Its bright colors and whimsical design are sure to bring a smile to anyone who sees it. You can personalize it further by adding tiny signs with candy prices, miniature baskets of faux fruit, or even tiny string lights for an evening market glow. Let your creativity soar and make this fruit stand truly your own!
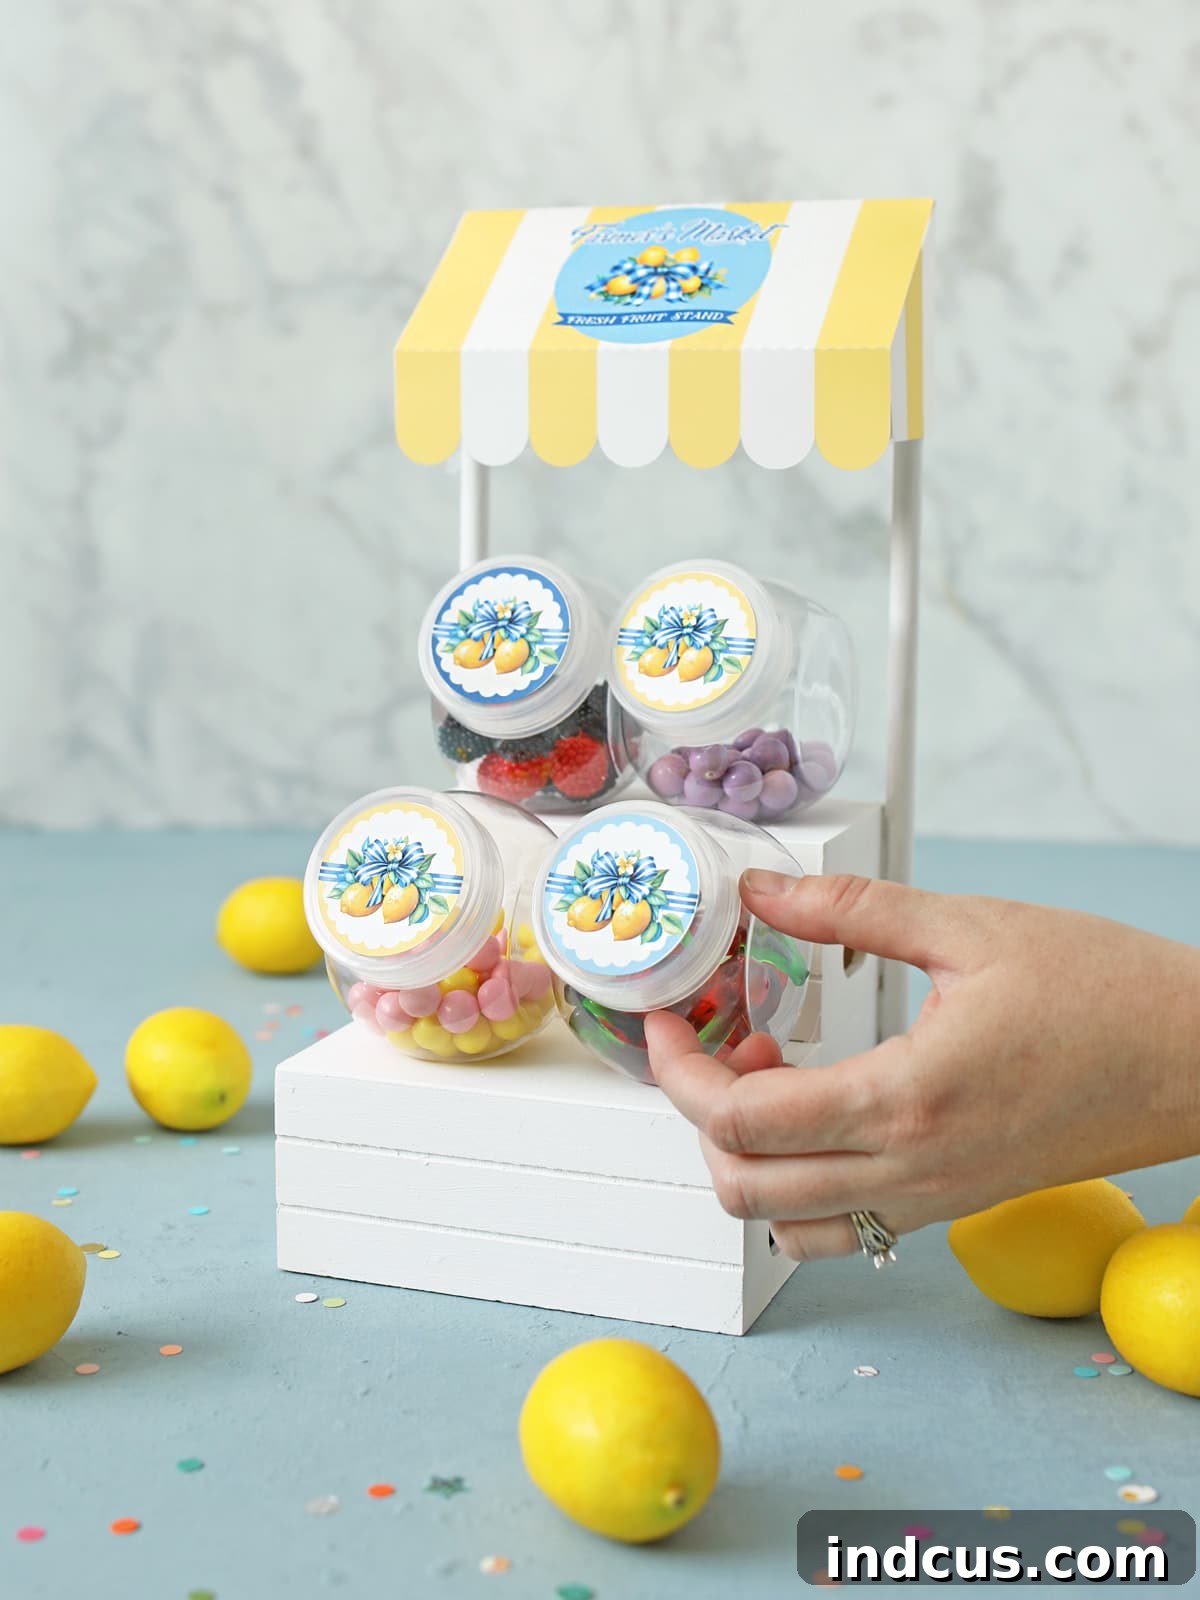
Crafting on a budget has never been this rewarding or fun. With a few simple items from Dollar Tree and a bit of creative spirit, you can construct a charming, personalized farmer’s market fruit stand that celebrates the joy of summer and the sweetness of life. Whether it’s for display, gifting, or just for the sheer pleasure of making something beautiful, this project is a true gem. Don’t forget to share your finished creations – I love seeing how you make these crafts your own!
Explore Our Full Collection of DIY Candy Shop Printables!
Loved creating this farmer’s market stand? Dive deeper into our world of seasonal mini candy shops! Each design offers a unique theme for holidays and seasons, making them perfect for year-round crafting and decorating. Discover new ways to bring joy and sweetness into your home with these charming, budget-friendly projects.
-
Cupid’s Candy Shoppe Valentine’s Day Craft
-
DIY Easter Candy Shop
-
Farmer’s Market Fruit Stand Candy Shop Craft
-
Halloween Candy Shop Craft
-
Shamrock Sweets Shop St. Patrick’s Day Craft
-
Patriotic Candy Shop Craft







