Craft Your Custom Thanksgiving Tablecloth: A DIY Guide to Personalized Holiday Decor with Iron-On Vinyl
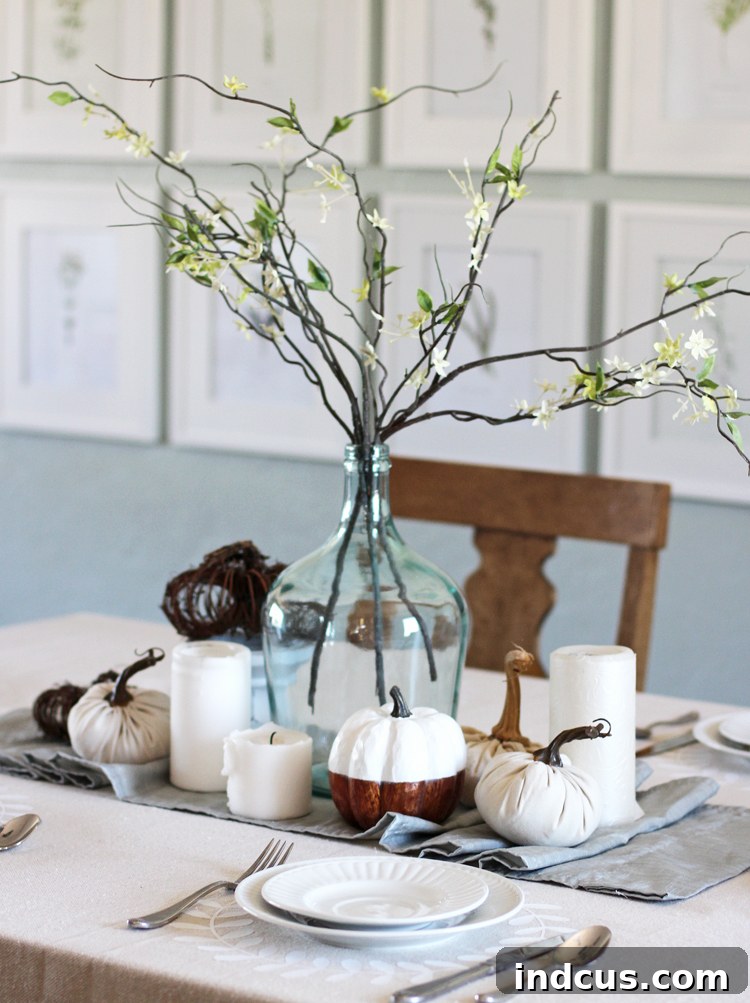
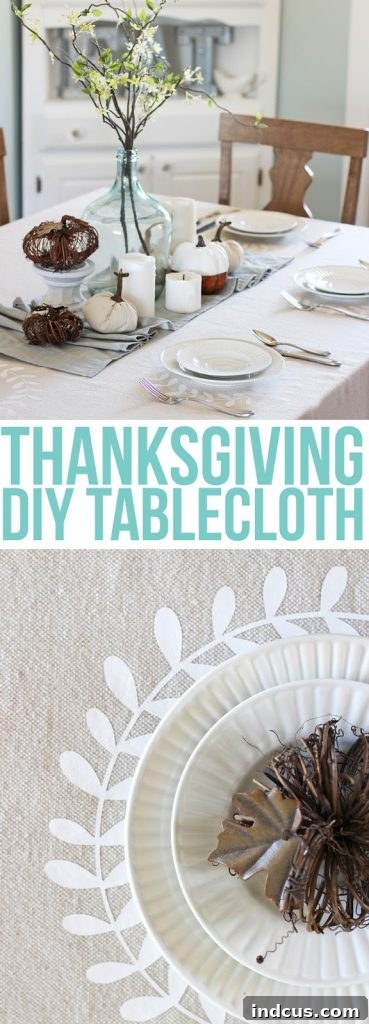
The quest for unique and heartwarming Thanksgiving decorations can often lead to disappointment in crowded stores, where mass-produced items rarely capture the personal touch we crave for our holiday gatherings. This year, transcend the ordinary by creating your very own custom Thanksgiving tablecloth. Imagine a beautifully adorned table, perfectly reflecting your unique style, ready to host cherished moments with family and friends. This delightful DIY project, utilizing an economical canvas drop cloth and versatile iron-on craft vinyl, promises to elevate your neutral Thanksgiving table decor with an undeniable charm and personality. I recently embarked on this creative journey, incorporating subtle, elegant wreaths around each place setting using pristine white heat transfer vinyl, and the results were simply breathtaking.
This post is proudly sponsored by Expressions Vinyl, your trusted source for high-quality craft vinyl.
Why DIY Your Thanksgiving Tablecloth? Embracing Creativity and Customization
In a world of mass consumption, handmade items offer an unparalleled sense of warmth and authenticity. Crafting your Thanksgiving tablecloth isn’t just about saving money; it’s about infusing your holiday celebration with personal meaning and a distinct flair. Here are compelling reasons to embark on this rewarding project:
- Uniqueness & Personalization: Say goodbye to generic decor. Your custom tablecloth will be one-of-a-kind, designed exactly to your taste, whether you prefer a minimalist, rustic, or traditionally elegant aesthetic. You can choose patterns, fonts, and messages that resonate deeply with your family’s traditions.
- Cost-Effectiveness: High-quality, personalized tablecloths can be surprisingly expensive. A canvas drop cloth offers an incredibly affordable base, allowing you to allocate your budget towards the creative details, like premium heat transfer vinyl.
- Perfect Fit for Any Table: Standard tablecloths often don’t fit unique table shapes or sizes perfectly. By making your own, you ensure a flawless drape and optimal design placement, tailored precisely to your dining area.
- Creative Expression: This project is a fantastic outlet for your creativity. Experiment with different designs, colors, and themes to perfectly complement your existing home decor or to introduce a fresh look for the holiday season.
- Building Traditions: A DIY Thanksgiving tablecloth can become a cherished part of your family’s annual traditions, creating lasting memories as it graces your table year after year. Imagine adding a new element each year or having children contribute to a new design as they grow.
- Versatility in Design: While wreaths are a classic choice, the possibilities are endless! Think about adding names, dates, gratitude phrases, or even playful autumn motifs. The beauty of heat transfer vinyl (HTV) lies in its adaptability.
Ready to create a memorable centerpiece for your Thanksgiving feast? Follow this comprehensive, step-by-step guide to craft a stunning and personalized tablecloth that will be the talk of the holiday season.
Essential Materials for Your Custom Thanksgiving Tablecloth
Before diving into the creative process, gather your materials. Choosing the right components ensures a smooth crafting experience and a durable, beautiful final product. (Please note: some links below are affiliate links, meaning I may earn a small commission if you make a purchase, at no extra cost to you.)
Materials Needed:
- White Heat Transfer Vinyl (HTV): The star of our show! HTV, also known as iron-on vinyl, is specially designed to adhere to fabric when heat is applied. White offers a crisp, elegant, and versatile look that complements virtually any decor scheme. For this project, I recommend a high-quality brand like EasyWeed from Expressions Vinyl, known for its ease of use and durability.
- Cutting Machine (e.g., Silhouette Cameo or Cricut): An electronic cutting machine is invaluable for precise and intricate designs. The Silhouette Cameo (or a Cricut machine) allows you to cut your chosen wreath designs with professional accuracy, saving you immense time and effort compared to hand-cutting.
- Canvas Drop Cloth: This forms the base of your tablecloth. Canvas drop cloths are an excellent choice due to their affordability, robust nature, and neutral color, which provides a perfect backdrop for your vinyl designs. They are readily available at home improvement stores like Walmart or Harbor Freight, or even craft stores. Alternatively, you can use any plain tablecloth of your preferred material, ensuring it’s suitable for HTV application.
- Heat Application Tool:
- Iron: A standard household iron can be used, provided it reaches a high, consistent temperature and allows for firm pressure.
- Cricut EasyPress (or a heat press): For optimal results, especially with larger designs or multiple applications, a heat press or an EasyPress is highly recommended. These tools provide even heat and consistent pressure, which are crucial for proper vinyl adhesion and longevity.
- Weeding Tool: A small hook or tweezers to remove excess vinyl from your cut design.
- Ruler or Measuring Tape: Essential for precise placement of your designs on the tablecloth.
- Parchment Paper or Thin Cloth: To protect your vinyl and iron during the heat application process.
Step-by-Step Instructions: Crafting Your Personalized Thanksgiving Tablecloth
With your materials ready, let’s transform that plain canvas into a holiday masterpiece. Precision and patience are key!
Instructions:
- Design Selection & Software Preparation:
- Begin by downloading a beautiful wreath design from the Silhouette Design Store (or your preferred design platform). I personally utilized a section of this charming Christmas wreath, but the store offers a plethora of lovely choices suitable for Thanksgiving.
- Crucial Step: Sizing! Before cutting, carefully consider the size of your dinner plates. Measure the diameter of your plates and decide how much of the wreath you want to show around the edges. It’s always better to make them slightly larger than too small. Adjust the design dimensions within your Silhouette software accordingly. For designs larger than your vinyl sheet (typically 12 inches wide), you’ll need to strategically cut them in sections, which we’ll discuss later.
- Mirror Your Design: This is a critical step for HTV! Always remember to mirror (flip horizontally) your design in the software before sending it to cut, as you will be applying it face down.
- Adjust Cut Settings: Select the appropriate cut settings for your specific type of heat transfer vinyl. Test cuts are highly recommended on a small scrap piece to ensure your blade depth and force are perfect, preventing cutting through the clear carrier sheet.
- Load HTV: Place your heat transfer vinyl onto the cutting mat with the shiny side down. The duller, adhesive side should be facing up.
- Cutting and Weeding the Vinyl:
- Once your design is cut, carefully remove the vinyl from the cutting mat.
- Using your weeding tool, gently peel away all the excess vinyl from around your design, leaving only the desired wreath shape attached to the clear transfer sheet. Take your time with intricate details to ensure clean edges.
- You should now be left with a perfectly weeded design, securely adhered to its clear carrier sheet.
- Strategic Placement on the Drop Cloth:
- This step is where your vision comes to life. Lay your canvas drop cloth smoothly on your dining table, ensuring it’s straight and centered.
- Place your dinner plates on the tablecloth where each person will sit. This gives you a visual guide for where your wreaths should go.
- Arrange each weeded wreath design, sticky side down, onto the drop cloth. The white vinyl design should be underneath the clear transfer sheet.
- Take your time to adjust, measure, and re-adjust the placement of each wreath. Ensure they are evenly spaced, centered with your plate markers, and aligned symmetrically. Step back and view the entire tablecloth to confirm the overall aesthetic.
- Heat Application: Securing Your Designs:
- Once you are completely satisfied with the placement of all your designs, it’s time to apply heat. For a large tablecloth, lifting it to an ironing board can risk shifting your carefully placed designs. My solution was to keep the tablecloth on the dining table and slide sections onto an ironing board placed at the end of the table. This allows you to work systematically without disturbing other designs.
- Place a thin cloth or a piece of parchment paper over the design you are about to iron. This protects both your vinyl and your iron.
- Using your hot iron or EasyPress, apply firm, even pressure over the design for 45-60 seconds. If using an EasyPress, follow the manufacturer’s recommended time and temperature settings for your specific HTV type and fabric. For an iron, ensure it’s on a high, dry heat setting (no steam) and press down with your full weight.
- Peel the clear carrier sheet away slowly and carefully, preferably while the vinyl is still warm (though some HTV is cold peel; check your vinyl’s instructions). If any part of the vinyl lifts, simply lay the carrier sheet back down, cover with your cloth, and reapply heat for another 10-15 seconds.
- Repeat this process for each wreath, moving the tablecloth section by section until all designs are securely ironed into place.
Tips for Success and Customization
Every crafting project presents opportunities for learning and refinement. Here are some insights from my experience and ideas to further customize your creation:
Making Wreaths Bigger: A Pro Tip
One lesson learned during my project was the importance of pre-measuring plates! My initial 12×12 inch wreaths were slightly too small to show prominently around the edges of standard dinner plates, prompting me to use salad plates for the photographs. If I were to do this again, I would definitely make the wreaths larger to create a more impactful statement.
For larger wreaths, especially if your design exceeds the width of your vinyl sheet (often 12 inches), here’s how to achieve seamless results:
- Adjust Size in Software: Enlarge your wreath design to the desired size in your Silhouette or Cricut design software.
- Slice the Design: Carefully cut the design in half or into manageable sections within the software, ensuring that each piece will fit onto a single sheet of vinyl. Try to make the cuts in less visible areas or where the design naturally breaks.
- Cut & Weed Separately: Cut and weed each half or section of the design individually, remembering to mirror each piece.
- Piece Together on Fabric: When applying the vinyl to your tablecloth, align the two halves or sections precisely on the fabric to create a complete, larger wreath. Take your time to match up the edges perfectly before applying heat. The clear carrier sheets make alignment much easier. Once aligned, apply heat as instructed in step 4.
Beyond Wreaths: Endless Customization Possibilities
Even with the initial sizing hiccup, I absolutely adore how this project turned out, and it feels perfectly suited for Thanksgiving. The real magic of this DIY lies in its adaptability. Here are just a few ideas to spark your imagination for future customizations:
- Guest Names: Personalize each place setting by adding the name of each guest within or above their wreath. This adds a charming, thoughtful touch and doubles as a seating arrangement!
- Thanksgiving Phrases: Encircle the edges of your tablecloth with meaningful Thanksgiving phrases like “Give Thanks,” “Gather & Feast,” or “Blessed & Grateful.”
- Favorite Foods: Imagine adorable, birds-eye-view graphics of your favorite Thanksgiving dishes – a tiny turkey, a slice of pumpkin pie, cornucopia overflowing with harvest goods. This would be incredibly cute and unique!
- Autumn Motifs: Instead of wreaths, consider using individual fall leaves, pumpkins, acorns, or stylized corn stalks.
- Grateful Messages: Create small, heartfelt messages of gratitude or blessings around the table, encouraging reflection during your meal.
- Different Colors: While white offers elegant neutrality, don’t shy away from experimenting with other HTV colors that complement your Thanksgiving palette – perhaps metallic gold, a deep cranberry, or earthy tones.
The beauty of a custom tablecloth is that it evolves with your creativity. Each year, you could add new elements, update colors, or try completely different designs to refresh your holiday decor. This project is not just about making a tablecloth; it’s about crafting memories and injecting your personality into the heart of your home for the most grateful holiday.
Care and Maintenance for Your DIY Tablecloth
To ensure your personalized Thanksgiving tablecloth remains a beautiful part of your holiday traditions for years to come, proper care is essential. Heat transfer vinyl is durable, but gentle handling will preserve its integrity:
- Washing: When it’s time to clean, turn the tablecloth inside out. Wash in cold water on a gentle cycle with mild detergent. Avoid harsh chemicals or bleach, as these can degrade the vinyl adhesive and color.
- Drying: Tumble dry on a low heat setting, or preferably, air dry by hanging the tablecloth. High heat in the dryer can cause the vinyl to peel or crack over time.
- Ironing: If ironing is needed, iron the tablecloth inside out, or place a thin cloth over the vinyl designs to protect them from direct heat. Never iron directly on the vinyl.
- Storage: Store your tablecloth folded or rolled in a clean, dry place, away from extreme temperatures. Avoid creasing the vinyl designs excessively.
Conclusion: A Tablecloth Crafted with Love and Gratitude
Creating your own personalized Thanksgiving tablecloth with iron-on craft vinyl and a humble canvas drop cloth is more than just a craft project; it’s an act of love and an expression of your unique style. It allows you to step away from the mundane and infuse your holiday celebrations with a truly custom touch that store-bought items simply cannot replicate. From the subtle elegance of white wreaths to the potential for adding names, meaningful phrases, or whimsical designs, the possibilities for personalization are truly boundless.
This project proves that with a little creativity and some accessible materials, you can transform ordinary items into extraordinary pieces that become cherished heirlooms. Imagine the compliments from your guests as they gather around a table set with such thoughtful detail, each wreath or custom design adding to the festive and grateful atmosphere. So, gather your supplies, unleash your creativity, and make this Thanksgiving truly special with a tablecloth that tells your unique story. Your beautifully adorned table will not only look stunning but will also serve as a testament to the joy of handmade craftsmanship and the spirit of gratitude. Happy crafting, and may your Thanksgiving be filled with warmth, love, and beautiful memories!