Our Dream Kitchen Remodel: A Jaw-Dropping Before & After Transformation!
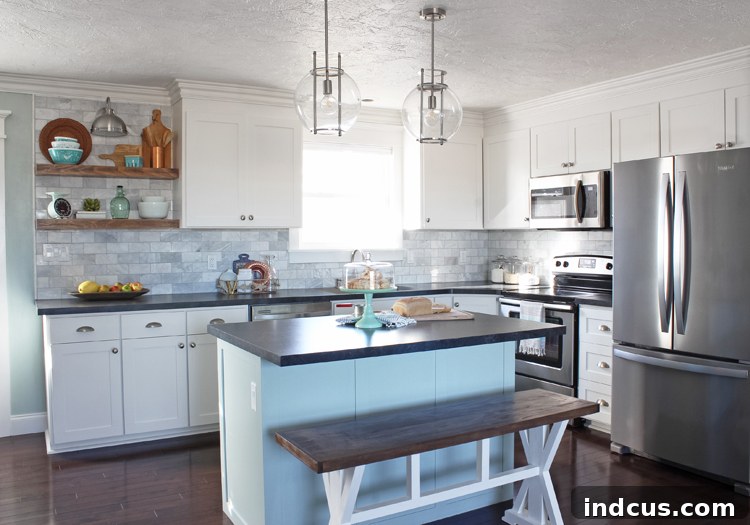
For those who have followed our journey on this blog, you know this day has been a long time coming. Today, with immense joy and pride, we are thrilled to finally unveil the complete transformation of our kitchen! This wasn’t just a remodel; it was a labor of love, a testament to perseverance, and a vision brought to life. After countless hours, meticulous planning, and a fair share of DIY adventures, our once outdated and dysfunctional kitchen has been reborn. Prepare to be amazed as we present the heart of our home:
The feeling of stepping into this space now is indescribable. It’s a culmination of a long-held dream, and every detail reflects the careful thought and effort poured into its creation. We’ve redefined functionality, enhanced aesthetics, and created a true sanctuary for cooking, entertaining, and family gatherings. It’s more than just a kitchen; it’s the vibrant new soul of our home.
Recalling the “Before”: A Journey from Dated to Dreamy
To truly appreciate the transformation, let’s take a moment to revisit where we started. It’s easy to forget the challenges once you’re basking in the glory of the “after,” but understanding the original state highlights the monumental changes we’ve achieved. Prepare for a trip down memory lane with these striking before photos:
Our old kitchen presented a myriad of design and functional challenges. It was oddly partitioned by a cumbersome beam and a bulky wood pillar right in the middle of the room, creating an obstructed and confined feel. The cabinets, a dated knotty pine, contributed to a heavy, rustic aesthetic that no longer aligned with our vision for a brighter, more modern home. Adding to the rustic theme, the floor was composed of pine shiplap planks, which, while perhaps charming in a log cabin, proved to be an absolute nightmare to keep clean in a high-traffic kitchen environment. Dust and debris seemed to cling to every groove, making routine maintenance an endless chore.
Aesthetically, the kitchen lacked cohesion and appeal. The backsplash was bland and uninspiring, doing nothing to elevate the space. The countertops, tragically, had been poorly tiled over with granite tiles, resulting in an uneven and visually jarring surface that felt rough to the touch and offered little in terms of practical use. Beyond the visual shortcomings, the layout itself was incredibly inefficient. A prime example was the dishwasher’s placement: opening it meant completely blocking access to the peninsula cupboards and making it impossible to reach the cabinet directly above to put dishes away. This constant traffic jam made post-meal cleanup a frustrating experience. Furthermore, the space between the bar stools and the kitchen table was uncomfortably tight, leading to constant bumping and congestion whenever we hosted guests. This “major traffic clog” was a daily source of annoyance and a clear sign that a complete overhaul was desperately needed.
The DIY Journey Begins: Step-by-Step Transformation
Our comprehensive kitchen remodel officially kicked off in January of 2016, starting with a foundational change that would impact the entire open-concept living area. We began by replacing all the flooring throughout the kitchen, dining, and living rooms. We chose stunning solid maple hardwood floors, which immediately brightened the space and provided a cohesive, elegant base. This was a significant undertaking, and we even documented the entire process in a detailed tutorial for Wayfair on how to install your own hardwood floor, offering valuable insights for fellow DIY enthusiasts.
Simultaneously with the flooring installation, we tackled a critical structural and layout change. The existing U-shaped kitchen, defined by a peninsula that restricted movement and created the aforementioned bottlenecks, needed a drastic rethink. We strategically rotated the cabinets that formed this peninsula, aligning them flush against the back wall. This pivotal alteration transformed our kitchen from a cramped U-shape into a much more open and efficient L-shape, instantly improving traffic flow and opening up the central area. This single decision was instrumental in creating the spacious feel we desired.
With the new L-shaped layout established, the next logical step was to introduce a central focal point and additional workspace: a custom island. We ingeniously constructed this island using pre-fabricated cabinet bases from Home Depot, a cost-effective solution that still allowed for a personalized touch. This island now serves as a multi-functional hub for prep, casual dining, and storage, making it an indispensable part of our redesigned kitchen.
Resourcefulness was a cornerstone of our remodel, especially when it came to countertops. Instead of opting for expensive stone, we proudly DIY-ed our own laminate countertops. This allowed us to achieve a beautiful, modern look on a budget. Furthermore, we even innovated a way to incorporate an undermount sink with laminate countertops, a feat often considered challenging but one that provides a seamless and easy-to-clean surface.
One of the most defining and beloved features of our new kitchen is undoubtedly the marble subway tile backsplash. It adds an element of timeless elegance and subtle texture that truly elevates the entire space. The natural veining of the marble brings a sophisticated touch, contrasting beautifully with the clean lines of the cabinets and countertops. Here’s a glimpse of the progress during its installation:
To further enhance the open feel and inject some personal character, we removed the upper cabinets that previously hung above the peninsula. In their place, we installed stylish floating shelves. These shelves not only visually open up the space but also provide a wonderful opportunity to display our favorite dishes, cherished decor pieces, and seasonal accents. The warmth of the wood and the curated displays instantly add character and a welcoming touch to the kitchen, making it feel truly ours.
One of the most significant ways we managed to save a substantial amount of money on our kitchen remodel was by ingeniously reusing our existing cabinet boxes. Instead of ripping out and replacing entire units, which can be incredibly costly, we opted for a smart, budget-friendly solution: simply replacing the cabinet doors. This monumental task fell to my incredibly talented husband, who personally built over 30 new cabinet doors. His craftsmanship is truly amazing, and the result is a beautiful, cohesive look. We chose a timeless shaker style, known for its clean lines and versatility, which perfectly complements the modern farmhouse aesthetic we were aiming for.
Beyond the main kitchen area, we also maximized every inch of our home’s potential. We transformed what was once an awkward, underutilized space at the top of our steps into a highly functional walk-in pantry. This addition has been a game-changer for organization and storage, providing dedicated space for groceries, small appliances, and pantry staples, thereby decluttering the main kitchen area and enhancing its efficiency.
To illuminate our new island and define the space, we installed elegant pendant lights. These fixtures not only provide essential task lighting but also serve as beautiful decorative elements, drawing the eye and adding a touch of modern sophistication to the heart of the kitchen.
A crucial detail that adds a polished and finished look to our kitchen is the extension of the upper cabinets all the way to the ceiling, capped with elegant crown molding. This not only enhances the visual height of the room but also provides a seamless, built-in appearance. And here’s a little secret: it’s not traditional wood molding! We opted for innovative foam crown molding. This choice offered surprising benefits in terms of ease of installation, cost-effectiveness, and a flawless finish, all of which we detailed in a dedicated blog post.
Finding the perfect seating for our island proved to be a quest that spanned the entire internet. After much deliberation, we decided against traditional bar stools, opting instead to build a custom counter-height bench to accompany our island. This decision has been a resounding success, especially with children in the house. The bench eliminates the constant need to chase down errant stools that inevitably get dragged across the kitchen floor. We’ve even shared the detailed building plans here, so others can enjoy the practicality and style of this innovative seating solution.
The Functional & Aesthetic Payoff: Our New Kitchen
Cooking and entertaining in this transformed kitchen are now an absolute delight. The flow has been dramatically improved, making every task from meal prep to cleanup seamless and enjoyable. The previous bottlenecks and awkward spaces are a distant memory, replaced by an intuitive and welcoming environment that encourages culinary creativity and social interaction.
One of the most impactful improvements is the creation of four distinct work zones, a feature that truly elevates the kitchen’s functionality. This thoughtful design means that four adults can comfortably and efficiently work in the kitchen simultaneously without getting in each other’s way. There’s ample space at the large counter to the left of the sink for food preparation, a dedicated zone at the stove for cooking, and two versatile areas on either side of the island for additional prep, baking, or casual dining. The days of struggling with an open dishwasher blocking critical pathways are over; there is now abundant space to open it fully and efficiently put dishes away. And as a personal touch that brings immense satisfaction, the center section of the island cleverly houses a pull-out garbage can—a feature I have wanted for what feels like forever and absolutely adore for its convenience and discreet integration.
Reflections and Lessons Learned from Our DIY Kitchen Remodel
Looking back on this extensive project, it’s hard to imagine changing much. The satisfaction of seeing our vision come to life, largely through our own efforts, is incredibly rewarding. If I were to undertake this journey again, the primary difference would be the invaluable knowledge gained from our initial mistakes and learning experiences. The “doing things right the first time” mentality comes from having gone through the process once. One specific change I would consider is selecting a lighter color for the hardwood flooring. While our current floor is undeniably gorgeous and adds a rich warmth to the space, its darker hue tends to highlight every crumb and speck of dust, making it a challenge to keep looking pristine. A lighter wood might offer a bit more forgiveness in the daily battle against dirt, yet the overall aesthetic and functionality are precisely what we dreamed of.
This kitchen remodel has been more than just an aesthetic upgrade; it’s transformed how we live in our home. It’s a testament to the power of vision, hard work, and the incredible satisfaction of a DIY project completed. We hope our journey inspires you to tackle your own home renovation dreams!
Our Kitchen Remodel Source List
For those interested in recreating elements of our dream kitchen, here is a comprehensive list of the products and resources we used throughout our DIY renovation. Please note that some links may be affiliate links, meaning we may earn a small commission if you make a purchase through them, at no extra cost to you. Your support helps us continue to create helpful content!
- Solid Maple Hardwood Floors from Shaw Floors in Montrose/Brandt Point Brown
- Laminate Countertops: Formica Basalt Slate Scovato Finish
- Foam Crown Molding
- Marble Subway Tile Backsplash
- Undermount Sink
- Moen Edison Kitchen Faucet
- Wall and Island Paint Color: Sherwin-Williams Rainwashed
- Kitchen Cabinet Paint
- Floating Shelves Tutorial
- Cabinet Hardware Knobs and Pulls
- Globe Pendant Lights
- Wall Sconce Over Floating Shelves
- Chandelier
- Rug