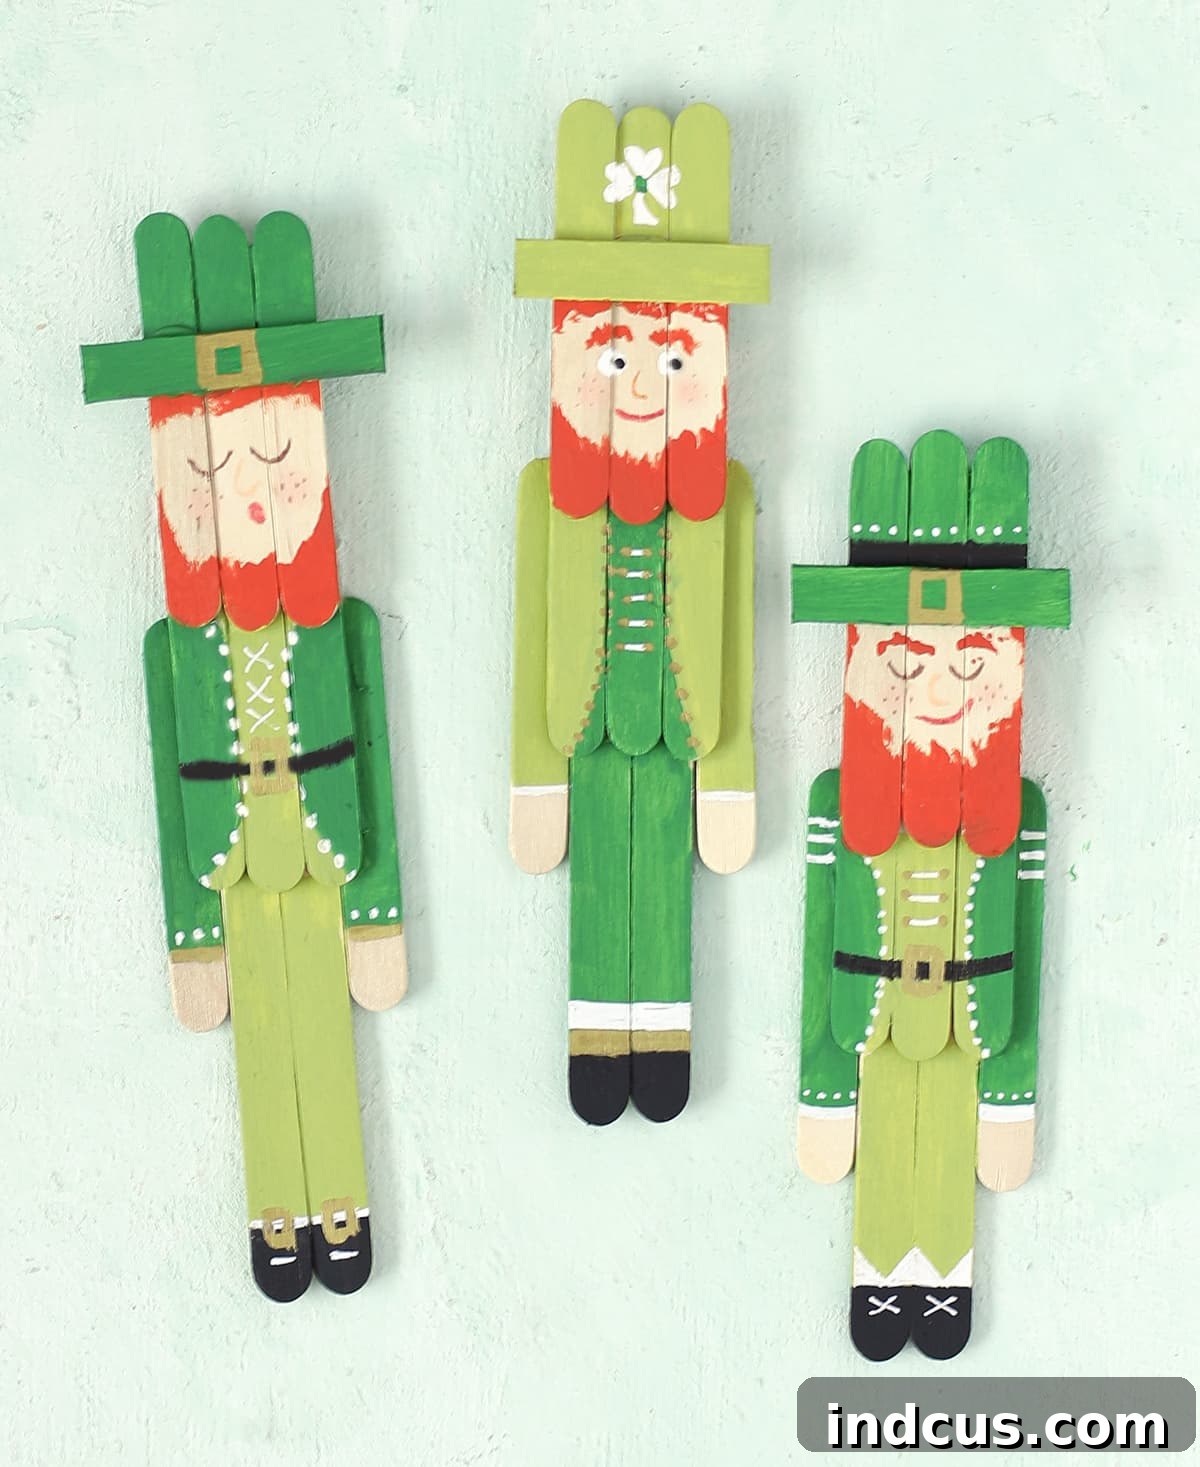
Craft Fun: Create Adorable Popsicle Stick Leprechauns for St. Patrick’s Day!
St. Patrick’s Day is a time for celebration, good luck, and all things green! If you’re searching for a wonderfully engaging and super fun craft project to get into the festive spirit, look no further. We’re about to embark on a magical journey to create the cutest popsicle stick leprechauns you’ve ever seen! Inspired by the charm of our popsicle stick nutcrackers, these little leprechauns are bursting with personality and are surprisingly simple to make. They’re perfect for decorating your home, as classroom projects, or simply for an afternoon of creative fun. Get ready to sprinkle some Irish magic and watch these charming characters come to life!
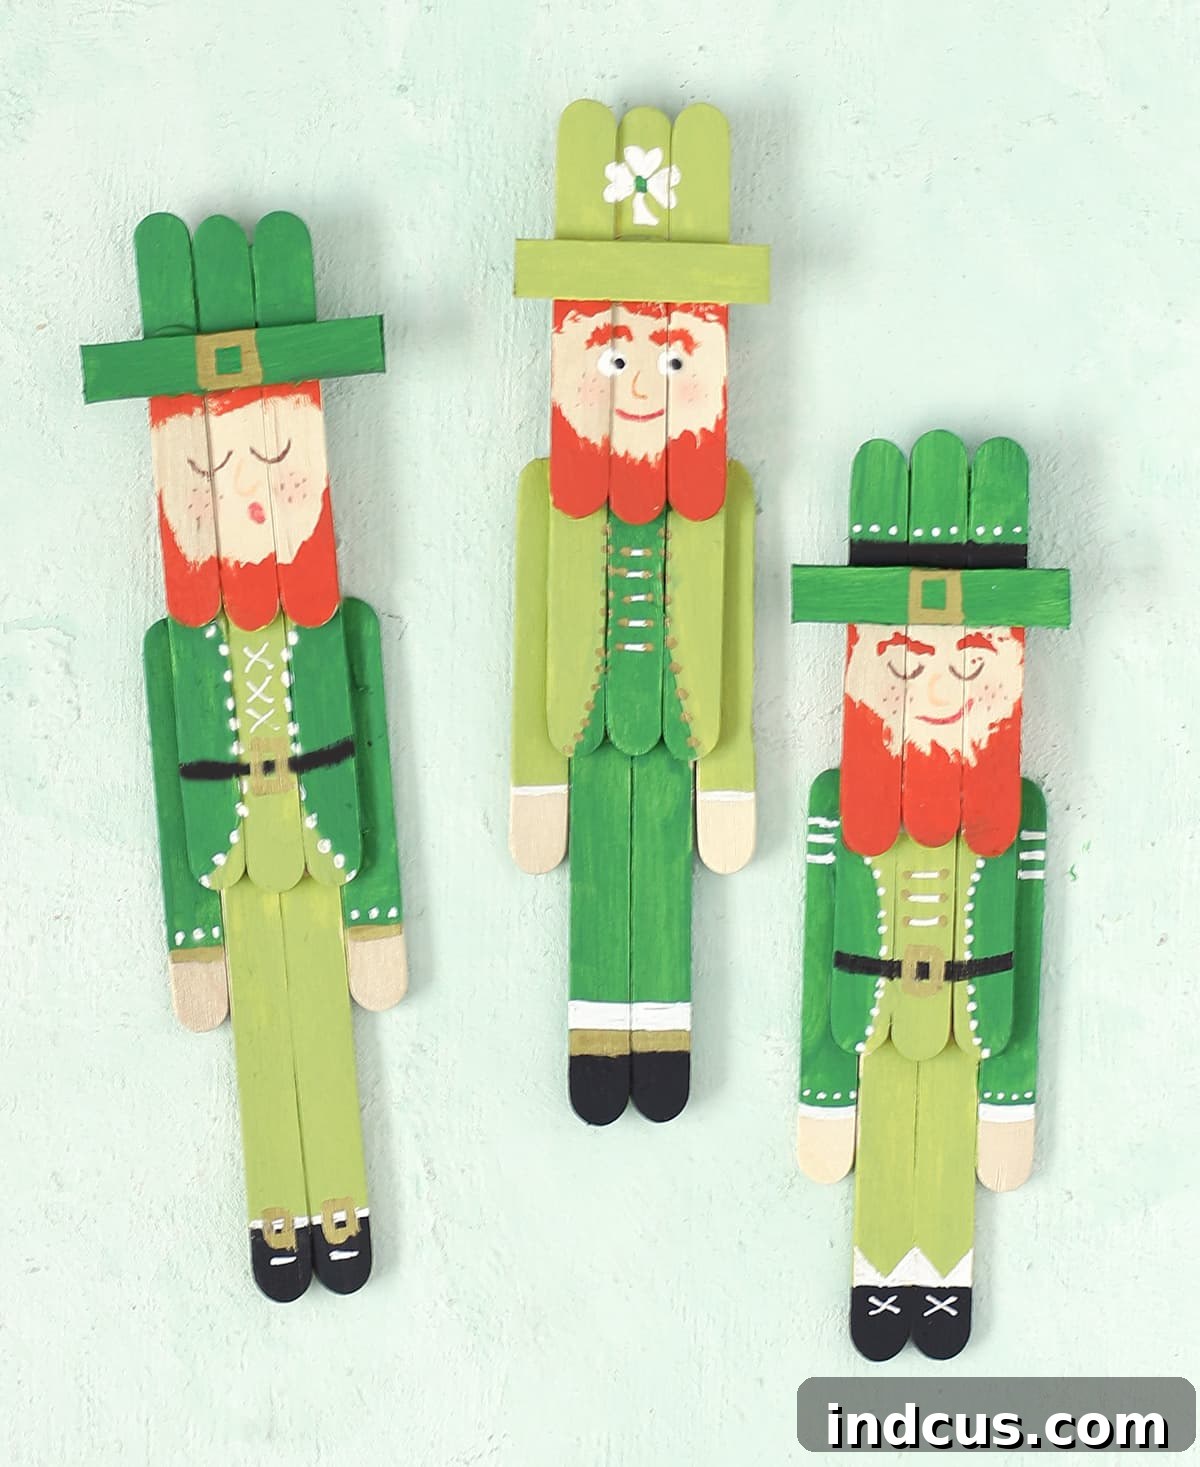
Crafting these little men is not just about the final product; it’s about the joy of creation, the shared laughter, and the sense of accomplishment. Each leprechaun you make will have its own unique quirks, making them truly special. Whether you’re a seasoned crafter or just starting, this guide will walk you through every step, ensuring a delightful experience for everyone involved. Let’s gather our supplies and begin crafting some St. Patrick’s Day cheer!
Essential Supplies for Your Leprechaun Craft
Before we dive into the creative process, let’s make sure you have all the necessary materials on hand. Most of these items can be found at your local craft store, or even in your existing craft supply stash. Gathering everything beforehand ensures a smooth and enjoyable crafting session.
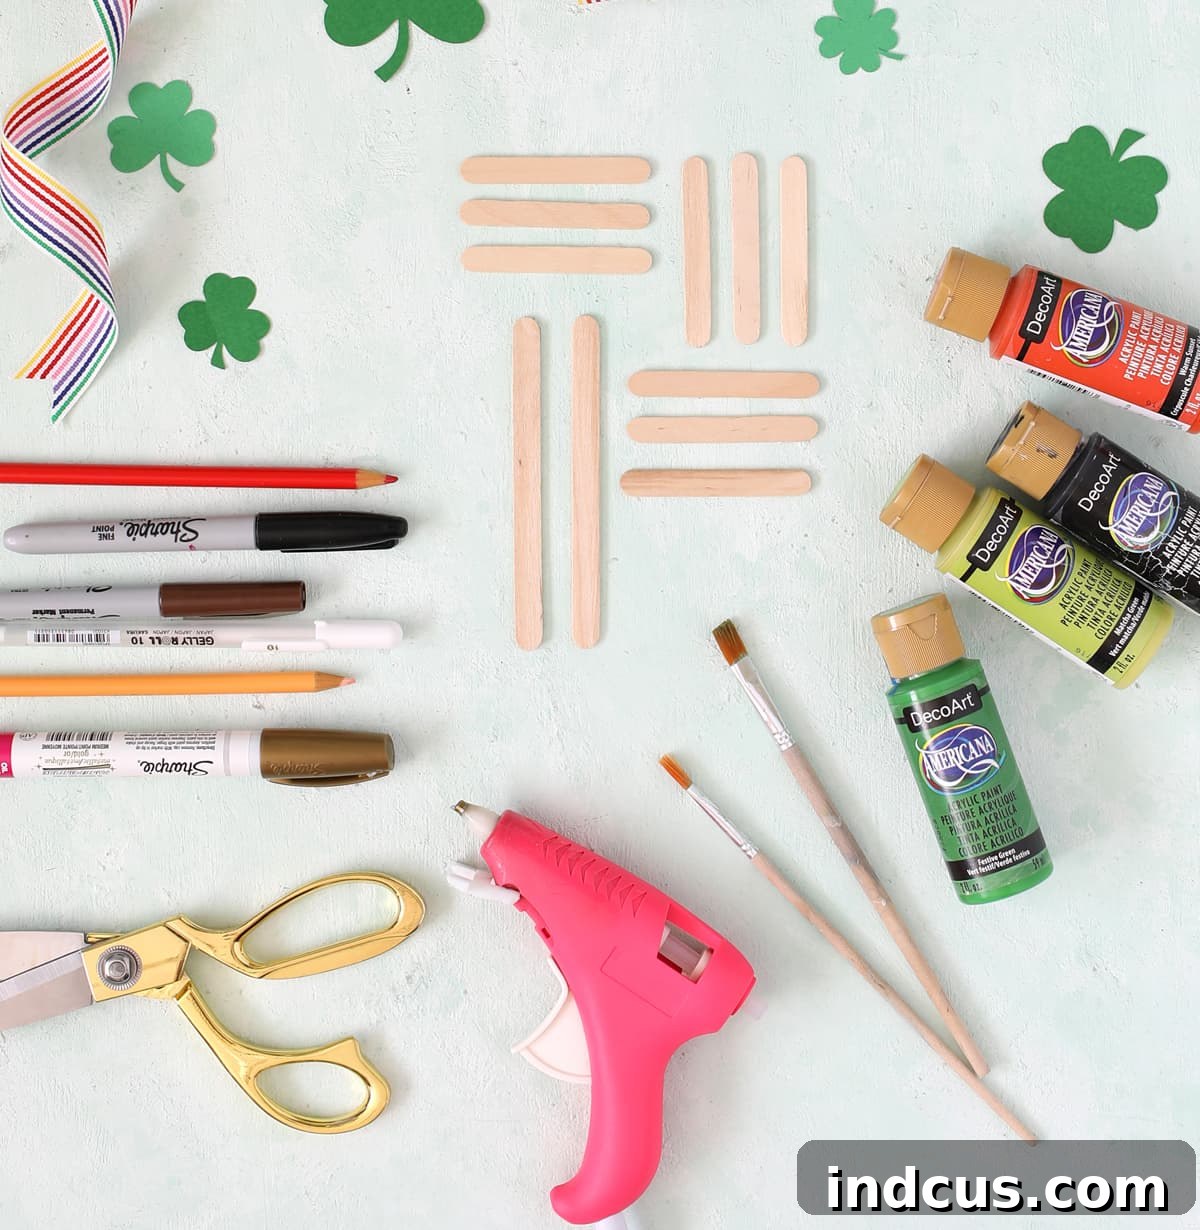
Materials List:
- Nine Small Craft Sticks (2.5 inches long): These smaller sticks will form the body, arms, and hat details of your leprechauns, offering a sturdy base for your design.
- Two Regular Craft Sticks (4.5 inches long): These longer sticks will serve as the foundation for the leprechaun’s legs, giving them their distinctive stance.
- Hot Glue Gun + Glue Sticks: Hot glue provides a quick and strong bond, essential for assembling the craft sticks. Always exercise caution or supervise children when using a hot glue gun.
- Craft Paint: You’ll need at least two shades of green for the leprechaun’s outfit (one darker, one lighter to add depth), black for the boots and hat details, and orange or red for the classic leprechaun beard and hair. Acrylic craft paint works perfectly and dries quickly.
- Small Paint Brushes: A variety of small brushes will help you achieve fine details and smooth coverage for different parts of your leprechaun.
- Paint Pens (or Fine-Tip Markers): These are fantastic for adding intricate details like eyes, buttons, buckles, and shoelaces. We recommend white, gold, and black for vibrant and crisp lines.
Step-by-Step Guide: Crafting Your Lucky Leprechauns
Now that you have all your materials ready, let’s bring these charming little characters to life! Follow these instructions carefully, but don’t be afraid to add your own creative flair along the way. Each leprechaun will be a unique reflection of your imagination.
Step 1: Assemble the Craft Stick Base
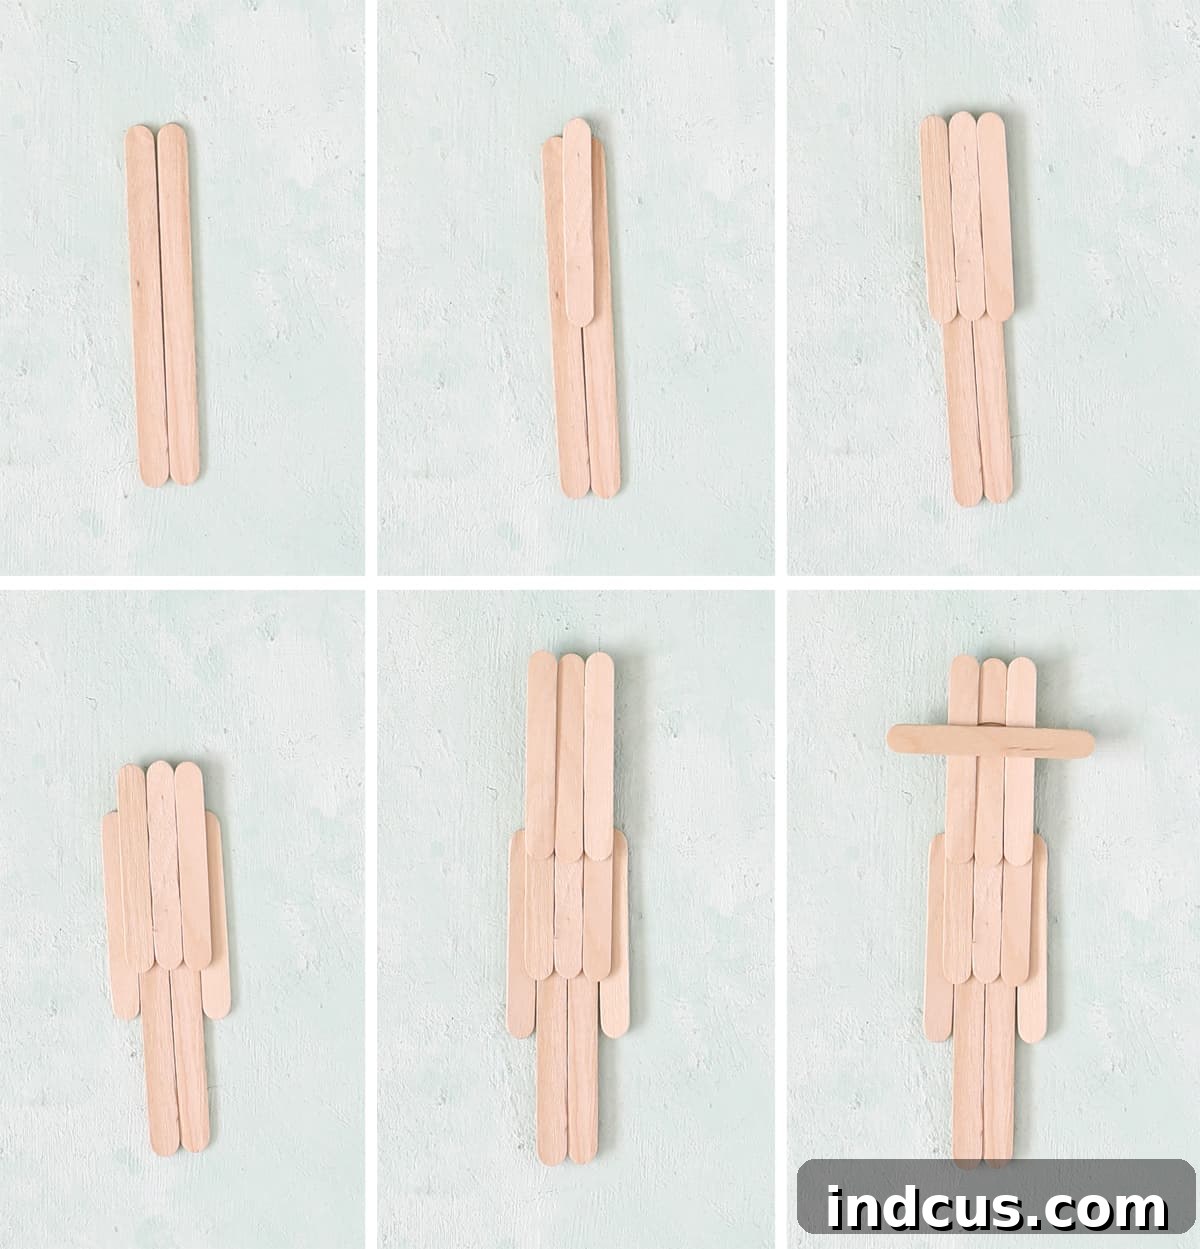
Begin by laying out your craft sticks to form the basic shape of your leprechaun. The two regular (4.5-inch) sticks will serve as the legs, and one small (2.5-inch) stick will be the main body. Arrange them as shown in the photo, overlapping slightly where they will connect. Use your hot glue gun to firmly attach the sticks together. Hold each joint for a few seconds to ensure a strong bond before moving on.
Creative Tip: This is where you can start to give each leprechaun its distinct personality! Experiment with the proportions: make one with longer legs for a lanky look, or shorter ones for a stout and whimsical appearance. You can also adjust the angle of the legs slightly for a dynamic pose. Don’t worry about perfect symmetry; the charm often lies in their individuality.
Step 2: Trim the Hat Brim
Once the main body is assembled, you’ll notice one of the smaller craft sticks forms the brim of the leprechaun’s hat. In many cases, this stick might appear a little too wide for a balanced look. Using a sharp pair of scissors or craft snips, carefully trim down the ends of this stick to achieve a more proportionate hat brim. A little trim goes a long way in refining the overall silhouette of your leprechaun’s iconic headwear.
Safety Note: Always cut away from your body, and if kids are helping, ensure adult supervision for this step, or handle the cutting yourself.
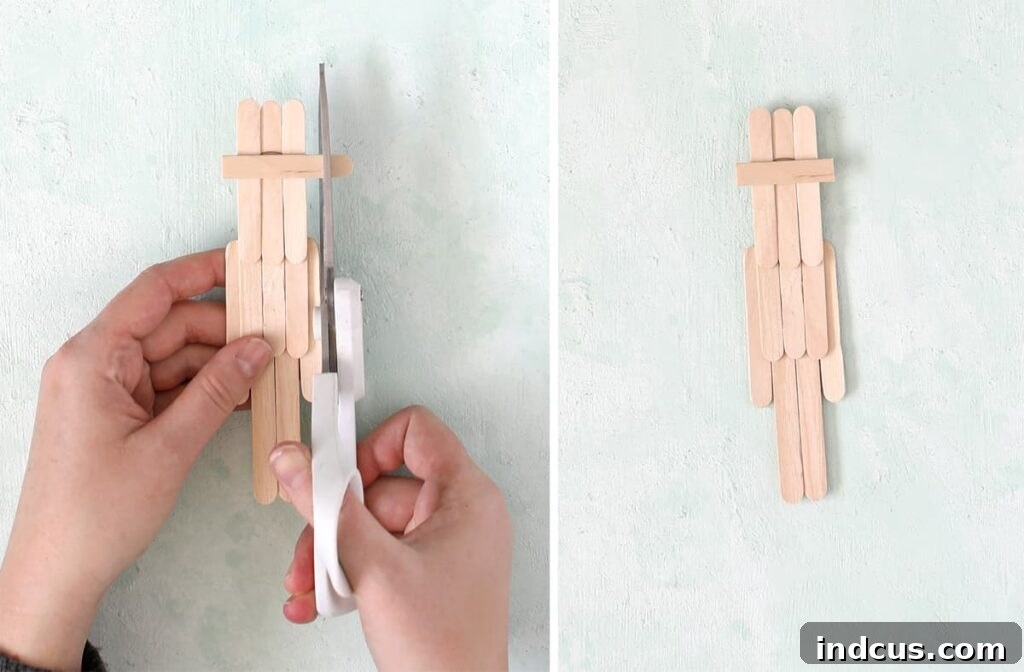
Step 3: Bring Your Leprechaun to Life with Paint
This is where the magic truly begins! Get out your craft paints and brushes. The key to a vibrant leprechaun is bold, even color. Start by painting the legs and the central body stick of the chest with one shade of green. Next, use your other shade of green for the arms and the jacket area, creating a subtle contrast. Remember to leave the small ends of the arms unpainted if you want them to resemble wooden hands.
Paint the hat a solid green, as this will be the base for further details. Now for the signature features: add bright orange or red paint for a bushy beard and flowing hair. Don’t forget those charming, bushy eyebrows – they add so much character! Finally, paint the very bottom of the long popsicle sticks black to create the appearance of shiny leprechaun boots. Allow each layer of paint to dry completely before adding new colors or moving to the next step.
Painting Tip: Apply paint in thin, even coats to avoid drips and ensure quick drying. If a color isn’t opaque enough, apply a second coat once the first is dry.
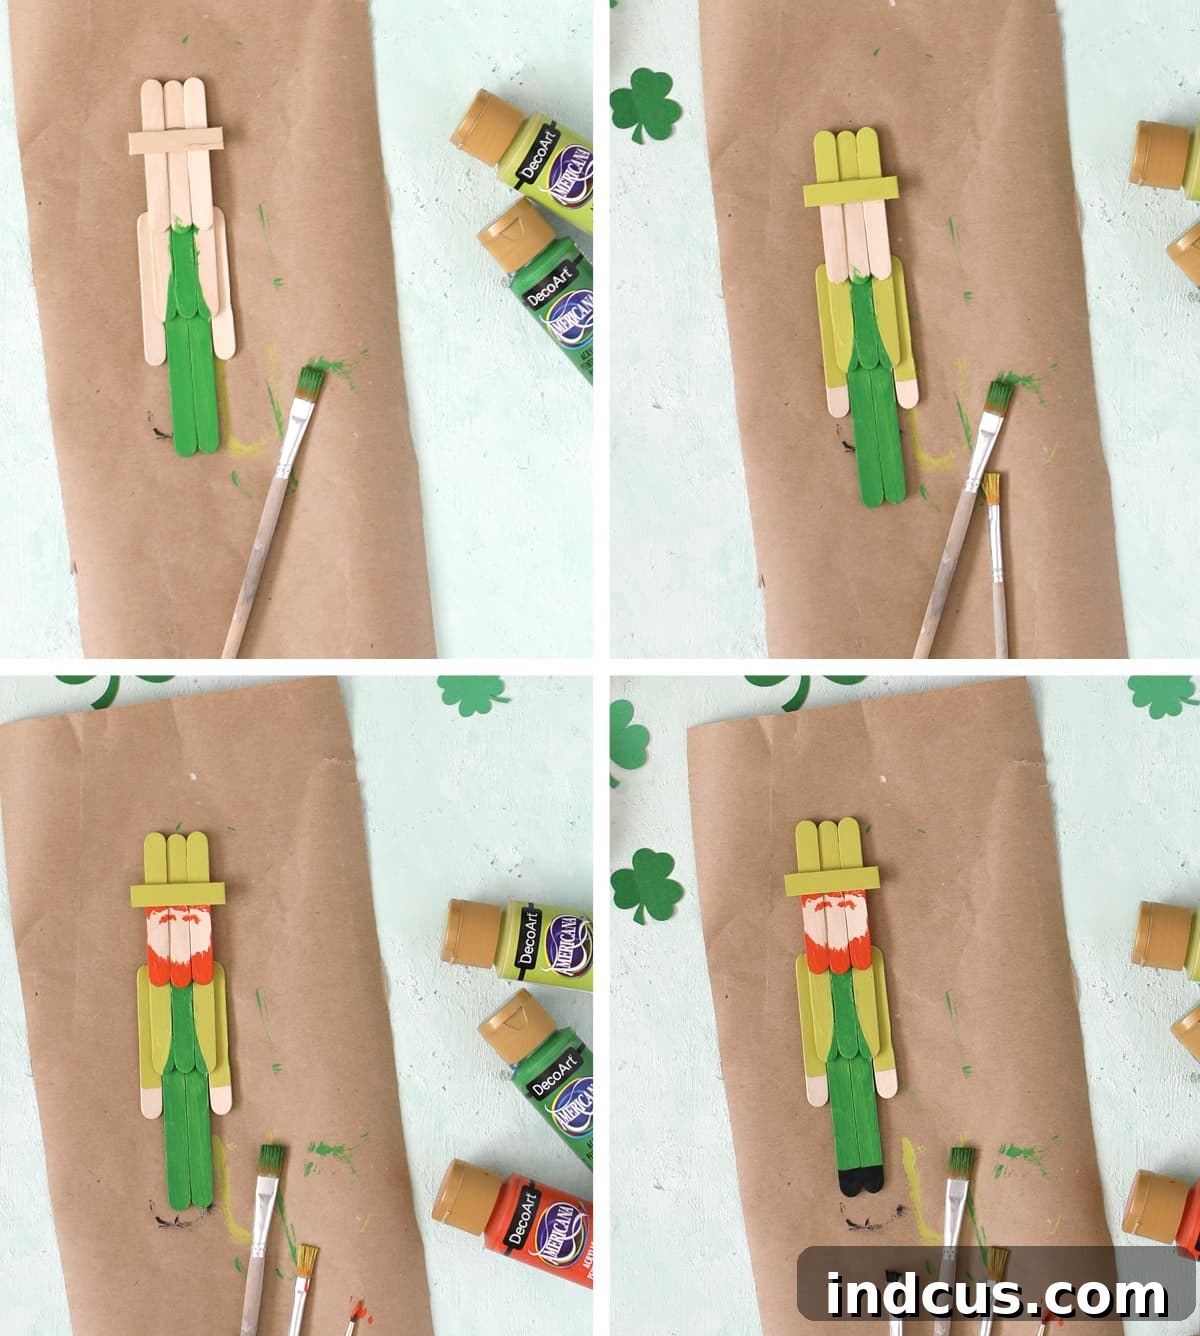
Step 4: Add Personality with Fine Details
Once all the paint is thoroughly dry, it’s time for the fun part: adding all the charming details that truly bring your leprechaun to life! Grab your paint pens or fine-tip markers. Use black to draw on a mischievous smile and expressive eyes. Add small buttons down the front of his jacket, perhaps a shiny gold buckle on his hat and shoes, and intricate shoelaces on his boots. You can also add rosy cheeks with a dab of pink paint or a colored pencil. Let your imagination run wild – the more details, the more personality your leprechaun will have!
And just like that, you’ve transformed simple wooden craft sticks into an adorable, character-filled leprechaun! This craft is not only incredibly satisfying but also a wonderful way to celebrate St. Patrick’s Day with a handmade touch. These little lucky charms are sure to bring smiles wherever they go.
Why This Craft is Perfect for St. Patrick’s Day
St. Patrick’s Day is synonymous with leprechauns, pots of gold, and vibrant green hues. Crafting these popsicle stick figures is more than just an activity; it’s an opportunity to engage with the holiday’s folklore in a tangible way. It’s a fantastic project for families, classrooms, and anyone looking for a creative outlet. It encourages fine motor skill development, color recognition, and imaginative play, making it beneficial for children of all ages. Plus, the sense of pride in creating something festive and unique is truly invaluable.
Displaying Your Lucky Leprechauns
Once your leprechauns are complete, don’t let them hide in a pot of gold! There are countless ways to display your finished creations and add a touch of St. Patrick’s Day magic to your surroundings:
- Shelf Decor: Line them up on a mantelpiece, bookshelf, or windowsill to greet everyone with a cheerful Irish welcome.
- Table Centerpiece: Arrange them around a small pot, perhaps with some gold coins (chocolate ones are always a hit!), for a festive centerpiece.
- Garland: Attach a loop of string to the back of each leprechaun and string them together to create a charming St. Patrick’s Day garland.
- Gift Toppers: Tie a leprechaun onto a gift bag or present for an extra special, handmade touch.
- Classroom Decorations: Perfect for school projects, they can adorn bulletin boards or hang from the ceiling.
- Playtime Pals: Kids will love playing with their new leprechaun friends, inventing stories and adventures.
Customization and Variations: Make It Your Own!
While we’ve provided a clear guide, the beauty of crafting lies in personal expression. Here are some ideas to customize your popsicle stick leprechauns:
- Sparkle and Shine: Add glitter to their hats, beards, or clothes for an extra touch of magic.
- Fabric Accents: Glue small pieces of felt or fabric for a waistcoat, a tiny bow tie, or a hatband.
- Go Beyond Green: While green is traditional, don’t be afraid to experiment with other colors for their outfits. Perhaps a leprechaun in shades of blue or purple?
- Accessories Galore: Give your leprechauns tiny shamrocks cut from green paper, a mini gold coin attached to their hand, or even a tiny pipe made from a bead and a pipe cleaner.
- Lady Leprechauns: Instead of a beard, paint long orange braids, add a floral crown to her hat, or a little skirt made from ribbon.
- Different Expressions: Experiment with various facial expressions – sleepy, surprised, grumpy – to give each leprechaun a truly unique personality.
- Name Tags: Add a small paper tag with a fun Irish name for each of your creations!
This simple craft opens up a world of creative possibilities. Feel free to mix and match materials and ideas to create a collection of truly unique and memorable St. Patrick’s Day figures.
Conclusion: Your St. Patrick’s Day Masterpiece Awaits!
We hope this guide has inspired you to grab some craft sticks and embark on this delightful St. Patrick’s Day adventure. Crafting these charming leprechauns is not just an activity; it’s a celebration of creativity, a way to connect with loved ones, and a fantastic method to infuse your home with festive cheer. These little lucky charms are sure to bring smiles, spark conversations, and perhaps even lead you to your own pot of crafting gold.
So, whether you’re looking for a fun project for the kids, a unique decoration for your home, or simply a creative escape, these popsicle stick leprechauns are the perfect choice. Gather your supplies, unleash your imagination, and get ready to celebrate St. Patrick’s Day in the most charming way possible!
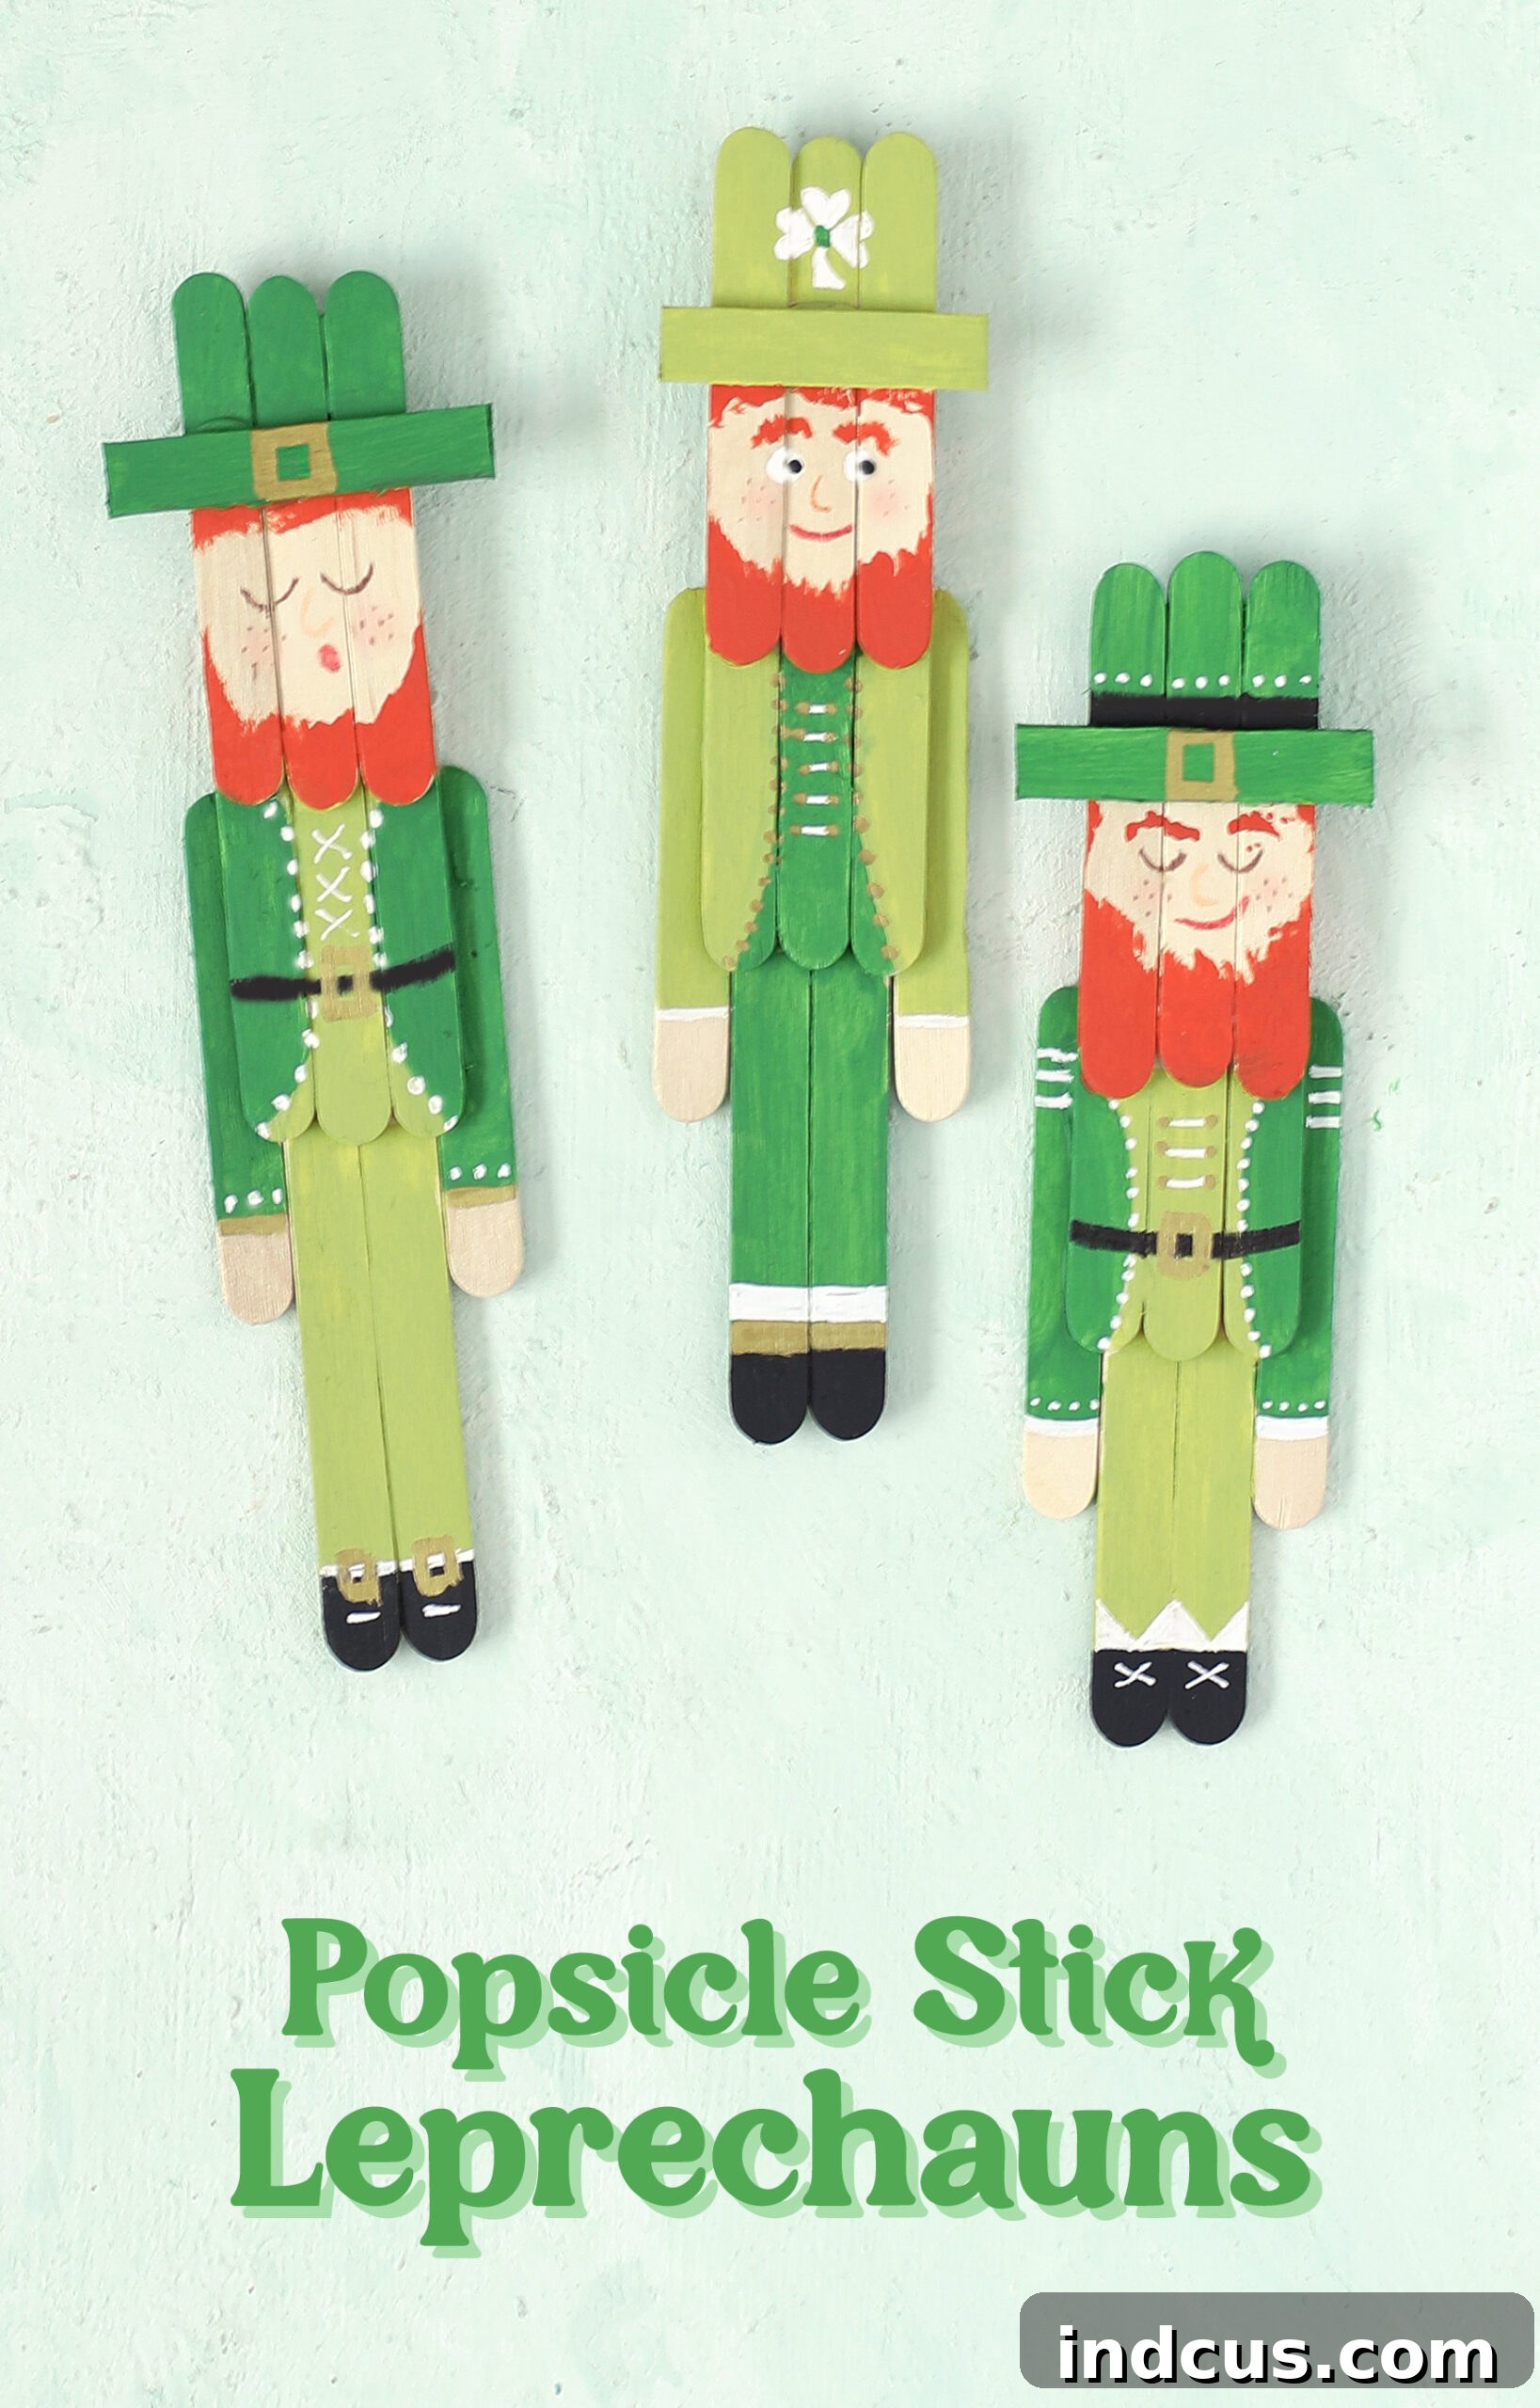
Loved this easy St. Patrick’s Day craft? Be sure to save it for later! Pin it to your favorite craft board and share the festive fun with others!