
DIY Oversized Christmas Ornaments: Crafting Chic and Cozy Holiday Decor
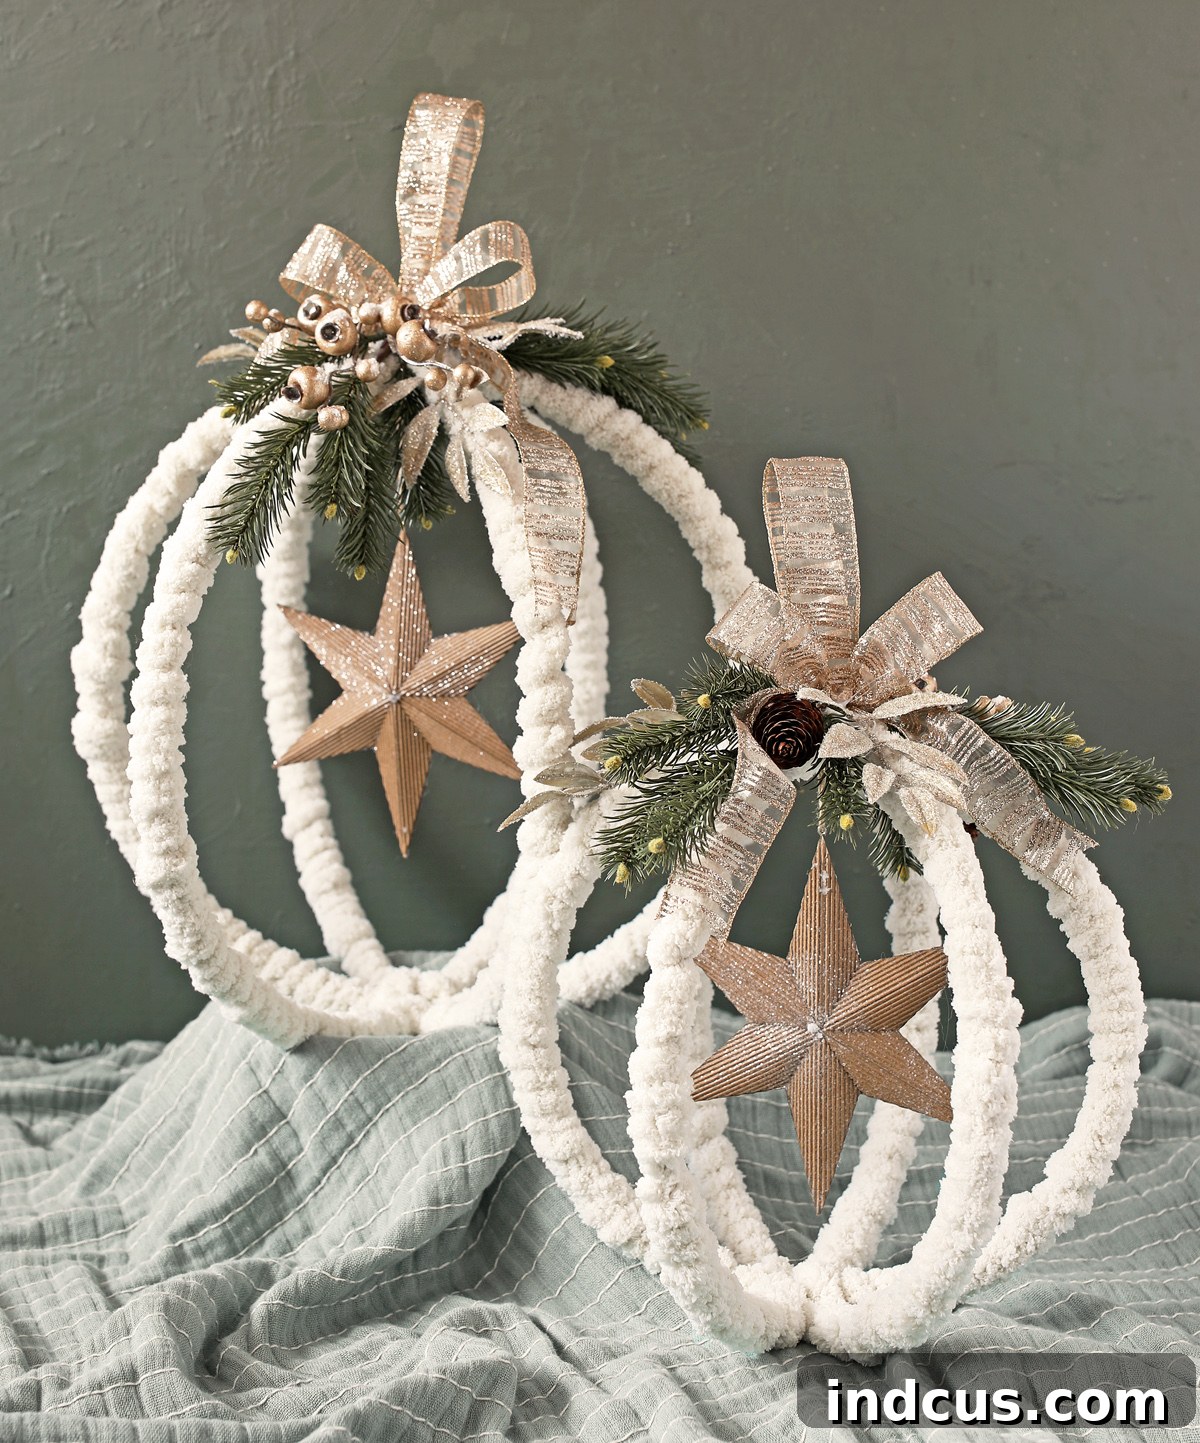
The holiday season is a magical time, filled with warmth, joy, and the beauty of festive decorations. If you’re looking to infuse your home with a touch of high-end charm without the hefty price tag, you’ve come to the right place! Today, we’re diving into an exciting DIY Christmas decoration tutorial that will guide you through creating truly show-stopping oversized ornaments. Imagine elegant, handcrafted spheres made from simple metal hoops and irresistibly cozy yarn, designed to look like they’ve been plucked straight from an exclusive Christmas boutique.
The beauty of crafting your own holiday decor lies in the complete creative freedom it offers. You’re not just making ornaments; you’re personalizing your festive display to perfectly match your unique style and existing Christmas theme. Whether your aesthetic leans towards rustic farmhouse, glittering glam, minimalist modern, or classic traditional, these oversized beauties can be customized in any color, texture, and embellishment to complement your vision. Get ready to impress your guests and elevate your holiday decor game!
This post is proudly sponsored by Hobby Lobby, your ultimate destination for all things craft and holiday. ad #HobbyLobby #HobbyLobbyFinds
Why DIY Oversized Christmas Ornaments? A Statement of Style
Oversized ornaments have rapidly become a trending focal point in holiday decorating, and for good reason. Their impressive scale instantly creates a dramatic visual impact, transforming any space into a festive wonderland. Here’s why you should consider making these magnificent decorations:
- Unforgettable Impact: Unlike smaller ornaments that might blend into the background, a few large ornaments can define a space, drawing the eye and setting a grand tone for your holiday decor. They act as magnificent statement pieces, perfect for creating a memorable display.
- Tailored to Your Taste: Store-bought decorations often limit your color and style choices. By going the DIY route, you control every element – from the specific shade of yarn to the type of greenery and ribbon. This ensures your ornaments perfectly integrate with your existing decor scheme or inspire a brand new one.
- Cost-Effective Elegance: High-end oversized ornaments can be quite expensive. Crafting them yourself using readily available and affordable materials allows you to achieve that luxurious, designer look without breaking the bank. It’s smart decorating at its best!
- The Joy of Creation: There’s immense satisfaction in bringing your creative ideas to life. The process of making these ornaments is not only relaxing but also incredibly rewarding, leaving you with unique pieces that carry personal meaning and memories.
- Incredible Versatility: These aren’t just for the Christmas tree! Their size and presence make them ideal for a multitude of display options, from porch decor to elegant ceiling hangers, fireplace mantel accents, or even stunning additions to large wreaths.
Gathering Your Materials: Everything You Need from Hobby Lobby
Embarking on this delightful DIY project is made incredibly easy with a quick trip to Hobby Lobby. You’ll find all the necessary materials to bring your oversized ornament vision to life, ensuring a cohesive and convenient shopping experience. Here’s a detailed list of what you’ll need:
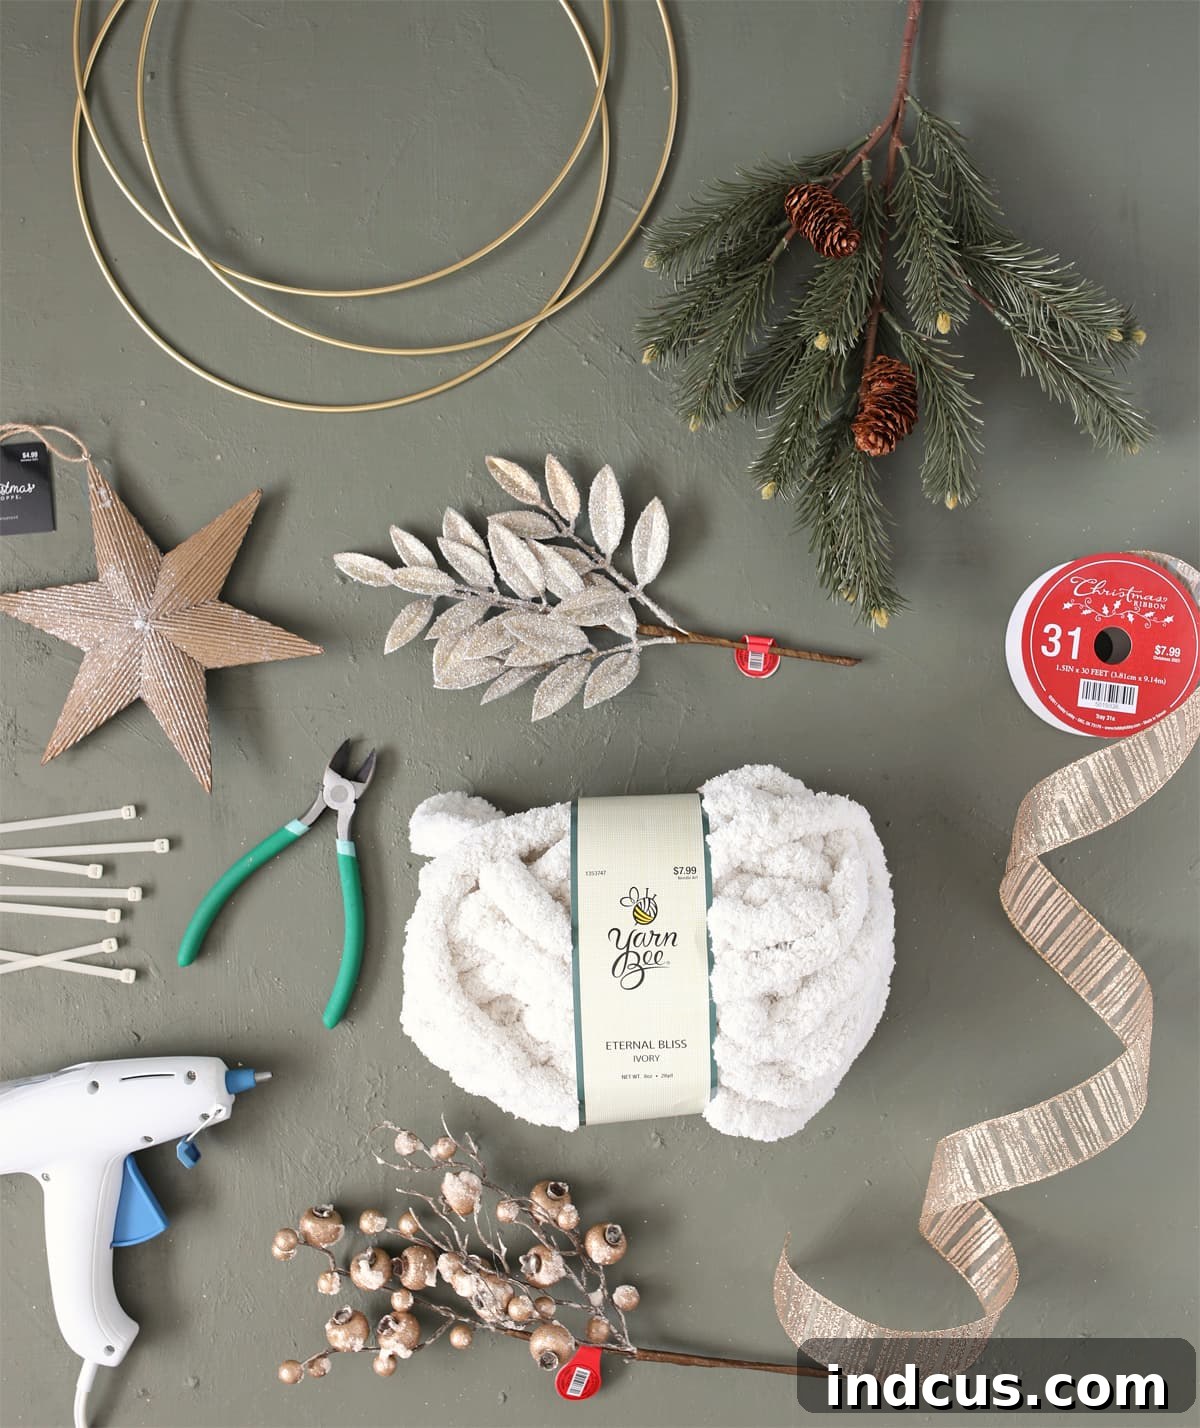
Materials Needed
- Metal Hoops: You’ll need three per ornament. For a substantial look, I recommend using both 12″ and 16″ hoops. Consider even larger sizes, like 20″, for maximum impact. These form the essential structural skeleton of your ornament.
- Christmas Greenery: Choose realistic pine, cedar, or eucalyptus sprigs to add a natural, festive touch. These can be used as a base for your top embellishments.
- Christmas Floral Picks: Select picks that complement your chosen aesthetic. I used elegant Champagne Glitter Leaf and delicate Frosted Crabapple picks to add sparkle and texture. Hobby Lobby offers an incredible variety to match any theme.
- Yarn Bee Eternal Bliss Fluffy Yarn: This luxurious, soft yarn (I chose Ivory) is perfect for creating that cozy, high-end feel. Its chunky texture provides excellent coverage and a beautiful, inviting finish. Explore other colors like white, gray, or even a deep holiday red to suit your palette.
- Christmas Ornament: A smaller, beautiful ornament to hang inside your larger sphere. Choose one that either contrasts or perfectly complements your overall color scheme, adding a lovely surprise element.
- Coordinating Ribbon: A high-quality ribbon for hanging and creating a decorative bow at the top. Wired ribbon is excellent for holding its shape. Consider textures like velvet, satin, or even burlap for different stylistic effects.
- White Zip Ties: Approximately six per ornament will be needed to securely fasten the hoops together. Choose white so they blend in with lighter yarn colors or can be easily hidden.
- Hot Glue Gun + Glue Sticks: Your trusty tool for securing yarn ends, greenery, and other embellishments. Ensure you have plenty of glue sticks on hand.
- Wire Cutters: Essential for trimming the metal stems of your floral picks and any excess zip tie tails cleanly.
- Scissors: For cutting yarn and ribbon with precision.
Instructions: Crafting Your Oversized Masterpiece
Before you begin, ensure you have a clear, spacious workspace. This project involves a few steps, but each is straightforward and rewarding. Take your time, enjoy the creative process, and don’t hesitate to personalize as you go!
Step 1: Assembling the Metal Hoop Sphere
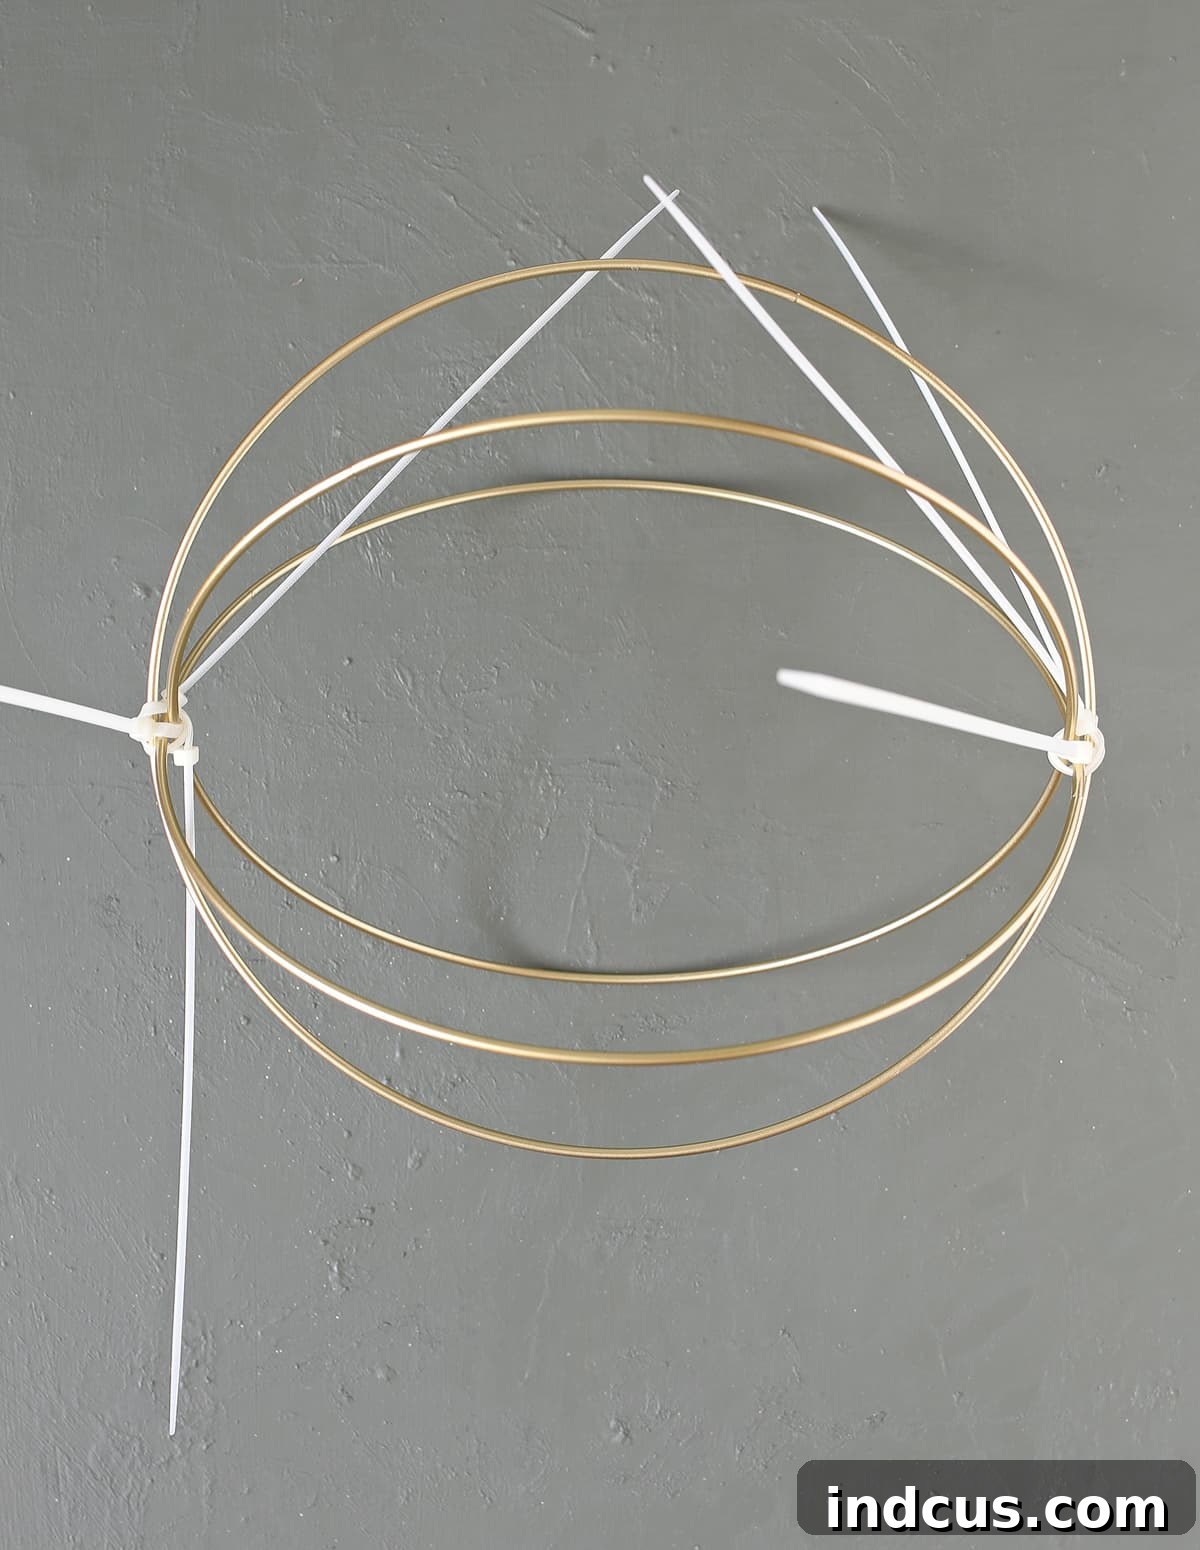
Step 1: Begin by taking your three metal hoops. Carefully arrange them so that they intersect and form a spherical shape. The goal is to create a sturdy, evenly spaced framework that will become the backbone of your ornament.
Once you have the desired spherical arrangement, use white zip ties to secure the hoops together at the two points where they overlap. I found that using three zip ties on each end provides exceptional stability. This means that when you’re finished, each of the six ‘spokes’ emanating from the central convergence point will have a zip tie securely holding it. It’s crucial to adjust each hoop meticulously at this stage to ensure they are all perfectly centered and create a symmetrical sphere. Pull the zip ties about 90% of the way tight, allowing for minor adjustments. Once you’re satisfied with the alignment and the perfect roundness of your sphere, pull the zip ties fully taut. Finally, use your wire cutters to trim off any excess zip tie tails flush with the knot for a clean finish.
Step 2: Wrapping the Hoops with Cozy Yarn
Step 2: Now for the cozy part! Take your Yarn Bee Eternal Bliss and begin wrapping all visible parts of the metal hoop sphere. To avoid tangles and make the process significantly easier, it’s highly recommended to cut your yarn into manageable pieces, approximately 3 feet long. Trying to wrap with the entire skein can quickly lead to frustrating knots and snags.
To start, apply a small dot of hot glue to the hoop and press the beginning of your yarn piece firmly onto it. Tightly wrap the yarn around the hoop, ensuring full coverage and a consistent, plush texture. When you reach the end of a 3-foot section, secure it with another small dot of hot glue. Simply start the next piece of yarn exactly where you left off, securing its beginning with hot glue as well. With the fluffy texture of this yarn, the transitions between pieces will be virtually invisible, creating a seamless and beautifully soft surface. This repetitive wrapping can be quite therapeutic, transforming the cold metal into a warm, inviting textile.

Step 3: Embellishing with Greenery and Floral Picks
Step 3: Once your entire metal frame is snugly covered with yarn, it’s time to add the decorative elements that will truly make your ornament shine. Gather your chosen greenery and floral picks. Think about creating a small, elegant cluster at the top of the ornament where all the hoops converge. This creates a natural focal point and a beautiful transition to the hanging ribbon.
Remember, most floral picks come with longer stems. Don’t hesitate to use your wire cutters to trim them down to size, or even cut larger stems apart into smaller sprigs, to better fit your project. Arrange them artfully, layering greenery first for a fuller base, then adding your sparkling floral picks for pops of color, glitter, or frosted texture. Secure each piece firmly to the yarn-wrapped hoop with hot glue. Hold each piece in place for a few seconds until the glue sets. This step allows for immense creativity – experiment with different arrangements until you achieve a look you love!

Step 4: Adding the Central Ornament and Hanging Ribbon
Step 4: The final touches bring your oversized ornament to life! Select the Christmas ornament you’ve chosen to hang inside the sphere. Using a thin piece of thread or a small piece of the same yarn, attach it to one of the top hoops so that it hangs beautifully in the center of your newly formed sphere. Ensure it’s secure but has enough length to dangle gracefully.
Next, create a sturdy hanging loop. Take your coordinating ribbon and form a loop, securing the ends with hot glue or a strong knot. Attach this loop to the very top of your ornament, nestled among the greenery and floral picks. To add an extra touch of elegance, tie a decorative bow from the same ribbon and attach it just above the cluster of greenery. This not only provides a convenient way to hang your ornament but also adds a polished, finished look. And just like that, your magnificent, oversized DIY Christmas ornament is complete!

And that’s it! Look at how absolutely charming and sophisticated these ornaments are. They truly embody the spirit of high-end holiday decor, crafted with your own hands. The combination of soft, fuzzy yarn and sparkling festive picks creates a delightful contrast that is both inviting and visually appealing.

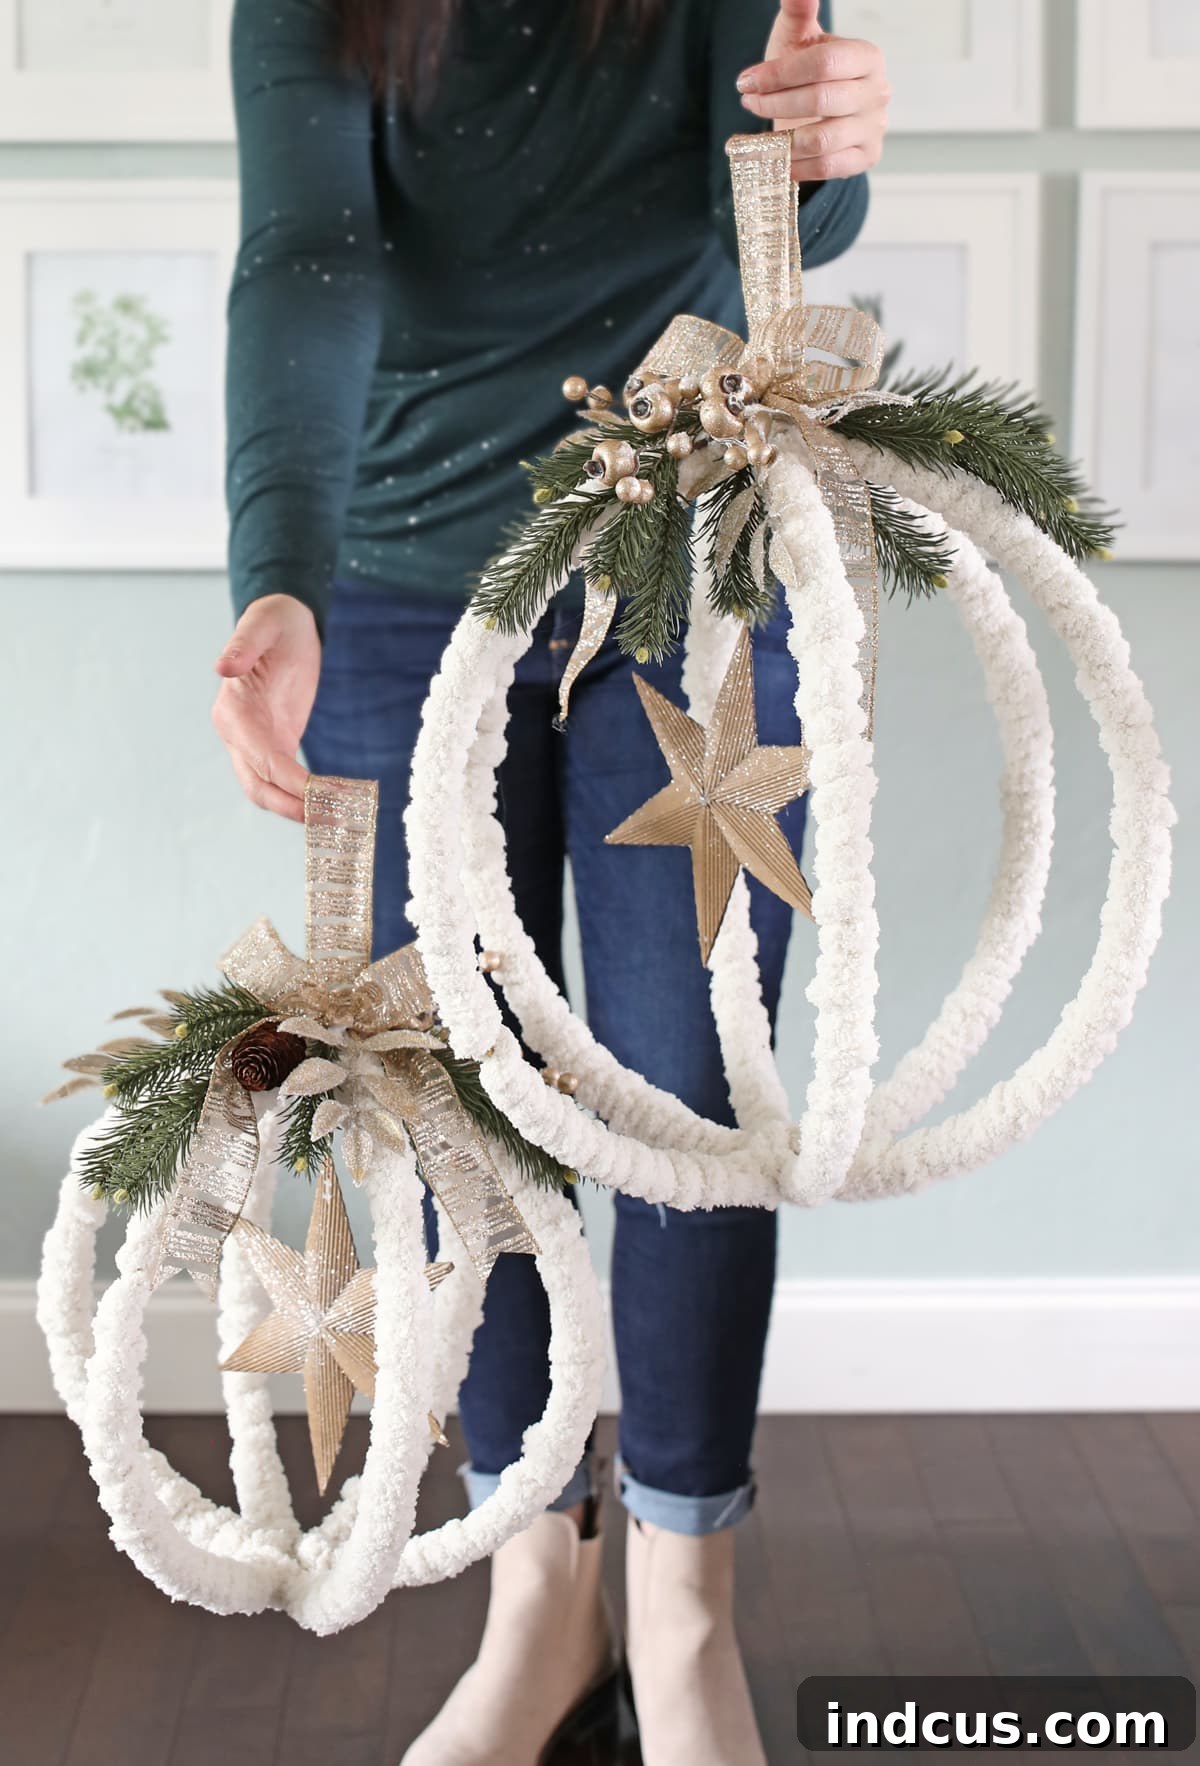
To give you a better sense of their impressive scale, here I am holding one. As you can see, even without using the largest available 20-inch hoop, these ornaments make a significant statement. Imagine the visual impact of a collection of these beauties adorning your home!

Where to Display Your Stunning Oversized Ornaments
The versatility of these oversized ornaments is one of their greatest assets. Their grand scale makes them ideal for a multitude of creative display options beyond the traditional Christmas tree:
- Ceiling Corners: As shown in the image, hanging them from a ceiling corner in a family room or living area creates a breathtaking focal point, drawing the eye upwards and adding an unexpected layer of festive decor.
- Porch or Entryway: Welcome guests with a festive flourish by hanging a grouping on your front porch or in your entryway. They’re sure to create a warm and inviting first impression.
- Large Christmas Trees: For those with grander trees, these ornaments can serve as impressive hero pieces, complementing smaller baubles and adding depth to your tree’s design.
- Fireplace Mantels: Arrange them artfully on a mantelpiece, perhaps nestled among other greenery and fairy lights, to create a cozy and elegant display above your fireplace.
- Staircase Banisters: Hang them at varying heights along your staircase banister for a whimsical and elegant touch as you ascend and descend.
- Window Displays: Suspend them in large windows, allowing them to be enjoyed from both inside and outside your home, spreading holiday cheer to passersby.
- Children’s Rooms: Choose brighter colors and playful inner ornaments for a festive addition to a child’s bedroom, creating a magical atmosphere.
Oversized Christmas Ornaments Video Tutorial
For those who prefer visual guidance, this video tutorial will walk you through each step of the process, ensuring you can craft your oversized ornaments with confidence.
Unleash Your Creativity: Endless Design Variations
The true beauty of this DIY project lies in its adaptability. While we’ve created a chic, cozy ivory version, the possibilities for customization are virtually endless. Let your imagination run wild and create ornaments that truly reflect your personal style and holiday spirit:
- Retro Christmas Charm: Embrace a vintage vibe by wrapping your hoops with silver tinsel garland instead of yarn. Then, adorn the interior with an assortment of colorful, mismatched vintage glass ornaments.
- Sweet Gingerbread Theme: Use brown or cream-colored yarn and embellish with faux gingerbread cookies, candy canes, and red and white ribbons for a deliciously charming look.
- Modern Minimalist: Opt for stark white or charcoal gray yarn, paired with sleek metallic floral picks (silver, gold, or rose gold) and a single geometric ornament suspended inside.
- Classic Red & Green: You can never go wrong with traditional! Use rich red or forest green yarn, traditional pine sprigs, holly berries, and gold or plaid ribbons.
- Winter Wonderland: Choose white or icy blue yarn, frosted greenery, glittery snowflake picks, and iridescent baubles for a magical, ethereal feel.
- Luxurious Velvet: Instead of yarn, try wrapping with strips of velvet fabric for an opulent, tactile finish. Jewel tones like emerald, sapphire, or deep burgundy would be stunning.
- Lighted Ornaments: Weave battery-operated micro fairy lights into the yarn as you wrap, or tuck them into the embellishments for a soft, glowing effect, especially beautiful at night.
And just think of all the different central ornaments you could hang! I almost used a cluster of charming Christmas bells – wouldn’t that be a delightful sound every time they gently sway? Or consider personalized photo ornaments, small glittering globes, or even miniature LED lanterns. There are truly so many ways you could take this basic idea and make it uniquely your own.
Don’t forget to explore the extensive Hobby Lobby Christmas collection for tons of holiday decorating inspiration. Their aisles are brimming with ideas and materials to help you bring any festive vision to life.
If you end up making these gorgeous oversized ornaments, I would absolutely love to see your creations! Please send me a picture via Instagram or Facebook. Happy crafting and happy holidays!







