Crafting the Perfect American Girl Doll Swimsuit & Beach Essentials: A Creative DIY Guide
The joy of creating something with your own hands, especially for the beloved dolls in your life, is truly unparalleled. If you’ve been following along, you know I’ve developed a bit of an obsession with sewing doll clothes lately. After successfully tackling some essential wardrobe pieces, like versatile basics (explore them here) and cozy pajamas (see the pajama project), my daughter presented a new, delightful challenge. Despite the frosty, snow-covered landscape outside, her doll, much like any child dreaming of summer, absolutely needed a swimsuit. And who am I to deny such a charming request?
This project was a fantastic opportunity to combine practicality with creativity, resulting in a charming little outfit perfect for imaginary poolside adventures or sunny beach days, even if they only happen within the confines of a warm living room. It’s about bringing those summer vibes indoors, one stitch at a time, and creating cherished memories through handmade treasures for your 18-inch American Girl doll or similar!
Diving into the Doll Swimsuit Project: Choosing and Adapting a Free Pattern
The journey of crafting doll clothes often begins with finding the perfect blueprint. Online resources are a treasure trove for doll clothes enthusiasts, offering countless free patterns that can kickstart any project. For this particular doll swimsuit, I utilized this fantastic free pattern from Liberty Jane Patterns. Opting for a free pattern is a brilliant choice, especially if you’re new to sewing doll clothes or simply want to try out a new design without investing in a paid pattern. They often provide a solid foundation that can be customized to your heart’s content, allowing for endless creativity and a chance to truly make the garment your own.
Before you begin, gather your supplies. For a doll swimsuit, you’ll want to select a fabric with good stretch, such as lycra, spandex, or a similar swimwear knit. These fabrics are essential for creating a garment that fits snugly and moves well with the doll. Vibrant colors and fun prints can make a simple swimsuit truly pop! Ensure your sewing machine is equipped with a stretch needle and that you have a thread suitable for knits, like polyester.
Essential Materials and Clever Adaptations: The Elastic Challenge
Every sewing project comes with its unique set of challenges and opportunities for innovation. While the free pattern called for fold-over elastic (FOE), I found myself without any on hand. Rather than halt the project and make an extra trip to the fabric store, I embraced a bit of creative problem-solving. I opted to use some readily available aqua-colored elastic and simply folded it over myself to achieve a similar finished edge. Now, I’ll be honest, this approach did make the sewing process a tad more challenging. Working with regular elastic in this way requires a bit more precision and patience, as it tends to stretch and shift more easily than its fold-over counterpart. However, sometimes you have to make do with what you have, and the satisfaction of seeing a project through despite minor hurdles is incredibly rewarding and helps build your sewing skills.
For those considering a similar adaptation or generally working with elastic on doll clothes, here are a few invaluable tips:
- **Use a Walking Foot:** If your sewing machine has one, a walking foot can significantly help feed multiple layers of fabric and elastic evenly, preventing stretching and puckering, which are common issues when working with slippery or stretchy materials.
- **Pin Extensively:** Don’t skimp on the pins! Place them frequently and perpendicular to your sewing line along the elastic and fabric edge to keep everything aligned as you sew. This will minimize shifting and ensure a smoother finish.
- **Gentle Stretching:** When attaching the elastic, stretch it just enough to fit the fabric smoothly, but avoid overstretching. Too much tension can cause the fabric to ripple or pucker, making the finished garment look distorted.
- **Test Stitches:** Always test your stitch length and tension on a scrap piece of your chosen fabric and elastic combination before sewing on your actual project. This helps you find the optimal settings for a clean, secure seam that stretches with the fabric. A zigzag stitch or a specialized stretch stitch is usually best for swimwear.
- **Pressing:** Pressing seams carefully with a low-heat iron (if suitable for your fabric) can help flatten and set the elastic, contributing to a professional look.
Adding a Touch of Whimsy: The Ruffle Detail
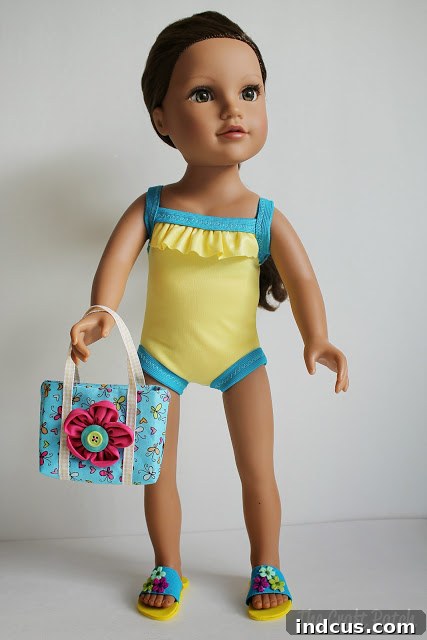
Even with a great basic pattern, personal touches can elevate a simple garment into something truly special and unique. The only significant modification I made to the original pattern for this American Girl doll swimsuit was the addition of a sweet little ruffle along the top edge. This seemingly small detail instantly transformed the look, adding a playful and charming flair that perfectly suited a doll’s swimwear, giving it a designer feel without the designer price tag.
Creating and attaching the ruffle was straightforward and can be adapted to many other doll clothing patterns:
- **Fabric Strip Creation:** I started by cutting a long, narrow strip of fabric that matched the swimsuit material. The length of this strip is crucial for achieving the desired fullness of your ruffle. A good rule of thumb is to make the strip about 1.5 to 2 times the length of the edge you want to ruffle. The width can vary depending on how prominent you want the ruffle to be, adding seam allowances to all sides.
- **Gathering the Fabric:** To create the ruffle effect, I used a basting stitch. This involves sewing two parallel lines of long, straight stitches with loosened tension along one long edge of the fabric strip. After sewing, I gently pulled the bobbin threads from both ends of these stitching lines, carefully gathering the fabric until it matched the exact length of the swimsuit’s top edge. Distribute the gathers evenly for a neat look.
- **Tacking in Place:** Once gathered to the desired fullness, I carefully pinned and then basted (using a regular straight stitch) the ruffle onto the right side of the swimsuit’s top edge. It’s important to ensure it was evenly distributed and aligned perfectly with the edge.
- **Integrating with Elastic:** Following the pattern’s instructions for attaching the elastic (or my adapted method), I then sewed the elastic over the ruffle and the swimsuit edge. This crucial step neatly secured the ruffle permanently in place while simultaneously finishing the raw edge of both the swimsuit and the ruffle, creating a clean, professional, and adorable look.
This simple addition is a testament to how easy it is to personalize any doll clothing pattern and make it uniquely yours, adding character and charm with minimal effort.
Beyond the Suit: Crafting Adorable Doll Accessories for Complete Play
A swimsuit, no matter how cute, often feels incomplete without the right accessories to set the scene for imaginative play. And truthfully, once I get into a creative groove, I find it incredibly hard to stop! So, naturally, I couldn’t resist crafting some coordinating pieces for the American Girl doll: tiny sandals and a functional little beach bag. These small additions not only complete the doll’s summer ensemble but also significantly enhance the storytelling possibilities for my daughter, turning a simple outfit into a full play scenario.
DIY Doll Sandals from Craft Foam: Easy & Fun
Making doll sandals might sound intricate, but with the right materials, it becomes a surprisingly accessible and fun project. Craft foam is wonderfully forgiving, inexpensive, and comes in a rainbow of colors, making it perfect for miniature footwear projects for 18-inch dolls.
Here’s a detailed look at how I created these playful doll sandals:
- **Creating the Soles:** For each sandal, I cut two identical pieces of craft foam in the basic shape of a doll’s foot. You can either trace your doll’s foot directly for a custom fit or use a small existing doll shoe as a template. Cutting two layers provides extra durability and a slightly more realistic sole thickness, giving the sandals more substance. Precision here is beneficial for neat edges, but remember, perfection isn’t the ultimate goal—fun and creativity are!
- **Designing and Attaching Straps:** I used thin elastic for the sandal straps, which offers flexibility and helps keep the sandals on the doll’s feet. Measuring the elastic around the doll’s foot and ankle is crucial to ensure a snug yet comfortable fit. For a simple flip-flop style, a single loop that goes between the toes and then around the ankle works well. For a more elaborate strappy sandal, you can experiment with multiple elastic loops or even thin ribbon crisscrossing over the doll’s foot.
- **Secure Assembly with Hot Glue:** This is where the magic happens with hot glue. I carefully positioned the elastic straps onto one foam sole, ensuring they were arranged correctly to comfortably hold the doll’s foot. Then, I carefully applied hot glue to the top of this sole and firmly sandwiched the elastic straps between the two foam pieces. Pressing them together gently but firmly ensures a strong, secure bond that will withstand playtime adventures.
Admittedly, getting the edges of the foam perfectly even and smooth can be a bit tricky, especially on such a small scale. Don’t let minor imperfections deter you. These handmade sandals, while not factory-perfect, possess a unique charm that mass-produced items often lack. More importantly, my daughter absolutely adores them, and her imaginative play is not hindered by a slightly wobbly edge or two! The beauty of handmade items lies in their character.
**Pro Tip for Variations:** For extra durability or a different aesthetic, consider using felt, thin leatherette, or even sturdy cardboard for the bottom layer of the sole. You can also embellish the straps with tiny beads, miniature fabric flowers, or a touch of glitter glue for added flair and personalization.
Crafting a Miniature Beach Bag: A Simple Sewing Project
What’s a trip to the “beach” without a bag to carry essentials? A miniature beach bag is not only adorable but also incredibly simple to make, often requiring just a small scrap of fabric—making it a perfect stash-buster project.
My approach was to keep it simple and sweet, focusing on functionality and charm:
- **Fabric Choice:** I selected a fabric scrap that either matched the doll’s swimsuit or complemented it nicely. A lightweight cotton print or even a sturdy linen blend works wonderfully for this, offering a texture that holds its shape well.
- **Basic Construction:** I cut two identical rectangles for the main body of the bag and a couple of narrow strips for the handles. After neatly hemming the top edge of each rectangle, I placed the two rectangles right sides together and sewed the sides and bottom seams, creating a simple pouch. You can reinforce the corners by boxing them out if you want a flat bottom for the bag.
- **Adding Handles:** The fabric strips designated for the handles were then folded lengthwise, pressed, and sewn to create sturdy straps. These handles were then securely attached to the inside top corners of the bag, either by sewing them in place or using a strong fabric glue. For an even quicker finish, ribbon, thin cord, or even a small braid of yarn could also be used for handles.
This tiny bag is perfect for carrying doll-sized sunglasses, a miniature beach towel, a tiny seashell collected from an imaginary shore, or even a doll-sized book. It truly completes the doll’s summery look and adds another layer of detail to her play scenarios.
The Enduring Appeal of DIY Doll Clothes: More Than Just a Hobby
Creating doll clothes and accessories is far more than just a pastime; it’s a deeply rewarding creative endeavor with numerous benefits for both the maker and the child. It allows for unparalleled personalization, offering the chance to design unique outfits that truly reflect your child’s personality, match their own clothes, or fit specific imaginative play scenarios. Unlike mass-produced doll clothes, handmade items carry a special touch, a story of care and creativity woven into every stitch, making them truly one-of-a-kind treasures.
Beyond the aesthetic appeal, sewing for dolls is an excellent way to hone your sewing skills without the pressure of working on full-sized garments. The small scale of doll clothes teaches precision, patience, and creative problem-solving – skills that are highly transferable to larger sewing projects. It’s also a fantastic way to utilize fabric scraps and remnants that might otherwise go to waste, promoting sustainability and resourcefulness in your crafting. Furthermore, it encourages a deeper understanding of garment construction and design principles.
Perhaps most importantly, witnessing the sheer joy on a child’s face when they receive a custom-made outfit or accessory for their favorite doll is a reward in itself. These handmade items often become cherished treasures, sparking imaginative play, fostering creativity, and creating lasting memories that go far beyond the material object itself. It’s an investment in imaginative play and personal connection.
What’s Next? Sharing the Creative Journey with More Free Patterns!
Inspired by the positive reception of these doll clothing projects and the pure delight they bring, I’ve been diligently working on developing a brand-new free pattern to share with all of you. My goal is always to empower fellow crafters and parents to embark on their own DIY adventures, making beautiful things for the special dolls in their lives. Keep an eye out for an announcement very soon—hopefully, it will be ready for posting tomorrow, bringing new inspiration to your sewing table!
I hope this detailed guide has encouraged you to pick up your needle and thread, or perhaps some craft foam and hot glue, and create something wonderful for your own 18-inch doll. The world of doll clothes is vast and full of possibilities, offering endless opportunities for creativity, learning, and fun. Whether it’s a simple swimsuit or an elaborate gown, every stitch contributes to a magical playtime experience. Happy crafting!