Craft Room Remodel: Transforming a Space into a Creative Sanctuary and Valued Asset
The past couple of weeks have been a whirlwind of activity and progress in what was once a neglected corner of our home, now destined to become the ultimate craft room. The journey began with a significant undertaking: a full-scale demolition that completely reimagined the space. While I was away, my incredibly supportive husband and his brother dove headfirst into the challenging work of tearing down almost all the existing walls and stripping out the entire ceiling. This initial phase, as you can see from the demolition photos HERE, set the stage for a truly remarkable transformation. It’s hard to believe how far we’ve come from the raw, exposed studs and joists you saw last time.
From Demolition to Transformation: The Initial State
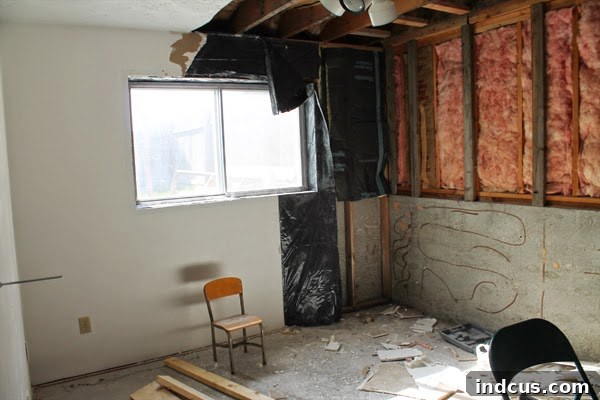
Witnessing the evolution of this space has been incredibly motivating. The photos below offer a stark reminder of the initial state—a blank canvas awaiting our vision. The decision to completely gut the room was driven by a desire for improved structural integrity, enhanced insulation, and a layout that would truly serve its purpose as a functional and inspiring craft haven. This wasn’t just about cosmetic changes; it was about building a solid foundation for years of creative endeavors.
The sheer amount of debris removed during demolition was astounding, highlighting just how much needed to be updated. This crucial step allowed us to address underlying issues and prepare for a completely fresh start, ensuring that every new element would contribute to a superior, long-lasting result. It also gave us the freedom to rethink the entire room’s potential, unburdened by old inefficiencies.
Framing Success: Building a Solid Foundation and Maximizing Value
One of the most impactful stages of our craft room remodel was the framing. We meticulously framed in the entire exterior wall, replacing what was once a section of shoddy, inefficient shelving. This wasn’t merely an aesthetic upgrade; it was a fundamental improvement to the room’s structural integrity and thermal performance. Old, makeshift storage was replaced with a robust new framework, allowing us to install all-new, high-performance insulation. This critical step ensures energy efficiency, helping to maintain a comfortable temperature year-round, which is essential for focused crafting sessions and also contributes to lower utility bills. Furthermore, proper insulation provides sound dampening, creating a quieter, more private space for creative work.
The Game-Changing Closet Addition
Beyond the exterior wall, we also strategically framed in a new closet. This seemingly small addition has a monumental impact, not just on the functionality of the craft room but on our entire home’s market value. By adding a functional closet, this space officially qualifies as a bedroom, transforming our home into a four-bedroom property. This is a significant advantage should we ever decide to sell, as a higher bedroom count often translates to a much sweeter deal on the housing market. It’s a prime example of how thoughtful planning in a DIY remodel can yield substantial returns. This closet will also provide invaluable storage for craft supplies, keeping the main workspace tidy and organized.
The transformation from a cluttered, underutilized space to a clearly defined room with proper storage and insulation is truly remarkable. These framing stages are often the most physically demanding but also the most rewarding, as you begin to see the true shape and potential of the remodeled area emerge. The structural improvements mean that this room is not only a fantastic craft space but also a valuable asset contributing positively to our home’s overall appeal and functionality.
The Drywall Debut: Walls Go Up, Vision Takes Shape
The last few days have brought us closer to the finish line with the installation of drywall. There’s something incredibly satisfying about seeing the exposed studs disappear behind smooth, clean surfaces. Just last night, my diligent husband proudly put up the very last piece of drywall, marking another monumental milestone in our craft room remodel journey. This stage truly brings the room to life, transforming it from a skeletal structure into a defined, enclosed space ready for its finishing touches. The process of cutting, fitting, and securing each sheet of drywall requires precision and patience, but the immediate visual impact of finished walls is incredibly rewarding. It’s looking so good, truly coming together beautifully, don’t you think?
The crisp lines and blank canvas of the freshly installed drywall make it easy to envision the vibrant colors and creative projects that will soon fill this room. It’s a moment of tangible progress, where the vision starts to become a solid reality. Every corner, every seam, speaks to the careful effort put into creating a robust and aesthetically pleasing foundation.
Navigating the Electrical Maze: Safety and Functionality First
While the drywall went up smoothly, the electrical work proved to be a particularly tricky, albeit essential, component of this DIY remodel. Modern craft rooms demand reliable and ample power for various tools, lighting, and devices, making a well-planned electrical system paramount. We undertook several key electrical upgrades: installing a dedicated wall heater for year-round comfort during crafting, adding a much-needed light in the new closet, and strategically placing several extra outlets throughout the room. These additional outlets are crucial for powering sewing machines, cutting tools, glue guns, charging devices, and more, ensuring maximum functionality.
Fortunately, my husband has a friend who is a professional electrician. His expertise was invaluable; he visited, assessed our plans, and provided precise guidance on what needed to be done and where each wire and fixture should be safely connected. This professional oversight was critical for ensuring everything met code requirements and, most importantly, for the safety of our home. Electrical work is not something to guess at, and we strongly advocate for seeking expert advice or hiring a certified electrician for any complex wiring tasks. Prioritizing safety and proper installation during electrical upgrades is non-negotiable for any home improvement project.
The Final Stretch: Taping, Mudding, and Texturing – A Race Against Time
Next up is arguably the most challenging and least glamorous part of drywall installation: taping, mudding, and texturing. This process, while physically demanding and messy, is crucial for achieving that perfectly smooth, professional finish. It involves applying joint compound over the seams and screw heads, embedding tape for strength, and then carefully sanding and applying multiple coats of mud until the walls are flawlessly even. Finally, a texture will be applied, which can range from a subtle orange peel to a more pronounced knockdown, adding character and hiding minor imperfections.
Our goal is to bust through this phase as quickly and efficiently as possible, and we have a very compelling deadline. We’re expecting no less than 27 people to stay with us over the upcoming Memorial Day weekend, and we will absolutely need every inch of this extra space! Our immediate objective is to at least complete the taping, undertake a thorough clean-up, and sweep the room clean. This will make it suitable for its initial role as a temporary guest room. And who better to test out its comfort than Mom and Dad? After all, they’re practically obligated to love us and our DIY efforts, no matter how chaotic the journey, right? This deadline provides a huge push to get the basics done, even if the final paint and decorative touches will have to wait just a little longer.
A Glimpse of Progress: Before and During the Remodel
To truly appreciate the scope of this project, it’s always fun to look back. Here’s a little “before” and “during” shot, showcasing the incredible transformation we’ve achieved so far. From a raw, undefined area to a structured space with new walls and essential utilities, the progress is undeniable. It’s a powerful reminder of what can be accomplished with dedication, teamwork, and a clear vision. This DIY remodel has been a labor of love, turning an ordinary space into something extraordinary.
Looking Forward: The Creative Haven Awaits
There’s still a significant amount of work left to do before our dream craft room is fully realized. The painting, flooring, and all the exciting organizational elements are yet to come. However, I cannot adequately express how incredibly excited I am to finally have a dedicated craft room again. This space represents more than just a room; it’s a future sanctuary for creativity, a place where ideas will flow freely, and countless projects will come to life. The satisfaction of building this space with our own hands, overcoming each challenge, is immense. It’s a testament to the power of DIY home improvement and the joy of creating a space perfectly tailored to our needs. We can’t wait to share the final reveal!