Crafting a Luxurious DIY Advent Calendar: A Step-by-Step Guide to Handmade Holiday Magic
The magic of the holiday season often unfolds in the cherished traditions we create and share. For many, the Advent calendar is more than just a countdown to Christmas; it’s a daily dose of anticipation, a tiny vessel of joy that builds excitement with each passing day. My personal fascination with Advent calendars runs deep, a delightful obsession that has led me to craft numerous versions over the years. You might have seen some of my previous creations here, here, here, or even here. Each project brings its own unique charm and challenges, but the underlying joy of creating something beautiful and meaningful remains constant. This year, I embarked on a new Advent calendar journey, aiming for a truly opulent, “blinged-out” rendition designed to be a special gift. The goal was to elevate the handmade aesthetic into something truly luxurious, a piece that would not only count down the days but also serve as a stunning decorative accent in any home.
Creating a DIY Advent calendar allows for unparalleled personalization, transforming a simple holiday tradition into a bespoke piece of art. Unlike mass-produced versions, a handmade calendar carries the warmth of intention and the unique touch of the maker. It becomes a cherished heirloom, brought out year after year, sparking memories and new traditions. This particular project was an exploration of how simple materials, combined with a little creativity and effort, could be transformed into something truly magnificent and sparkling. The journey began with a set of humble, uninspired mini-ornaments, destined for a glamorous makeover.
From Drab to Dazzling: The Ornament Transformation
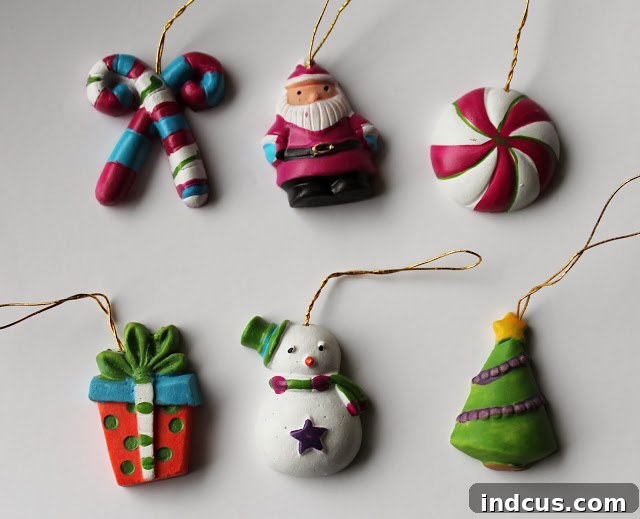
The foundation of this luxe Advent calendar project lay in these little resin mini-ornaments I discovered at Michael’s. They were initially far from glamorous, a collection of roughly painted figures in a rather odd mix of colors. In their original state, they certainly didn’t embody the “luxe” aesthetic I was aiming for. They required a complete artistic intervention to align with the elegant vision for the calendar. This transformation process is often the most rewarding part of any DIY project – taking something ordinary and making it extraordinary.
My first step in their glamorous metamorphosis was a unifying coat of white spray paint. This provided a clean, fresh canvas, instantly elevating their appearance and setting the stage for more refined detailing. Once the white base was perfectly dry, I meticulously hand-painted intricate parts of each ornament with pearlescent paint. This subtle shimmering finish added a sophisticated glow, catching the light beautifully and imparting that coveted luxurious feel. The transformation didn’t stop there. The original gold hangers, while functional, detracted from the desired sparkle. I replaced them with delicate, sparkly thread, a small but impactful change that enhanced the overall elegance and cohesiveness of the collection. The result was a stunning set of miniature ornaments, each a tiny gem, sparkling with newfound charm and ready to adorn our holiday countdown.
Fabric Selection and Festive Embellishments
With the ornaments sparkling, it was time to construct the main body of the Advent calendar. The choice of fabrics was crucial in achieving the desired luxurious aesthetic. I selected a magnificent metallic white/silver fabric for the central Christmas tree and the pockets. This fabric choice was a stroke of genius, as its subtle shimmer and reflective quality made the calendar truly come alive, particularly when viewed in person. It added an undeniable touch of festive glamour and sophistication, a far cry from traditional cotton or felt. This metallic fabric contrasted beautifully with a crisp white cotton fabric chosen for the background, providing a clean, elegant base that allowed the shimmering tree and pockets to truly stand out. To introduce a subtle pop of color and visual interest, I incorporated a delicate touch of aqua in the border, a refreshing complement to the dominant whites and silvers. This thoughtful combination of textures and tones created a cohesive and visually appealing design.
One of my favorite details, and perhaps the crowning glory of this calendar, is the lavish fur trim around the edges. This luxurious addition instantly elevated the entire piece, adding a soft, tactile dimension and an undeniable sense of warmth and holiday coziness. The fur trim transformed the calendar from merely decorative to truly sumptuous, inviting touch and further enhancing its elegant appeal. The overall aesthetic is one of understated luxury, a neutral palette brought to life by shimmering fabrics and tactile textures, perfectly blending modern elegance with traditional holiday charm. Even before the ornaments are hung, the calendar exudes a captivating beauty, thanks to the thoughtful selection of materials and the dazzling accents.
The front of the calendar also features a delightful array of shiny buttons strategically placed on the tree. These buttons serve a dual purpose: they add another layer of sparkle and visual interest, making the tree look pretty and inviting even when the daily ornaments haven’t been added yet. They act as placeholders and decorative elements, ensuring the calendar retains its festive charm throughout the Advent season, regardless of how many ornaments are currently hanging. This meticulous attention to detail ensures that every aspect of the calendar contributes to its overall luxurious and celebratory feel.
Construction Details and Finishing Touches
To ensure the Advent calendar could be proudly displayed, I incorporated felt tabs across the back. These tabs are designed to allow the calendar to hang easily from a dowel, providing a neat and secure display solution. The structural integrity and visual appeal were further enhanced by quilting around the edge of the tree and along the outer border of the calendar. This quilting not only adds a beautiful textural element but also helps to define the shapes and provide a professional, finished look. Quilting, though time-consuming, adds a layer of craftsmanship that truly sets a handmade piece apart. It gives depth and dimension, preventing the fabric layers from shifting over time.
A particular challenge, but ultimately a rewarding one, was attaching the sumptuous fur trim. After some deliberation and experimentation, I found that hot glue was the most effective and efficient method for securing the fur along the edges. While some might raise an eyebrow at the use of hot glue in a meticulously crafted project, its expediency and strong hold proved invaluable for this particular material, ensuring the trim was perfectly positioned and securely fastened. Sometimes, the best solution isn’t the most traditional, but the one that achieves the desired aesthetic with lasting results. The overall impression is undeniably charming, especially when all the carefully prepared ornaments are finally hung in their designated places. The interplay of the metallic fabric, the pearlescent ornaments, and the soft fur creates a truly enchanting display, a focal point for holiday cheer.
A special detail that adds a touch of whimsical perfection is the placement of a single button just above the tree. This button serves as the anchor for the snowflake ornament, ensuring it lines up perfectly with the very top point of the tree. This isn’t just an arbitrary detail; it signifies the 25th ornament, the grand finale of the Advent countdown, crowning the tree with its snowy elegance. It’s these thoughtful, small touches that elevate a handmade item from good to truly exceptional, demonstrating the care and consideration invested in its creation. Each ornament, meticulously transformed, finds its perfect spot, contributing to a harmonious and festive tableau.
Crafting the Pockets and Numbering
The functionality of an Advent calendar lies in its pockets, and for this luxurious version, I wanted them to be as beautifully finished as the rest of the piece. I created the pockets by sewing two pieces of the metallic fabric together, right sides facing each other. After stitching, I flipped them right sides out, pressed them perfectly flat with an iron, and then meticulously sewed these finished strips onto the main background fabric. This technique ensures that the pockets are fully lined, providing a clean, professional finish with no raw edges visible. The result is a series of sturdy, elegant pockets that not only hold the ornaments securely but also add to the overall polished look of the calendar. The attention to detail in the pocket construction ensures durability and a high-quality feel.
To number the pockets from 1 to 24, I opted for a hands-on approach that added a personal and crafty touch. The numbers were carefully hand-cut from a contrasting fabric, then secured onto each pocket using double-sided fusible webbing. This method provides a clean, permanent attachment without the need for visible stitching, maintaining the sleek aesthetic of the metallic fabric. Fusible webbing is a fantastic tool for crafters, offering an easy way to apply appliques with a neat finish. The hand-cut numbers underscore the bespoke nature of the calendar, giving each pocket a unique character. This careful combination of materials and techniques resulted in a truly spectacular Advent calendar, perfect for gifting or displaying as a treasured piece of holiday decor.
The Joy of Crafting a Glamorous Advent Calendar
Embarking on this project to create a more “glammed-up” version of the Advent calendar was an incredibly enjoyable and satisfying experience. The creative process, from conceptualizing the luxurious aesthetic to transforming ordinary materials into sparkling components, was a rewarding journey. One of the greatest advantages of this particular design was the efficiency it offered. By utilizing pre-made mini-ornaments, albeit heavily customized, I significantly reduced the time typically spent on sewing individual ornaments. This streamlining allowed me to focus more on the decorative elements, the intricate fabric work, and the overall luxurious finish, making the project quicker to complete without compromising on quality or visual impact. The decision to use and personalize mini-ornaments proved to be a brilliant time-saver, demonstrating that sometimes, smart material choices can enhance a project’s feasibility without sacrificing its handmade charm. Had I sewn each of the 24 ornaments from scratch, the project would have taken considerably longer.
The satisfaction of seeing the finished calendar, shimmering with metallic fabric, adorned with pearlescent ornaments, and edged with soft fur, was immense. It truly embodied the elegant, high-end feel I had envisioned from the start. This project reinforced my belief that creativity knows no bounds and that even a traditional item like an Advent calendar can be reinterpreted in countless beautiful ways. If the opportunity ever arises to craft another Advent calendar, I would wholeheartedly recommend and absolutely use the mini-ornaments again. Their potential for transformation is remarkable, offering a fantastic balance of customizability and efficiency for any crafter looking to add a touch of sparkle to their holiday season. This luxurious Advent calendar stands as a testament to the joy of DIY, a beautiful and functional piece that will undoubtedly bring smiles and festive anticipation for many years to come.