Crafting Personalized Fridge Magnets: Elevate Your Home Decor with DIY Charm
There’s a special kind of satisfaction that comes with personalizing your living space, turning a house into a home filled with unique touches that reflect your personality and style. One of the simplest yet most effective ways to inject this personal charm into your kitchen is through DIY fridge magnets. Forget the generic, often uninspired magnets that accumulate on your refrigerator door; imagine a collection that’s not only aesthetically pleasing but also highly functional. Today, I’m thrilled to share a few recent creations that have transformed my fridge from a utilitarian appliance into a delightful canvas of personal expression and organized efficiency.
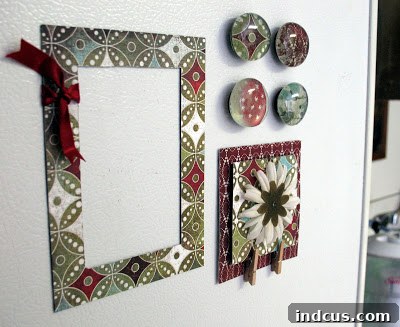
The beauty of crafting your own magnets lies in the endless possibilities for customization. Whether you’re aiming for chic elegance, playful whimsy, or practical utility, the power to create is entirely in your hands. My recent batch, crafted with lovely Basic Grey paper, proves that even the simplest materials can yield charming results. While they may not be “fancy” in the traditional sense, their handcrafted appeal far surpasses the bland, often promotional magnets that typically adorn our fridges. These aren’t just decorative pieces; they’re tiny masterpieces designed to bring joy, organization, and a touch of handmade warmth to the heart of your home.
The Allure of Handmade Magnets: Why DIY Reigns Supreme
In a world saturated with mass-produced items, the act of creating something with your own hands offers a refreshing sense of accomplishment and individuality. DIY fridge magnets stand out as a perfect entry point into the crafting world, offering a low-cost, low-commitment project with high visual and functional impact. Here’s why embracing the handmade magnet trend is a fantastic idea for anyone looking to add a personal touch to their kitchen or office space:
- Unmatched Personalization: You choose every element – the paper, the embellishments, the shape, and the purpose. This means your magnets will be truly unique, reflecting your taste and complementing your home decor perfectly.
- Budget-Friendly Decor: Compared to purchasing designer magnets, making your own can be incredibly economical, especially if you already have craft supplies on hand like scrapbook paper scraps, small embellishments, or even old magazine cutouts.
- Stress-Relieving Hobby: Engaging in creative activities like crafting can be a wonderful way to unwind, de-stress, and tap into your artistic side. It’s a mindful activity that offers a tangible reward.
- Eco-Conscious Crafting: Repurpose old materials, fabric scraps, or discarded items to give them a new lease on life, transforming potential waste into functional art.
- Thoughtful Gift Ideas: Handmade magnets make delightful and personal gifts for friends, family, or colleagues. They’re perfect for housewarmings, birthdays, or just because.
Crafting with Flair: Basic Grey Paper Magnets
One of the easiest ways to start your magnet-making journey is by utilizing beautiful patterned paper, and for this project, I turned to some exquisite Basic Grey paper. Known for its sophisticated designs and high-quality finishes, Basic Grey paper lends an air of understated elegance to any craft project. The beauty of using patterned paper is that it instantly elevates a simple magnet into a miniature work of art.
Selecting Your Materials: The Magic of Patterned Paper
When choosing paper for your magnets, consider the overall aesthetic you’re aiming for. Do you prefer subtle textures, bold geometrics, or delicate florals? Basic Grey offers a wide range of collections that cater to various styles, ensuring you’ll find something that resonates with your personal taste. For these particular magnets, I opted for patterns that were visually interesting without being overwhelming, allowing them to complement rather than compete with the items they would hold.
The process involves simply cutting your chosen paper to size, adhering it to a sturdy base (like chipboard or thick cardstock, or directly onto flat magnets), and then sealing it for durability. A clear sealant or a layer of clear epoxy can protect the paper from moisture and wear, ensuring your beautiful designs last for years. The result is a set of magnets that are infinitely cuter and more personal than any mass-produced alternative, bringing a smile to my face every time I reach for one.
Functional Decor: The Weekly Dinner Menu Frame Magnet
Beyond mere aesthetics, my DIY magnets also serve crucial organizational roles. One of my favorite creations is a framed magnet designed specifically to hold our weekly dinner menu. This concept marries form and function, providing an elegant solution to a common household challenge: what’s for dinner?
Streamlining Meal Planning with a Custom Magnet
Meal planning is a game-changer for busy households. It saves time, reduces food waste, and often leads to healthier eating habits. However, keeping that plan visible and accessible can sometimes be a challenge. This framed magnet solves that problem beautifully. Using a small, decorative frame as the base, I secured it to a strong magnet, creating a dedicated spot on the fridge for our weekly culinary roadmap. Inside the frame, a simple piece of paper or a small whiteboard insert can be swapped out each week, allowing for effortless updates.
Benefits of a dedicated meal planner magnet:
- Reduces Dinner-Time Stress: No more last-minute scrambling or endless debates about what to cook.
- Saves Time and Money: Plan your grocery list based on your menu, leading to fewer impulse buys and less food waste.
- Promotes Healthy Eating: Easily incorporate balanced meals and dietary considerations into your weekly routine.
- Family Involvement: Kids and partners can see what’s planned, reducing questions and potentially encouraging them to help with meal prep.
- Aesthetic Appeal: A beautifully framed menu adds to your kitchen’s decor, turning a chore into a charming display.
Keeping Track: The Clothespin Reminder Magnet
Another incredibly practical addition to my fridge magnet collection is a square magnet equipped with miniature clothespins. This ingenious design transforms a simple magnet into a versatile mini bulletin board, perfect for keeping track of those small but important reminders that often get lost in the shuffle of daily life.
The Power of a Pin: Versatile Reminder System
The beauty of the clothespin magnet lies in its flexibility. Unlike traditional magnets that merely hold a single piece of paper, the clothespins allow for easy rotation and display of multiple items. This means I can quickly clip up a grocery list add-on, a doctor’s appointment card, a school permission slip, or even a heartfelt note from a family member. The square shape provides a neat and compact base, while the little clothespins add a touch of playful functionality.
Creative uses for your clothespin reminder magnet:
- Grocery List Additions: Clip up small notes for items you run out of during the week.
- Appointment Reminders: Hold small cards or notes for upcoming appointments.
- School Notes and Artwork: Display important school notices or a child’s latest masterpiece.
- Inspirational Quotes: Change out motivating quotes or affirmations regularly.
- Photo Display: Showcase mini photos or polaroids, updating them as often as you like.
- Recipe Snippets: Keep a quick recipe handy while cooking.
This magnet serves as a highly visible command center for quick reference items, ensuring nothing important slips through the cracks. It’s a small detail that makes a big difference in maintaining an organized and calm household.
The Magic of Marble Magnets: Easy and Fun
Among the most delightful and surprisingly simple DIY magnet projects are marble magnets. If you’ve never ventured into making these before, you’re missing out on an incredibly satisfying crafting experience! They are super easy to make, require minimal supplies, and the results are consistently charming.
What Are Marble Magnets and Why Make Them?
Marble magnets, often referred to as glass cabochon magnets, typically involve adhering a decorative paper or image to the flat side of a clear glass gem (or “marble”), and then attaching a small magnet to the back. The glass gem acts as a magnifying lens, beautifully enhancing the image beneath it, creating a polished, professional-looking magnet that belies its simple origins.
The four round magnets I made for this batch are indeed marble magnets, and their smooth, glossy finish adds a lovely textural contrast to the other paper-based designs. They are perfect for holding up photos, postcards, or even just adding a decorative touch to your fridge or magnetic board.
Reasons to try making marble magnets:
- Incredibly Easy: The process is straightforward, making it perfect for beginners and even kids (with supervision).
- Uses Minimal Supplies: All you need are glass gems (flat-backed are best), paper (patterned, photos, text), a strong adhesive, and small magnets.
- Highly Customizable: Use any image you desire – old book pages, maps, family photos, comic strips, or your favorite scrapbook paper designs.
- Quick to Make: You can create a whole set in a single crafting session.
- Beautiful Results: The magnified effect of the glass gives them a professional and unique appearance.
Seriously, if you haven’t ever made them before, you should! They are super easy and genuinely fun, offering a quick win in the world of DIY crafting.
Beyond the Fridge: Versatile Uses for DIY Magnets
While the refrigerator is the most common home for magnets, their utility extends far beyond the kitchen. Handmade magnets can bring organization and personality to various other spaces in your home or office. Consider these alternative applications:
- Office Whiteboards: Keep important notes, project deadlines, or inspirational quotes front and center in your workspace.
- Magnetic Memo Boards: Create a dedicated memo board in your entryway for keys, mail, or shopping lists.
- School Lockers: Help students personalize and organize their lockers with fun, themed magnets.
- Craft Room Organization: Use magnets to hold small tools, fabric swatches, or pattern pieces on a magnetic strip.
- Kid’s Play Areas: Adorn magnetic chalkboards or easels with educational or playful magnets.
- Tool Sheds: Keep small metal tools or accessories within easy reach on a magnetic strip.
The possibilities are truly endless, limited only by your imagination and the presence of a magnetic surface!
Materials and Tools for Your Magnet Adventures
Getting started with DIY magnets is surprisingly simple, often requiring just a few basic craft supplies. Here’s a general list of what you might need, depending on the type of magnet you’re creating:
- Magnets: Various types are available – flat ceramic discs, rare-earth magnets (neodymium) for stronger hold, or flexible magnetic tape. Choose based on the weight of your embellishment and desired strength.
- Adhesive: A strong craft glue like E6000, super glue, or a heavy-duty adhesive designed for crafting will work best to secure your embellishments to the magnets.
- Decorative Elements:
- Paper: Scrapbook paper (like Basic Grey!), cardstock, magazine cutouts, old book pages, photos, maps, sheet music.
- Glass Gems/Cabochons: For marble magnets.
- Small Frames: For menu planners or photo magnets.
- Mini Clothespins: For reminder magnets.
- Buttons, Beads, Charms: For three-dimensional embellishments.
- Fabric Scraps: For softer, textural magnets.
- Cutting Tools: Scissors, craft knife, or a paper punch for clean cuts.
- Sealant (Optional but Recommended): Clear acrylic spray sealant, Mod Podge, or clear epoxy resin to protect paper-based designs and add a glossy finish.
Most of these items can be found at your local craft store, or you might already have them tucked away in your crafting stash. Don’t be afraid to experiment with different materials to find what works best for your style!
Unleash Your Creativity: More Magnet Ideas
Once you’ve mastered the basics, the world of DIY magnets opens up even further. Here are a few more creative ideas to inspire your next crafting session:
- Photo Magnets: Print cherished photos, trim them to size, and adhere them to magnet bases for personalized keepsakes.
- Button Magnets: Glue an assortment of colorful vintage or new buttons onto small magnets for a whimsical, textural look.
- Resin Magnets: Pour clear epoxy resin over small trinkets, dried flowers, or glitter embedded in a mold with a magnet on the back for a durable, glossy finish.
- Bottle Cap Magnets: Flatten bottle caps and fill them with paper cutouts, then seal with clear epoxy or Mod Podge for a retro vibe.
- Scrabble Tile Magnets: Glue magnets to the back of Scrabble tiles to spell out names, words, or motivational messages.
Each of these ideas offers a unique way to express your creativity and add practical charm to your home. They also make fantastic, heartfelt gifts that show you put thought and effort into them.
The Joy of Crafting: Why DIY Magnets Are Worth It
Engaging in creative crafting, especially projects as accessible as making magnets, offers more than just a decorative outcome. It’s an opportunity to slow down, engage your hands, and experience the therapeutic benefits of creation. The process itself can be a mindful escape from the daily grind, allowing you to focus on a simple task and enjoy the tangible results of your efforts.
From the initial concept of choosing materials like the elegant Basic Grey paper, to the careful assembly of a functional meal planner, to the sheer delight of seeing a simple glass gem transform into a vibrant marble magnet, each step is imbued with personal meaning. These aren’t just objects; they’re tiny narratives of your creativity, small declarations of your unique style, and practical aids that help bring order and cheer to your everyday life.
So, gather your supplies, let your imagination take flight, and embark on your own magnet-making adventure. You’ll not only end up with charming and useful additions to your home but also the profound satisfaction that comes from bringing your creative visions to life.