Craft Your First Cozy Masterpiece: An Easy Side Button Crochet Scarf for Beginners
Embarking on a journey into the world of crochet can be an incredibly rewarding experience. For me, what started as a new creative curiosity less than six months ago has blossomed into a deeply cherished passion. There’s a unique tranquility in the rhythmic motion of the hook and yarn, a mindful escape from the daily hustle. One of the most beautiful aspects of crochet, especially for beginners, is its forgiving nature. If a stitch goes awry or a row looks off, a simple tug on the yarn allows you to unravel and restart, leaving no trace of error or wasted material. This freedom from perfectionism makes learning delightful and stress-free.
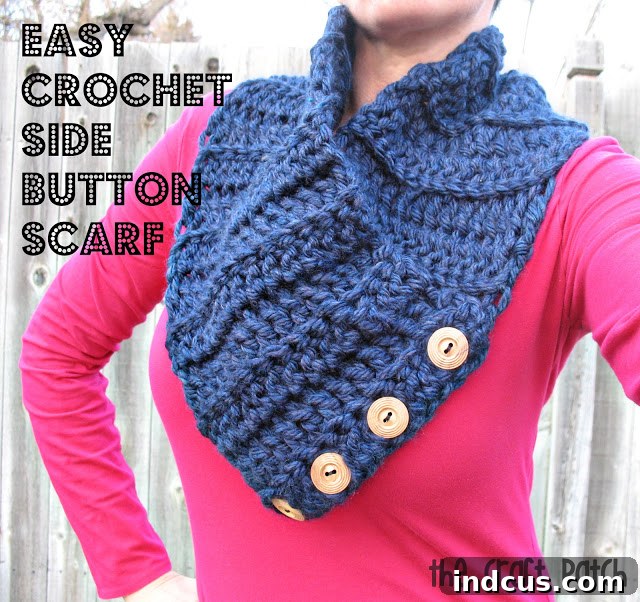
As the holiday season approaches, the allure of crafting handmade gifts grows stronger. There’s nothing quite like the warmth and personal touch conveyed by a gift made with your own hands. This year, my crochet hook is already busy creating a collection of unique presents, and I’m thrilled to share my first finished piece: a charming and surprisingly simple side-button crochet scarf. This project isn’t just a stylish accessory; it’s a testament to how quickly beginners can create something beautiful and functional. Its modern, chunky aesthetic is sure to make a statement, and the best part? I designed the pattern myself, making it incredibly straightforward for anyone new to the craft.
Why This Scarf is Your Perfect Beginner Crochet Project
When choosing your first crochet project, simplicity and quick gratification are key motivators. This side-button scarf ticks all the boxes, making it an ideal entry point for anyone eager to learn how to crochet. Here’s why:
Simplicity at Its Core: The Double Crochet Stitch
The entire scarf is constructed using just one fundamental stitch: the double crochet (DC). This stitch is one of the pillars of crochet, easy to learn, and forms a lovely, dense fabric. By focusing on mastering just one stitch, beginners can build confidence and consistency without feeling overwhelmed by a multitude of techniques. It’s repetitive enough to become meditative, yet engaging enough to keep you interested.
Mastering Texture: The Back Loop Only (BLO) Technique
To give the scarf its distinctive modern and chunky look with beautiful raised ridges, we introduce a simple variation: working into the back loop only (BLO) of each double crochet stitch. This isn’t a new stitch, but rather a different way of inserting your hook. It’s incredibly easy to do but creates a stunning ribbed texture that mimics knitting, adding an advanced look to a truly beginner-friendly pattern. It’s a fantastic way to experiment with texture early in your crocheting journey.
Quick Gratification with Super Bulky Yarn
Using super bulky weight yarn is a game-changer for beginners. Thicker yarn means fewer stitches per row and fewer rows overall to achieve a substantial length. This translates into a project that works up remarkably fast. There’s immense satisfaction in seeing your scarf grow quickly, providing continuous motivation to keep going. Plus, the super bulky yarn makes for an extra cozy and squishy scarf that feels luxurious.
The Charming Side Button Detail
The addition of four large buttons transforms a basic rectangular scarf into a stylish and versatile accessory. The buttons allow the scarf to be fastened securely, creating a unique silhouette that stays put and adds a touch of sophistication. This simple embellishment not only enhances the scarf’s functionality but also provides an opportunity to personalize your creation with buttons that reflect your style or the recipient’s taste.
Gathering Your Essentials: Materials List
Before you begin your crocheting adventure, ensure you have all the necessary supplies. Choosing the right materials is half the battle in ensuring a smooth and enjoyable crafting experience.
- Lion Brand Super Bulky Weight Yarn: I highly recommend Lion Brand Hometown USA yarn for this project, as it’s readily available, affordable, and comes in a wide array of vibrant colors. Its super bulky nature (weight category 6) is perfect for creating that desired chunky texture and quick progress. For a scarf of this length and width, you will typically need around 2-3 skeins, depending on your tension and desired final dimensions. Experiment with different colors – a solid neutral for versatility or a bold, bright shade for a pop of color!
- Size N/15 (9mm) Crochet Hook: The large hook size complements the super bulky yarn, allowing the stitches to be loose enough for a soft drape but firm enough to hold their shape. Using a hook size appropriate for your yarn weight is crucial for achieving the intended fabric and stitch definition. A comfortable ergonomic handle can also make a big difference during longer crocheting sessions.
- Four Large Buttons: Select buttons that are substantial enough to complement the chunky nature of the yarn. Wooden buttons, as I used, add a rustic and natural charm, but you could opt for metal, ceramic, or even decorative plastic buttons to match the scarf’s style. Ensure they have enough holes or a shank for secure attachment and are roughly 1 to 1.5 inches (2.5 to 3.8 cm) in diameter.
- Tapestry Needle (Yarn Needle): Essential for weaving in all your loose ends neatly and invisibly once your scarf is complete. Choose one with a large eye to accommodate the bulky yarn.
- Scissors: A good pair of sharp scissors for cutting yarn tails.
- Measuring Tape: Crucial for checking your gauge, ensuring consistent length, and precisely placing your buttons.
Understanding the Stitches: A Quick Refresher
Before diving into the pattern, let’s quickly review the core techniques you’ll be using. Even if you’re a complete beginner, these instructions will guide you through.
The Double Crochet (DC) Stitch
The double crochet is a taller stitch than a single crochet and creates a wonderful fabric quickly. Here’s how to make it:
- Yarn Over (YO):
- Insert Hook:
- Yarn Over (YO):
- Pull Up a Loop:
- Yarn Over (YO):
- Pull Through Two Loops:
- Yarn Over (YO):
- Pull Through Last Two Loops:
Working in the Back Loop Only (BLO)
Typically, when you work into a stitch, you insert your hook under both “legs” or loops of the V-shape at the top of the stitch. When working in the back loop only:
- Identify Loops:
- Insert Hook:
Your Step-by-Step Side Button Scarf Pattern
This pattern is designed to be simple and easy to follow. Don’t worry about achieving perfect gauge on your first try; focus on consistent tension and enjoying the process. The measurements are approximate and can be adjusted to your preference.
Getting Started: The Foundation Chain
Begin by creating your foundation chain. This will determine the width of your scarf.
Chain 17. (This will create a scarf approximately 7-8 inches wide, once worked into double crochet stitches, allowing for 16 DC across).
Creating the Scarf Body
Now you will build the main body of your scarf, creating the ribbed texture.
Row 1: Double crochet (DC) in the 3rd chain from your hook (the first 2 skipped chains count as your first DC). Continue to DC in each chain across. You should have 16 double crochet stitches. Chain 2 (this counts as your first DC for the next row), then turn your work.
Row 2: Work a double crochet (DC) in the back loop only (BLO) of the next stitch and in each stitch across. Remember to work the last DC into the top of the turning chain from the previous row. You should still have 16 DC stitches. Chain 2 (counts as your first DC for the next row), then turn your work.
Repeat Row 2 until your scarf reaches your desired length. For an adult scarf, aim for approximately 40-45 inches (100-115 cm). This will typically be around 60-70 rows, but it can vary significantly based on your yarn, hook, and tension. Use your measuring tape to check regularly. Once you’ve reached the desired length, fasten off your yarn, leaving a tail about 6-8 inches long.
Finishing Touches: Weaving Ends and Attaching Buttons
Almost done! These final steps will give your scarf a polished, professional look.
- Weave in Ends: Using your tapestry needle, carefully weave in any loose yarn tails (starting tail and fastening-off tail) into the body of your scarf. Aim to weave them in along the direction of the stitches to make them as invisible as possible.
- Attach Buttons: Lay your scarf flat. Decide which end will have the buttons. Position your four large buttons vertically along one short end of the scarf. For the best look and functionality, place the first button about 1 inch (2.5 cm) from the edge, and space the remaining three buttons evenly, about 1.5-2 inches (3.8-5 cm) apart. Securely sew each button onto the scarf using a strong sewing needle and thread that matches your yarn. Double-check that they are firmly attached.
Styling Your New Chunky Crochet Scarf
The beauty of this side-button scarf lies in its versatility and modern appeal. To wear it, simply wrap the buttoned end around your neck once, bringing the other end across the front of your chest. Then, loop the unbuttoned end through the gaps created by the buttons, fastening it securely. This creates a chic, layered look that keeps you wonderfully warm. It’s perfect for pairing with a casual sweater and jeans, or adding a touch of cozy elegance to a more dressed-up ensemble. The chunky texture adds visual interest and a sense of handmade luxury to any outfit.
The Joy of Handmade: Gifting Your Creation
There’s an undeniable magic in giving a handmade gift. This thick, squishy scarf, made with love and care, is the perfect present for a sister-in-law, a best friend, or anyone who appreciates thoughtful craftsmanship. It’s more than just an accessory; it’s a hug in yarn form, a tangible expression of your effort and affection. Imagine the joy of your loved one receiving this unique, cozy scarf, knowing you poured your time and creativity into making them feel warm and stylish this winter.
Tips for Every Beginner Crocheter
- Don’t Fear the Frog: In crochet, “frogging” means unraveling your work (rip-it, rip-it!). It’s a completely normal part of the learning process. Don’t be afraid to pull out stitches if they don’t look right. It’s better to correct mistakes early than to carry them through the whole project.
- Practice Makes Progress: Your first stitches might feel awkward, but with each row, you’ll gain confidence and your tension will become more consistent. Embrace the learning curve.
- Utilize Resources: If written instructions feel daunting, search for video tutorials online. Seeing the stitches being formed can be incredibly helpful for visual learners.
- Enjoy the Process: Crochet is meant to be relaxing. Don’t get bogged down in perfection. Focus on enjoying the meditative rhythm and the satisfaction of creating something with your own hands.
Conclusion: Embrace Your Crocheting Journey
This easy side-button crochet scarf is more than just a beginner-friendly project; it’s an invitation to discover the joy and tranquility of crafting. With simple stitches, a quick-to-grow fabric, and a stylish design, it’s a project that promises satisfaction and a beautiful, wearable outcome. Whether you’re making it for yourself or as a heartfelt handmade gift, you’ll find immense pride in what you’ve accomplished.
So, gather your materials, settle into a comfy spot, and let your crochet journey begin. You’ll be amazed at what you can create with just a hook, some yarn, and a little bit of patience. Happy crocheting!