
Create a Timeless Tradition: Your DIY Christmas Memory Box Ornament
The holiday season is a magical time, filled with warmth, joy, and the cherished tradition of decorating the Christmas tree. For many, including my husband and me, this annual ritual involves exchanging special ornaments, each piece holding a unique story or representing a year gone by. It’s a delightful journey down memory lane as we unbox our collection, reminiscing about the origins of each ornament and the memories they evoke. However, finding that truly perfect, deeply personal ornament can often be a challenge. We longed for something more than just a store-bought bauble; something that truly encapsulated the spirit of the year.
This quest for a meaningful Christmas ornament led me on a search that began even before the Halloween decorations were packed away. Despite my diligent efforts, I couldn’t quite find what I envisioned—an ornament that would truly embody the essence of our year together. Then, during a casual stroll through the aisles of Michael’s, a craft store haven, my eyes landed on a display of simple, unassuming paper mache boxes. Instantly, an idea sparked, a brilliant “ding ding” moment that illuminated the path to creating our most memorable ornament yet. I knew exactly what I would craft to capture the spirit of the season and the highlights of our year.
The Art of Crafting Your Personalized Memory Box Ornament
Creating this unique memory box ornament is a delightful and surprisingly simple craft project that adds a deeply personal touch to your holiday decorations. It transforms a humble paper mache box into a cherished keepsake, brimming with the year’s most significant moments. The process is not just about crafting; it’s about infusing love and memories into every step.
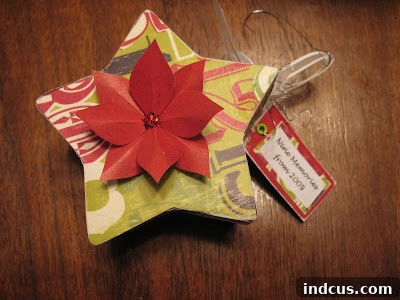
My first step involved meticulously covering the entire paper mache box with beautiful, festive holiday paper. The choice of paper sets the tone, allowing for endless personalization to match your holiday theme or personal style. Once the paper was carefully applied, I slathered everything in a generous coat of Mod Podge. This not only acts as a strong adhesive but also provides a durable, protective sealant, giving the ornament a lovely finished look and ensuring it withstands the test of time.
To add a classic holiday touch, I carefully pieced together a beautiful poinsettia flower and affixed it to the top of the box. This simple embellishment instantly elevated the ornament, making it feel festive and complete. The final exterior detail was a small, elegant tag, which proudly declared, “Nine Memories from 2009.” This tag serves as a clear indicator of the treasure held within, beckoning curious eyes to imagine the stories it contains.
Capturing the Year: The Heart of Your Memory Box
The true magic of this DIY Christmas ornament lies in its contents. Instead of being an empty vessel, it becomes a miniature time capsule, holding tangible reminders of the past year’s journey. This is where the real sentiment comes into play, transforming a simple craft into an invaluable family heirloom.
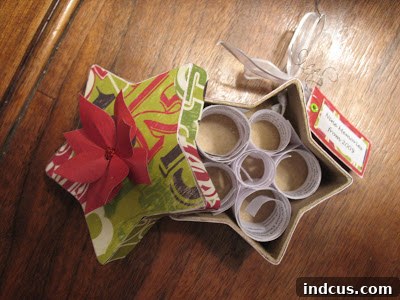
The core of this project involved reflecting on the past year and selecting nine of the most significant or cherished events. These weren’t necessarily monumental life changes, but rather moments that brought joy, growth, or simply encapsulated a feeling from the year. It could be anything from a memorable family vacation, a career milestone, a new hobby discovered, a funny family anecdote, to a simple yet profound moment of gratitude. Each memory was thoughtfully written down on a small slip of paper, then carefully rolled up and placed inside the decorated box. This act of writing and sealing away the memories felt incredibly poignant, like preserving a piece of time.
An Unforgettable Gift and a Lasting Family Tradition
The moment of presenting this handmade memory box ornament to my husband was truly special. His reaction was priceless – he absolutely loved it. The genuine surprise and delight on his face confirmed that this was more than just an ornament; it was a deeply personal gift, a testament to our shared experiences and the love woven into our year.
This single memory box sparked an even grander vision: “Wouldn’t it be neat to make one of these every year?” The idea instantly took root, transforming a simple craft project into the beginning of a beautiful new family tradition. Imagine the profound joy and nostalgia years from now, perhaps 10 or even 20 years down the line, when our Christmas tree would be covered not just in decorative ornaments, but in a constellation of these little boxes, each one a mini-archive of an entire year. Each memory box would serve as a tangible timeline, holding whispers of laughter, triumphs, challenges, and growth from every passing year.
Making It Your Own: Ideas for Your Memory Box Journey
Step-by-Step Guide to Crafting Your Memory Box Ornament:
- Gather Your Supplies: You’ll need a small paper mache box (available at most craft stores), festive scrapbook paper or wrapping paper, Mod Podge (matte or gloss finish), a paintbrush or sponge brush, scissors, various embellishments (like faux poinsettias, ribbons, glitter, small charms), a hot glue gun (or strong craft glue), plain paper slips for writing memories, and a pen.
- Prepare Your Box: If desired, you can give your paper mache box a base coat of acrylic paint in a coordinating color before applying paper, especially if your decorative paper is thin. Ensure it’s completely dry.
- Decorate the Exterior: Cut your festive paper to fit each side of the box (top, bottom, and four sides). Apply a thin, even layer of Mod Podge to one surface of the box, then carefully place the cut paper on top, smoothing out any bubbles with your fingers or a brayer. Repeat for all surfaces. Once all paper is applied and slightly dry, apply a generous top coat of Mod Podge over the entire box, sealing the paper and adding a protective, durable finish. Allow to dry completely.
- Add Embellishments: Once dry, adorn your box with your chosen embellishments. Hot glue works best for attaching heavier items like a faux poinsettia or small figures. Ribbons can be wrapped around the box and secured, or tied into a bow. Consider adding a small loop of ribbon to the top for hanging, securing it firmly with glue.
- Create Your Memory Slips: Reflect on the past year. What were the most significant, joyful, or memorable moments? Aim for a number that fits comfortably in your box (e.g., 5-10 memories). Write each memory clearly on a small slip of paper. You can use different colored papers for variety or a single elegant choice.
- Fill Your Box: Carefully roll or fold each memory slip and place them gently inside the decorated box. Once all memories are nestled within, secure the lid.
- Add the Finishing Touch: Attach a small tag to the ornament, either by tying it with ribbon or gluing it on. Clearly write the year, for example, “Memories of [Current Year]”. This makes it easy to identify each year’s collection.
What Memories Should You Include?
The beauty of this memory box lies in its flexibility. There are no strict rules for what constitutes a “memory.” Here are some ideas to inspire your reflections:
- Significant life events: Births, weddings, graduations, new jobs, moving homes.
- Travel adventures: A memorable trip, a weekend getaway, a new place explored.
- Personal achievements: Learning a new skill, completing a project, overcoming a challenge.
- Small joys: A particularly delicious meal, a beautiful sunset, a heartwarming moment with a pet.
- Family milestones: A child’s first step, a special family gathering, a funny inside joke.
- Moments of gratitude: What were you most thankful for this year?
- Lessons learned: A new perspective gained, a moment of personal growth.
Encourage everyone in the family to contribute their favorite memories, making it a truly collective and cherished artifact.
Expanding the Tradition: Beyond the Ornament
While the memory box as a tree ornament is a fantastic starting point, the concept can be expanded:
- Memory Jar Centerpiece: Instead of small boxes, use a beautiful glass jar as a centerpiece during holiday meals. Family members can write down memories throughout the year and add them, opening and reading them aloud during Christmas dinner.
- Year-End Reflection Gift: Create a memory box for a loved one, filling it with memories you share together. It’s an incredibly thoughtful and personal gift.
- Themed Boxes: Dedicate boxes to specific themes, like “Travel Adventures,” “Baby’s First Year,” or “Favorite Family Quotes.”
- Photo Integration: Include tiny rolled-up photos along with your written memories, or even decoupage small photos onto the exterior of the box itself.
Start Your Own Timeless Holiday Tradition Today
In a world often saturated with fleeting trends and mass-produced items, the DIY Christmas Memory Box ornament stands out as a beacon of genuine sentiment and lasting value. It’s more than just a decoration; it’s a conversation starter, a nostalgic journey, and a precious record of your life’s moments. As each year passes, your collection of memory boxes will grow, transforming your Christmas tree into a living tapestry of your family’s history, a beautiful visual representation of the journey you’ve shared.
This holiday season, I invite you to embrace the joy of crafting and the power of memory. Take a moment to reflect, gather your supplies, and create your very own DIY Christmas Memory Box ornament. You’ll not only be adding a unique piece of decor to your home but also embarking on a meaningful tradition that will be cherished for generations to come. Imagine the stories that will be told, the laughter that will be shared, and the love that will be felt as you revisit these miniature time capsules year after year. Begin your legacy of memories today!







