Craft Your Own Stunning Interchangeable DIY Holiday Wood Sign – Seasonal Decor Made Easy!
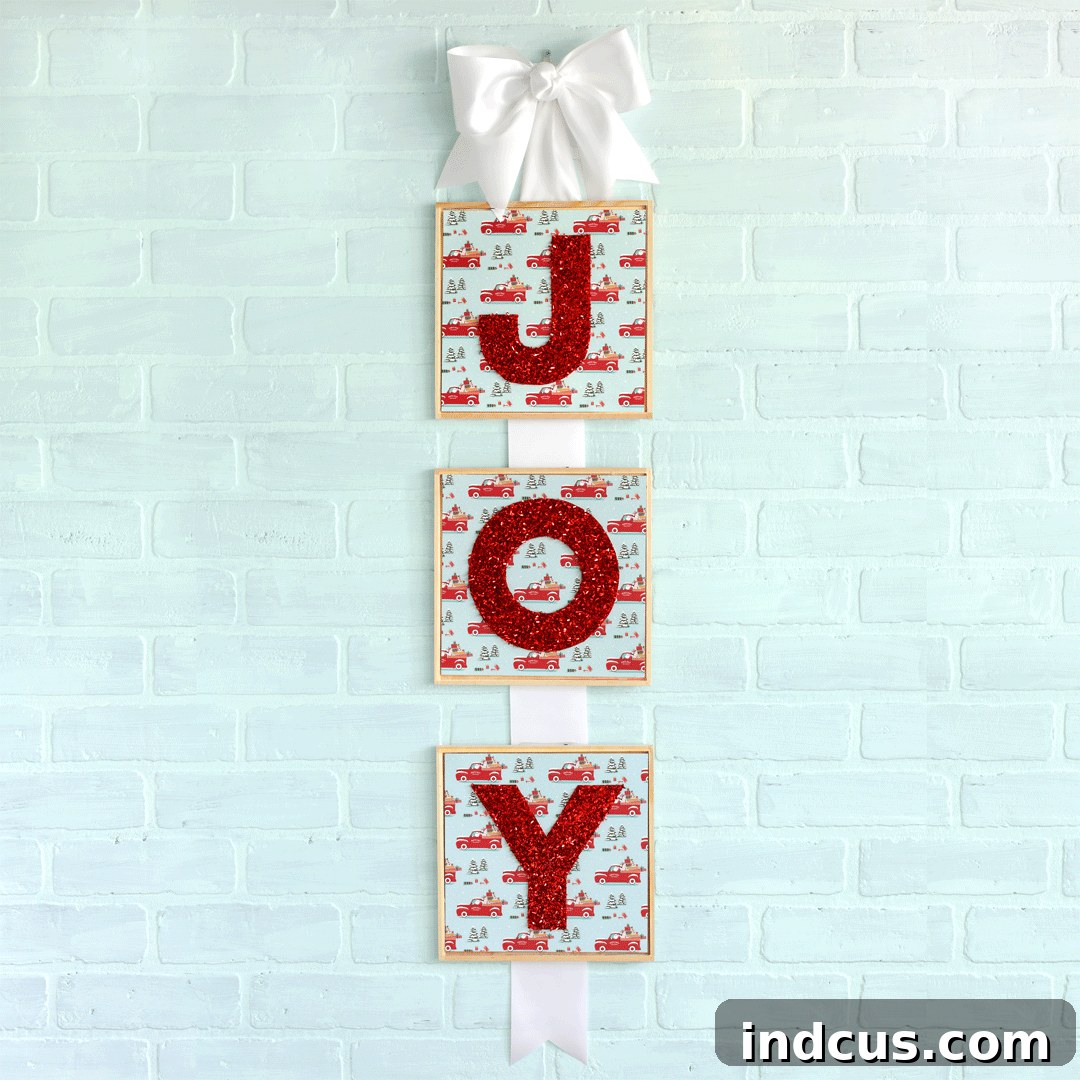
Embrace the joy of seasonal decorating without the clutter! Imagine a single, beautiful piece of home decor that effortlessly transitions from one holiday to the next, reflecting the festive spirit of every season. This ingenious interchangeable DIY wood sign is not just a craft project; it’s a versatile solution for keeping your home stylishly adorned year-round. Say goodbye to storing bulky decorations in the off-season and hello to a smart, space-saving, and utterly charming decor piece.
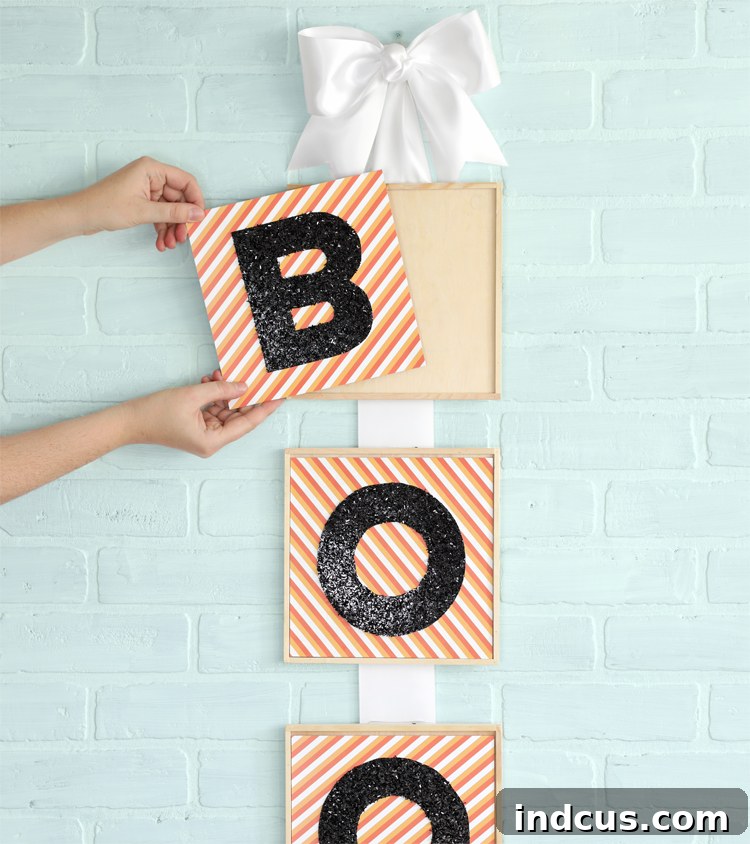
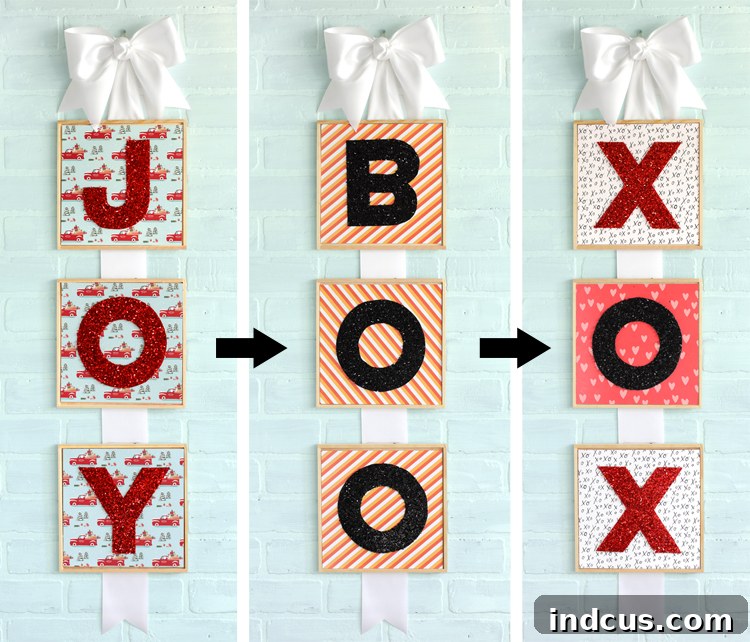
Today, we’re thrilled to guide you through creating this delightful vertical wooden sign, featuring customizable letters that can be swapped out for different holidays. It’s a fantastic way to personalize your space and celebrate every special occasion with a touch of handmade charm.
This post is proudly sponsored by American Crafts, bringing you the best in crafting innovation.
Discover the Magic of Tinsel Glitter Paper
A true highlight of this project is a wonderful material you might not have encountered before: tinsel paper. Picture glitter paper, but with an extra dimension of thickness and an incredible texture. It’s essentially individual pieces of shimmering tinsel meticulously affixed to a sheet, resulting in a remarkably sparkly and tactile finish. This isn’t just paper; it’s a sensory experience that elevates any craft. Its unique shine and robust feel make it an absolute game-changer for adding a touch of glamour and sophistication. Once you work with it, you’ll want to incorporate tinsel paper into all your future creative endeavors!
Finding the right supplies is often the first step to a successful DIY project. For this particular craft, all the materials were conveniently sourced from my local AC Moore craft store. They boast an impressive and ever-evolving selection of open stock paper, ensuring you’ll always find the latest designs and unique treasures like the captivating tinsel paper. Their diverse inventory makes it easy to gather everything you need in one stop, whether you’re a seasoned crafter or just starting out.
Essential Materials You’ll Need
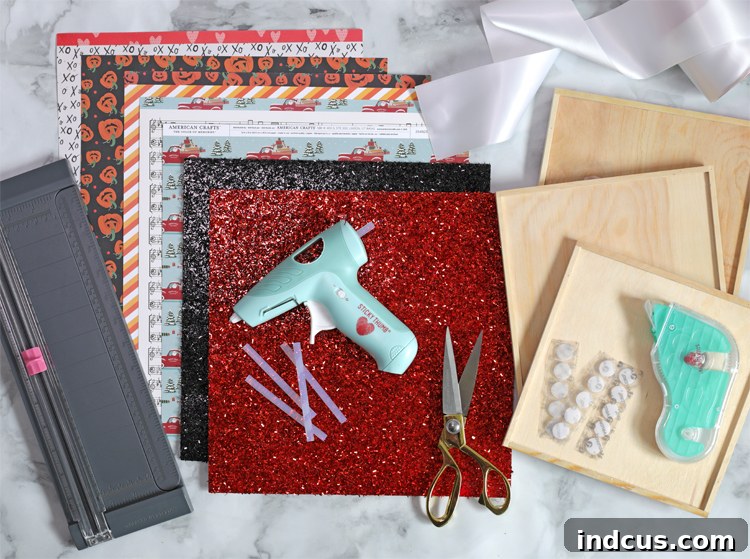
To embark on this exciting DIY journey, gather the following supplies. Each item plays a crucial role in bringing your interchangeable holiday sign to life:
- Tinsel Glitter Paper: The star of our show, this paper provides unparalleled sparkle and texture for your letters. Look for a variety of colors to match different holiday themes.
- Assorted Holiday Patterned Paper: Choose designs that resonate with specific holidays (e.g., pumpkins for Halloween, snowflakes for Christmas, hearts for Valentine’s Day). Having a good selection will allow for maximum interchangeability.
- 3 Wood Signs (approx. 8×8 inches): These serve as the sturdy base for your interchangeable panels. While 8×8 inches is a great size, feel free to adjust to your preferred dimensions, ensuring they provide enough space for your chosen letters.
- Wide Ribbon: Opt for a sturdy, decorative ribbon that complements your chosen color schemes. A width of at least 1-2 inches will provide good support for hanging your sign.
- Velcro Dots: These small, adhesive-backed dots are key to the “interchangeable” aspect of the sign. They allow for easy swapping of your holiday panels.
- Paper Trimmer: Essential for achieving clean, straight cuts on your patterned papers, ensuring a professional finish.
- Glue Gun + Glue Sticks: For securely attaching the ribbon to the wood signs and any optional embellishments.
- Adhesive Tape Runner: Ideal for neat and strong adhesion of the tinsel letters to the patterned paper, without the mess of liquid glues.
- Sharp Scissors: Crucial for precise cutting, especially when working with detailed letter templates and the thicker tinsel paper.
For those who prefer visual instructions, a comprehensive video tutorial for this craft is available at the bottom of this post. Feel free to scroll down and watch the steps in action after reviewing these written instructions.
Step-by-Step Guide to Crafting Your Interchangeable Sign
Step 1: Preparing Your Base Panels with Holiday Flair
Begin by measuring the inside dimensions of your wood signs accurately. Precision here ensures a snug and professional fit for your patterned paper panels. Once you have your measurements, use a paper trimmer to cut your assorted holiday scrapbook papers to fit perfectly within each sign. You will need three pieces of patterned paper for each holiday phrase you wish to create. For example, if you plan to make a “BOO” sign for Halloween, a “JOY” sign for Christmas, and a “LOVE” sign for Valentine’s Day, you’ll need three Halloween-themed papers, three Christmas-themed papers, and three Valentine’s-themed papers. Choose papers with complementary patterns and colors that evoke the spirit of each holiday, ensuring a cohesive and visually appealing look.
Step 2: Implementing the Interchangeable Magic with Velcro
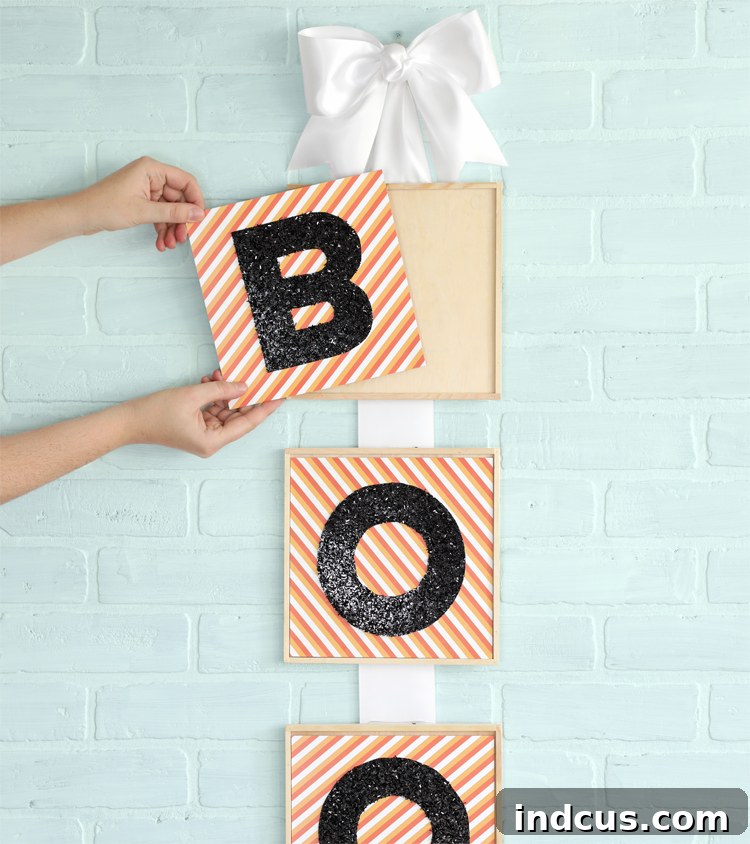
The secret to your sign’s versatility lies in Velcro dots. Apply one scratchy-sided Velcro dot to each of the four inside corners of every wood sign. Then, attach a soft-sided Velcro dot to each of the four corners on the back side of every single patterned paper panel you’ve cut. This strategic application ensures that all your holiday papers will easily adhere to any of the wood signs, allowing for quick and hassle-free swapping. This method creates a consistent system, making it simple to change your decor with the seasons without any fuss or mess.
Step 3: Crafting Your Sparkly Tinsel Letters
First, print out your desired letters to use as templates. The font used for this project, “Lulo Clean Outline Bold,” offers a fantastic clear and bold aesthetic. This step requires a bit of foresight: before tracing, remember to flip your printed letters over so they are backwards. Then, carefully trace the reversed letters onto the back side of your tinsel paper. This crucial step ensures that when you cut out your letters and flip them right-side up, they will appear correctly. Trust me, learning from my own “rookie mistake” (as seen with the ‘B’ in the video tutorial!), this backward tracing technique is essential to avoid reversed letters and save valuable crafting time and materials. Precision in tracing will lead to cleaner cuts and more professional-looking letters.

Step 4: Precision Cutting and Letter Adhesion
With your letters traced, it’s time to carefully cut them out from the tinsel paper. Due to the thickness and texture of tinsel paper, using sharp scissors and taking your time will yield the best results. Once cut, apply an adhesive tape runner along the entire back surface of each tinsel letter. This ensures strong and even adhesion without the bumps or wrinkles that liquid glues can sometimes create. Then, carefully position and adhere each sparkly letter to the center of its corresponding patterned paper panel. Take a moment to center each letter perfectly for a balanced and visually appealing finished product.
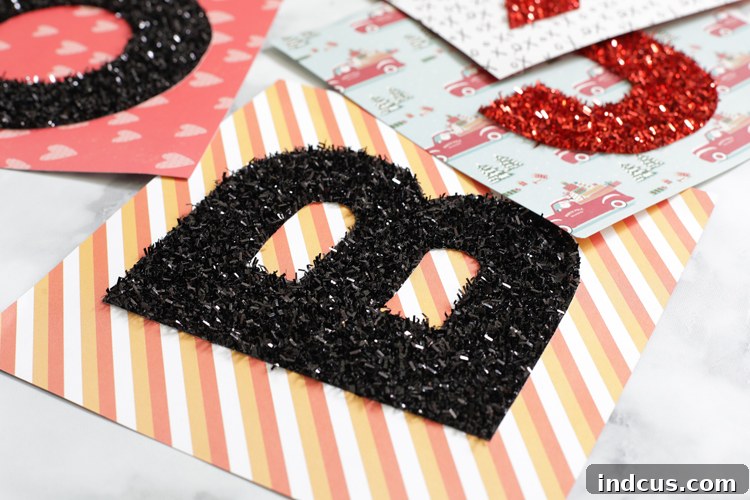
As you can clearly observe in the accompanying photo, the tinsel paper truly stands out with its remarkable thickness and distinct texture. This isn’t your average glitter paper; its substantial quality and captivating shimmer add a premium, handcrafted feel that truly elevates this project. The unique visual and tactile appeal of tinsel paper transforms a simple craft into a sophisticated piece of decor, bringing an extraordinary level of sparkle and depth.
Step 5: Assembling Your Vertical Sign Hanger
Take your wide ribbon and form a loop at the very top, securing the end firmly in place with a hot glue gun. This loop will serve as the hanger for your entire sign. Next, arrange your three wood signs evenly spaced down the length of the ribbon, making sure they are perfectly centered. Use a ruler to ensure consistent spacing between each sign for a polished look. Once you’re satisfied with the placement, use your hot glue gun to securely attach each wood sign to the ribbon. For an extra touch of elegance and a more finished appearance, consider cutting the bottom end of the ribbon into an inverted V-shape and adding a decorative bow at the very top of the hanger. These small details can significantly enhance the overall charm of your interchangeable holiday sign.
Expand Your Collection: More Holiday & Seasonal Ideas
While I initially created letters for just three holidays, the potential for expansion is truly endless! This interchangeable sign concept is incredibly versatile. I’m already envisioning a vibrant “USA” sign for the Fourth of July, perhaps adorned with red, white, and blue tinsel. For Easter, three adorable sparkly tinsel bunnies would be an absolute delight. And imagine a generic winter sign featuring shimmering tinsel snowflakes – they would be so beautifully delicate and wonderfully sparkly, perfect for the colder months.
But why stop there? Consider these additional ideas to further personalize your sign for every occasion:
- Spring: Create panels that spell “BLOOM” with floral patterned paper and pastel tinsel letters.
- Autumn: “FALL” or “GATHER” with rich, earthy patterned papers and warm-toned tinsel.
- St. Patrick’s Day: “LUCK” with green and gold themes.
- Birthdays: “HBDAY” (Happy Birthday) or “CELEBRATE” with confetti-inspired paper and multi-colored tinsel.
- Generic Welcome: “HOME” or “WELCOME” with farmhouse or neutral patterns, ideal for everyday decor.
- Valentine’s Day: Beyond “LOVE,” how about “XOXO” or “HUGS” with romantic themes?
- Halloween: If you’ve already done “BOO,” try “SPOOKY” or “EEK!”
- Thanksgiving: “GIVE” or “GRATEFUL” with autumn leaves and harvest motifs.
The beauty of this project is its adaptability. You can continuously add new sets of letters and themed papers, ensuring your home decor is always fresh, relevant, and personal. Get creative with fonts, colors, and patterns to make each set uniquely yours!
VIDEO TUTORIAL
Found this project inspiring? Pin it now so you don’t forget these creative ideas!
This post was sponsored by American Crafts. All opinions expressed are genuinely my own and reflect my true experience with their products.