
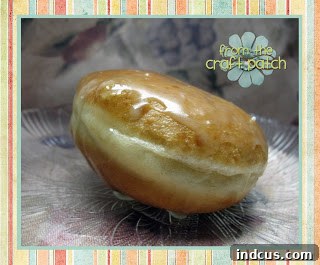
Irresistible 30-Minute Homemade Donuts: Your New Go-To Recipe for Quick & Fluffy Treats
There’s nothing quite like the warm, sweet comfort of a freshly made donut. The aroma filling your kitchen, the soft dough melting in your mouth, and that perfect sugary glaze – it’s pure bliss. However, the traditional donut-making process often involves hours of waiting for dough to rise, which can be a real deterrent when a craving strikes. Who wants to wait that long for instant gratification? Not us! That’s why we’re thrilled to share an absolutely game-changing donut recipe that is nothing short of outrageous. This incredible recipe shatters the myth that homemade donuts require a full day of dedication. In fact, it only demands a mere 30 minutes of rising time, making it an absolute winner in our culinary arsenal!
Imagine biting into a light, airy, and fluffy donut, still warm from the fryer, without the extensive prep work. This isn’t a dream; it’s what this recipe delivers every single time. The finished product is so profoundly delicious and wonderfully tender, it’s almost dangerous. Consider yourself warned: these quick donuts are completely irresistible, so you might find it hard to stop at just one. While they’re a dream come true for satisfying those spontaneous sweet cravings, perhaps don’t make them too often, unless you’re prepared for endless delight!
Why Homemade Donuts Are Always Better
Beyond the sheer joy of creating something delicious with your own hands, homemade donuts offer a superior experience compared to their store-bought counterparts. You control the quality of ingredients, ensuring no artificial flavors or preservatives sneak into your sweet treats. The freshness is unmatched; there’s simply no comparison to a donut eaten minutes after it’s been fried and glazed. Plus, making donuts can be a wonderfully therapeutic and fun activity, whether you’re baking solo or involving family and friends in the process. This specific recipe takes all the advantages of homemade goodness and combines them with unparalleled speed.
The Magic of 30-Minute Donut Perfection
What sets this recipe apart from the countless others you might encounter? It’s the ingenious balance of yeast quantity and proofing time. While many recipes call for two or even three hours of rising, this recipe is expertly crafted to give you perfectly airy and delicious donuts with just 30 minutes of rest. This means less planning, less waiting, and more immediate donut enjoyment! The dough develops just enough to achieve that signature light texture without becoming overly dense or chewy, striking the ideal balance for a truly sensational bite. It’s the perfect solution for weekend brunches, unexpected guests, or simply satisfying that sudden, overwhelming urge for something sweet and homemade.
Gathering Your Essential Ingredients
Before you dive into the delightful process of donut making, ensure you have all your ingredients measured and ready. This recipe is straightforward, using common pantry staples to create something extraordinary. Precision in measurements, especially for the yeast and flour, will guarantee the best results.
Donut Ingredients:
- 5 teaspoons active dry yeast: The star ingredient for that quick rise.
- 1 cup lukewarm water: Essential for activating the yeast.
- 3 tablespoons granulated sugar: Feeds the yeast and adds sweetness to the dough.
- 1 large egg, well beaten: Adds richness, color, and helps bind the dough.
- 1/2 teaspoon ground cinnamon: A hint of warm spice that complements the donut flavor beautifully.
- 1/3 cup melted butter: Contributes to a tender crumb and rich taste.
- 1 teaspoon vanilla extract: Enhances the overall flavor profile.
- 1 teaspoon salt: Balances the sweetness and strengthens the gluten structure.
- 2 1/2 cups all-purpose flour (plus more if dough is sticky): The foundation of your donut dough. Have extra on hand for dusting and adjusting consistency.
- Oil for frying: Vegetable oil, canola oil, or peanut oil are great choices, ensuring a neutral taste.
Maple Glaze Ingredients:
While these donuts are fantastic on their own, a simple maple glaze elevates them to an even higher level of deliciousness. It’s quick to whip up and offers a comforting, sweet finish.
- 2 tablespoons butter, softened: Provides a rich base for the glaze.
- 2 tablespoons maple syrup or maple extract: For that distinctive, comforting maple flavor.
- Powdered sugar (confectioners’ sugar): Enough to achieve your desired glaze consistency – typically around 1 to 1.5 cups, sifted.
Step-by-Step Perfection: Crafting Your Amazing Quick Donuts
Follow these simple instructions to create light, fluffy donuts that will impress everyone (including yourself!) with their homemade taste and unbelievably fast preparation time.
- Activate the Yeast: In a large mixing bowl, combine the 5 teaspoons of active dry yeast with 1 cup of lukewarm water and 3 tablespoons of sugar. Stir gently to dissolve the sugar. It’s crucial that the water is lukewarm (around 105-115°F or 40-46°C) – too hot will kill the yeast, too cold won’t activate it. Allow the mixture to sit undisturbed for about 5-10 minutes. You’ll know the yeast is active and healthy when bubbles or a foamy layer begin to form on the surface. This “proofing” step is vital for light and airy donuts.
- Form the Dough: Once your yeast is bubbly and active, add the well-beaten egg, melted butter, cinnamon, vanilla extract, and salt to the mixture. Stir these wet ingredients until well combined. Gradually add the 2 1/2 cups of flour, mixing until a soft dough begins to form. You can use a stand mixer with a dough hook attachment or mix by hand with a sturdy spoon. Once the dough comes together, turn it out onto a lightly floured surface and knead it for just 1 minute. The dough should be soft and slightly tacky, but not overly sticky. If it’s too sticky, add a little more flour, one tablespoon at a time, until it’s manageable.
- Shape and Rise: On your lightly floured surface, roll out the dough to a thickness of approximately 1/2 inch. Using a donut cutter, or if you don’t have one, a large drinking glass (for the outer circle) and a smaller bottle cap or pastry tip (for the center hole), cut out your donut shapes. Carefully transfer the cut donuts and donut holes to a lightly floured baking sheet or a clean, floured surface. Cover them loosely with a clean kitchen towel and allow them to rise in a warm spot for precisely 30 minutes. This short rise time is key to their quick preparation and fluffy texture.
- Fry to Golden Brown Perfection: While your donuts are rising, prepare your frying oil. Pour enough oil into a large, heavy-bottomed pot or deep fryer to reach a depth of about 2-3 inches. Heat the oil over medium heat until it reaches approximately 350°F (175°C). It’s highly recommended to use a candy or deep-fry thermometer to ensure accurate temperature. If the oil is too hot, the donuts will brown too quickly on the outside and remain raw inside. If it’s too cool, they’ll absorb too much oil and become greasy. Carefully lower 2-3 donuts (do not overcrowd the pot) into the hot oil using a slotted spoon or spider skimmer. Fry for about 1-2 minutes per side, or until they are beautifully golden brown and puffed up.
- Glaze and Serve: Once fried, remove the donuts from the oil and place them on a wire rack lined with paper towels to drain any excess oil. While they are still warm, prepare your maple glaze. In a small bowl, combine the softened butter and maple syrup (or extract). Gradually whisk in powdered sugar until you reach your desired consistency – thick enough to coat the donuts but still pourable. Dip each warm donut into the maple glaze, ensuring both sides are coated, or drizzle the glaze over them. You can also experiment with other toppings like a simple dusting of powdered sugar, a toss in cinnamon sugar, or a decadent chocolate glaze. These homemade delights are best enjoyed fresh!
Pro Tips for Donut Success
- Oil Temperature is Key: As mentioned in the instructions, maintaining a consistent oil temperature of 350°F (175°C) is crucial for perfectly cooked donuts. Invest in a good thermometer.
- Don’t Overcrowd: Fry donuts in small batches to avoid dropping the oil temperature too much, which can lead to greasy donuts.
- Drain Properly: Always place fried donuts on a wire rack over paper towels to allow excess oil to drip off.
- Serve Warm: While these donuts are delicious at any temperature, they are truly heavenly when enjoyed warm, fresh from the glaze.
- Storage: If you miraculously have any leftovers, store them in an airtight container at room temperature for up to 1-2 days. Reheating briefly in the microwave can refresh them.
- Flour Your Surface Lightly: When rolling and cutting, use just enough flour to prevent sticking. Too much flour can make your donuts tough.
Beyond the Maple Glaze: Creative Topping & Filling Ideas
While the maple glaze is a classic and utterly delicious choice, don’t limit your creativity! These versatile quick donuts serve as a perfect canvas for a variety of flavors. Here are some ideas to inspire your next batch:
- Cinnamon Sugar: A simple yet timeless coating. Toss warm donuts in a mixture of granulated sugar and ground cinnamon for a comforting spice kick.
- Powdered Sugar: A delicate dusting of confectioners’ sugar is elegant and allows the donut’s inherent flavor to shine.
- Chocolate Glaze: Melted chocolate (dark, milk, or white) mixed with a little heavy cream or butter makes for a rich and indulgent topping. Add sprinkles for a festive touch!
- Lemon Glaze: A zesty option made with powdered sugar and fresh lemon juice.
- Cream Cheese Glaze: A tangy and sweet glaze made with softened cream cheese, powdered sugar, vanilla, and a touch of milk.
- Filled Donuts: Remember, these donuts would also be absolutely AWESOME if filled! Once cooled slightly, you can pipe in various delicious fillings using a pastry bag with a long tip.
- Classic Cream: Vanilla or chocolate pastry cream, or even a simple sweetened whipped cream.
- Custard: Rich, creamy custard adds a delightful texture and flavor.
- Fruit Filling: Raspberry jam, strawberry preserves, lemon curd, or apple butter make for vibrant and fruity centers.
The Joy of Sharing Homemade Delights
These quick homemade donuts are not just a treat for yourself; they’re perfect for sharing! Surprise your family with a warm batch on a lazy weekend morning, bring them to a potluck, or package a few for a thoughtful gift. The effort is minimal, but the delight they bring is immense. There’s something truly special about serving up a batch of donuts you’ve made from scratch, especially when they’re ready in such a short amount of time. Get ready for compliments and requests for the recipe!
Frequently Asked Questions About Quick Donuts
Got more questions? We’ve got answers to help you master these amazing quick donuts.
- Q: Can I make the dough ahead of time?
A: While this recipe is designed for quick preparation and immediate enjoyment, you could prepare the dough the night before and let it rise slowly in the refrigerator overnight. Just be aware that the texture might be slightly different than a quick-rise dough. If refrigerating, let the dough come to room temperature for about 30 minutes before rolling and cutting. - Q: My yeast didn’t bubble. What went wrong?
A: This usually means your yeast was expired or the water temperature was incorrect. Always check the expiration date on your yeast and ensure your water is lukewarm (not too hot or cold). If it doesn’t bubble, discard the mixture and start again with fresh yeast and properly tempered water. - Q: Can I bake these donuts instead of frying?
A: This recipe is specifically formulated for frying to achieve that classic light and fluffy texture. While you can technically bake any donut dough, the results will be denser and cake-like, not the airy fried texture this recipe is known for. For best results, we recommend sticking to frying. - Q: How can I tell if the oil is at the right temperature without a thermometer?
A: While a thermometer is highly recommended for accuracy, a quick test is to drop a small piece of donut dough into the hot oil. If it immediately sizzles and floats to the top, browning gently, the oil is ready. If it sinks or browns too quickly, adjust the heat. - Q: What if my donuts turn out greasy?
A: Greasy donuts are usually a sign that the oil temperature was too low. The dough absorbed too much oil before it could cook through. Ensure your oil maintains a consistent 350°F (175°C) and don’t overcrowd the pot, which can also lower the oil temperature.
Ready to Satisfy Your Donut Cravings?
No more lengthy waits, no more store-bought compromises. With this incredible 30-minute quick donut recipe, you’re just moments away from experiencing the sheer joy of homemade goodness. Light, fluffy, and utterly delicious, these donuts are guaranteed to become a family favorite. So, gather your ingredients, fire up your fryer, and prepare to indulge in the best quick donuts you’ve ever tasted!
Did You Make This?
We absolutely love seeing your culinary creations! Share your beautiful donut masterpieces with us on Instagram @thecraftpatch and make sure to follow us on Pinterest for even more delicious recipes and creative inspiration!







