Mastering Tie Dye Patterns: Your Ultimate Guide to Creative Designs
Tie-dye is more than just a craft; it’s a vibrant expression of creativity that has captivated generations. From its resurgence in popular culture to its status as a timeless DIY activity, tie-dye offers endless possibilities for transforming ordinary fabrics into wearable art. Whether you’re a beginner eager to explore the basics or an experienced crafter looking for fresh inspiration, this comprehensive guide will walk you through everything you need to know to create stunning, custom tie-dye patterns.
Get ready to dive into the colorful world of tie-dye! We’ll cover essential supplies, choosing the right kits, and provide detailed, step-by-step instructions for some of the most popular and eye-catching tie-dye designs. Each pattern comes with clear instructions, helpful tips, and visual guidance to ensure your projects turn out beautifully. Let’s make this your most colorful crafting adventure yet!
Where to Buy Your Tie Dye Kit? Discovering the Best Sources
Embarking on your tie-dye journey often starts with finding the right supplies. Luckily, tie-dye kits and materials are widely available, making it easy to get started. Retailers like Hobby Lobby offer an extensive selection of tie-dye products, from individual dyes to comprehensive kits. You can also find great options at major retailers such as Walmart, craft stores like Michaels, and of course, the convenience of online shopping on Amazon.
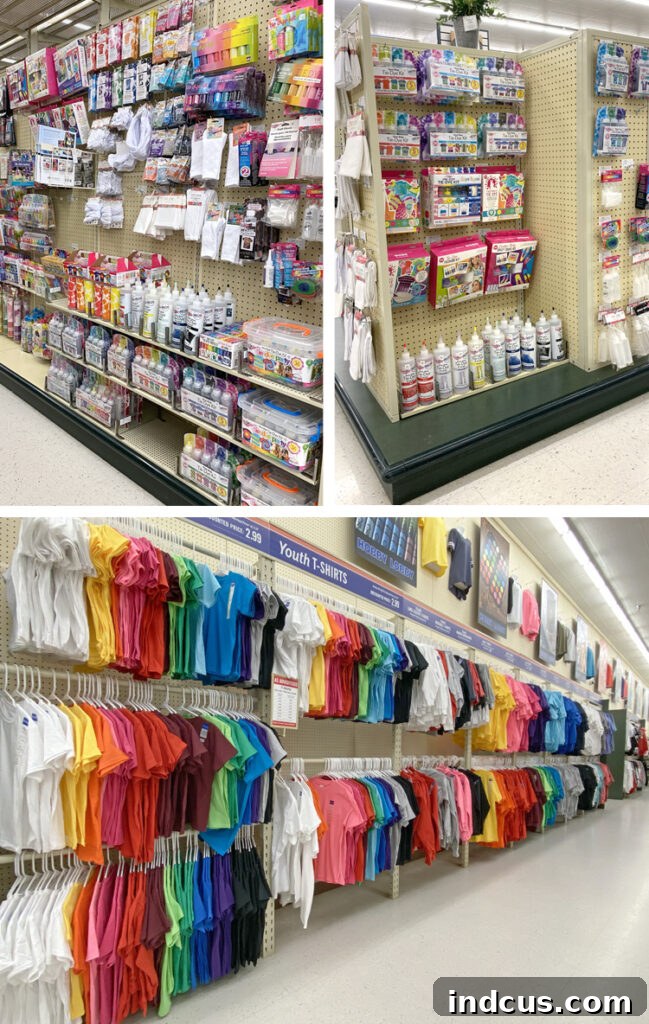
Many of these stores are excellent one-stop-shops for all your tie-dye needs. For instance, Hobby Lobby often stocks cotton t-shirts in a wide range of sizes, including baby, toddler, children’s, and adult plus sizes. Beyond basic tees, you might also find long-sleeved shirts, baseball tees, and solid white sweatshirts, all perfect canvases for your creative dyeing projects. Always look for natural fiber garments like 100% cotton for the best dye absorption and most vibrant results. Local craft stores can also be great resources, offering personalized advice and unique dye options.
Choosing the Right Tie Dye Kit for Your Project
Selecting the perfect tie-dye kit is crucial for a successful and enjoyable experience. When making your choice, consider two primary factors: the number of items you plan to dye and the specific color palette you envision for your creations.
Every tie-dye kit provides an estimate of how many garments can be dyed with the included amount of dye powder. It’s important to remember that once the dye powder is mixed with water, it has a limited shelf life—typically around 72 hours. This means it’s best to choose a kit that aligns with your immediate project needs, as unused mixed dye cannot be stored for future use. A helpful rule of thumb is to expect about two-thirds of the advertised yield; for example, if a package claims to dye 36 shirts, you can realistically expect to color around 24. This conservative estimate helps ensure you have enough dye for your desired projects without running short, preventing disappointment mid-project.
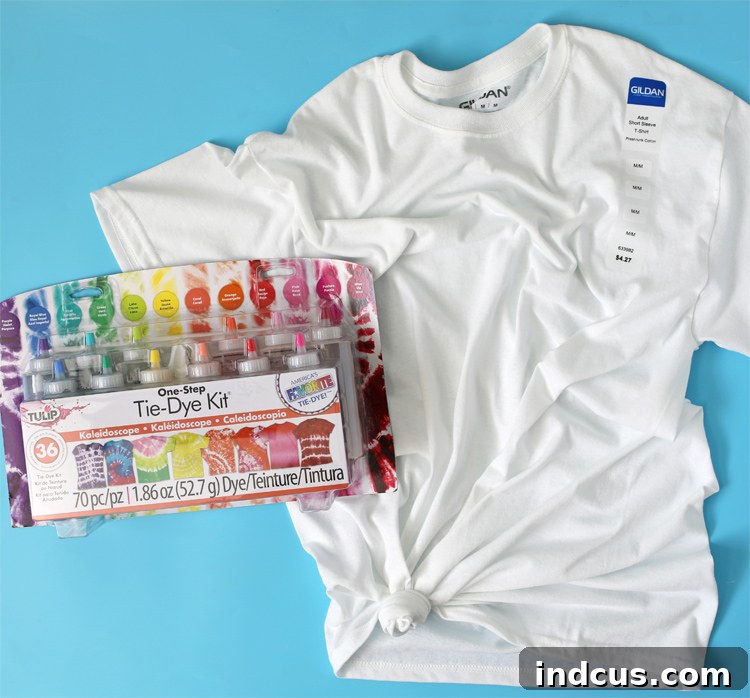
Beyond quantity, the fun part is choosing your colors! Kits come in a dazzling array of options. You can find vibrant rainbow sets, perfect for creating kaleidoscopic designs, or more subdued palettes for a sophisticated look. If you’re planning a group activity or want to create a cohesive collection, single-color kits with larger dye quantities are also available. These are ideal for projects like team uniforms, personalized gifts, or creating multiple items in a favorite shade. Remember to consider how colors will interact; complementary colors (like red and green) can create muddy browns when mixed, while analogous colors (like blue and green) blend beautifully, producing lovely transitions.
Essential Supplies for Tie Dyeing: Beyond the Kit
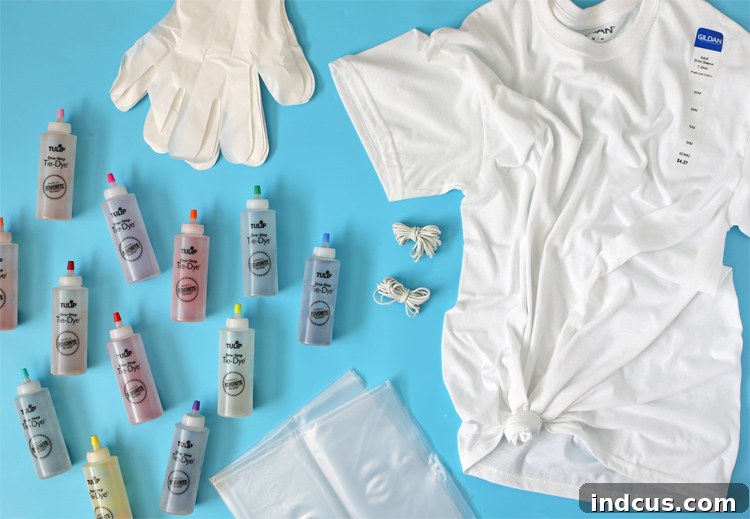
While most tie-dye kits are comprehensive and include the basic necessities, having a few extra items on hand can significantly enhance your tie-dyeing experience, making the process smoother and the cleanup easier. Here’s a detailed list of what you’ll need to create beautiful tie-dye patterns:
Supplies Needed for Your Tie Dye Project
- Cotton T-Shirt or other Natural Fiber Garment: The foundation of your project! Ensure it’s made of natural fibers like 100% cotton, rayon, or hemp for the best dye absorption and most vibrant results. Pre-wash your garment to remove any sizing that might inhibit dye uptake and to ensure even dye penetration.
- Tie Dye Kit: Typically includes:
- Dye Bottles: Conveniently pre-filled with powder; simply add water and shake to activate the dye.
- Rubber Bands: Crucial for creating patterns by binding, folding, and securing sections of fabric. You might want extra if your kit is small.
- Rubber/Plastic Gloves: Essential for protecting your hands from dye stains and chemical exposure. Always wear them during the dyeing process and initial rinsing.
- Plastic Drop Cloth or Sheeting: To generously protect your work surface, floor, and surrounding areas from permanent dye stains.
- Water: For mixing dyes, dampening fabric, and rinsing.
- Spray Bottle: Useful for dampening areas of the shirt that might start to dry out during longer dyeing sessions, ensuring consistent moisture for even dye saturation.
- Paper Towels and/or Baby Wipes: For quick cleanups of drips, spills, and accidental smudges. Keep plenty within reach!
- Wire Cooling Rack: This item is a game-changer! Elevates your project above the work surface, allowing excess dye to drip away and preventing muddy colors from pooling underneath and contaminating other sections of your design.
- Gallon-Sized Zip Plastic Bags: To individually store your dyed garments while the dye sets. These create a moist, sealed environment that helps colors bind effectively and prevents dye from drying out prematurely.
General Tie Dye Tips and Preparation for Success
Before diving into specific patterns, a few general tips can make your tie-dye experience smoother, more enjoyable, and ultimately more successful. Proper preparation is key to achieving vibrant colors and clean designs.
- Pre-wash Your Garment: Always wash your fabric (t-shirt, sweatshirt, etc.) before dyeing. This removes any sizing, dirt, or oils that could prevent the dye from adhering properly. Do not use fabric softener, as it can also create a barrier against the dye.
- Work on Damp Fabric: Most tie-dye techniques work best on damp, not soaking wet, fabric. This allows the dye to spread evenly and create beautiful transitions without bleeding excessively into unintended areas. Wring out your pre-washed garment thoroughly before starting.
- Protect Your Workspace: Tie-dye can be messy, and dye stains are permanent on many surfaces. Lay down a plastic drop cloth, old newspapers, or a large tarp generously on your work surface and floor. Consider setting up outdoors if possible.
- Wear Old Clothes: Accidents happen, even with the best intentions! Wear old clothes that you don’t mind getting stained, or an apron to protect your attire.
- Always Wear Gloves: The rubber or plastic gloves provided in your kit (or any household gloves) are essential for protecting your hands from dye. Dye can stain skin for days.
- Plan Your Colors: Think about your color combinations beforehand. Consult a color wheel if you’re unsure which colors will blend harmoniously without creating muddy tones. Generally, colors next to each other on the color wheel (e.g., blue and green, yellow and orange) mix well and create pleasing transitions. Avoid placing complementary colors (like red and green, blue and orange) directly adjacent unless you intend to create brown or muted shades where they meet.
- Patience is Key for Dye Setting: Allow adequate time for the dye to set (at least 8 hours, preferably 24-48 hours). This curing time is crucial for the dye to chemically bond with the fabric fibers, ensuring the most vibrant, fade-resistant, and long-lasting results.
Popular Tie Dye Patterns: A Step-by-Step Visual Guide
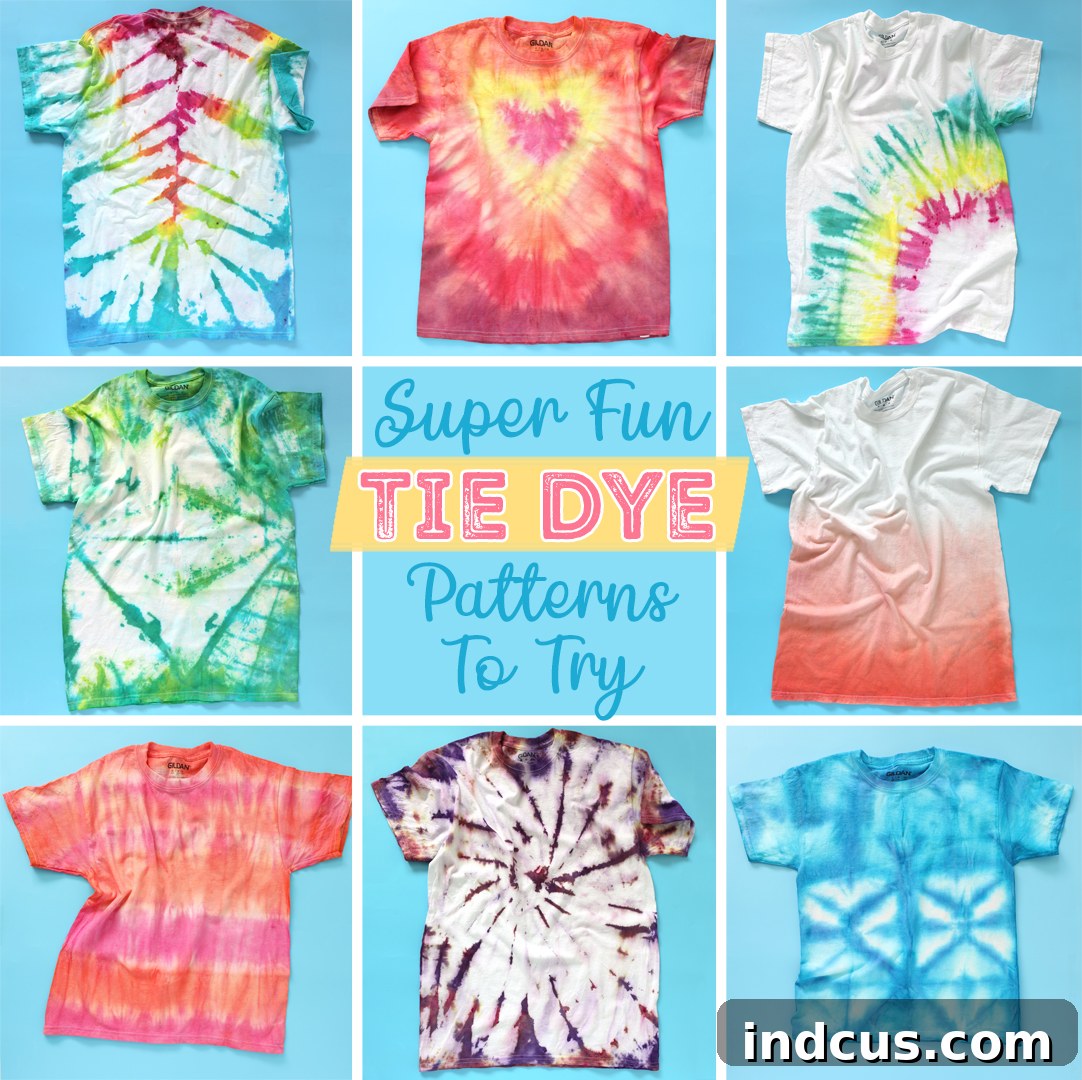
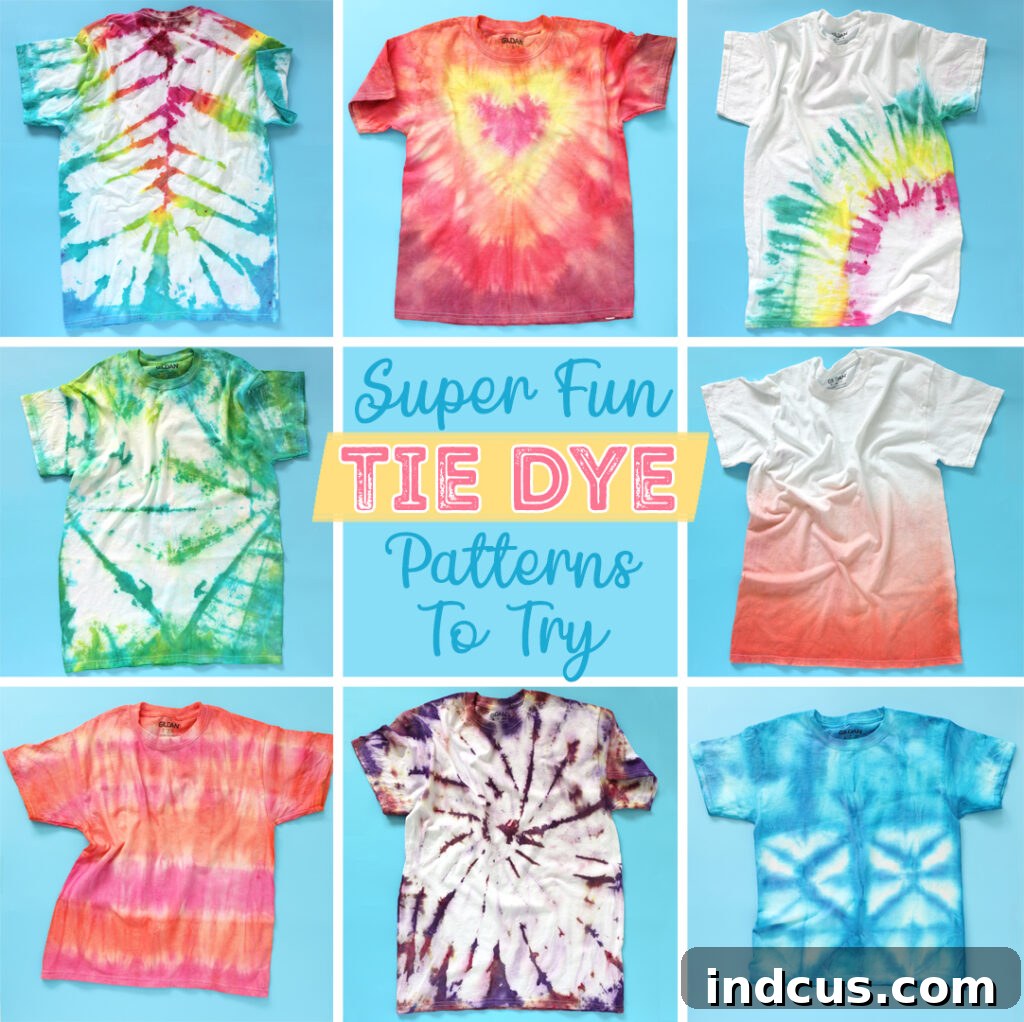
Ready to transform your fabric into a masterpiece? Let’s explore some of the most popular and captivating tie-dye patterns. These designs are perfect for adding a personalized touch to your wardrobe or creating unique gifts. From classic swirls to intricate mandalas, each technique offers a distinct aesthetic. Here are the eight fantastic tie-dye patterns we’ll cover, complete with folding instructions and dyeing tips:
- Rainbow Tie Dye Pattern
- V Tie Dye Pattern
- Shibori Tie Dye Pattern
- Ombre Tie Dye Pattern
- Swirl Tie Dye Pattern
- Stripes Tie Dye Pattern
- Mandala Tie Dye Pattern
- Heart Tie Dye Pattern
For an even clearer demonstration of these techniques, be sure to watch the accompanying video tutorial. Each pattern is shown in detailed, step-by-step visuals, making it incredibly easy to follow along.
Video Tutorial: Essential Tie Dye Folding Techniques
This video provides an excellent visual guide to all the folding techniques discussed below, ensuring you can confidently recreate each design and achieve stunning results.
The Stunning Rainbow Tie Dye Design
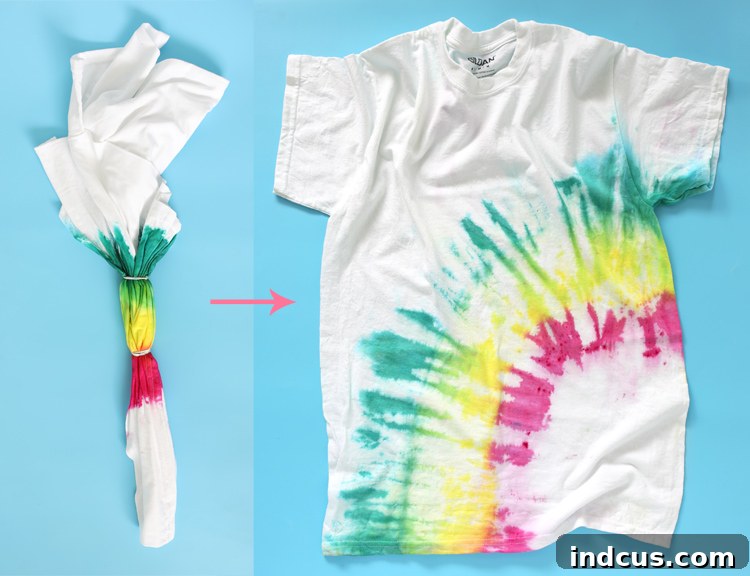
Create a beautiful arch of colors across your garment with the rainbow tie-dye design. This pattern is fantastic for adding a cheerful, vibrant touch and is surprisingly simple to achieve once you master the pleating technique. It allows for creative placement of colors, letting you decide how much of your shirt will be embraced by the rainbow effect.
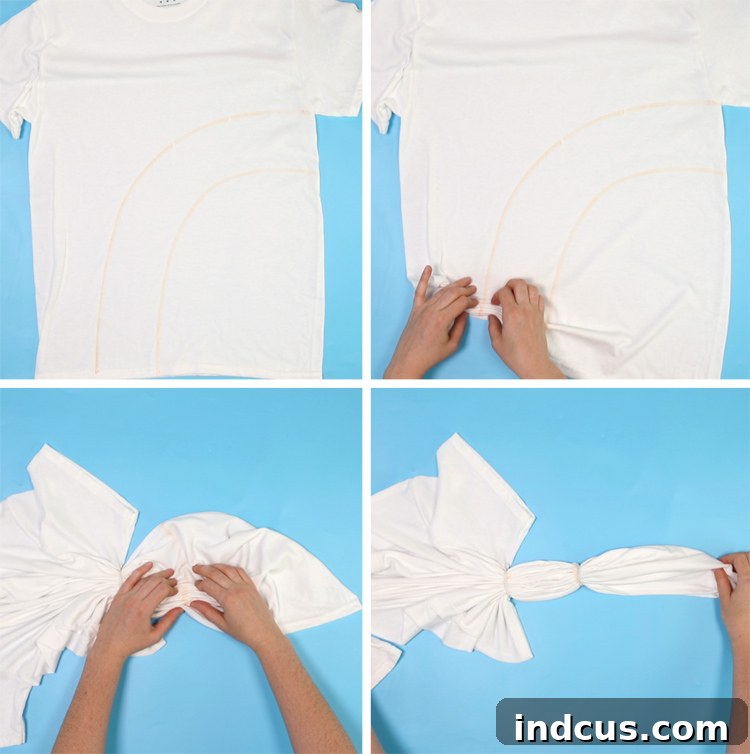
Step 1: Begin by laying a damp, pre-washed shirt flat and smooth on your protected plastic drop cloth. Ensure the fabric is free of wrinkles.
Step 2: Using a washable marker, carefully draw a gentle rainbow-like curve on the bottom section of the shirt. Then, draw a second curved line parallel to the first, creating a distinct band where your rainbow colors will reside.
Step 3: Starting with the first curved line, begin pleating the fabric along this line. The goal is to gather the curved fabric into a straight, accordion-like fold. Once pleated, secure this section tightly with a rubber band. Ensure the pleats remain flat and even beneath the band.
Step 4: Repeat the pleating process for the second curved line, turning it into another straight fold and securing it with a separate rubber band. You should now have two distinct, banded sections ready for dye application.
Step 5: Apply your chosen dyes to the banded sections. For a crisp rainbow effect, apply different colors to each band. If you want to maintain significant white space, as shown in the example, apply dye carefully and ensure excess drips away by using a cooling rack underneath. This method helps prevent unintended color bleeding onto other areas of the shirt, preserving your clean design.
Dynamic V Tie Dye Design (Great for Chevron or Tiger Stripes!)
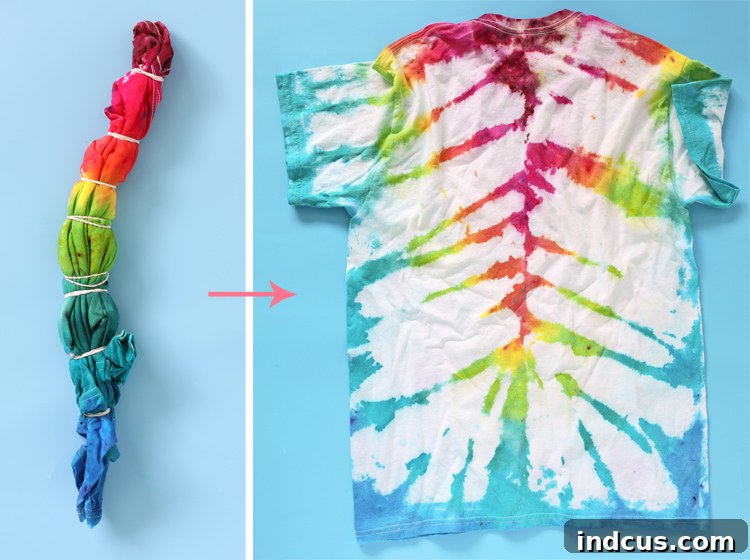
The V tie-dye design creates striking diagonal patterns that converge, resembling chevron stripes or abstract tiger stripes when done with specific colors. This technique is excellent for adding movement and a bold statement to your garment. It involves precise folding and banding to achieve those crisp, angled lines, making it a favorite for graphic, eye-catching results.
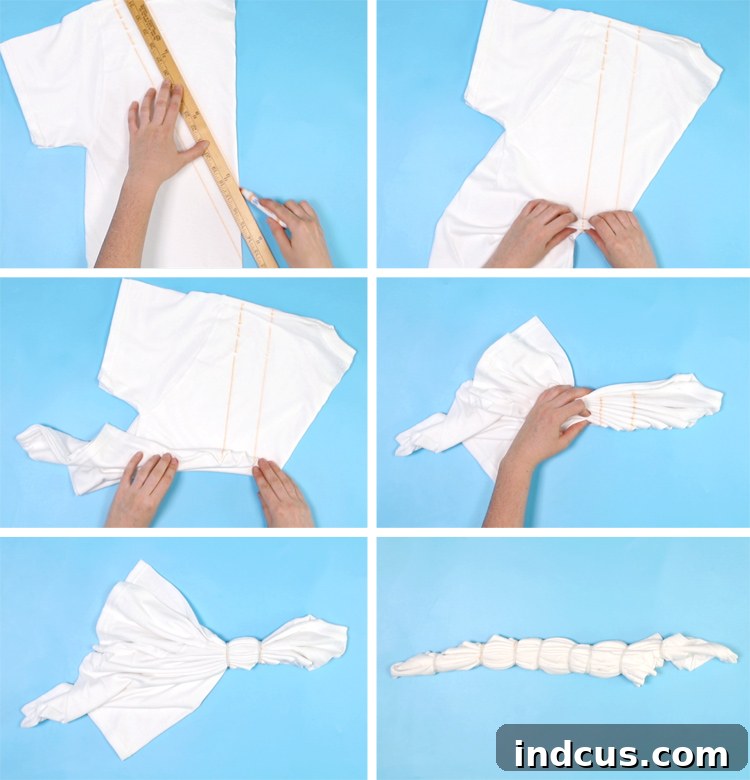
Step 1: Lay a damp, pre-washed shirt flat. Fold it precisely in half vertically, ensuring the front of the shirt is facing outwards. Smooth out any wrinkles.
Step 2: Use a washable marker and a ruler for accuracy. Draw two straight lines across the folded shirt. These lines should start from the fold and extend outwards diagonally towards the sleeves, forming a ‘V’ shape. Ensure these lines are perpendicular to each other at the point of the ‘V’ if you’re aiming for a sharp effect.
Step 3: Carefully gather the fabric along the first drawn line, keeping the line straight as you bunch and pleat the material. Place a rubber band tightly over this gathered line. Double-check that the line remains perfectly straight underneath the rubber band. Repeat this process for the second drawn line.
Step 4: Continue adding more rubber bands on both sides of your initial two lines, working outwards from the center. Band the entire shirt until all the fabric is tightly bunched and secured in sections. The more bands you add, the more intricate and detailed your V-pattern will become.
Step 5: Apply dye to the banded sections. For a rainbow V-pattern, apply a different color to each banded segment in sequential order. When selecting colors, remember to choose those that blend well together (e.g., analogous colors like blue and purple) to avoid muddy results. Avoid placing complementary colors side-by-side if you don’t want brown transitions at the meeting points.
Elegant Shibori-Inspired Tie Dye Design
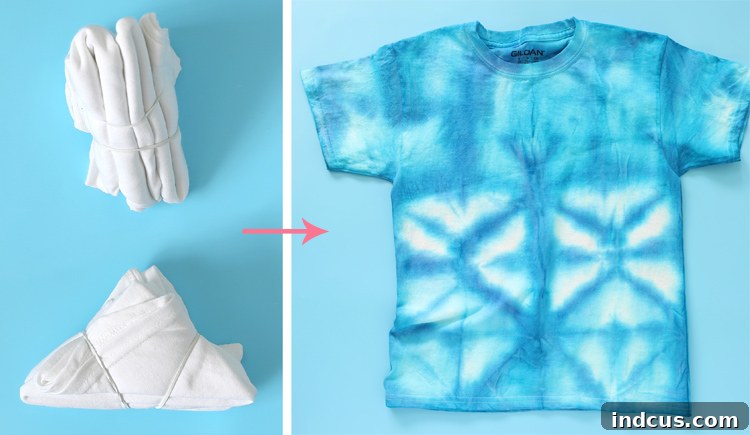
Shibori is a traditional Japanese dyeing technique that produces intricate patterns by folding, twisting, or compressing fabric before dyeing. Our simplified shibori-inspired design creates geometric, often square or rectangular, patterns that offer a sophisticated and artistic look. This method is excellent for those seeking a more refined aesthetic than the typical free-form tie-dye, often resulting in beautiful, understated designs.
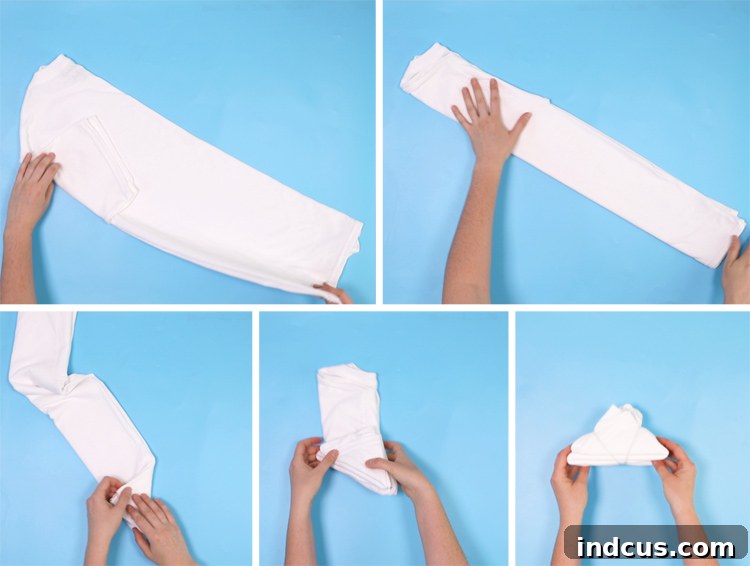
Step 1: Lay a damp, pre-washed shirt flat. First, fold it in half lengthwise, then fold it in half again to create a long, skinny rectangle shape. Ensure your folds are crisp and even for symmetrical results.
Step 2: Starting from one end of your long rectangle, begin accordion folding the fabric into consistent triangle shapes all the way up. Each fold should be equal in size, creating a neat stack of fabric triangles. Secure the entire folded stack tightly with several rubber bands to hold its shape firmly.
Step 3: For this pattern, you will apply dye primarily to the three exposed outside edges of the bundled triangle. Carefully squeeze your chosen dye(s) onto these edges, making sure the color thoroughly saturates and soaks into all the nooks and crannies of the folded fabric. The un-dyed interior sections will reveal beautiful resist patterns once unfolded, characteristic of the Shibori technique.
Smooth Ombre Tie Dye Design
The ombre tie-dye effect creates a beautiful, gradual transition from one color shade to another, or from a color to white. This technique results in a sophisticated and often serene look, making it a popular choice for those who prefer a more subtle yet stylish dyed garment. It’s also relatively simple, making it great for beginners looking to achieve an elegant gradient.
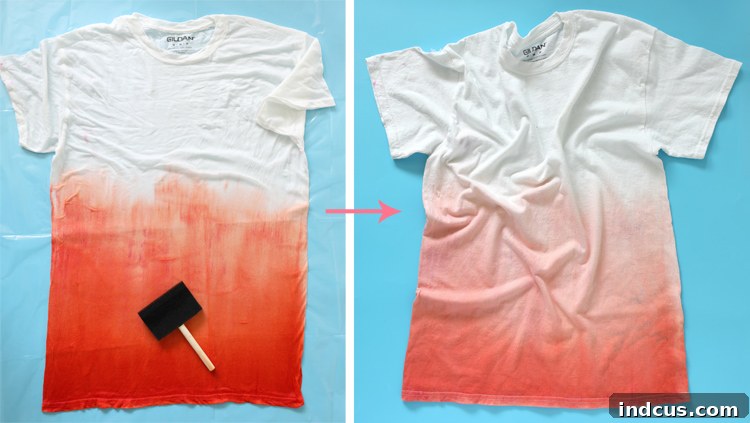
Step 1: Lay a damp, pre-washed shirt completely flat and smooth on your protected plastic drop cloth. Ensure there are no wrinkles or bunched areas, as these will disrupt the dye’s smooth gradient and create uneven results.
Step 2: Choose one end of the shirt (e.g., the bottom hem) where you want the darkest concentration of color to be. Squeeze a generous amount of your chosen dye directly onto this edge. The key to a good ombre is to start with a strong, saturated color base. Immediately after applying the dye, take a foam brush or even a sponge and gently, but firmly, push and blend the dye upwards, gradually lessening the pressure and the amount of dye as you move higher. This creates a soft fade, achieving the classic ombre look. You can repeat this process from the other side if you want a two-tone ombre, or from another section for a different gradient direction.
The Classic Swirl Tie Dye Design
The swirl pattern is arguably the most iconic and recognizable tie-dye design. It creates a mesmerizing spiral of colors radiating outwards from a central point, offering a truly psychedelic and classic look. This pattern is surprisingly easy to master and provides a fantastic canvas for multiple colors, making it a timeless favorite for all ages.
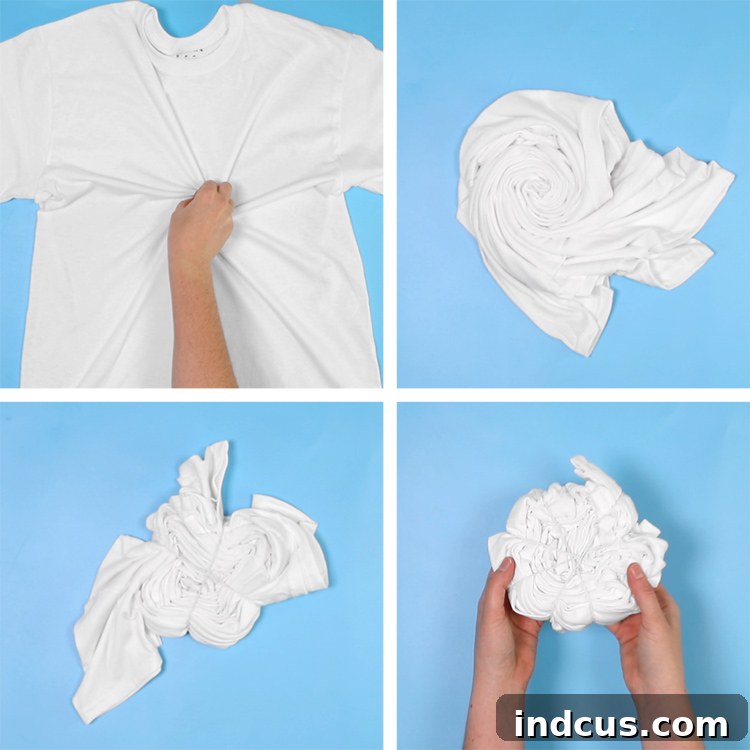
Step 1: Lay a damp, pre-washed cotton shirt completely flat and smooth on your work surface. Ensure there are no wrinkles or creases that could disrupt the spiral pattern.
Step 2: Pinch the very center of the shirt, or choose any point where you want the center of your spiral to originate. While holding this pinch, begin to gently twist the fabric around this central point. Continue twisting both layers of the fabric (front and back) in a consistent circular motion until the entire shirt forms a flat, compact circle, resembling a cinnamon roll.
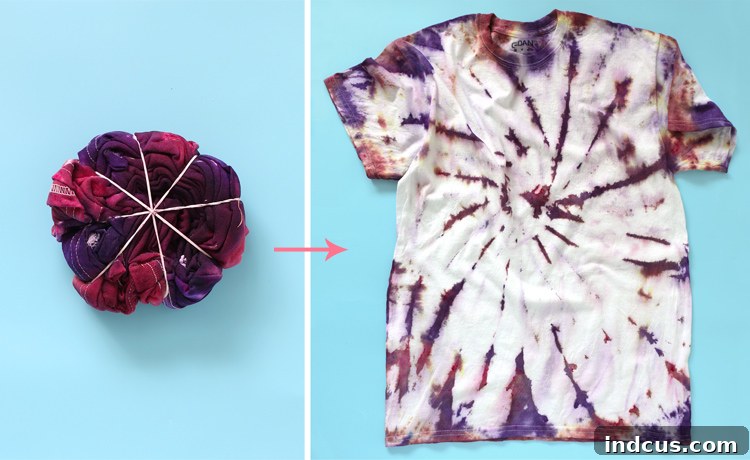
Step 3: Once your shirt is tightly swirled into a circular shape, carefully place several rubber bands across the circle. Each rubber band should cross the center point, dividing the circle into wedge-like sections (like slices of a pizza). The more bands you use, the more defined your color sections will be within the spiral.
Step 4: Apply your chosen dyes to each wedge-shaped section of the circular bundle. Be generous with the dye, ensuring it deeply penetrates all layers of the folded fabric. The amount of dye you use directly impacts the finished look: more dye will result in less white space and more saturated colors, while less dye will create more white areas and a softer, more pastel effect. Apply different colors to adjacent wedges for a multi-colored swirl, or use varying shades of the same color for a monochromatic spiral.
Effortless Stripes Tie Dye Design
The stripes tie-dye pattern is a fantastic choice for beginners and kids, offering a straightforward way to create bold, linear designs. This versatile technique allows you to achieve horizontal, vertical, or even diagonal stripes simply by adjusting your initial accordion fold. It’s an easy-to-love design that always delivers a satisfying outcome, providing clean and consistent lines.
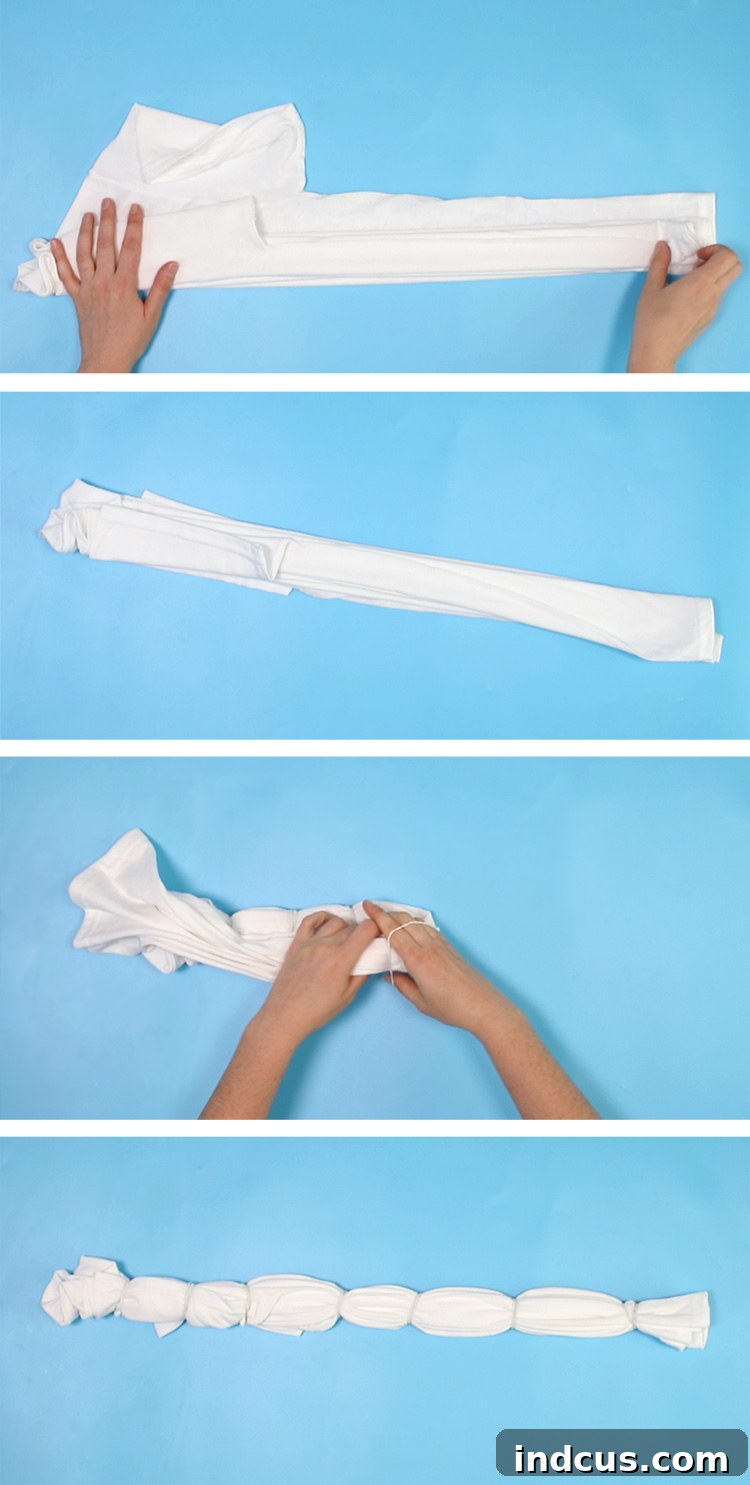
Step 1: Lay a damp, pre-washed shirt completely flat on your protective plastic drop cloth. Ensure it’s smooth and free of wrinkles to achieve crisp stripe lines.
Step 2: Decide on the direction of your stripes. For horizontal stripes, begin accordion folding the shirt lengthwise (from top to bottom). For vertical stripes, fold across the width of the shirt (from side to side). For diagonal stripes, fold from one corner to the opposite, then proceed with accordion folds from there. Maintain consistent fold widths for even stripes.
Step 3: Once the entire shirt is folded into a neat, compressed accordion, secure the folds tightly in place using several rubber bands. Space the rubber bands evenly along the length of the folded fabric. These bands will create the white or un-dyed sections between your vibrant stripes.
Step 4: Apply your chosen dyes to each exposed section between the rubber bands. You can alternate colors for a multi-striped look or use varying shades of a single color for a gradient effect. Ensure the dye saturates the fabric thoroughly on all sides of the folded sections to achieve consistent color.
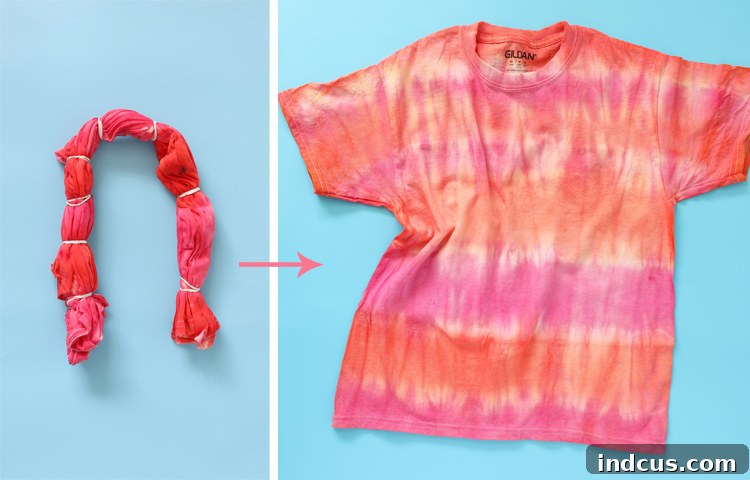
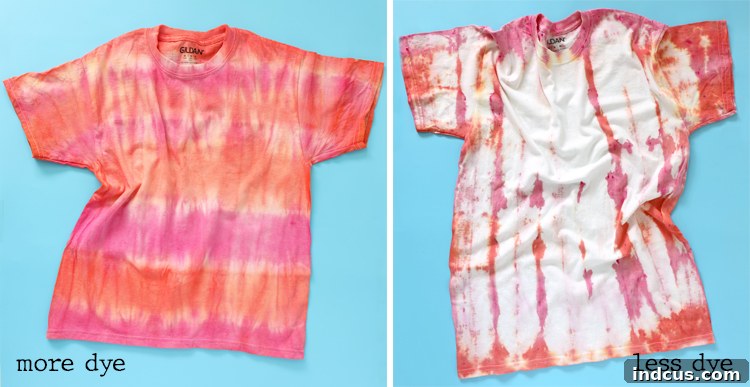
One fascinating aspect of the stripes pattern is how dye saturation affects the final result. As illustrated below, applying more dye will reduce white space and create bolder, more saturated stripes. Conversely, using less dye will leave more white areas, resulting in a softer, more delicate striped effect. Both approaches yield beautiful results, allowing you to customize your stripe intensity and overall aesthetic.
Intricate Mandala Tie Dye Design
Creating a mandala tie-dye pattern is a truly rewarding experience, resulting in a complex, symmetrical design that radiates from a central point. This pattern often produces flower-like or starburst effects, perfect for those seeking an intricate and artistic outcome. It requires careful, precise folding but yields stunning, unique results that are sure to impress.
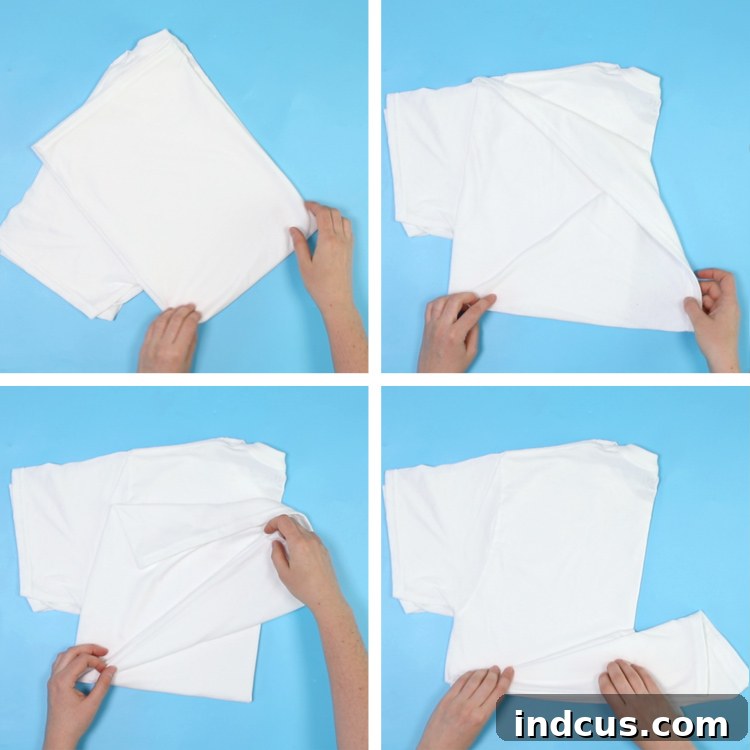
Step 1: Lay a damp, pre-washed shirt flat. Fold it precisely in half lengthwise, then fold it in half again crosswise. This will create a neat square of four fabric layers, which is the foundation for your symmetrical design.
Step 2: Carefully peel back just one layer of the top-most fabric. Now, fold this single layer into three equal triangle sections, much like folding a paper fan, but in a radial manner. Ensure these folds are as even and consistent as possible to maintain symmetry.
Step 3: Repeat the triangle folding process with the second layer of fabric. Align these folds carefully with the first set to maintain the overall symmetrical structure of your mandala.
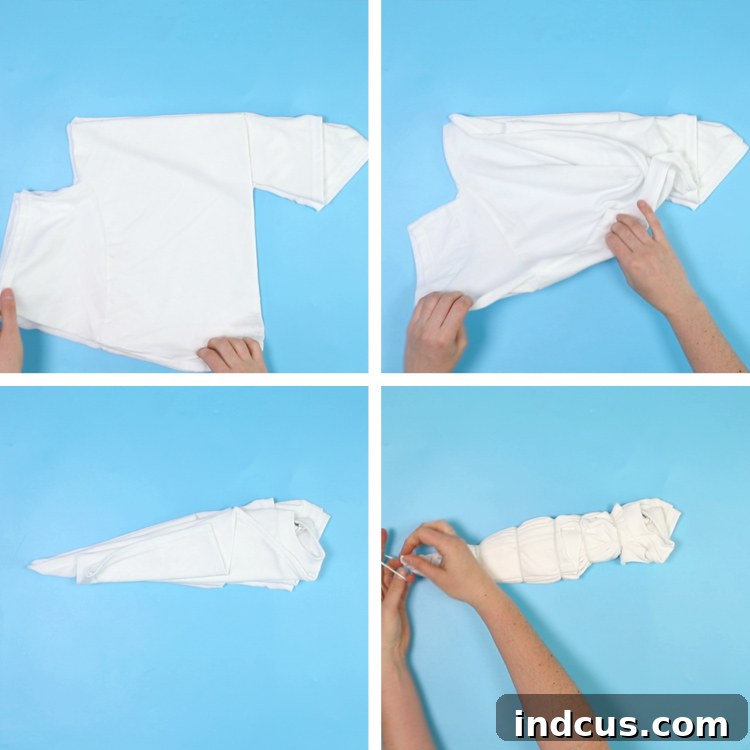
Step 4: Gently flip the entire folded shirt over. Now, repeat the process of folding the remaining two layers into three equal triangle sections, ensuring alignment with the folds on the other side. You should now have a compact, multi-layered triangle bundle, perfectly prepped for dyeing.
Step 5: With extreme care, keeping all layers perfectly aligned, begin adding rubber bands down the entire length of your triangle bundle. Place bands at regular intervals to create distinct sections for dye application. The more bands you use, the more segments and intricate details your mandala will have.
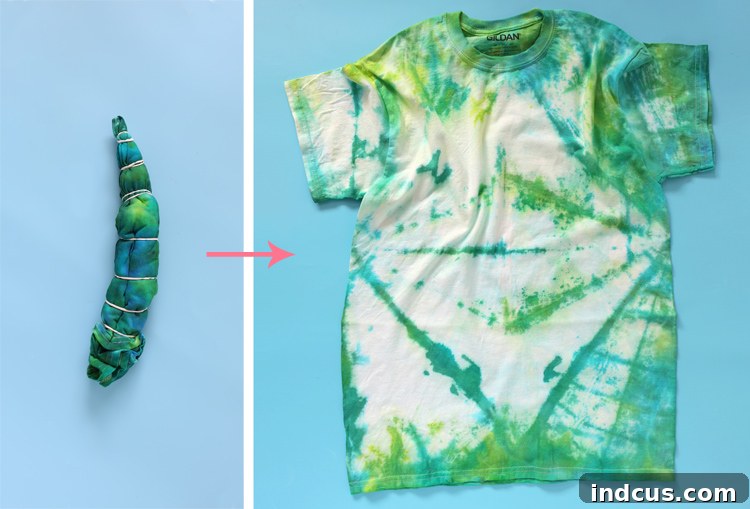
Step 6: Apply dye generously to each section created by the rubber bands. For a truly vivid mandala, it is crucial to apply a significant amount of dye and ensure it deeply penetrates all the inner layers of the folded fabric. As seen in some examples, insufficient dye can result in unintended white areas or incomplete patterns, especially in the deeper folds. Don’t be shy with the dye to achieve that full, intricate effect and make your mandala truly pop!
Sweet Heart Tie Dye Design
The heart tie-dye pattern is a beloved choice for its charming and unmistakable shape. Perfect for gifts, special occasions, or simply to express some love, this design creates a clear, vibrant heart in the center of your garment. It’s a fantastic way to personalize a shirt with a meaningful motif that stands out beautifully.
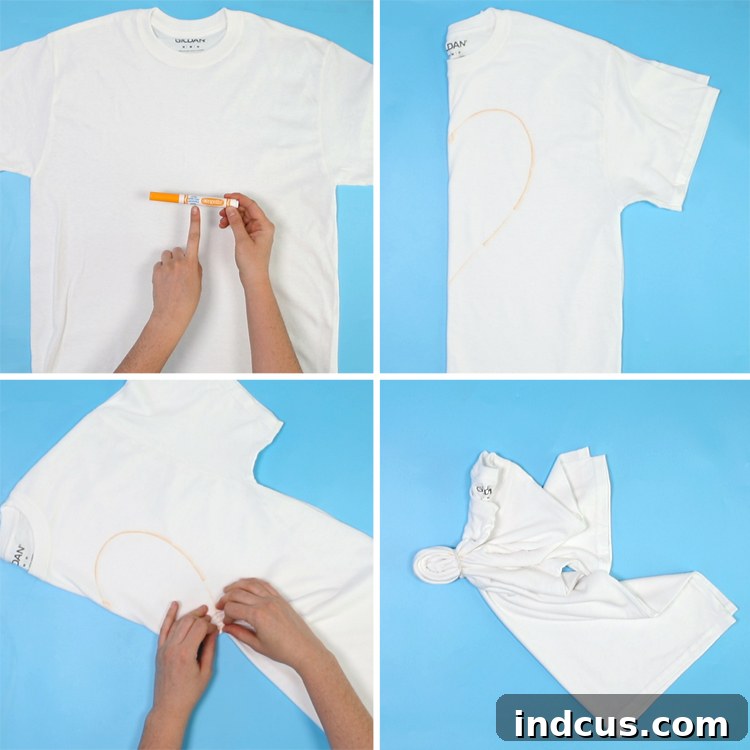
Step 1: Lay a damp, pre-washed cotton shirt flat on your protected work surface. Carefully fold it exactly in half vertically, straight down the middle of the shirt, ensuring the edges align perfectly.
Step 2: Using a washable marker, draw half of a heart shape along the fold line. The fold should represent the exact center line of your heart. Ensure the heart is drawn to your desired size and position on the shirt; this outline will guide your pleats.
Step 3: Starting from the bottom point of your half-heart, begin pinch pleating the fabric along the drawn line. The objective is to gather the curved heart shape into a straight, tight accordion-like fold, effectively making the drawn line disappear beneath your pleats. Keep the pleats even and compact for a clean heart outline.
Step 4: Once you have pleated along the entire half-heart line, place a rubber band securely over this drawn line. This rubber band is critical for holding the heart shape in place and preventing dye from reaching the protected fabric within the heart outline.
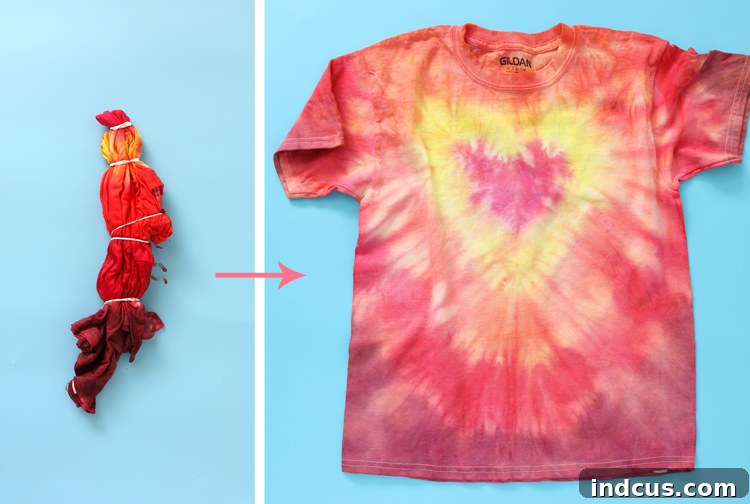
Step 5: Continue adding more rubber bands down the remaining length of the shirt, working outwards from the heart. These bands will create additional sections for dyeing and contribute to the overall background pattern around your heart.
Step 6: Apply dye generously between the rubber bands. You can use one color for the heart’s outline (if you choose to dye that specific band) and different colors for the surrounding sections to make the heart pop. For a stark white heart, avoid applying dye directly to the band covering the heart outline. The versatility of this technique means you can create any shape; just draw the desired shape along the fold line and follow the same pinch-pleating and banding method.
Final Steps for Tie Dyeing Success: Setting and Care
Once you’ve expertly applied your dyes and created your desired pattern, the work isn’t quite over. These final steps are crucial for setting the colors, ensuring vibrancy, and properly caring for your newly tie-dyed garment. Following these instructions will help prevent fading and bleeding, keeping your masterpiece looking brilliant for longer and preserving your hard work.
- Seal and Set: Carefully place your dyed shirt into a gallon-sized zippered plastic bag. Seal it tightly, removing as much air as possible. This creates a moist, enclosed environment that allows the dye to fully bond with the fabric fibers, which is essential for colorfastness.
- Curing Time: Let the dye set for a minimum of 8 hours. For the most vivid and saturated colors, especially with darker shades or intricate patterns, allow it to set for 24 to 48 hours. Patience during this stage truly pays off in color intensity and longevity.
- Rinse Thoroughly (Still Tied!): After the curing period, remove the shirt from the plastic bag. While still banded, rinse out the excess, unbound dye thoroughly with cold water. A stainless steel sink or an outdoor hose is ideal for this to prevent staining other areas. Continue rinsing until the water runs completely clear. It’s highly recommended to wear gloves again during this step to protect your hands from residual dye. Be mindful not to splash dye onto other surfaces.
- First Wash & Dry: Once the water runs clear, you can carefully remove all the rubber bands and unfold your shirt to reveal your masterpiece! Wash the tie-dyed garment by itself in the washing machine using cold water and a mild detergent. Avoid washing it with other items, as some residual dye might still bleed. Dry the shirt alone in the dryer on high heat.
- Subsequent Washes: For the first two to three subsequent washes, continue to wash your tie-dyed item separately or with similarly colored items. This precaution helps prevent any lingering dye from bleeding onto other clothing in your laundry. Over time, as the dye fully sets, it will become safe to wash with regular laundry without risk of bleeding.
With these careful final steps, your unique tie-dye creation is now ready to wear, enjoy, and showcase your artistic flair for years to come!
Frequently Asked Tie Dye Questions
New to tie-dye or encountering a common query? Here are answers to some of the most frequently asked questions to help you navigate your tie-dye projects with confidence and achieve the best possible results.
- Do I Need to Soak My Shirt In Soda Ash?
Many modern, store-bought tie-dye kits (especially those designed for ease of use) often have the soda ash pre-mixed into the dye powder or include it as a separate fixer that’s mixed with water before dyeing. Always check the specific instructions on your dye packaging to determine if this step is necessary. For professional-grade results with fiber-reactive dyes, soda ash (sodium carbonate) acts as a dye fixative, helping the colors bond permanently with natural fibers like cotton, ensuring maximum vibrancy and washfastness. - Can I Dye A Sweatshirt?
Absolutely! Sweatshirts make excellent canvases for tie-dye, offering a cozy and stylish result. The most important factor is to ensure your sweatshirt is made of natural fibers, such as 100% cotton. Keep in mind that due to the thicker and more dense fabric of a sweatshirt compared to a t-shirt, it will absorb a significantly larger amount of dye. Plan to purchase considerably more dye than you would for a standard t-shirt to achieve full saturation and vibrant colors throughout the garment. - Any Tips for Tie Dyeing with Kids?
Tie-dye is a fantastic activity for kids, fostering creativity and providing a memorable experience! For children, kits like Tulip Dye are highly recommended because they come in convenient squeeze bottles where you simply add water. This minimizes mess and simplifies the dyeing process. However, be prepared for mess regardless! It is strongly advised to conduct tie-dye activities outdoors if at all possible to contain spills. Ensure each child wears plastic gloves and old clothes that can get stained. For optimal supervision and assistance, maintain a ratio of approximately three to four children per adult to ensure safety and provide adequate help. - What Dye is Best for Advanced Crafters?
If you’re looking to elevate your tie-dye game and achieve professional-level results with incredibly vivid colors and superior washfastness, consider using fiber reactive dye, often referred to as Procion MX Dye. These dyes chemically bond with natural fibers like cotton, linen, and rayon, resulting in colors that are brighter, more permanent, and less prone to fading over time. While they might involve a slightly more involved process (often requiring a soda ash soak and specific temperatures), the stunning, lasting results are well worth the extra effort for serious crafters and artists.
Printable Tie Dye Pattern Instructions: Your Handy Reference Guide
When organizing a group tie-dye event or simply wanting a quick reference for yourself, having printable instructions can be incredibly helpful. These detailed PDF instructions provide clear, step-by-step photos alongside written directions for each tie-dye pattern. They serve as an excellent visual aid, allowing participants to easily understand the folding techniques and get inspired for their own designs, ensuring everyone can create something unique.
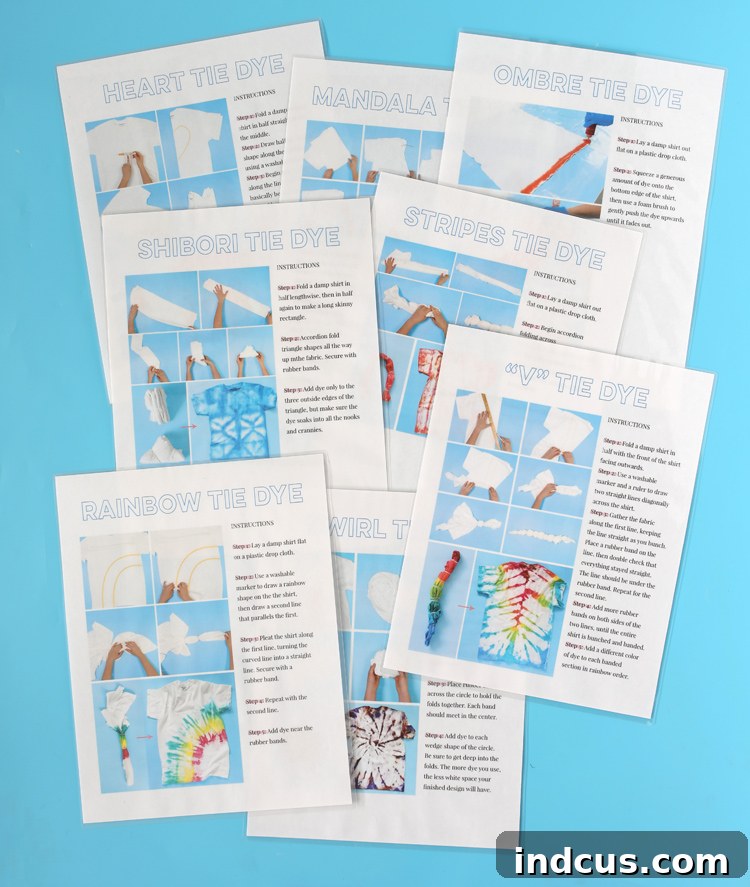
To make them durable for repeated use, consider laminating the sheets. This protects them from dye spills, moisture, and general wear and tear, ensuring they remain a valuable resource for many tie-dye sessions to come. Download your free printable instruction sheets below and make your next tie-dye gathering a breeze, or keep them handy for your personal crafting adventures!
Beyond traditional tie-dyeing, there’s a whole world of creative fabric manipulation to explore. If you’re looking for even more unique techniques, check out how to tie dye with Sharpies for a no-mess alternative on various surfaces, or discover the striking effects of how to tie dye with bleach for a reverse tie-dye look that removes color instead of adding it!
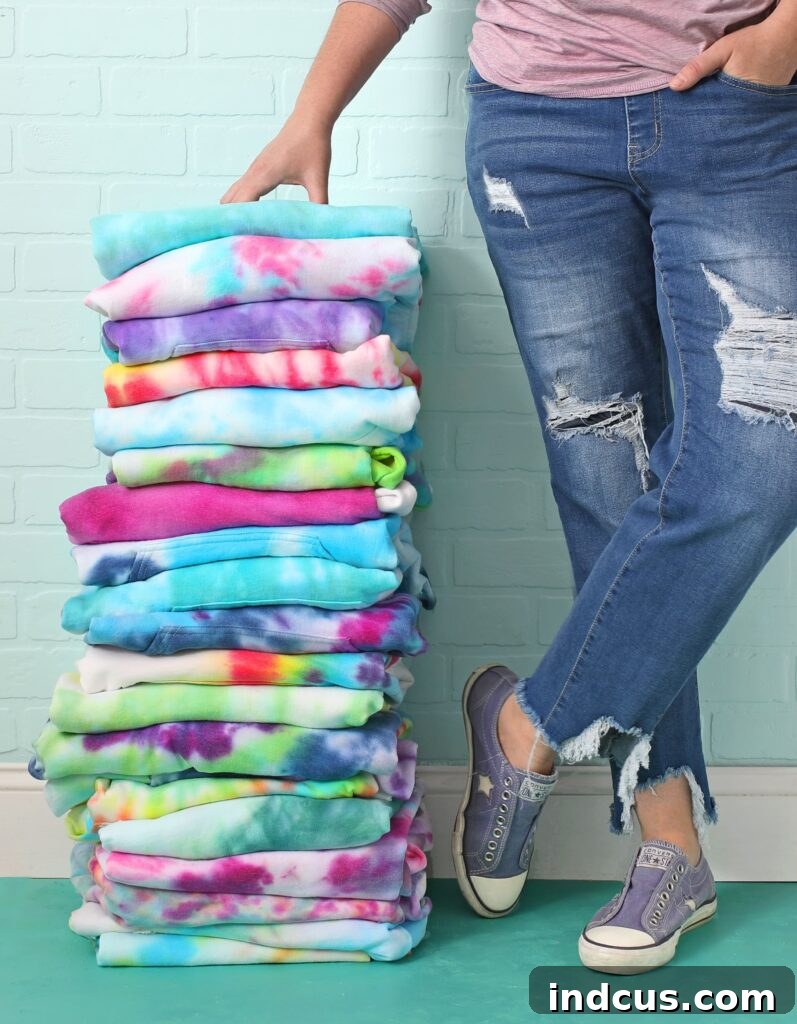
We hope this comprehensive guide inspires you to unleash your inner artist and embrace the joy of tie-dye. Get creative, have fun, and here’s to making this summer, or any time of year, a spectacularly colorful tie-dye season filled with personalized, vibrant creations! Happy crafting!