Budget-Friendly Backsplash Makeover: Transform Your Rental Kitchen with Contact Paper
Living in a rental home offers undeniable perks—like when the water heater gives up or a major appliance unexpectedly breaks, someone else handles the bill. However, this convenience often comes with a caveat: the limitations it places on personalizing your living space. For many renters, the dream of a perfectly styled home clashes with the reality of landlord rules and the desire to avoid permanent changes. While owning a home might be on the horizon, the present demands creative solutions for updating a rental without hefty expenses or irreversible alterations.
Today’s project perfectly embodies this philosophy, delivering a dramatic impact with minimal investment of time and money. It’s a transformation so effective and straightforward, it leaves one wondering why this simple trick wasn’t discovered sooner!
The Perennial Rental Conundrum: Personalizing a Temporary Space
One of the biggest frustrations for renters is the inability to truly make a space their own. From paint colors to fixtures, most elements are off-limits for modification. This often leads to living with outdated aesthetics that simply don’t align with modern tastes or personal style. Kitchens, being the heart of the home, are particularly susceptible to this challenge. Many rental kitchens feature design choices from a bygone era—think laminate countertops, uninspiring cabinetry, and unfortunately, backsplashes that have seen better days.
The quest for stylish yet temporary solutions drives many DIY enthusiasts. The goal is to find updates that are not only affordable and easy to install but also completely reversible, ensuring a smooth move-out process without losing your security deposit. This balancing act requires a keen eye for innovative products and a willingness to think outside the traditional renovation box.
A Persistent Kitchen Eyesore: Our Hunter Green Backsplash
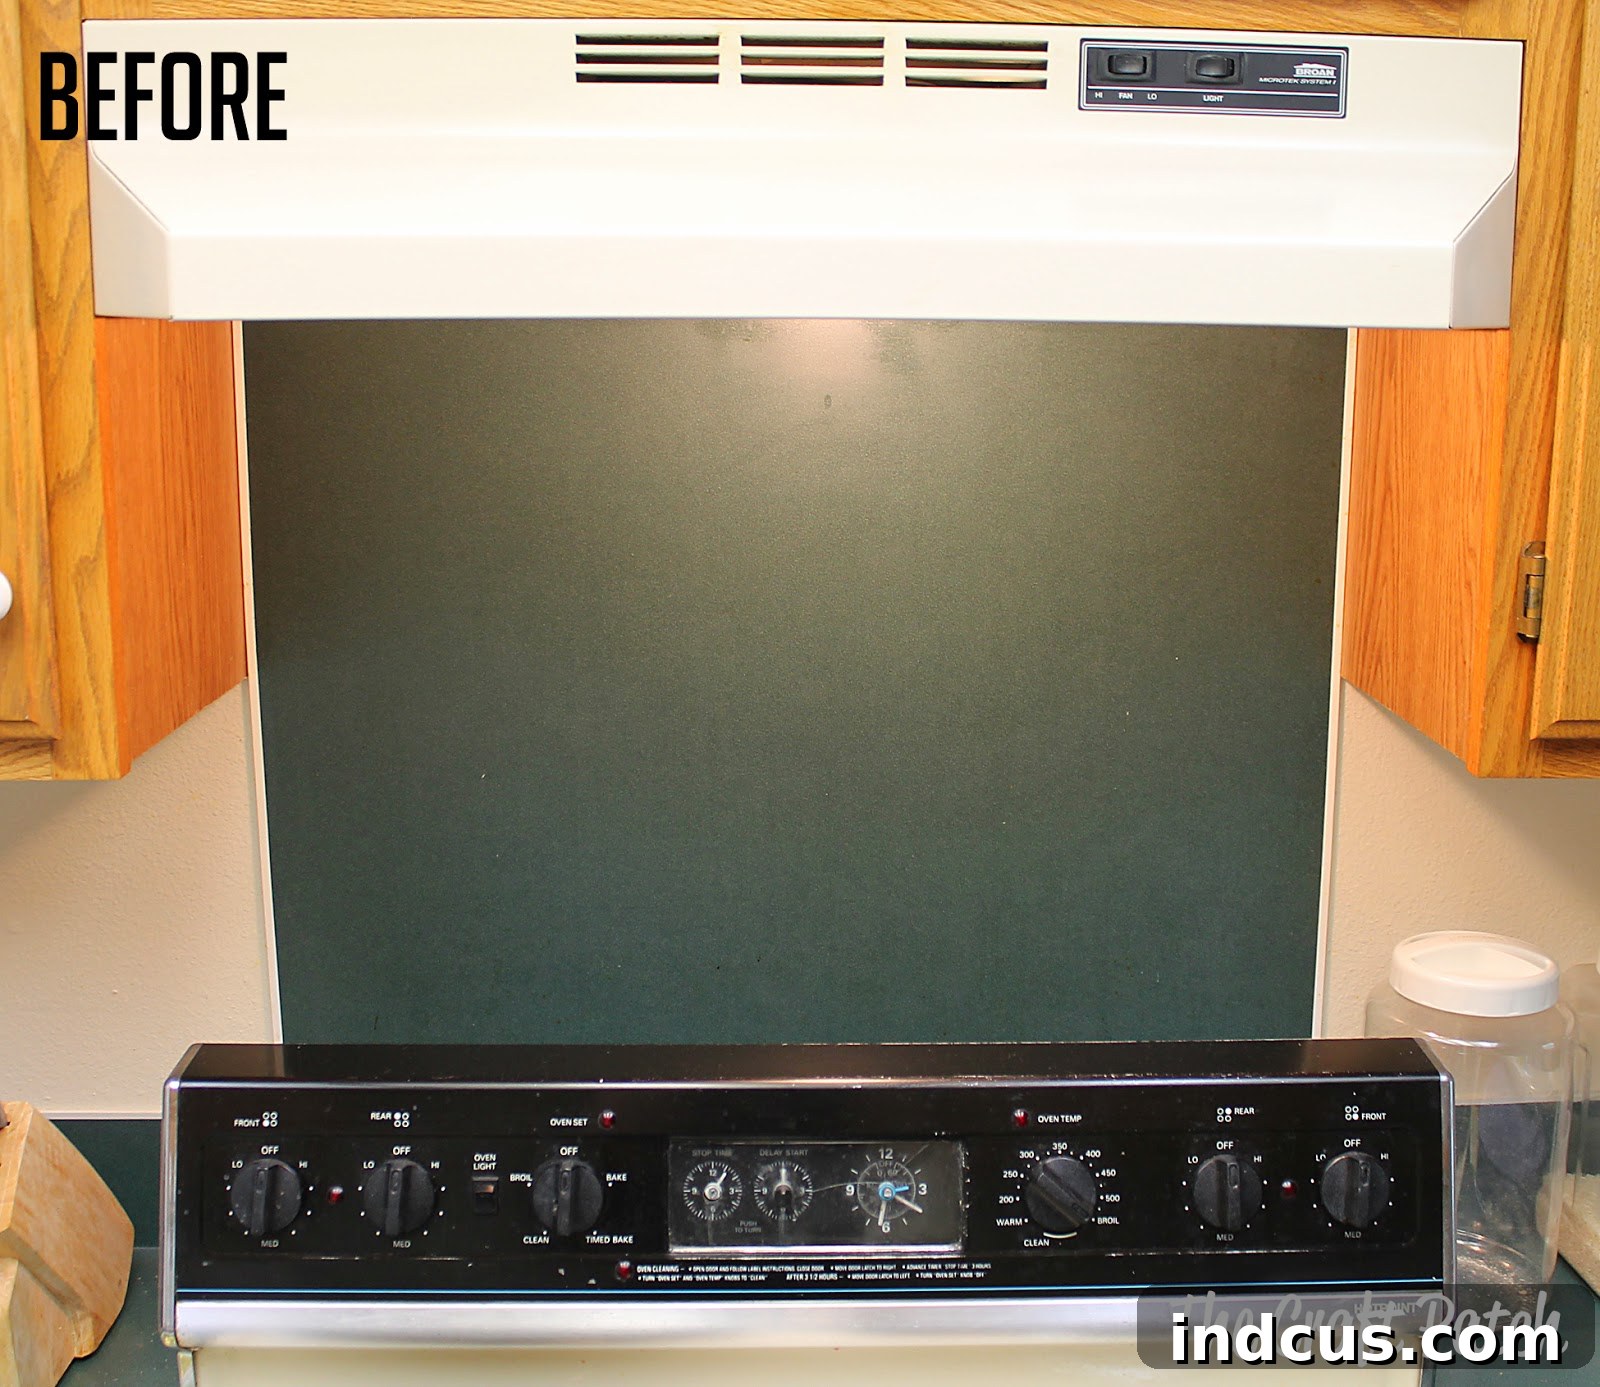
In our rental kitchen, the most glaring eyesore was undeniably the backsplash. It wasn’t just any outdated backsplash; it was a prominent section of hunter green laminate situated directly behind the stove, complemented by matching countertops. This particular shade of green, once perhaps fashionable, now screamed “dated” and contributed to an overall drab atmosphere in the kitchen. Beyond its aesthetic failings, the laminate itself showed signs of wear and tear—chipped edges, minor scuffs, and an overall tired appearance that detracted significantly from the kitchen’s potential charm. It was a constant reminder of the room’s uninspired state.
Every time I stepped into the kitchen, my eyes were drawn to this section, yearning for a fresh, cleaner look that better reflected a contemporary aesthetic. Traditional tile installation was out of the question due to its permanent nature and cost, forcing us to seek an alternative that could offer a dramatic visual upgrade without violating our rental agreement.
The Ingenious Solution: Contact Paper to the Rescue
The answer to this pervasive design dilemma arrived in a surprisingly simple, inexpensive, and incredibly versatile form: non-permanent contact paper. This humble household item, often used for lining shelves, proved to be the ultimate weapon against our outdated backsplash.
Why Contact Paper is a Rental Game-Changer
Contact paper offers an array of benefits that make it an ideal choice for renters seeking impactful, temporary updates:
- Affordability: It is remarkably inexpensive, making it accessible for even the tightest budgets. A single roll can often cover a significant area.
- Non-Permanent: The adhesive is designed to be strong enough to stick firmly but gentle enough to peel off without damaging surfaces, leaving no residue behind. This is paramount for rental properties.
- Variety: Available in an astonishing array of patterns, textures, and colors, from faux marble and wood grains to solid hues and geometric designs. This allows for endless creative possibilities to match any decor style.
- Ease of Application: With basic tools and a bit of patience, contact paper can be applied by anyone, regardless of DIY experience.
- Instant Transformation: It provides an immediate visual upgrade, instantly modernizing or refreshing a space with minimal effort.
- Durability: Most contact papers are water-resistant and easy to wipe clean, making them practical for kitchen environments.
The Dollar Tree Find: Our Specific Solution
For this particular project, the solution came from an unexpected source of incredible value: a roll of tan marble-patterned contact paper purchased from Dollar Tree. Priced at just a dollar, this budget-friendly find was poised to deliver a high-end look without the high-end cost. The specific product, “Con-Tact Quick Cover Tan Marble Self-Adhesive Shelf Liners (18×54″),” proved to be exactly what was needed for a quick and effective transformation. Its subtle marble design offered a sophisticated alternative to the gaudy green, promising a brighter, cleaner aesthetic.
You can often find similar products at various discount stores, craft stores, or online retailers. The key is to look for “removable” or “non-permanent” varieties to ensure it’s safe for rental use. The availability of diverse patterns means you can truly customize the look to fit your desired kitchen style, whether you’re aiming for a sleek modern design, a rustic farmhouse feel, or something in between.
Step-by-Step: Transforming Your Backsplash with Contact Paper
The application process for contact paper is remarkably straightforward, requiring only a few basic tools and a careful approach. Here’s how this simple, fifteen-minute project unfolded:
Prep & Measure
Before beginning, ensure your backsplash surface is clean, dry, and free of any grease or debris. A quick wipe-down with a degreaser or all-purpose cleaner and then a dry cloth is usually sufficient. Next, measure the exact dimensions of the backsplash area you intend to cover. It’s always best to cut the contact paper slightly larger than needed, allowing for trimming to achieve a perfect, straight edge. This small buffer prevents any gaps if your initial measurement isn’t absolutely precise.
Apply & Smooth
Carefully peel back a small section of the contact paper’s backing, perhaps the top 1-2 inches. Align the exposed adhesive edge with the top of your backsplash, ensuring it’s straight. Slowly and evenly, begin to press the contact paper onto the wall, gradually peeling off more of the backing as you work your way down. As you apply, use a smoothing tool—an old spatula, a credit card, or a dedicated felt squeegee—to press out any air bubbles that form. Work from the center outwards to push air to the edges. This step is crucial for achieving a smooth, professional finish without unsightly bumps or wrinkles. Patience is key here; take your time to ensure even application.
Trim & Finish
Once the entire piece of contact paper is adhered and smoothed, it’s time for the final touches. Use a sharp utility knife or razor blade to carefully trim any excess paper along the edges, ensuring a clean, crisp line where the backsplash meets the countertop, cabinets, or other walls. A ruler or straight edge can be helpful for guiding your blade and achieving perfectly straight cuts. This precise trimming gives the temporary backsplash a custom, built-in appearance, elevating its overall look. Step back and admire the immediate difference!
The Stunning Transformation: Before & After
The instant gratification of this project was truly remarkable. What was once an outdated, chipped, hunter green monstrosity was transformed into a clean, modern, and aesthetically pleasing surface in a mere fifteen minutes. The subtle tan marble pattern introduced a fresh lightness to the kitchen, instantly brightening the space and making it feel more contemporary and inviting. The contrast between the “before” and “after” was not just noticeable; it was a revelation, highlighting the incredible power of small, strategic changes.
This transformation wasn’t just about covering up an old color; it was about reclaiming a sense of style and happiness in a space that previously felt stagnant. The addition of the marble pattern provided a touch of elegance and sophistication that was entirely absent before. The success of this project reiterated a crucial lesson: you don’t need a huge budget or extensive renovation to make a significant impact on your home’s aesthetics, especially in a rental.
Immediate Impact and Lasting Joy
The sense of satisfaction derived from this simple DIY was immense. A little less hunter green in the kitchen equated to a much happier homeowner, even if only temporary. And the best part? When the time eventually comes to move out, this stylish update will peel right off, leaving no trace behind. This reversible nature is the cornerstone of effective rental decorating, allowing for bold changes without commitment. Three cheers, indeed, for the versatility and transformative power of contact paper!
Beyond the Backsplash: More Rental-Friendly DIY Ideas
The success of the contact paper backsplash opens up a world of possibilities for other temporary, renter-friendly updates throughout your home. This versatile material isn’t just for backsplashes; it can revolutionize various surfaces and furniture pieces, offering a cohesive and stylish aesthetic without a permanent commitment.
Countertop Cover-Ups
Just like with backsplashes, contact paper is an excellent solution for covering outdated or damaged laminate countertops. Imagine transforming a scratched, dull counter into a sleek faux marble or granite surface. The process is similar to the backsplash application, requiring careful measurement, smoothing, and trimming. For areas with heavy use, consider a thicker, more durable contact paper or even a peel-and-stick vinyl designed specifically for countertops.
Shelf & Drawer Liners
Beyond its decorative applications, contact paper is fantastic for purely functional purposes. Line shelves in your pantry or cabinets to protect them from spills and make cleaning easier. Use it in drawers to add a pop of pattern or simply create a clean base for your organized items. This small detail can make a big difference in the overall feel of your kitchen or bathroom.
Furniture Facelifts
Give old, inexpensive furniture a fresh lease on life. A plain IKEA dresser can be upgraded with a wood grain or geometric patterned contact paper on its drawer fronts. A tired tabletop can be resurfaced to mimic a high-end material. This is a brilliant way to personalize mass-produced items or breathe new life into thrift store finds, making them unique pieces that reflect your style without heavy investment or permanent alteration.
Tips for Success with Contact Paper
While contact paper is relatively easy to use, a few tips can ensure a flawless and long-lasting application, even if temporary:
Choosing the Right Contact Paper
- Quality Matters: While dollar store options are great for budget projects, investing in slightly higher quality contact paper (especially for high-traffic areas like countertops) can offer better durability and a more realistic finish.
- Consider the Pattern: For large areas, continuous patterns (like wood grain or subtle textures) are easier to align than bold, repeating geometric designs that require precise matching.
- Read Reviews: If purchasing online, check reviews for ease of application, adhesion strength, and removability.
Preparation is Key
- Clean Surface: Always start with a thoroughly clean, dry, and smooth surface. Any dust, grease, or texture will show through or prevent proper adhesion.
- Gather Tools: Have your utility knife/razor, straight edge, smoothing tool, and tape measure ready before you begin.
- Measure Twice, Cut Once: Precision in measuring will save you frustration and material. Always allow a little extra for trimming.
Patience and Precision
- Slow and Steady: Don’t rush the application. Peel the backing off gradually and smooth as you go to prevent large air bubbles.
- Overlap if Necessary: If covering a very wide area, you might need to use multiple pieces. Slightly overlap the edges (by about 1/16th of an inch) to create a more seamless look, or for very detailed work, you can even double cut through both layers for a perfect butt joint.
- Heat for Curves: For tricky corners or slightly curved surfaces, a hairdryer on a low setting can make the contact paper more pliable and easier to manipulate.
Maintenance and Removal
- Gentle Cleaning: Most contact papers can be wiped clean with a damp cloth and mild soap. Avoid abrasive cleaners or harsh scrubbing.
- Easy Removal: To remove, start by gently peeling an edge. If it’s resistant, a little heat from a hairdryer can soften the adhesive, making it easier to pull off cleanly without leaving residue.
Empowering Your Rental Home Style
This simple backsplash project serves as a powerful reminder that living in a rental doesn’t mean sacrificing style or personal expression. With a dash of creativity, a minimal budget, and a willingness to embrace temporary solutions, you can transform areas of your home that once felt drab and uninspiring. Contact paper is just one of many tools in the renter’s DIY arsenal, alongside peel-and-stick wallpaper, temporary floor tiles, removable wall decals, and command hooks, all designed to make your temporary space feel more like home.
Don’t let the limitations of renting stifle your design aspirations. Take inspiration from this quick and easy backsplash makeover and look for other small, impactful changes you can make. You’ll be amazed at the difference a dollar and a few minutes can make in creating a space that truly reflects you, all while keeping your landlord—and your security deposit—happy. Your rental home can be both functional and fabulous!